FAQs (English)
Page 2
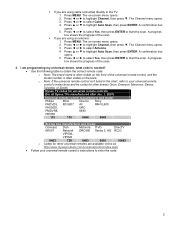
... programming my universal remote, what code is needed? Use the following table to start the scan. PMDVR8, 6690 PDVR8 115 135 0464 8043 Set-top box manufacturer and model Comcast Dish Motorola TIVO DirecTV M1057 Network DRC800 Series 3, HD RC23 VIP508, VIP622 0463 720 0463 0091 10463 o Codes for other universal remotes are available online at: http://www.dynexproducts.com/universalcontrolcodes.aspx Follow your universal remote control's instructions and try codes...
... programming my universal remote, what code is needed? Use the following table to start the scan. PMDVR8, 6690 PDVR8 115 135 0464 8043 Set-top box manufacturer and model Comcast Dish Motorola TIVO DirecTV M1057 Network DRC800 Series 3, HD RC23 VIP508, VIP622 0463 720 0463 0091 10463 o Codes for other universal remotes are available online at: http://www.dynexproducts.com/universalcontrolcodes.aspx Follow your universal remote control's instructions and try codes...
FAQs (English)
Page 3
... COMPONENT Out jacks on the HDMI device, then set it to the correct mode. o If you using an antenna: 1. o If you have a yellow video cable, and red and white audio cables. 1. A progress box shows the progress of the scan. 3 The Channel menu opens. 3. Turn on the component device. 2. Connect a component video cable and audio cables to the correct mode. Turn on the S-Video device. 2. o A/V Cables (RCA Cables, Composite Cables) have the correct input selected to view channels via component cables please press the COMP button on the S-Video...
... COMPONENT Out jacks on the HDMI device, then set it to the correct mode. o If you using an antenna: 1. o If you have a yellow video cable, and red and white audio cables. 1. A progress box shows the progress of the scan. 3 The Channel menu opens. 3. Turn on the component device. 2. Connect a component video cable and audio cables to the correct mode. Turn on the S-Video device. 2. o A/V Cables (RCA Cables, Composite Cables) have the correct input selected to view channels via component cables please press the COMP button on the S-Video...
Quick Setup Guide (English)
Page 1
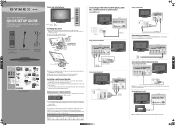
..." LCD TV QUICK SETUP GUIDE DX-32L150A11, DX-37L150A11, DX-40L130A11, and DX-46L150A11 Remote control and 2 AAA batteries AC power cord Component video cable C M Y TV stand and screws CM MY CY CMY K Quick Setup Guide Front and side features Connecting a DVD or Blu-ray DVD player, cable box, satellite receiver or game station Using HDMI (best) Back of TV Remote control Power sensor indicator Installing the stand 1 Remove the stand from damages and scratches. 2 Remove the four screws holding the TV to its stand column, then remove the stand column. 3 Secure the wall-mount bracket...
..." LCD TV QUICK SETUP GUIDE DX-32L150A11, DX-37L150A11, DX-40L130A11, and DX-46L150A11 Remote control and 2 AAA batteries AC power cord Component video cable C M Y TV stand and screws CM MY CY CMY K Quick Setup Guide Front and side features Connecting a DVD or Blu-ray DVD player, cable box, satellite receiver or game station Using HDMI (best) Back of TV Remote control Power sensor indicator Installing the stand 1 Remove the stand from damages and scratches. 2 Remove the four screws holding the TV to its stand column, then remove the stand column. 3 Secure the wall-mount bracket...

Quick Setup Guide (English)
Page 2
...directly using the number buttons. program name, TV rating, signal type, audio information, resolution, CC mode, current time, and current program start and end times. • Analog mode information-Displays channel number, channel label (if preset), signal type, audio information, and resolution. • Press GUIDE to show the digital program guide, which may view a list of BBY Solutions, Inc. If you selected Home Mode, the Choose your TV and turn off the sound. If you selected Cable/Satellite Box, you select Manual, press or to change the setting. MENU...
...directly using the number buttons. program name, TV rating, signal type, audio information, resolution, CC mode, current time, and current program start and end times. • Analog mode information-Displays channel number, channel label (if preset), signal type, audio information, and resolution. • Press GUIDE to show the digital program guide, which may view a list of BBY Solutions, Inc. If you selected Home Mode, the Choose your TV and turn off the sound. If you selected Cable/Satellite Box, you select Manual, press or to change the setting. MENU...

Firmware Installation Guide (English)
Page 1
... the "Support/Downloads" tab; Note: This file is IMPORTANT: Please completely read these instructions prior to your TV. 6. To download firmware click on the firmware link titled "LC46KS70AUO.Bin" when the pop up box appears select "Save" and choose the destination of the TV (see photo below) and write down the Model and Rev id for Dynex Model DX‐46L150A11 1. b. Tuner Firmware Update Process for use later...
... the "Support/Downloads" tab; Note: This file is IMPORTANT: Please completely read these instructions prior to your TV. 6. To download firmware click on the firmware link titled "LC46KS70AUO.Bin" when the pop up box appears select "Save" and choose the destination of the TV (see photo below) and write down the Model and Rev id for Dynex Model DX‐46L150A11 1. b. Tuner Firmware Update Process for use later...

User Manual (English)
Page 2
... Installing and removing the stand 4 Installing the stand 4 Installing a wall-mount bracket 4 TV components 5 Accessories 5 Front 5 Side 5 Back 6 Remote control 7 Using the remote control 8 Installing remote control batteries 8 Aiming the remote control 8 Programming a universal remote control to work with your TV 8 Making connections 9 Selecting a location 9 Connecting the power 9 Connecting an HDMI device 9 Connecting a component video device 9 Connecting an antenna, cable TV, or satellite TV box 10 Connecting a VCR 10 Connecting a camcorder or game console 10 Connecting...
... Installing and removing the stand 4 Installing the stand 4 Installing a wall-mount bracket 4 TV components 5 Accessories 5 Front 5 Side 5 Back 6 Remote control 7 Using the remote control 8 Installing remote control batteries 8 Aiming the remote control 8 Programming a universal remote control to work with your TV 8 Making connections 9 Selecting a location 9 Connecting the power 9 Connecting an HDMI device 9 Connecting a component video device 9 Connecting an antenna, cable TV, or satellite TV box 10 Connecting a VCR 10 Connecting a camcorder or game console 10 Connecting...

User Manual (English)
Page 3
... 20 Turning parental controls on or off 20 Setting or changing the password 21 Turning the button lock on or off 21 Setting parental control levels 22 Using closed captioning 24 Turning closed captioning on or off 24 Selecting the closed captioning mode 25 Customizing digital TV closed captioning styles 25 Adjusting time settings 26 Setting the date and time 26 Setting the sleep timer 27 Adjusting menu settings 27 Selecting the menu language and transparency 27 Labeling an input source 28 Restoring default settings 28 Troubleshooting 29 Video and audio 29 Remote control 29...
... 20 Turning parental controls on or off 20 Setting or changing the password 21 Turning the button lock on or off 21 Setting parental control levels 22 Using closed captioning 24 Turning closed captioning on or off 24 Selecting the closed captioning mode 25 Customizing digital TV closed captioning styles 25 Adjusting time settings 26 Setting the date and time 26 Setting the sleep timer 27 Adjusting menu settings 27 Selecting the menu language and transparency 27 Labeling an input source 28 Restoring default settings 28 Troubleshooting 29 Video and audio 29 Remote control 29...
User Manual (English)
Page 4
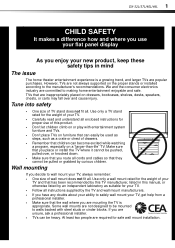
... enclosed instructions for the weight of your TV. • Carefully read and understand all instructions supplied by the TV and wall mount manufacturers. • If you have any doubts about your ability to making home entertainment enjoyable and safe. DX-32L/37L/40L/46L 1 f CHILD SAFETY It makes a difference how and where you use of this manual, or otherwise listed by...
... enclosed instructions for the weight of your TV. • Carefully read and understand all instructions supplied by the TV and wall mount manufacturers. • If you have any doubts about your ability to making home entertainment enjoyable and safe. DX-32L/37L/40L/46L 1 f CHILD SAFETY It makes a difference how and where you use of this manual, or otherwise listed by...
User Manual (English)
Page 11
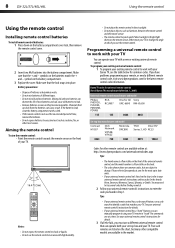
... front of the universal remote control, and the model number is not used for an extended period of time, remove the batteries. • Do not expose batteries to work with your TV You can operate both your set-top box and your universal remote control's instructions and try several codes before finding a match. 2 Follow your universal remote control's instructions to identify a code that matches your TV remote to leak. • Remove batteries as soon...
... front of the universal remote control, and the model number is not used for an extended period of time, remove the batteries. • Do not expose batteries to work with your TV You can operate both your set-top box and your universal remote control's instructions and try several codes before finding a match. 2 Follow your universal remote control's instructions to identify a code that matches your TV remote to leak. • Remove batteries as soon...
User Manual (English)
Page 12
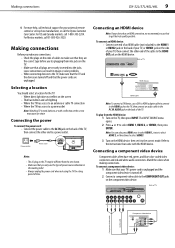
... your universal remote control or set it to the correct mode. Loose connections can also press HDMI once to select HDMI 1, twice to select HDMI 2, or three times to select HDMI3. 3 Turn on the HDMI device, then set -top box manufacturer, or call the Dynex Customer Care Center. Back of time. Connecting the power To connect the power cord: • Connect the power cable to the AC IN jack on the back of TV Component video device Component video cable Audio cable The INPUT SOURCE menu opens...
... your universal remote control or set it to the correct mode. Loose connections can also press HDMI once to select HDMI 1, twice to select HDMI 2, or three times to select HDMI3. 3 Turn on the HDMI device, then set -top box manufacturer, or call the Dynex Customer Care Center. Back of time. Connecting the power To connect the power cord: • Connect the power cable to the AC IN jack on the back of TV Component video device Component video cable Audio cable The INPUT SOURCE menu opens...
User Manual (English)
Page 14
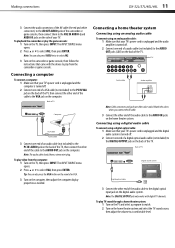
... a digital optical audio cable (not included) to the AUDIO IN jacks on the camcorder or game console, then follow the instructions that your TV's power cord is unplugged and the computer is turned off . 2 Connect one end of TV Audio cable Audio amplifier AUDIO IN Note: Cable connectors and jacks are often color-coded. Note: You can also press the VGA button on the remote for VGA. 3 Turn on the home theater system and select the TV sound...
... a digital optical audio cable (not included) to the AUDIO IN jacks on the camcorder or game console, then follow the instructions that your TV's power cord is unplugged and the computer is turned off . 2 Connect one end of TV Audio cable Audio amplifier AUDIO IN Note: Cable connectors and jacks are often color-coded. Note: You can also press the VGA button on the remote for VGA. 3 Turn on the home theater system and select the TV sound...
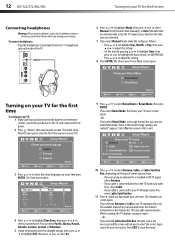
User Manual (English)
Page 15
... (Power), then wait several minutes. 12 DX-32L/37L/40L/46L Turning on your TV for the first time S ERVICE PORT Connecting headphones Warning: When using an antenna for a standard or HD TV signal, select Antenna. • If your cable is connected directly to the TV (without a tuner box), select Cable. • If your cable is not realized." Press or to select your time zone. appears. The channel scan screen opens. If you turn on your Picture Mode screen...
... (Power), then wait several minutes. 12 DX-32L/37L/40L/46L Turning on your TV for the first time S ERVICE PORT Connecting headphones Warning: When using an antenna for a standard or HD TV signal, select Antenna. • If your cable is connected directly to the TV (without a tuner box), select Cable. • If your cable is not realized." Press or to select your time zone. appears. The channel scan screen opens. If you turn on your Picture Mode screen...
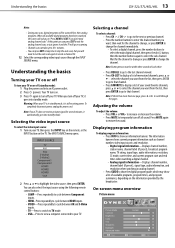
User Manual (English)
Page 16
... turn your TV on scanning. • Channel scan can take up to 30+ minutes. • You can press EXIT to select the sub-channel. The information banner shows current program information such as channel number, video input source, and resolution. • Digital signal information-Displays channel number, station name, channel label (if preset), broadcast program name, TV rating, signal type, audio information, resolution, CC mode, current time, and current program start and end times when watching a digital channel. • Analog signal...
... turn your TV on scanning. • Channel scan can take up to 30+ minutes. • You can press EXIT to select the sub-channel. The information banner shows current program information such as channel number, video input source, and resolution. • Digital signal information-Displays channel number, station name, channel label (if preset), broadcast program name, TV rating, signal type, audio information, resolution, CC mode, current time, and current program start and end times when watching a digital channel. • Analog signal...

User Manual (English)
Page 17
... illustrations and screens shown in TV mode. Adjusting basic settings To adjust basic settings: 1 Press MENU. Picture Mode Contrast Brightness Color T int Sharpness Backlight Advanced Video Move Picture Audio Custom Setup Channel 70 40 60 0 50 30 Select MENU Exit 2 Press or to adjust selected items, or move on-screen cursor left or right. Parental Controls T ime Closed Caption Menu Settings VGA Settings Input Label Restore Default Audio Only Move Picture Audio Setup Channel Off Select MENU Exit The above menus are shown in the manual are for...
... illustrations and screens shown in TV mode. Adjusting basic settings To adjust basic settings: 1 Press MENU. Picture Mode Contrast Brightness Color T int Sharpness Backlight Advanced Video Move Picture Audio Custom Setup Channel 70 40 60 0 50 30 Select MENU Exit 2 Press or to adjust selected items, or move on-screen cursor left or right. Parental Controls T ime Closed Caption Menu Settings VGA Settings Input Label Restore Default Audio Only Move Picture Audio Setup Channel Off Select MENU Exit The above menus are shown in the manual are for...
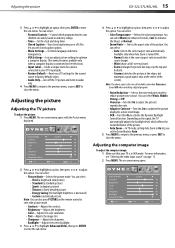
User Manual (English)
Page 18
... turned ON when watching a digital program. • Noise Reduction-Selects the noise reduction mode to close the menu. Adjusting the computer image To adjust the computer image: 1 Make sure that your TV is decreased) • Custom (customized picture). Picture Mode Contrast Brightness Color T int Sharpness Backlight Advanced Video Move Picture Audio Custom Setup Channel 70 40 60 0 50 30 Select MENU Exit Also lets you set closed captioning on page 13. 2 Press MENU. The on the remote control...
... turned ON when watching a digital program. • Noise Reduction-Selects the noise reduction mode to close the menu. Adjusting the computer image To adjust the computer image: 1 Make sure that your TV is decreased) • Custom (customized picture). Picture Mode Contrast Brightness Color T int Sharpness Backlight Advanced Video Move Picture Audio Custom Setup Channel 70 40 60 0 50 30 Select MENU Exit Also lets you set closed captioning on page 13. 2 Press MENU. The on the remote control...

User Manual (English)
Page 19
... ENTER. Parental Controls T ime Closed Caption Menu Settings VGA Settings Input Label Restore Default Audio Only Move Picture Audio Setup Channel Off Select MENU Exit Sound Mode Bass Treble Balance Surround AVC Digital Output Audio Language Move Picture Audio Setup Channel Custom 57 50 0 Off Off RA W English Select MENU Exit 4 Press or to highlight Setup, then press . Adjusting the sound Adjusting the sound To adjust the sound: 1 Press MENU. Note: You can also press AUDIO one or more times. Selecting the audio mode You can select: • Standard (for normal programs) •...
... ENTER. Parental Controls T ime Closed Caption Menu Settings VGA Settings Input Label Restore Default Audio Only Move Picture Audio Setup Channel Off Select MENU Exit Sound Mode Bass Treble Balance Surround AVC Digital Output Audio Language Move Picture Audio Setup Channel Custom 57 50 0 Off Off RA W English Select MENU Exit 4 Press or to highlight Setup, then press . Adjusting the sound Adjusting the sound To adjust the sound: 1 Press MENU. Note: You can also press AUDIO one or more times. Selecting the audio mode You can select: • Standard (for normal programs) •...

User Manual (English)
Page 24
... again to enter the four-digit password. Note: If you set the parental password: 1 Press MENU. Turning the button lock on or off : 1 Press MENU. Parental Controls T ime Closed Caption Menu Settings VGA Settings Input Label Restore Default Audio Only Move Picture Audio Setup Channel Off Select MENU Exit 3 Press ENTER. The password entry screen opens. Enter Old Password Enter New Password Confirm Password Picture Audio Setup Channel Picture Mode Contrast Brightness Color T int Sharpness Backlight Advanced Video Move Picture Audio Custom Setup Channel 70 40 60 0 50 30...
... again to enter the four-digit password. Note: If you set the parental password: 1 Press MENU. Turning the button lock on or off : 1 Press MENU. Parental Controls T ime Closed Caption Menu Settings VGA Settings Input Label Restore Default Audio Only Move Picture Audio Setup Channel Off Select MENU Exit 3 Press ENTER. The password entry screen opens. Enter Old Password Enter New Password Confirm Password Picture Audio Setup Channel Picture Mode Contrast Brightness Color T int Sharpness Backlight Advanced Video Move Picture Audio Custom Setup Channel 70 40 60 0 50 30...

User Manual (English)
Page 30
... To turn off . The on -screen menu opens. The Setup menu opens. Press or to adjust the setting. 8 Press EXIT to set the sleep timer. Parental Controls T ime Closed Caption Menu Settings VGA Settings Input Label Restore Default Audio Only Move Picture Audio Setup Channel Off Select MENU Exit 3 Press or to highlight Setup, then press . Adjusting menu settings Selecting the menu language and transparency To select the on the remote control to close the menu. Picture Mode Contrast Brightness Color T int Sharpness Backlight Advanced Video Move Picture Audio Custom Setup Channel 70...
... To turn off . The on -screen menu opens. The Setup menu opens. Press or to adjust the setting. 8 Press EXIT to set the sleep timer. Parental Controls T ime Closed Caption Menu Settings VGA Settings Input Label Restore Default Audio Only Move Picture Audio Setup Channel Off Select MENU Exit 3 Press or to highlight Setup, then press . Adjusting menu settings Selecting the menu language and transparency To select the on the remote control to close the menu. Picture Mode Contrast Brightness Color T int Sharpness Backlight Advanced Video Move Picture Audio Custom Setup Channel 70...
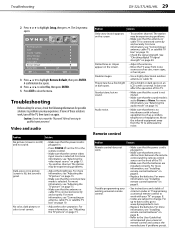
User Manual (English)
Page 32
... experiencing problems. • Adjust the brightness. See "Checking digital TV signal strength" on page 8. • Refer to change. Parental Controls T ime Closed Caption Menu Settings VGA Settings Input Label Restore Default Audio Only Move Picture Audio Setup Channel Off Select MENU Exit 3 Press or to problems you may be experiencing problems. • Make sure that the sound mode is selected. Dotted lines or stripes appear on the screen. • Try another channel. Remote control Problem Solution Remote control does not work. For up to date codes...
... experiencing problems. • Adjust the brightness. See "Checking digital TV signal strength" on page 8. • Refer to change. Parental Controls T ime Closed Caption Menu Settings VGA Settings Input Label Restore Default Audio Only Move Picture Audio Setup Channel Off Select MENU Exit 3 Press or to problems you may be experiencing problems. • Make sure that the sound mode is selected. Dotted lines or stripes appear on the screen. • Try another channel. Remote control Problem Solution Remote control does not work. For up to date codes...
User Manual (English)
Page 33
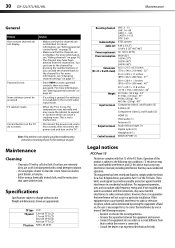
... interference in a particular installation. Specifications Specifications subject to clean the screen. Password is in use a soft cloth dampened with the instructions, may cause the cabinet to comply within the limits for help. TV type TV panel TV system LCD 32-inch TFT LCD 37-inch TFT LCD 40-inch TFT LCD 46-inch TFT LCD NTSC-M, ATSC Receiving channels Audio multiples Audio out Power requirement Power consumption Dimensions (W × H × D with stand) Weight Input terminals Output terminals Control terminals VHF: 2 - 13...
... interference in a particular installation. Specifications Specifications subject to clean the screen. Password is in use a soft cloth dampened with the instructions, may cause the cabinet to comply within the limits for help. TV type TV panel TV system LCD 32-inch TFT LCD 37-inch TFT LCD 40-inch TFT LCD 46-inch TFT LCD NTSC-M, ATSC Receiving channels Audio multiples Audio out Power requirement Power consumption Dimensions (W × H × D with stand) Weight Input terminals Output terminals Control terminals VHF: 2 - 13...


