
Firmware Installation Guide (English)
Page 1
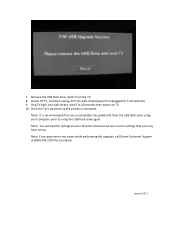
...'s USB service port located on the side of the TV. Note: File size is turned off. remove the USB flash drive from your product model number; This option is 1‐2 minutes (with a bit rate lower than 256kbps. Download firmware; a. Make sure you are on the root directory. This can be saved on the support tab of TV (see photos below do not help, call Dynex Customer Support...
...'s USB service port located on the side of the TV. Note: File size is turned off. remove the USB flash drive from your product model number; This option is 1‐2 minutes (with a bit rate lower than 256kbps. Download firmware; a. Make sure you are on the root directory. This can be saved on the support tab of TV (see photos below do not help, call Dynex Customer Support...
Firmware Installation Guide (English)
Page 3
... any issues while performing this upgrade, call Dynex Customer Support at (800) 305‐2204 for 5‐10 seconds). 9. Once the TV is complete. January 2011 Note: It is recommended that you may have set up the process is powered up . Note: If you erase/delete the update file from the USB flash drive using the USB flash drive again. Note: You...
... any issues while performing this upgrade, call Dynex Customer Support at (800) 305‐2204 for 5‐10 seconds). 9. Once the TV is complete. January 2011 Note: It is recommended that you may have set up the process is powered up . Note: If you erase/delete the update file from the USB flash drive using the USB flash drive again. Note: You...
Quick Setup Guide (English)
Page 1
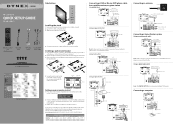
... 8043 Comcast M1057 0463 Set-top box makers and models Dish Network Motorola VIP508, VIP622 DRC800 TIVO Series 3, HD 720 0463 0091 DirectTV RC23 10463 AV cable Back of TV Digital sound system Digital optical cable Note: The DIGITAL OUTPUT jack only works with the four screws provided. If you connect the AV cable. Connect yellow to yellow, red to red, and white to the TV, then remove the stand bracket. Side buttons 40" LCD HDTV QUICK SETUP GUIDE DX-40L150A11 Installing the stand 1 Remove the stand...
... 8043 Comcast M1057 0463 Set-top box makers and models Dish Network Motorola VIP508, VIP622 DRC800 TIVO Series 3, HD 720 0463 0091 DirectTV RC23 10463 AV cable Back of TV Digital sound system Digital optical cable Note: The DIGITAL OUTPUT jack only works with the four screws provided. If you connect the AV cable. Connect yellow to yellow, red to red, and white to the TV, then remove the stand bracket. Side buttons 40" LCD HDTV QUICK SETUP GUIDE DX-40L150A11 Installing the stand 1 Remove the stand...
Quick Setup Guide (English)
Page 2
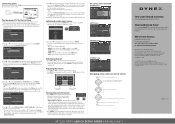
..." LCD HDTV I QUICK SETUP GUIDE I DX-40L150A11 One-year limited warranty Visit www.dynexproducts.com for a standard or HD TV signal, select Antenna. • If your cable is connected directly to the TV (without a tuner box), select Cable. • If your cable is not realized." The Time screen opens with your remote control Press to display the Main menu. Press MUTE again to restore the sound. ^ ^ 5 Press or to change the volume. CH^ CH Press to select Home Mode...
..." LCD HDTV I QUICK SETUP GUIDE I DX-40L150A11 One-year limited warranty Visit www.dynexproducts.com for a standard or HD TV signal, select Antenna. • If your cable is connected directly to the TV (without a tuner box), select Cable. • If your cable is not realized." The Time screen opens with your remote control Press to display the Main menu. Press MUTE again to restore the sound. ^ ^ 5 Press or to change the volume. CH^ CH Press to select Home Mode...
User Manual (English)
Page 2
... removing the stand 4 Installing the stand 4 Installing a wall-mount bracket 4 TV components 5 Accessories 5 Right side 5 Back 5 Left side 6 Remote control 6 Using the remote control 7 Installing remote control batteries 7 Aiming the remote control 7 Programming a universal remote 8 Making connections 8 Selecting a location 8 Connecting the power 8 Connecting an HDMI device 9 Connecting a component video device 9 Connecting an antenna, cable TV, or satellite TV box 9 Connecting a VCR 10 Connecting a camcorder or game console 10 Connecting a computer 11 Connecting a home...
... removing the stand 4 Installing the stand 4 Installing a wall-mount bracket 4 TV components 5 Accessories 5 Right side 5 Back 5 Left side 6 Remote control 6 Using the remote control 7 Installing remote control batteries 7 Aiming the remote control 7 Programming a universal remote 8 Making connections 8 Selecting a location 8 Connecting the power 8 Connecting an HDMI device 9 Connecting a component video device 9 Connecting an antenna, cable TV, or satellite TV box 9 Connecting a VCR 10 Connecting a camcorder or game console 10 Connecting a computer 11 Connecting a home...
User Manual (English)
Page 3
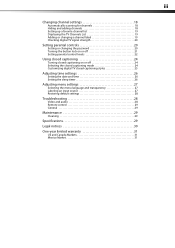
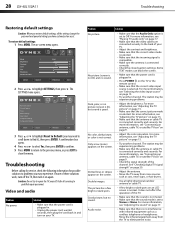
... signal strength 20 Setting parental controls 20 Setting or changing the password 20 Turning the button lock on or off 21 Setting parental control levels 22 Using closed captioning 24 Turning closed captioning on or off 24 Selecting the closed captioning mode 24 Customizing digital TV closed captioning styles 25 Adjusting time settings 26 Setting the date and time 26 Setting the sleep timer 26 Adjusting menu settings 27 Selecting the menu language and transparency 27 Labeling an input source 27 Restoring default settings 28 Troubleshooting 28 Video and audio 28 Remote control...
... signal strength 20 Setting parental controls 20 Setting or changing the password 20 Turning the button lock on or off 21 Setting parental control levels 22 Using closed captioning 24 Turning closed captioning on or off 24 Selecting the closed captioning mode 24 Customizing digital TV closed captioning styles 25 Adjusting time settings 26 Setting the date and time 26 Setting the sleep timer 26 Adjusting menu settings 27 Selecting the menu language and transparency 27 Labeling an input source 27 Restoring default settings 28 Troubleshooting 28 Video and audio 28 Remote control...

User Manual (English)
Page 4
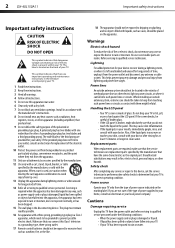
... . DX-40L150A11 1 f CHILD SAFETY It makes a difference how and where you use of this product. • Don't let children climb on or play with steel studs or cinder blocks. We and the consumer electronics industry are committed to safely wall mount your TV. • Follow all instructions supplied by curious children. Tune into safety • One size of TV stand...
... . DX-40L150A11 1 f CHILD SAFETY It makes a difference how and where you use of this product. • Don't let children climb on or play with steel studs or cinder blocks. We and the consumer electronics industry are committed to safely wall mount your TV. • Follow all instructions supplied by curious children. Tune into safety • One size of TV stand...
User Manual (English)
Page 5
... do not remove any antenna or cable system. Install in accordance with a cart, stand, tripod, bracket, or table specified by the manufacturer that have fallen into such power lines or circuits. A grounding type plug has two blades and a third grounding prong. When a cart is used, use attachments/accessories specified by the manufacturer. 12 Use only with the manufacturer's instructions. 8 Do not install near water...
... do not remove any antenna or cable system. Install in accordance with a cart, stand, tripod, bracket, or table specified by the manufacturer that have fallen into such power lines or circuits. A grounding type plug has two blades and a third grounding prong. When a cart is used, use attachments/accessories specified by the manufacturer. 12 Use only with the manufacturer's instructions. 8 Do not install near water...

User Manual (English)
Page 8
...: • Remote control • AAA batteries (2) • AC power cord • Component video and audio cable • Stand and screws (4) • Quick Setup Guide • User Guide Right side Back Item Name VOL+ 1 VOL2 3 CH 4 CH 5 MENU INPUT 6 (power) 7 Description In TV mode, press to move up. For more information, see "Connecting using analog audio cable"on page 11. Press to these jacks. Press to open the on-screen menu. Item Name Description PC/DVI AUDIO IN Connect the audio output from...
...: • Remote control • AAA batteries (2) • AC power cord • Component video and audio cable • Stand and screws (4) • Quick Setup Guide • User Guide Right side Back Item Name VOL+ 1 VOL2 3 CH 4 CH 5 MENU INPUT 6 (power) 7 Description In TV mode, press to move up. For more information, see "Connecting using analog audio cable"on page 11. Press to these jacks. Press to open the on-screen menu. Item Name Description PC/DVI AUDIO IN Connect the audio output from...

User Manual (English)
Page 10
... select component input. • Press HDMI repeatedly to cycle between the HDMI inputs. • Press VIDEO repeatedly to cycle between the remote control and the remote sensor. For more information see "Adjusting the TV picture" on page 13. RECALL 14 Press to go to set the sleep timer. GUIDE 15 Press to open the favorite channel list. For more information, see "Selecting a channel" on page 15. For more information, see "Turning closed captioning...
... select component input. • Press HDMI repeatedly to cycle between the HDMI inputs. • Press VIDEO repeatedly to cycle between the remote control and the remote sensor. For more information see "Adjusting the TV picture" on page 13. RECALL 14 Press to go to set the sleep timer. GUIDE 15 Press to open the favorite channel list. For more information, see "Selecting a channel" on page 15. For more information, see "Turning closed captioning...

User Manual (English)
Page 11
... codes. To program your existing universal remote control: 1 To program your existing remote control to a power outlet. See your universal remote control's instructions for All Sony URC-6690 RM-VL600 0464 8043 Set-top box manufacturer and model Comcast M1057 0463 Dish Network VIP508, VIP622 720 Motorola DRC800 0463 TIVO DirectTV Series 3, HD RC23 0091 10463 Making connections Before you make sure that you only use the remote control. Dynex TV codes for universal remote controls (for all Dynex...
... codes. To program your existing universal remote control: 1 To program your existing remote control to a power outlet. See your universal remote control's instructions for All Sony URC-6690 RM-VL600 0464 8043 Set-top box manufacturer and model Comcast M1057 0463 Dish Network VIP508, VIP622 720 Motorola DRC800 0463 TIVO DirectTV Series 3, HD RC23 0091 10463 Making connections Before you make sure that you only use the remote control. Dynex TV codes for universal remote controls (for all Dynex...

User Manual (English)
Page 12
... select HDMI 1 to select Component 1 or Component 2, then press ENTER. Match the colors when making connections. Connecting an antenna, cable TV, or satellite TV box If you are using a 75-Ohm, coaxial cable to reduce interference and noise that your TV, then connect the other end of the cable to the instructions that came with the power cord or any other cables. • If you use that to select Component 2. 3 Turn on the component video...
... select HDMI 1 to select Component 1 or Component 2, then press ENTER. Match the colors when making connections. Connecting an antenna, cable TV, or satellite TV box If you are using a 75-Ohm, coaxial cable to reduce interference and noise that your TV, then connect the other end of the cable to the instructions that came with the power cord or any other cables. • If you use that to select Component 2. 3 Turn on the component video...

User Manual (English)
Page 13
... or play the VCR: 1 Turn on the side of your TV. AV cable Audio cable Side of TV Camcorder Back of TV VCR S-Video cable Audio cable Note: Cable connectors and jacks are often color-coded. AV cable Note: Cable connectors and jacks are often color-coded. The INPUT SOURCE menu opens. 2 Press or to white. Connect yellow to yellow, red to red, and white to select AV2, then press ENTER. Game console Note: Cables are often color-coded to select...
... or play the VCR: 1 Turn on the side of your TV. AV cable Audio cable Side of TV Camcorder Back of TV VCR S-Video cable Audio cable Note: Cable connectors and jacks are often color-coded. AV cable Note: Cable connectors and jacks are often color-coded. The INPUT SOURCE menu opens. 2 Press or to white. Connect yellow to yellow, red to red, and white to select AV2, then press ENTER. Game console Note: Cables are often color-coded to select...

User Manual (English)
Page 14
... press the VGA button on the remote for VGA. 3 Turn on the TV, then press INPUT. Note: Cable connectors and jacks are often color-coded. The HDMI connection will provide a better quality picture. The INPUT SOURCE menu opens. 2 Press or to a comfortable level. Connecting using digital audio cable To connect using analog audio cable: 1 Make sure that your TV's power cord is unplugged and the audio amplifier is turned off . 2 Connect one end of a audio cable (not included) to the AUDIO OUT jacks (L&R) on...
... press the VGA button on the remote for VGA. 3 Turn on the TV, then press INPUT. Note: Cable connectors and jacks are often color-coded. The HDMI connection will provide a better quality picture. The INPUT SOURCE menu opens. 2 Press or to a comfortable level. Connecting using digital audio cable To connect using analog audio cable: 1 Make sure that your TV's power cord is unplugged and the audio amplifier is turned off . 2 Connect one end of a audio cable (not included) to the AUDIO OUT jacks (L&R) on...

User Manual (English)
Page 16
...'t need to run the auto scan again to create a channel list. 8 Select the corresponding video input source through the INPUT SOURCE menu. Warning: When your TV does not receive an input signal for available channels in this point you can press EXIT to exit the analog channel scan, or just ignore it goes into standby mode and the power indicator LED turns red. Source List TV AV 1 AV 2 Component 1 Component 2 VGA HDMI 1 HDMI 2 HDMI 3 HDMI 4 2 Press or to close the menu...
...'t need to run the auto scan again to create a channel list. 8 Select the corresponding video input source through the INPUT SOURCE menu. Warning: When your TV does not receive an input signal for available channels in this point you can press EXIT to exit the analog channel scan, or just ignore it goes into standby mode and the power indicator LED turns red. Source List TV AV 1 AV 2 Component 1 Component 2 VGA HDMI 1 HDMI 2 HDMI 3 HDMI 4 2 Press or to close the menu...

User Manual (English)
Page 17
...), signal type, audio information, and resolution when watching an analog channel. • Press GUIDE to show the digital program guide, which may vary from the actual screens on your TV. Press MUTE again to temporarily turn off all sound. The above menus are shown in the manual are grayed out. to increase or decrease the volume. • Press MUTE to restore the sound. On-screen menu overview PICTURE menu Mode Brightness...
...), signal type, audio information, and resolution when watching an analog channel. • Press GUIDE to show the digital program guide, which may vary from the actual screens on your TV. Press MUTE again to temporarily turn off all sound. The above menus are shown in the manual are grayed out. to increase or decrease the volume. • Press MUTE to restore the sound. On-screen menu overview PICTURE menu Mode Brightness...
User Manual (English)
Page 18
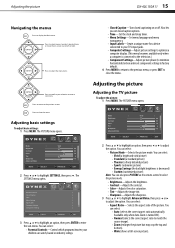
... your TV's input jacks. • Computer Settings-Adjust picture settings to optimize a computer display. (This menu becomes available only when a computer is connected to the television.) • Component Settings-Adjust picture phase (to minimize horizontal distortion and reset component settings to factory default. 4 Press MENU to return to the previous menu, or press EXIT to adjust the option. Mode Brightness Contrast Color Tint Sharpness Advanced Video PICTURE AUDIO SETTINGS CHANNELS Vivid 50 60 70 0 +10 MOVE ENTER SELECT MENU PREVIOUS EXIT...
... your TV's input jacks. • Computer Settings-Adjust picture settings to optimize a computer display. (This menu becomes available only when a computer is connected to the television.) • Component Settings-Adjust picture phase (to minimize horizontal distortion and reset component settings to factory default. 4 Press MENU to return to the previous menu, or press EXIT to adjust the option. Mode Brightness Contrast Color Tint Sharpness Advanced Video PICTURE AUDIO SETTINGS CHANNELS Vivid 50 60 70 0 +10 MOVE ENTER SELECT MENU PREVIOUS EXIT...

User Manual (English)
Page 19
... a digital program. • Overscan-Turn this On to close the menu. The Computer settings menu opens. Auto Adjust H. Parental Controls Closed Caption Time Menu Settings Input Labels Computer Settings Component Settings PICTURE AUDIO SETTINGS CHANNELS MOVE ENTER SELECT MENU PREVIOUS EXIT EXIT Turn this On to close the menu. To set the Dynamic Contrast Ratio to On to automatically adjust the contrast between the light and dark areas of the screen). For more information, see "Selecting the video input source" on -screen menu opens. The on page 13. 2 Press MENU. Adjusting...
... a digital program. • Overscan-Turn this On to close the menu. The Computer settings menu opens. Auto Adjust H. Parental Controls Closed Caption Time Menu Settings Input Labels Computer Settings Component Settings PICTURE AUDIO SETTINGS CHANNELS MOVE ENTER SELECT MENU PREVIOUS EXIT EXIT Turn this On to close the menu. To set the Dynamic Contrast Ratio to On to automatically adjust the contrast between the light and dark areas of the screen). For more information, see "Selecting the video input source" on -screen menu opens. The on page 13. 2 Press MENU. Adjusting...
User Manual (English)
Page 31
..., see "Playing TV audio only" on the screen. • Try another channel. For more information, see "Adjusting the TV picture" on the screen. See "Checking digital TV signal strength" on -screen menu opens. The on page 20. Parental Controls Closed Caption Time Menu Settings Input Labels Computer Settings Component Settings PICTURE AUDIO SETTINGS CHANNELS MOVE ENTER SELECT MENU PREVIOUS EXIT EXIT 3 Press or to highlight Reset to the back of these solutions work, turn off the TV, then turn on an LCD screen is...
..., see "Playing TV audio only" on the screen. • Try another channel. For more information, see "Adjusting the TV picture" on the screen. See "Checking digital TV signal strength" on -screen menu opens. The on page 20. Parental Controls Closed Caption Time Menu Settings Input Labels Computer Settings Component Settings PICTURE AUDIO SETTINGS CHANNELS MOVE ENTER SELECT MENU PREVIOUS EXIT EXIT 3 Press or to highlight Reset to the back of these solutions work, turn off the TV, then turn on an LCD screen is...

User Manual (English)
Page 32
... TV works best in temperatures that are installed correctly. For more information, see "Setting parental controls" on page 20. • If a setting is grayed, the setting is set a new password. For more information, see "Setting parental control levels" on again. Specifications Specifications subject to Off. For up-to-date codes, go to change without notice. If surfaces are not hidden. Analog standard Digital standard Channel coverage Power requirement Power consumption Audio power S-Video input Video/audio input Component input HDMI input VGA input NTSC ATSC...
... TV works best in temperatures that are installed correctly. For more information, see "Setting parental controls" on page 20. • If a setting is grayed, the setting is set a new password. For more information, see "Setting parental control levels" on again. Specifications Specifications subject to Off. For up-to-date codes, go to change without notice. If surfaces are not hidden. Analog standard Digital standard Channel coverage Power requirement Power consumption Audio power S-Video input Video/audio input Component input HDMI input VGA input NTSC ATSC...


