User Manual (English)
Page 2
Controls 5 Side - ii Dynex DX-32L200A12/DX-37L200A12/DX-46L262A12 32"/37"/46" LCD TV Contents CHILD SAFETY 1 Important safety instructions 2 Warnings 2 Cautions 3 Installing the stand or wall-mount bracket 4 Installing the stand 4 Installing a wall-mount bracket 4 TV components 5 Package contents 5 Front 5 Side - Connections 6...connections 7 What connection should I use 7 Connecting power 8 Connecting a cable or satellite box 8 Connecting an antenna or cable TV (no box 11 Connecting a DVD or Blu-ray player 11 Connecting an HDMI or DVI device (best 12 Connecting a component...
Controls 5 Side - ii Dynex DX-32L200A12/DX-37L200A12/DX-46L262A12 32"/37"/46" LCD TV Contents CHILD SAFETY 1 Important safety instructions 2 Warnings 2 Cautions 3 Installing the stand or wall-mount bracket 4 Installing the stand 4 Installing a wall-mount bracket 4 TV components 5 Package contents 5 Front 5 Side - Connections 6...connections 7 What connection should I use 7 Connecting power 8 Connecting a cable or satellite box 8 Connecting an antenna or cable TV (no box 11 Connecting a DVD or Blu-ray player 11 Connecting an HDMI or DVI device (best 12 Connecting a component...
User Manual (English)
Page 3
iii Setting parental controls 23 Setting or changing the password 23 Setting parental control levels 23 Blocking unrated TV 25 Locking control buttons 26 Downloading rating information 26 Using closed captioning 27 Turning closed captioning on or off 27 Selecting the closed ... Displaying system information 31 Restoring settings to obtain warranty service 39 Where is the warranty valid 39 What does the warranty not cover 39 Dynex Televisions 39 Definitions 39 How long does the coverage last 39 What does this warranty cover 39 How to default 32 Maintaining 32 Cleaning ...
iii Setting parental controls 23 Setting or changing the password 23 Setting parental control levels 23 Blocking unrated TV 25 Locking control buttons 26 Downloading rating information 26 Using closed captioning 27 Turning closed captioning on or off 27 Selecting the closed ... Displaying system information 31 Restoring settings to obtain warranty service 39 Where is the warranty valid 39 What does the warranty not cover 39 Dynex Televisions 39 Definitions 39 How long does the coverage last 39 What does this warranty cover 39 How to default 32 Maintaining 32 Cleaning ...
User Manual (English)
Page 5
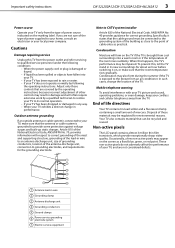
... route all cords and cables so that are unsure, ask a professional installer. • TVs can be mounted to walls backed with entertainment system furniture and TVs. • Don't place TVs on the proper stands or installed according to the manufacturer's recommendations. If you are inappropriately placed...fit all . Wall mounting If you decide to wall mount your TV, always remember: • One size of TV stand does not fit all . Some wall mounts are mounting the TV is a growing trend, and larger TVs are committed to making home entertainment enjoyable and safe. 1 f CHILD...
... route all cords and cables so that are unsure, ask a professional installer. • TVs can be mounted to walls backed with entertainment system furniture and TVs. • Don't place TVs on the proper stands or installed according to the manufacturer's recommendations. If you are inappropriately placed...fit all . Wall mounting If you decide to wall mount your TV, always remember: • One size of TV stand does not fit all . Some wall mounts are mounting the TV is a growing trend, and larger TVs are committed to making home entertainment enjoyable and safe. 1 f CHILD...
User Manual (English)
Page 6
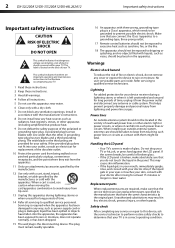
... plug has two blades with the apparatus. Handling the LCD panel • Your TV's screen is the disconnecting device. Also, if the liquid gets in your eyes or touches your skin, consult with your safety. 2 DX-32L200A12/DX-37L200A12/DX-46L262A12 Important safety instructions Important safety instructions CAUTION RISK OF ELECTRIC SHOCK DO NOT OPEN...
... plug has two blades with the apparatus. Handling the LCD panel • Your TV's screen is the disconnecting device. Also, if the liquid gets in your eyes or touches your skin, consult with your safety. 2 DX-32L200A12/DX-37L200A12/DX-46L262A12 Important safety instructions Important safety instructions CAUTION RISK OF ELECTRIC SHOCK DO NOT OPEN...
User Manual (English)
Page 7
Important safety instructions DX-32L200A12/DX-37L200A12/DX-46L262A12 3 Power source Operate your TV only from the type of the antenna-discharge unit, connection to grounding electrodes, and requirements for the grounding electrode. Article 810 of the National Electrical Code, ANSI/NFPA No. 70, provides information with your TV picture and sound, operating problems, or even damage...
Important safety instructions DX-32L200A12/DX-37L200A12/DX-46L262A12 3 Power source Operate your TV only from the type of the antenna-discharge unit, connection to grounding electrodes, and requirements for the grounding electrode. Article 810 of the National Electrical Code, ANSI/NFPA No. 70, provides information with your TV picture and sound, operating problems, or even damage...
User Manual (English)
Page 8
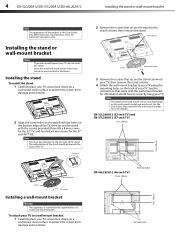
... then remove the stand. Note The length of the TV. 4 DX-32L200A12/DX-37L200A12/DX-46L262A12 Installing the stand or wall-mount bracket Note The appearance of the product in . (600 mm) Wall mount brackets Wall mount brackets DX-46L262A12 (46-inch TV) 23.62 in this User Guide may differ from ...screen from damage and scratches. 2 Align the screw holes on the stand with the wall-mount bracket for the 37" and 46" TVs). DX-32L200A12 (32-inch TV) and DX-37L200A12 (37-inch TV) 7.84 in. (200 mm) 7.84 in. (200 mm) 7.84 in the future. Installing the stand To install the stand:...
... then remove the stand. Note The length of the TV. 4 DX-32L200A12/DX-37L200A12/DX-46L262A12 Installing the stand or wall-mount bracket Note The appearance of the product in . (600 mm) Wall mount brackets Wall mount brackets DX-46L262A12 (46-inch TV) 23.62 in this User Guide may differ from ...screen from damage and scratches. 2 Align the screw holes on the stand with the wall-mount bracket for the 37" and 46" TVs). DX-32L200A12 (32-inch TV) and DX-37L200A12 (37-inch TV) 7.84 in. (200 mm) 7.84 in. (200 mm) 7.84 in the future. Installing the stand To install the stand:...
User Manual (English)
Page 9
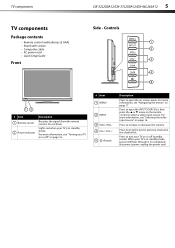
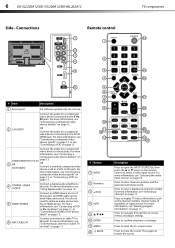
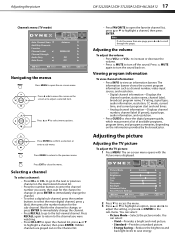
... control and batteries (2 AAA) • Stand with screws • Composite cable • AC power cord • Quick Setup Guide Front DX-32L200A12/DX-37L200A12/DX-46L262A12 5 Side - For more information, see "Turning your TV on or off " on page 16. # Item 1 MENU 2 INPUT 3 VOL+/VOL- 4 CH /CH 5 (Power) Description Press to...open the on the remote control to the next or previous channel in the channel list. When your TV is in standby mode. Do not block. Press to turn your TV on or off (standby mode). Press to increase or decrease the volume. Controls MENU INPUT VOL VOL ...
... control and batteries (2 AAA) • Stand with screws • Composite cable • AC power cord • Quick Setup Guide Front DX-32L200A12/DX-37L200A12/DX-46L262A12 5 Side - For more information, see "Turning your TV on or off " on page 16. # Item 1 MENU 2 INPUT 3 VOL+/VOL- 4 CH /CH 5 (Power) Description Press to...open the on the remote control to the next or previous channel in the channel list. When your TV is in standby mode. Do not block. Press to turn your TV on or off (standby mode). Press to increase or decrease the volume. Controls MENU INPUT VOL VOL ...
User Manual (English)
Page 10
... press the or arrow on -screen menu. Press to enter a digital sub-channel number. Press again to display TV status information, such as a VCR, to this jack. 6 DX-32L200A12/DX-37L200A12/DX-46L262A12 TV components Side - Do not use. 2 L/R AUDIO Connect the audio for an HDMI device. For more information, ... video device (good)" on page 13, or see "Selecting a channel" on page 12. 6 ANT/CABLE IN Connect an antenna or cable TV to this jack. Press to enter channel numbers and the parental control password. For more information, see "Connecting a DVD or Blu-ray player"...
... press the or arrow on -screen menu. Press to enter a digital sub-channel number. Press again to display TV status information, such as a VCR, to this jack. 6 DX-32L200A12/DX-37L200A12/DX-46L262A12 TV components Side - Do not use. 2 L/R AUDIO Connect the audio for an HDMI device. For more information, ... video device (good)" on page 13, or see "Selecting a channel" on page 12. 6 ANT/CABLE IN Connect an antenna or cable TV to this jack. Press to enter channel numbers and the parental control password. For more information, see "Connecting a DVD or Blu-ray player"...
User Manual (English)
Page 11
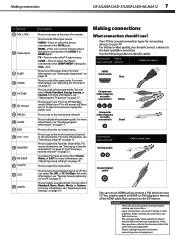
... best available connection. VGA-N/A. Making connections What connection should connect a device to turn your TV. VIDEO-Press to select the device connected to select an audio mode. When your TV. Press to the AV IN jacks. Making connections DX-32L200A12/DX-37L200A12/DX-46L262A12 7 # Button 9 VOL+/VOL- 10 Video Input 11 SLEEP 12 ZOOM 13 PICTURE...
... best available connection. VGA-N/A. Making connections What connection should connect a device to turn your TV. VIDEO-Press to select the device connected to select an audio mode. When your TV. Press to the AV IN jacks. Making connections DX-32L200A12/DX-37L200A12/DX-46L262A12 7 # Button 9 VOL+/VOL- 10 Video Input 11 SLEEP 12 ZOOM 13 PICTURE...

User Manual (English)
Page 12
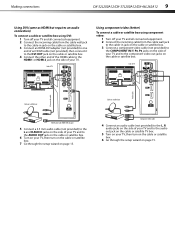
... EO HDMI 1 HDMI 2 Cable or satellite box ANT/ CABLE IN HDMI cable 4 Turn on your TV, then turn on the cable or satellite box. 5 Go through the setup wizard on page 15. 8 DX-32L200A12/DX-37L200A12/DX-46L262A12 Making connections Connecting power To connect the power: • Connect the AC power cord to the... AC IN jack on the back of your TV and to the HDMI OUT jack on the cable or satellite box....
... EO HDMI 1 HDMI 2 Cable or satellite box ANT/ CABLE IN HDMI cable 4 Turn on your TV, then turn on the cable or satellite box. 5 Go through the setup wizard on page 15. 8 DX-32L200A12/DX-37L200A12/DX-46L262A12 Making connections Connecting power To connect the power: • Connect the AC power cord to the... AC IN jack on the back of your TV and to the HDMI OUT jack on the cable or satellite box....
User Manual (English)
Page 13
Making connections DX-32L200A12/DX-37L200A12/DX-46L262A12 9 3.5 mm audio cable AV IN Audio cable AV IN Using DVI (same as HDMI but requires an audio connection) To connect a cable or satellite box using component video: 1 Turn off your TV and all connected equipment. 2 Connect the incoming cable from the cable wall jack to ... the cable or satellite box. 4 Connect the other end of the HDMI cable to the component video out jacks on the side of your TV. Side of TV SE RV IC E PO RT COMPONENT IN R AUDIO PR L AV IN PB COAXIAL Y/ V ID EO HDMI 1 Cable or satellite box HDMI 2 ANT/ ...
Making connections DX-32L200A12/DX-37L200A12/DX-46L262A12 9 3.5 mm audio cable AV IN Audio cable AV IN Using DVI (same as HDMI but requires an audio connection) To connect a cable or satellite box using component video: 1 Turn off your TV and all connected equipment. 2 Connect the incoming cable from the cable wall jack to ... the cable or satellite box. 4 Connect the other end of the HDMI cable to the component video out jacks on the side of your TV. Side of TV SE RV IC E PO RT COMPONENT IN R AUDIO PR L AV IN PB COAXIAL Y/ V ID EO HDMI 1 Cable or satellite box HDMI 2 ANT/ ...
User Manual (English)
Page 14
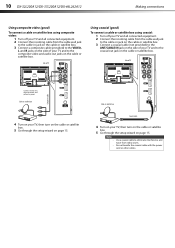
...Go through the setup wizard on the cable or satellite box. Side of TV Connect red to red, white to white, and yellow to eliminate interference and noise from radio waves. 10 DX-32L200A12/DX-37L200A12/DX-46L262A12 Making connections Using composite video (good) To connect a cable or... satellite box using coaxial: 1 Turn off your TV and all connected equipment. 2 Connect the incoming cable from the cable...
...Go through the setup wizard on the cable or satellite box. Side of TV Connect red to red, white to white, and yellow to eliminate interference and noise from radio waves. 10 DX-32L200A12/DX-37L200A12/DX-46L262A12 Making connections Using composite video (good) To connect a cable or... satellite box using coaxial: 1 Turn off your TV and all connected equipment. 2 Connect the incoming cable from the cable...
User Manual (English)
Page 15
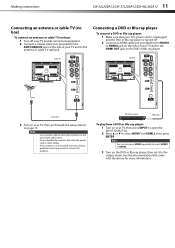
...DX-32L200A12/DX-37L200A12/DX-46L262A12 11 Connecting an antenna or cable TV (no box) To connect an antenna or cable TV (no box): 1 Turn off . 2 Connect an HDMI cable (not provided) to the HDMI1 or HDMI2 jack on the side of your TV... EO HDMI 1 HDMI 2 HDMI 2 ANT/ CABLE IN ANT/ CABLE IN Coaxial cable 3 Turn on your TV, then go through the setup wizard on the DVD or Blu-ray player, then set it to correct the ...2, then press ENTER. Do not bundle the coaxial cable with the device for more information. Side of TV SE RV IC E PO RT COMPONENT IN R AUDIO PR L AV IN PB COAXIAL Y/ V ID...
...DX-32L200A12/DX-37L200A12/DX-46L262A12 11 Connecting an antenna or cable TV (no box) To connect an antenna or cable TV (no box): 1 Turn off . 2 Connect an HDMI cable (not provided) to the HDMI1 or HDMI2 jack on the side of your TV... EO HDMI 1 HDMI 2 HDMI 2 ANT/ CABLE IN ANT/ CABLE IN Coaxial cable 3 Turn on your TV, then go through the setup wizard on the DVD or Blu-ray player, then set it to correct the ...2, then press ENTER. Do not bundle the coaxial cable with the device for more information. Side of TV SE RV IC E PO RT COMPONENT IN R AUDIO PR L AV IN PB COAXIAL Y/ V ID...
User Manual (English)
Page 16
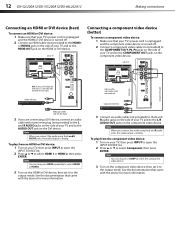
.... To play from an HDMI or DVI device: 1 Turn on your TV, then press INPUT to open the INPUT SOURCE list. 2 Press or to the L/R AUDIO OUT jacks on the component video device. 12 DX-32L200A12/DX-37L200A12/DX-46L262A12 Making connections Connecting an HDMI or DVI device (best) To connect ...an HDMI or DVI device: 1 Make sure that your TV's power cord is unplugged and the HDMI or DVI device is turned off . 2...
.... To play from an HDMI or DVI device: 1 Turn on your TV, then press INPUT to open the INPUT SOURCE list. 2 Press or to the L/R AUDIO OUT jacks on the component video device. 12 DX-32L200A12/DX-37L200A12/DX-46L262A12 Making connections Connecting an HDMI or DVI device (best) To connect ...an HDMI or DVI device: 1 Make sure that your TV's power cord is unplugged and the HDMI or DVI device is turned off . 2...
User Manual (English)
Page 17
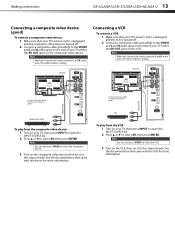
... composite video device. Note You can also press VIDEO to select AV, then press ENTER. Making connections DX-32L200A12/DX-37L200A12/DX-46L262A12 13 Connecting a composite video device (good) To connect a composite video device: 1 Make sure that your TV's power cord is unplugged and the composite video device is analog. Connect red to red, white...
... composite video device. Note You can also press VIDEO to select AV, then press ENTER. Making connections DX-32L200A12/DX-37L200A12/DX-46L262A12 13 Connecting a composite video device (good) To connect a composite video device: 1 Make sure that your TV's power cord is unplugged and the composite video device is analog. Connect red to red, white...

User Manual (English)
Page 18
.... 3 Turn on the camcorder or game console, then set it to the output mode. 14 DX-32L200A12/DX-37L200A12/DX-46L262A12 Using the remote control Connecting a camcorder or game console To connect a camcorder or game console: 1 Make sure that your TV's power cord is unplugged and the camcorder or game console is turned off. 2 Connect...
.... 3 Turn on the camcorder or game console, then set it to the output mode. 14 DX-32L200A12/DX-37L200A12/DX-46L262A12 Using the remote control Connecting a camcorder or game console To connect a camcorder or game console: 1 Make sure that your TV's power cord is unplugged and the camcorder or game console is turned off. 2 Connect...
User Manual (English)
Page 19
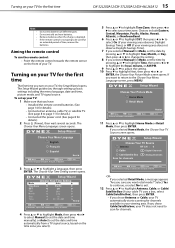
...Cable, or Cable/ Satellite Box (if your cable TV uses a box, select Cable/Satellite Box), then press ENTER. • If you have: • Installed the remote control batteries. (See page 14 for the first time DX-32L200A12/DX-37L200A12/DX-46L262A12 15 Notes Do not mix batteries of different ...old and new batteries. Remove batteries when the charge is not going to highlight a language, then press ENTER. If you through setting up your TV. Choices include Eastern, Central, Mountain, Pacific, Alaska, Hawaii, Atlantic, or Newfoundland. 6 Press or to highlight DST, then press or to...
...Cable, or Cable/ Satellite Box (if your cable TV uses a box, select Cable/Satellite Box), then press ENTER. • If you have: • Installed the remote control batteries. (See page 14 for the first time DX-32L200A12/DX-37L200A12/DX-46L262A12 15 Notes Do not mix batteries of different ...old and new batteries. Remove batteries when the charge is not going to highlight a language, then press ENTER. If you through setting up your TV. Choices include Eastern, Central, Mountain, Pacific, Alaska, Hawaii, Atlantic, or Newfoundland. 6 Press or to highlight DST, then press or to...

User Manual (English)
Page 20
... 70 Brightness 40 Color 60 Tint 0 Sharpness 50 Backlight 30 Advanced Video Reset Picture Settings Move Select Adjust settings to turn on your TV. Using the on-screen menus Notes • • • • Depending on the signal source selected, you will need ... a DVI adapter, select HDMI 1 or HDMI 2. • If your TV is complete, a message appears asking if you select Antenna, during the auto channel scan your TV searches for digital channels first. 16 DX-32L200A12/DX-37L200A12/DX-46L262A12 Understanding the basics • When you want to turn off your...
... 70 Brightness 40 Color 60 Tint 0 Sharpness 50 Backlight 30 Advanced Video Reset Picture Settings Move Select Adjust settings to turn on your TV. Using the on-screen menus Notes • • • • Depending on the signal source selected, you will need ... a DVI adapter, select HDMI 1 or HDMI 2. • If your TV is complete, a message appears asking if you select Antenna, during the auto channel scan your TV searches for digital channels first. 16 DX-32L200A12/DX-37L200A12/DX-46L262A12 Understanding the basics • When you want to turn off your...
User Manual (English)
Page 21
...video input source, and resolution. • Digital channel information-Displays the channel number, station name, channel label, broadcast program name, TV rating, signal type, audio information, resolution, CC mode, current time, and current program start and end times. • Analog channel.... • Press GUIDE to close the menu. Press ENTER to affect picture quality. Adjusting the picture DX-32L200A12/DX-37L200A12/DX-46L262A12 17 Channels menu (TV mode) Auto Channel Scan Add/Skip Channels Favorites Channel Label Channel Strength Audio Only Auto Zoom Picture Audio Settings...
...video input source, and resolution. • Digital channel information-Displays the channel number, station name, channel label, broadcast program name, TV rating, signal type, audio information, resolution, CC mode, current time, and current program start and end times. • Analog channel.... • Press GUIDE to close the menu. Press ENTER to affect picture quality. Adjusting the picture DX-32L200A12/DX-37L200A12/DX-46L262A12 17 Channels menu (TV mode) Auto Channel Scan Add/Skip Channels Favorites Channel Label Channel Strength Audio Only Auto Zoom Picture Audio Settings...
User Manual (English)
Page 22
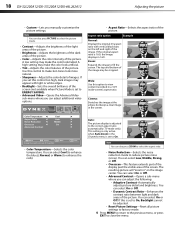
18 DX-32L200A12/DX-37L200A12/DX-46L262A12 Adjusting the picture • Custom-Lets you can adjust the following: • Adaptive Contrast-Automatically adjusts picture detail and brightness. Aspect ratio option Example ... picture. You can also press ZOOM to select the aspect ratio. • Noise Reduction-Selects the noise reduction mode to the correct aspect ratio automatically (TV mode only). If this control to On, Backlight cannot be cropped. A low setting may make the color look faded. If you can select Cool (to...
18 DX-32L200A12/DX-37L200A12/DX-46L262A12 Adjusting the picture • Custom-Lets you can adjust the following: • Adaptive Contrast-Automatically adjusts picture detail and brightness. Aspect ratio option Example ... picture. You can also press ZOOM to select the aspect ratio. • Noise Reduction-Selects the noise reduction mode to the correct aspect ratio automatically (TV mode only). If this control to On, Backlight cannot be cropped. A low setting may make the color look faded. If you can select Cool (to...


