User Manual (English)
Page 2
ii Dynex DX-26L100A13 26" LCD TV Contents CHILD SAFETY 1 Important Safety Instructions 2 Warning 2 Caution 3 Installing the stand or wall-mount bracket 4 Installing the stand 4 Installing a wall-mount bracket 4 TV components 4 Package contents 4 Front 5 Back and Side 5 Remote control 6 Making connections 7 What ...connection should I use 7 Connecting power 8 Connecting a cable or satellite box 8 Connecting an antenna or cable TV (no box 10 Connecting a DVD or Blu-ray player 11 Connecting a VCR 13 Connecting a camcorder or game console 13 Connecting ...
ii Dynex DX-26L100A13 26" LCD TV Contents CHILD SAFETY 1 Important Safety Instructions 2 Warning 2 Caution 3 Installing the stand or wall-mount bracket 4 Installing the stand 4 Installing a wall-mount bracket 4 TV components 4 Package contents 4 Front 5 Back and Side 5 Remote control 6 Making connections 7 What ...connection should I use 7 Connecting power 8 Connecting a cable or satellite box 8 Connecting an antenna or cable TV (no box 10 Connecting a DVD or Blu-ray player 11 Connecting a VCR 13 Connecting a camcorder or game console 13 Connecting ...

User Manual (English)
Page 5
... as a crate or chest of drawers. • Remember that children can become excited while watching a program, especially on a "larger-than-life" TV. TVs that are required for safe wall mount installation. At least two people are inappropriately placed on dressers, bookcases, shelves, desks, speakers, chests, or carts... can easily be heavy. 1 f CHILD SAFETY It makes a difference how and where you use your flat panel display As you enjoy your TV. • Carefully read and understand all enclosed instructions for proper use of this product. • Don't let children climb on or play ...
... as a crate or chest of drawers. • Remember that children can become excited while watching a program, especially on a "larger-than-life" TV. TVs that are required for safe wall mount installation. At least two people are inappropriately placed on dressers, bookcases, shelves, desks, speakers, chests, or carts... can easily be heavy. 1 f CHILD SAFETY It makes a difference how and where you use your flat panel display As you enjoy your TV. • Carefully read and understand all enclosed instructions for proper use of this product. • Don't let children climb on or play ...
User Manual (English)
Page 6
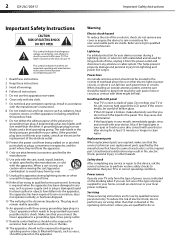
...apparatus which needs to be located in clean water. Servicing is required when the apparatus has been damaged in the literature accompanying your TV. 1 Read these instructions. 2 Keep these instructions. 3 Heed all warnings. 4 Follow all servicing to avoid injury from touching such... inside. Install in accordance with one wider than that contained in fire, electric shock, personal injury, or other . 2 DX-26L100A13 Important Safety Instructions Important Safety Instructions CAUTION RISK OF ELECTRIC SHOCK DO NOT OPEN This symbol indicates that dangerous voltage constituting a risk...
...apparatus which needs to be located in clean water. Servicing is required when the apparatus has been damaged in the literature accompanying your TV. 1 Read these instructions. 2 Keep these instructions. 3 Heed all warnings. 4 Follow all servicing to avoid injury from touching such... inside. Install in accordance with one wider than that contained in fire, electric shock, personal injury, or other . 2 DX-26L100A13 Important Safety Instructions Important Safety Instructions CAUTION RISK OF ELECTRIC SHOCK DO NOT OPEN This symbol indicates that dangerous voltage constituting a risk...

User Manual (English)
Page 7
... covered by the operating instructions because incorrect adjustment of cable entry as practical. Important Safety Instructions DX-26L100A13 3 Caution Damage requiring service Unplug this TV from the power outlet and refer servicing to qualified service personnel under the following the operating instructions...cable system is connected to your area. Article 810 of the building as a fixed blue, green, or red point. In such cases, change in your TV, make sure that are not considered defects. 1 2 3 4 5 7 6 1 Antenna lead-in wire 2 Grounding clamp 3 Antenna discharge unit 4 ...
... covered by the operating instructions because incorrect adjustment of cable entry as practical. Important Safety Instructions DX-26L100A13 3 Caution Damage requiring service Unplug this TV from the power outlet and refer servicing to qualified service personnel under the following the operating instructions...cable system is connected to your area. Article 810 of the building as a fixed blue, green, or red point. In such cases, change in your TV, make sure that are not considered defects. 1 2 3 4 5 7 6 1 Antenna lead-in wire 2 Grounding clamp 3 Antenna discharge unit 4 ...

User Manual (English)
Page 8
Note The length of the M4 wall-mount screws vary depending on the back of your TV. See the instructions that came with the six screws M4 type (16 mm) provided. TV components Package contents • Remote control and batteries (2 AAA) • Stand with the wall-mount bracket for ..., clean surface to protect the screen from damages and scratches. 3 Attach the wall-mount bracket to protect the screen from damages and scratches. 4 DX-26L100A13 Installing the stand or wall-mount bracket Installing the stand or wall-mount bracket Notes • • If you plan to be supported by a...
Note The length of the M4 wall-mount screws vary depending on the back of your TV. See the instructions that came with the six screws M4 type (16 mm) provided. TV components Package contents • Remote control and batteries (2 AAA) • Stand with the wall-mount bracket for ..., clean surface to protect the screen from damages and scratches. 3 Attach the wall-mount bracket to protect the screen from damages and scratches. 4 DX-26L100A13 Installing the stand or wall-mount bracket Installing the stand or wall-mount bracket Notes • • If you plan to be supported by a...

User Manual (English)
Page 9
... turned on -screen menu. To completely disconnect power, unplug the power cord. Lights red when your TV is in the channel list. Connect an antenna or cable TV to increase or decrease the volume. For more information, see "Navigating the menus" on or off (standby mode). For ..." on page 10. 3 DIGITAL OUTPUT Connect a digital sound system to this jack. For more information, see "Connecting an antenna or cable TV (no box)" on page 14. TV components Front DX-26L100A13 5 Back and Side DIGITAL ANT OUTPUT CAB LE IN AUDIO OUT L AUDIO R L AUDIO R L AUDIO R PR C OMPONE NT IN...
... turned on -screen menu. To completely disconnect power, unplug the power cord. Lights red when your TV is in the channel list. Connect an antenna or cable TV to increase or decrease the volume. For more information, see "Navigating the menus" on or off (standby mode). For ..." on page 10. 3 DIGITAL OUTPUT Connect a digital sound system to this jack. For more information, see "Connecting an antenna or cable TV (no box)" on page 14. TV components Front DX-26L100A13 5 Back and Side DIGITAL ANT OUTPUT CAB LE IN AUDIO OUT L AUDIO R L AUDIO R L AUDIO R PR C OMPONE NT IN...

User Manual (English)
Page 10
6 DX-26L100A13 TV components # Item 9 HDMI1/HDMI2/HDMI3 10 USB Description Connect HDMI ...page 23 and "Viewing a favorite channel" on -screen menu. Press to select the input source. • Press TV to select TV. • Press COMP to select the device connected to the COMPONENT IN video jacks. • Press VIDEO to ...more information, see "Viewing program information" on page 20. Press to this model. For more information, see "Adjusting the TV picture" on page 20. For more information, see "Adjusting sound settings" on -screen menu. Connect a USB flash drive ...
6 DX-26L100A13 TV components # Item 9 HDMI1/HDMI2/HDMI3 10 USB Description Connect HDMI ...page 23 and "Viewing a favorite channel" on -screen menu. Press to select the input source. • Press TV to select TV. • Press COMP to select the device connected to the COMPONENT IN video jacks. • Press VIDEO to ...more information, see "Viewing program information" on page 20. Press to this model. For more information, see "Adjusting the TV picture" on page 20. For more information, see "Adjusting sound settings" on -screen menu. Connect a USB flash drive ...

User Manual (English)
Page 11
... end of the HDMI cable that came with your equipment. • Always unplug the power cord when connecting external equipment. Making connections DX-26L100A13 7 Making connections What connection should connect a device to the best available connection. If you should I use the HDMI1 jack to connect... a DVI device to your equipment. Cautions • Check the jacks for connecting devices to your TV. Your TV has several connection types for position and type before making any connections. • Loose connections can use ? For the best video ...
... end of the HDMI cable that came with your equipment. • Always unplug the power cord when connecting external equipment. Making connections DX-26L100A13 7 Making connections What connection should connect a device to the best available connection. If you should I use the HDMI1 jack to connect... a DVI device to your equipment. Cautions • Check the jacks for connecting devices to your TV. Your TV has several connection types for position and type before making any connections. • Loose connections can use ? For the best video ...
User Manual (English)
Page 12
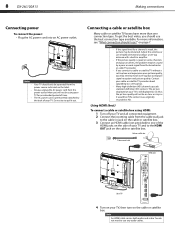
...(HD) channels upscale standard-definition (SD) content. Notes • • • • If the signal level for an extended period of your TV, then turn on the cable or satellite box. Do not try to pull it would be distorted. If the picture quality is weak, the picture ...cable or satellite box. 3 Connect an HDMI cable (not provided) to the cable-in amplifier. Note An HDMI cable carries both audio and video. 8 DX-26L100A13 Making connections Connecting power To connect the power: • Plug the AC power cord into an AC power outlet. Using HDMI (best) To connect a...
...(HD) channels upscale standard-definition (SD) content. Notes • • • • If the signal level for an extended period of your TV, then turn on the cable or satellite box. Do not try to pull it would be distorted. If the picture quality is weak, the picture ...cable or satellite box. 3 Connect an HDMI cable (not provided) to the cable-in amplifier. Note An HDMI cable carries both audio and video. 8 DX-26L100A13 Making connections Connecting power To connect the power: • Plug the AC power cord into an AC power outlet. Using HDMI (best) To connect a...

User Manual (English)
Page 13
...to match color-coded jacks. 4 Connect an audio cable (provided) to the HDMI1 jack on the side of your TV, then turn on the cable or satellite TV box. Making connections DX-26L100A13 9 Using DVI (same as HDMI but requires an audio connection) Note A DVI device must be connected to the ...component video out jacks on the cable or satellite box. Cable or satellite box 75 ohm coaxial cable Side of TV Using component video ...
...to match color-coded jacks. 4 Connect an audio cable (provided) to the HDMI1 jack on the side of your TV, then turn on the cable or satellite TV box. Making connections DX-26L100A13 9 Using DVI (same as HDMI but requires an audio connection) Note A DVI device must be connected to the ...component video out jacks on the cable or satellite box. Cable or satellite box 75 ohm coaxial cable Side of TV Using component video ...

User Manual (English)
Page 14
...AUDIO jacks on the side of your TV and to the composite video and audio out jacks on the cable or satellite box. If the antenna is not installed correctly, contact qualified service personnel to correct the problem. 10 DX-26L100A13 Making connections Using composite video (good)... To connect a cable or satellite box using composite video: 1 Turn off your TV and all connected equipment. 2 Connect the incoming cable from radio waves. Do...
...AUDIO jacks on the side of your TV and to the composite video and audio out jacks on the cable or satellite box. If the antenna is not installed correctly, contact qualified service personnel to correct the problem. 10 DX-26L100A13 Making connections Using composite video (good)... To connect a cable or satellite box using composite video: 1 Turn off your TV and all connected equipment. 2 Connect the incoming cable from radio waves. Do...

User Manual (English)
Page 15
...cable with DVI adapter (not provided) to the HDMI3/DVI jack on the side of your TV and to the DVI OUT jack on the DVD or Blu-ray player. 3 Connect an ...TV, then press INPUT to open the INPUT SOURCE list. 2 Press or to select HDMI1, HDMI2, or HDMI3. 3 Turn on the DVD or Blu-ray player. Note When you connect the audio using the PC AUDIO IN jack, the audio output is analog. Making connections DX-26L100A13... 11 Connecting a DVD or Blu-ray player Using HDMI To connect a DVD or Blu-ray player using HDMI: 1 Make sure that your TV's power cord is ...
...cable with DVI adapter (not provided) to the HDMI3/DVI jack on the side of your TV and to the DVI OUT jack on the DVD or Blu-ray player. 3 Connect an ...TV, then press INPUT to open the INPUT SOURCE list. 2 Press or to select HDMI1, HDMI2, or HDMI3. 3 Turn on the DVD or Blu-ray player. Note When you connect the audio using the PC AUDIO IN jack, the audio output is analog. Making connections DX-26L100A13... 11 Connecting a DVD or Blu-ray player Using HDMI To connect a DVD or Blu-ray player using HDMI: 1 Make sure that your TV's power cord is ...

User Manual (English)
Page 16
... an audio cable (not provided) to the L and R (audio in ) jacks on the side of your TV and to the L/R AUDIO OUT jacks on the DVD or Blu-ray player. 12 DX-26L100A13 Making connections Using component video (better) To connect a DVD or Blu-ray player using component video: 1 Make sure... that your TV's power cord is unplugged and the composite video device is turned off . 2 Connect a component...
... an audio cable (not provided) to the L and R (audio in ) jacks on the side of your TV and to the L/R AUDIO OUT jacks on the DVD or Blu-ray player. 12 DX-26L100A13 Making connections Using component video (better) To connect a DVD or Blu-ray player using component video: 1 Make sure... that your TV's power cord is unplugged and the composite video device is turned off . 2 Connect a component...

User Manual (English)
Page 17
... game console, then press INPUT to open the INPUT SOURCE list. 2 Press or to match color-coded jacks. Making connections DX-26L100A13 13 Connecting a VCR To connect a VCR: 1 Make sure that your TV's power cord is unplugged and the camcorder or game console is turned off . 2 Connect a composite cable (not provided) to ...the VIDEO and L and R (audio in ) jacks on the side of your TV and to select the VCR. Connect yellow to yellow, red to red, and white to the AV OUT jacks on the camcorder or game console...
... game console, then press INPUT to open the INPUT SOURCE list. 2 Press or to match color-coded jacks. Making connections DX-26L100A13 13 Connecting a VCR To connect a VCR: 1 Make sure that your TV's power cord is unplugged and the camcorder or game console is turned off . 2 Connect a composite cable (not provided) to ...the VIDEO and L and R (audio in ) jacks on the side of your TV and to select the VCR. Connect yellow to yellow, red to red, and white to the AV OUT jacks on the camcorder or game console...

User Manual (English)
Page 18
... the display properties if necessary. Note You can use an HDMI cable to the VGA jack on the side of your TV and to select HDMI1, HDMI2, or HDMI3. Side of TV HDMI cable 3 Connect an audio cable with stereo mini plug VGA cable Using HDMI To connect a computer using VGA:...on the computer. Using VGA To connect a computer using HDMI: 1 Make sure that your TV's power cord is unplugged and the computer is turned off . 2 Connect a VGA cable (not provided) to the VGA IN jack on the computer. 14 DX-26L100A13 Making connections Connecting a computer Tip Some computers have an HDMI jack.
... the display properties if necessary. Note You can use an HDMI cable to the VGA jack on the side of your TV and to select HDMI1, HDMI2, or HDMI3. Side of TV HDMI cable 3 Connect an audio cable with stereo mini plug VGA cable Using HDMI To connect a computer using VGA:...on the computer. Using VGA To connect a computer using HDMI: 1 Make sure that your TV's power cord is unplugged and the computer is turned off . 2 Connect a VGA cable (not provided) to the VGA IN jack on the computer. 14 DX-26L100A13 Making connections Connecting a computer Tip Some computers have an HDMI jack.

User Manual (English)
Page 19
... on your headphones that still lets you hear the sound. Warning Loud noise can damage your TV, then press INPUT to open the INPUT SOURCE list. 2 Press or to the USB flash drive. Making connections DX-26L100A13 15 Connecting a USB flash drive To connect a USB flash drive: 1 Plug a USB flash ...drive into the USB port on the side of your TV. To play from a USB flash drive: 1 Turn on page 31.
... on your headphones that still lets you hear the sound. Warning Loud noise can damage your TV, then press INPUT to open the INPUT SOURCE list. 2 Press or to the USB flash drive. Making connections DX-26L100A13 15 Connecting a USB flash drive To connect a USB flash drive: 1 Plug a USB flash ...drive into the USB port on the side of your TV. To play from a USB flash drive: 1 Turn on page 31.

User Manual (English)
Page 20
...Refer to the documentation that your TV's power cord is unplugged and the home system is turned off the remote control. 2 Insert two AAA batteries into the battery compartment. on the batteries with the + and - symbols in the battery compartment. 16 DX-26L100A13 Using the remote control Connecting a... basic home theater system To connect a basic home theater system using digital audio: 1 Make sure that came with your TV and to the DIGITAL AUDIO IN jack on the home theater system...
...Refer to the documentation that your TV's power cord is unplugged and the home system is turned off the remote control. 2 Insert two AAA batteries into the battery compartment. on the batteries with the + and - symbols in the battery compartment. 16 DX-26L100A13 Using the remote control Connecting a... basic home theater system To connect a basic home theater system using digital audio: 1 Make sure that came with your TV and to the DIGITAL AUDIO IN jack on the home theater system...

User Manual (English)
Page 21
... zone you select). 5 If you have: • Installed the remote control batteries. (See page 16 for details). • Connected an antenna, cable TV, or satellite TV. (See page 8 to page 10 for details.) • Connected the power cord. (See page 8 for mode, press or to highlight Daylight Savings ... press or to highlight the hour, minute, or AM/PM. 9 Press or to select your TV for an extended period of correctly. Cautions • Batteries should not be used for the first time DX-26L100A13 17 3 Replace the battery cover. Notes Do not mix batteries of your skin, wash immediately. ...
... zone you select). 5 If you have: • Installed the remote control batteries. (See page 16 for details). • Connected an antenna, cable TV, or satellite TV. (See page 8 to page 10 for details.) • Connected the power cord. (See page 8 for mode, press or to highlight Daylight Savings ... press or to highlight the hour, minute, or AM/PM. 9 Press or to select your TV for an extended period of correctly. Cautions • Batteries should not be used for the first time DX-26L100A13 17 3 Replace the battery cover. Notes Do not mix batteries of your skin, wash immediately. ...

User Manual (English)
Page 22
... digital channels first. The screens shown in the INPUT SOURCE list, then press ENTER. • If your TV. The Choose Your TV Source screen opens. Your TV enters Standby mode and the power indicator turns red. The following menus are for explanation purposes and may see ...• Depending on your viewing area. You can press EXIT at any button to scan for your TV in this manual are grayed out. The INPUT SOURCE list opens. 18 DX-26L100A13 Understanding the basics 10 Press ENTER. The Choose Your Picture Mode screen opens. Setup Wizard Choose your ...
... digital channels first. The screens shown in the INPUT SOURCE list, then press ENTER. • If your TV. The Choose Your TV Source screen opens. Your TV enters Standby mode and the power indicator turns red. The following menus are for explanation purposes and may see ...• Depending on your viewing area. You can press EXIT at any button to scan for your TV in this manual are grayed out. The INPUT SOURCE list opens. 18 DX-26L100A13 Understanding the basics 10 Press ENTER. The Choose Your Picture Mode screen opens. Setup Wizard Choose your ...

User Manual (English)
Page 23
... selected item. to increase or decrease the volume. • Press MUTE to scroll through the pages. Understanding the basics DX-26L100A13 19 Picture menu (TV mode) Picture Picture Mode Contrast Brightness Color Tint Sharpness Backlight Advanced Video Reset Picture Settings Move Select Audio Settings Channels USB... Audio Settings Audio Settings Channels USB Standard 50 50 50 PCM English Mono Move Select MENU Back EXIT Exit Settings menu (TV mode) Picture Parental Controls Time Closed Caption Menu Settings Computer Settings Input Label System Info Power on in Vivid Mode Reset...
... selected item. to increase or decrease the volume. • Press MUTE to scroll through the pages. Understanding the basics DX-26L100A13 19 Picture menu (TV mode) Picture Picture Mode Contrast Brightness Color Tint Sharpness Backlight Advanced Video Reset Picture Settings Move Select Audio Settings Channels USB... Audio Settings Audio Settings Channels USB Standard 50 50 50 PCM English Mono Move Select MENU Back EXIT Exit Settings menu (TV mode) Picture Parental Controls Time Closed Caption Menu Settings Computer Settings Input Label System Info Power on in Vivid Mode Reset...


