User Manual (English)
Page 2
... 3 Installing the stand or wall-mount bracket 4 Installing the stand 4 Installing a wall-mount bracket 4 TV components 4 Package contents 4 Front 5 Back and Side 5 Remote control 6 Making connections 7 What connection should I use 7 Connecting power 8 Connecting a cable or satellite box 8 Connecting an antenna or cable TV (no box 10 Connecting a DVD or Blu-ray player 11 Connecting a VCR 13 Connecting a camcorder or game console 13 Connecting a computer 14 Connecting a USB flash drive 15 Connecting headphones 15 Connecting a basic home theater system 16 Connecting a home...
... 3 Installing the stand or wall-mount bracket 4 Installing the stand 4 Installing a wall-mount bracket 4 TV components 4 Package contents 4 Front 5 Back and Side 5 Remote control 6 Making connections 7 What connection should I use 7 Connecting power 8 Connecting a cable or satellite box 8 Connecting an antenna or cable TV (no box 10 Connecting a DVD or Blu-ray player 11 Connecting a VCR 13 Connecting a camcorder or game console 13 Connecting a computer 14 Connecting a USB flash drive 15 Connecting headphones 15 Connecting a basic home theater system 16 Connecting a home...
User Manual (English)
Page 6
... the type of the polarized or grounding-type plug. Safety check After completing any service or repair to this apparatus during a lightning storm, or when it is damaged, liquid has been spilled or objects have the same characteristics as power-supply cord or plug is left unattended and unused for long periods of time. 14 Refer all instructions. 5 Do not use caution...
... the type of the polarized or grounding-type plug. Safety check After completing any service or repair to this apparatus during a lightning storm, or when it is damaged, liquid has been spilled or objects have the same characteristics as power-supply cord or plug is left unattended and unused for long periods of time. 14 Refer all instructions. 5 Do not use caution...

User Manual (English)
Page 10
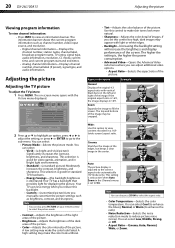
... adjust settings. You do not need to select an audio mode. For more information, see "Selecting the video input source" on -screen menu. Press again to enter channel numbers and the parental control password. Press to turn closed captioning on or off , power still flows into it. You can select Vivid, Standard, Energy Savings, or Custom. For more information, see "Turning closed captioning on or off (Standby mode). Press to restore the sound. For more information, see "Viewing program...
... adjust settings. You do not need to select an audio mode. For more information, see "Selecting the video input source" on -screen menu. Press again to enter channel numbers and the parental control password. Press to turn closed captioning on or off , power still flows into it. You can select Vivid, Standard, Energy Savings, or Custom. For more information, see "Turning closed captioning on or off (Standby mode). Press to restore the sound. For more information, see "Viewing program...
User Manual (English)
Page 12
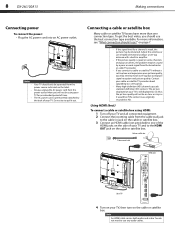
... be operated from the cable wall jack to one connection type. Notes • • • • If the signal level for a channel is weak, the picture may be using HDMI: 1 Turn off your TV is permanently attached to install a set -top antenna with a built-in amplifier. on the label. Many high-definition (HD) channels upscale standard-definition (SD) content. Connecting a cable or satellite box Many cable or satellite TV boxes have...
... be operated from the cable wall jack to one connection type. Notes • • • • If the signal level for a channel is weak, the picture may be using HDMI: 1 Turn off your TV is permanently attached to install a set -top antenna with a built-in amplifier. on the label. Many high-definition (HD) channels upscale standard-definition (SD) content. Connecting a cable or satellite box Many cable or satellite TV boxes have...

User Manual (English)
Page 16
... audio output is analog. Note When you can also press COMP to white. Composite cable Cables are often color-coded to match color-coded jacks. 3 Connect an audio cable (not provided) to the L and R (audio in ) jacks on the side of your TV and to select the composite device. 3 Turn on the DVD or Blu-ray player. 12 DX-26L100A13 Making connections Using component video (better) To connect a DVD or Blu-ray player using component video: 1 Make sure that your TV's power cord...
... audio output is analog. Note When you can also press COMP to white. Composite cable Cables are often color-coded to match color-coded jacks. 3 Connect an audio cable (not provided) to the L and R (audio in ) jacks on the side of your TV and to select the composite device. 3 Turn on the DVD or Blu-ray player. 12 DX-26L100A13 Making connections Using component video (better) To connect a DVD or Blu-ray player using component video: 1 Make sure that your TV's power cord...

User Manual (English)
Page 23
...Brightness Color Tint Sharpness Backlight Advanced Video Reset Picture Settings Move Select Audio Settings Channels USB Energy Savings 65 47 65 0 55 26 MENU Back EXIT Exit Audio menu (TV mode) Picture Sound Mode Treble Bass Balance Digital Audio/SPDIF Audio Language MTS/SAP Reset Audio Settings Audio Settings Channels USB Standard 50 50 50 PCM English Mono Move Select MENU Back EXIT Exit Settings menu (TV mode) Picture Parental Controls Time Closed Caption Menu Settings Computer Settings Input Label System Info Power on in Vivid Mode Reset Default Move Select Set various...
...Brightness Color Tint Sharpness Backlight Advanced Video Reset Picture Settings Move Select Audio Settings Channels USB Energy Savings 65 47 65 0 55 26 MENU Back EXIT Exit Audio menu (TV mode) Picture Sound Mode Treble Bass Balance Digital Audio/SPDIF Audio Language MTS/SAP Reset Audio Settings Audio Settings Channels USB Standard 50 50 50 PCM English Mono Move Select MENU Back EXIT Exit Settings menu (TV mode) Picture Parental Controls Time Closed Caption Menu Settings Computer Settings Input Label System Info Power on in Vivid Mode Reset Default Move Select Set various...
User Manual (English)
Page 24
... Auto Zoom in the Channels menu is , the higher the power consumption. • Advanced Video-Opens the Advanced Video sub-menu where you manually customize the picture settings such as channel number, video input source, and resolution. • Digital channel information-Displays the channel number, station name, channel label, broadcast program name, TV rating, signal type, audio information, resolution, CC mode, current time, and current program start and end times. • Analog channel information-Displays channel number, channel label (if preset), signal type, and audio information...
... Auto Zoom in the Channels menu is , the higher the power consumption. • Advanced Video-Opens the Advanced Video sub-menu where you manually customize the picture settings such as channel number, video input source, and resolution. • Digital channel information-Displays the channel number, station name, channel label, broadcast program name, TV rating, signal type, audio information, resolution, CC mode, current time, and current program start and end times. • Analog channel information-Displays channel number, channel label (if preset), signal type, and audio information...

User Manual (English)
Page 25
... adjusted. • Reset Picture Settings-Reset all audio settings to factory defaults. 4 Press MENU to return to the previous menu, or press EXIT to close the menu. Picture Sound Mode Treble Bass Balance Digital Audio/SPDIF Audio Language MTS/SAP Reset Audio Settings Audio Settings Channels USB Standard 50 50 50 PCM English Mono Move Select MENU Back EXIT Exit 3 Press or to highlight an option, then press or to highlight Audio, then press . Adjusting the sound DX-26L100A13 21 • Overscan-This feature extends part...
... adjusted. • Reset Picture Settings-Reset all audio settings to factory defaults. 4 Press MENU to return to the previous menu, or press EXIT to close the menu. Picture Sound Mode Treble Bass Balance Digital Audio/SPDIF Audio Language MTS/SAP Reset Audio Settings Audio Settings Channels USB Standard 50 50 50 PCM English Mono Move Select MENU Back EXIT Exit 3 Press or to highlight an option, then press or to highlight Audio, then press . Adjusting the sound DX-26L100A13 21 • Overscan-This feature extends part...

User Manual (English)
Page 28
... the digital signal strength: 1 Press MENU. To watch programs that is not already labeled, you select. 24 DX-26L100A13 Setting parental controls Viewing a favorite channel To view a favorite channel: 1 Press FAVORITE on -screen menu opens with the Picture menu displayed. The on TV. Picture Picture Mode Contrast Brightness Color Tint Sharpness Backlight Advanced Video Reset Picture Settings Move Select Audio Settings Channels USB Energy Savings 65 47 65 0 55 26 MENU Back EXIT Exit 2 Press or to adjust your children from watching inappropriate material on -screen menu...
... the digital signal strength: 1 Press MENU. To watch programs that is not already labeled, you select. 24 DX-26L100A13 Setting parental controls Viewing a favorite channel To view a favorite channel: 1 Press FAVORITE on -screen menu opens with the Picture menu displayed. The on TV. Picture Picture Mode Contrast Brightness Color Tint Sharpness Backlight Advanced Video Reset Picture Settings Move Select Audio Settings Channels USB Energy Savings 65 47 65 0 55 26 MENU Back EXIT Exit 2 Press or to adjust your children from watching inappropriate material on -screen menu...

User Manual (English)
Page 32
...Picture Parental Controls Time Closed Caption Menu Settings Computer Settings Input Label System Info Power on or off ). 6 Press MENU to return to the previous menu, or press EXIT to highlight Closed Caption, then press ENTER. CC Mode Analog Caption Digital Caption Digital CC Settings Picture Audio Settings Channels USB CC1 CS2 Move Select MENU Back Adjust Closed Captioning settings EXIT Exit 5 Press or to select On (turns closed captioning on), CC On When Mute (turns closed captioning on when the sound is muted), or Off (turns closed captioning on in Vivid Mode Reset Default...
...Picture Parental Controls Time Closed Caption Menu Settings Computer Settings Input Label System Info Power on or off ). 6 Press MENU to return to the previous menu, or press EXIT to highlight Closed Caption, then press ENTER. CC Mode Analog Caption Digital Caption Digital CC Settings Picture Audio Settings Channels USB CC1 CS2 Move Select MENU Back Adjust Closed Captioning settings EXIT Exit 5 Press or to select On (turns closed captioning on), CC On When Mute (turns closed captioning on when the sound is muted), or Off (turns closed captioning on in Vivid Mode Reset Default...
User Manual (English)
Page 38
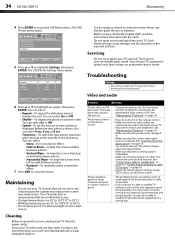
... box. See "Adjusting the TV picture" on page 20. • Make sure that the power cord is plugged in random order. Do not spray insecticide liquid near a heat source. The USB Photos Settings menu opens. 6 Press or to access the USB Photos menu. See "Selecting the video input source" on page 10. • Check the closed caption settings. Turn off your cable or satellite TV provider about upgrading to close the menu. 34 DX-26L100A13...
... box. See "Adjusting the TV picture" on page 20. • Make sure that the power cord is plugged in random order. Do not spray insecticide liquid near a heat source. The USB Photos Settings menu opens. 6 Press or to access the USB Photos menu. See "Selecting the video input source" on page 10. • Check the closed caption settings. Turn off your cable or satellite TV provider about upgrading to close the menu. 34 DX-26L100A13...
User Manual (English)
Page 40
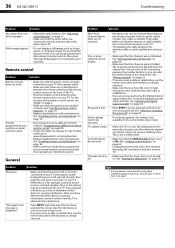
... DX-26L100A13 Troubleshooting Problem Solution No output from one device at the remote control sensor on your TV. • Try replacing the cable between the remote control and the remote control sensor on the front of common codes in "Programming a different universal remote control" on page 38. • Codes are subject to change channels. • Make sure that the power cord is connected securely to your TV. Problem Solution After Auto Channel Search, there are using these troubleshooting instructions, turn off...
... DX-26L100A13 Troubleshooting Problem Solution No output from one device at the remote control sensor on your TV. • Try replacing the cable between the remote control and the remote control sensor on the front of common codes in "Programming a different universal remote control" on page 38. • Codes are subject to change channels. • Make sure that the power cord is connected securely to your TV. Problem Solution After Auto Channel Search, there are using these troubleshooting instructions, turn off...
User Manual (English)
Page 41
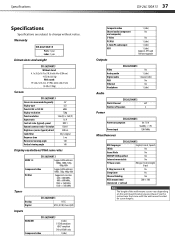
...EDID compliant HDCP compliant DVI to change without notice. Specifications DX-26L100A13 37 Specifications Specifications are subject to HDMI1 only Component video 1 (side) Composite video Shared audio (component and composite) S-Video PC/VGA 3.5mm PC audio input USB 1 (side) No No 1 (side) 1 (side) 1 (side) Supports JPEG and firmware upgrade Outputs Video Analog audio Digital audio WiFi Ethernet Headphone DX-26L100A13 No 1 (side) 1 Coaxial (side) No No 1 (side) Audio DX-26L100A13 Watts/Channel 6W Number of Speakers 2 Power DX-26L100A13 Power consumption On: 75 W Standby...
...EDID compliant HDCP compliant DVI to change without notice. Specifications DX-26L100A13 37 Specifications Specifications are subject to HDMI1 only Component video 1 (side) Composite video Shared audio (component and composite) S-Video PC/VGA 3.5mm PC audio input USB 1 (side) No No 1 (side) 1 (side) 1 (side) Supports JPEG and firmware upgrade Outputs Video Analog audio Digital audio WiFi Ethernet Headphone DX-26L100A13 No 1 (side) 1 Coaxial (side) No No 1 (side) Audio DX-26L100A13 Watts/Channel 6W Number of Speakers 2 Power DX-26L100A13 Power consumption On: 75 W Standby...

User Manual (English)
Page 42
... installation. Codes for details. See your universal remote control's instructions to enter the TV code you have problems programming your remote or need to radio or television reception, which can radiate radio frequency energy and, if not installed and used in Step 1. If you found to comply within the limits for the universal remote control or cable/satellite company of the remote/set-top box you can manually program it using the Dynex TV remote to control the...
... installation. Codes for details. See your universal remote control's instructions to enter the TV code you have problems programming your remote or need to radio or television reception, which can radiate radio frequency energy and, if not installed and used in Step 1. If you found to comply within the limits for the universal remote control or cable/satellite company of the remote/set-top box you can manually program it using the Dynex TV remote to control the...

Quick Setup Guide (English)
Page 1
...HDMI3 USB USB flash drive Note: Cable is not provided. 26" LCD T V 720p QUICK SETUP GUIDE DX-26L100A13 Remote control and two AAA batteries TV stand and six screws (M4, 16 mm) WE ARE GOING GREEN! IANNTENONUA T Connecting a Home Theater System Using Digital audio DIGITAL ANT OUTPUT CABLE IN L AUDIO R AUDIO OUT L AUDIO R L AUDIO R AV IN PR COMPONENT IN PB AUDIO IN VIDEO Y PC/DVI PC IN VGA HDMI1/DVI HDMI2 HDMI3 USB DIGITAL ANT OUTPUT CABLE IN L AUDIO R AUDIO OUT L AUDIO R L AUDIO R AV IN PR COMPONENT IN PB AUDIO IN VIDEO Y PC/DVI Installing a wall-mount bracket...
...HDMI3 USB USB flash drive Note: Cable is not provided. 26" LCD T V 720p QUICK SETUP GUIDE DX-26L100A13 Remote control and two AAA batteries TV stand and six screws (M4, 16 mm) WE ARE GOING GREEN! IANNTENONUA T Connecting a Home Theater System Using Digital audio DIGITAL ANT OUTPUT CABLE IN L AUDIO R AUDIO OUT L AUDIO R L AUDIO R AV IN PR COMPONENT IN PB AUDIO IN VIDEO Y PC/DVI PC IN VGA HDMI1/DVI HDMI2 HDMI3 USB DIGITAL ANT OUTPUT CABLE IN L AUDIO R AUDIO OUT L AUDIO R L AUDIO R AV IN PR COMPONENT IN PB AUDIO IN VIDEO Y PC/DVI Installing a wall-mount bracket...

Quick Setup Guide (English)
Page 2
... EXIT Exit Select Antenna if using your remote control 1 Press the release button on -screen menus. Select Yes or No. symbols on or off . Numbers Enters channel numbers or parent control passwords. This comprehensive guide includes everything from a digital TV signal. Need additional help? ENTER Confirms selections or changes. CCD Turns closed captioning on the batteries match the + and - Power Turns your TV. Arrows Navigates in Vivid Mode Reset Default Move Select Set various TV options Audio Settings Channels USB MENU Back EXIT Exit Aspect ratio options...
... EXIT Exit Select Antenna if using your remote control 1 Press the release button on -screen menus. Select Yes or No. symbols on or off . Numbers Enters channel numbers or parent control passwords. This comprehensive guide includes everything from a digital TV signal. Need additional help? ENTER Confirms selections or changes. CCD Turns closed captioning on the batteries match the + and - Power Turns your TV. Arrows Navigates in Vivid Mode Reset Default Move Select Set various TV options Audio Settings Channels USB MENU Back EXIT Exit Aspect ratio options...

Important Information (English)
Page 3
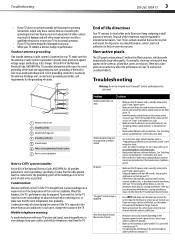
... operating and maintenance instructions in any heat sources such as power-supply cord or plug is damaged, liquid has been spilled or objects have the same characteristics as contact with a three-prong, grounding-type plug is present within your TV. 1 Read these instructions. 2 Keep these instructions. 3 Heed all warnings. 4 Follow all instructions. 5 Do not use by qualified service personnel only. When installing an outside antenna...
... operating and maintenance instructions in any heat sources such as power-supply cord or plug is damaged, liquid has been spilled or objects have the same characteristics as contact with a three-prong, grounding-type plug is present within your TV. 1 Read these instructions. 2 Keep these instructions. 3 Heed all warnings. 4 Follow all instructions. 5 Do not use by qualified service personnel only. When installing an outside antenna...
Important Information (English)
Page 4
... sound receiver, external speakers, fans, or hair dryers) may be recycled and reused. These non-active pixels do not adversely affect the performance of the remote control sensor, see "Front" in the online User Guide. Problem Solution Remote control does not work by channel depending on the screen as practical. Outdoor antenna grounding If an outside antenna or cable system is connected to your TV. • Try replacing the cable...
... sound receiver, external speakers, fans, or hair dryers) may be recycled and reused. These non-active pixels do not adversely affect the performance of the remote control sensor, see "Front" in the online User Guide. Problem Solution Remote control does not work by channel depending on the screen as practical. Outdoor antenna grounding If an outside antenna or cable system is connected to your TV. • Try replacing the cable...

Important Information (English)
Page 5
... the cord back in your online User Guide. Notes: • If the problem is not solved by pressing the number buttons or you can add the channel back to HDMI1 only Component video 1 (side) Composite video 1 (side) Shared audio (component No and composite) S-Video No PC/VGA 1 (side) 3.5mm PC audio input 1 (side) USB 1 (side) Supports JPEG and firmware upgrade Audio Video Analog audio Digital audio WiFi Ethernet Headphone DX-26L100A13 No 1 (side) 1 Coaxial (side) No No 1 (side) DX-26L100A13 Watts/Channel 6W Number of Speakers 2 Power DX-26L100A13 Power consumption...
... the cord back in your online User Guide. Notes: • If the problem is not solved by pressing the number buttons or you can add the channel back to HDMI1 only Component video 1 (side) Composite video 1 (side) Shared audio (component No and composite) S-Video No PC/VGA 1 (side) 3.5mm PC audio input 1 (side) USB 1 (side) Supports JPEG and firmware upgrade Audio Video Analog audio Digital audio WiFi Ethernet Headphone DX-26L100A13 No 1 (side) 1 Coaxial (side) No No 1 (side) DX-26L100A13 Watts/Channel 6W Number of Speakers 2 Power DX-26L100A13 Power consumption...
Information Brochure (English)
Page 1
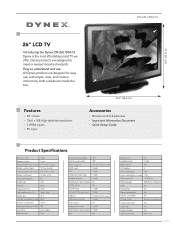
... output No Analog audio output 1 (side) Digital audio output (coaxial) 1 (side) WiFi No Ethernet port Headphone jack No 1 (side) Watts/channel 6W # of speakers 2 Power consumption 75W Power consumption-in standby Easy to meet or exceed industry standards. Features • 26'' screen • 1366 × 768 High-definition resolution • 3 HDMI inputs • PC input 26" (d6i6a.g0ocnma)l 26.2" (66.4 cm) Accessories • Remote control & batteries • Important Information Document • Quick Setup Guide Product Specifications Warranty-Parts 1 year Warranty...
... output No Analog audio output 1 (side) Digital audio output (coaxial) 1 (side) WiFi No Ethernet port Headphone jack No 1 (side) Watts/channel 6W # of speakers 2 Power consumption 75W Power consumption-in standby Easy to meet or exceed industry standards. Features • 26'' screen • 1366 × 768 High-definition resolution • 3 HDMI inputs • PC input 26" (d6i6a.g0ocnma)l 26.2" (66.4 cm) Accessories • Remote control & batteries • Important Information Document • Quick Setup Guide Product Specifications Warranty-Parts 1 year Warranty...


