Quick Setup Guide (English)
Page 1
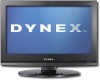
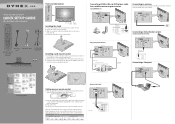
..., cushioned surface. 3 Align the screw holes on the stand with the holes on the bottom edge of the TV. 4 Secure the stand with your new Dynex TV, see the table below for common codes. Back of TV PC/DVI AUDIO IN PB PR Using component (better) Back of TV PC/DVI... TV and to work with the two screws provided. Make sure that the + and - 19"/22"LCD/DVD Combo TV QUICK SETUP GUIDE DX-19LD150A11/DX-22LD150A11 Front and side features Remote control Power sensor indicator Installing the stand 1 Remove the stand from damages and scratches. 2 Remove the two screws holding the TV to...
..., cushioned surface. 3 Align the screw holes on the stand with the holes on the bottom edge of the TV. 4 Secure the stand with your new Dynex TV, see the table below for common codes. Back of TV PC/DVI AUDIO IN PB PR Using component (better) Back of TV PC/DVI... TV and to work with the two screws provided. Make sure that the + and - 19"/22"LCD/DVD Combo TV QUICK SETUP GUIDE DX-19LD150A11/DX-22LD150A11 Front and side features Remote control Power sensor indicator Installing the stand 1 Remove the stand from damages and scratches. 2 Remove the two screws holding the TV to...
Quick Setup Guide (English)
Page 2
...your set automatically. If you are asked to select the correct input source for your remote control MENU Press to open the on-screen menu. de R.L. All rights reserved. ...1 9 " • 2 2 " LC D / D V D CO M B O T V I Q U I C K S E T U P G U I D E I DX-19LD150A11/DX-22LD150A11 ENGLISH 09-1087 09-0xxx SETTINGS menu CHANNEL menu One-year limited warranty Visit www.dynexproducts.com for you are trademarks of the video..., press CH or CH . We're here for details. to a power outlet. DYNEX is a trademark of the TV, then connect the other products and brand names are done...
...your set automatically. If you are asked to select the correct input source for your remote control MENU Press to open the on-screen menu. de R.L. All rights reserved. ...1 9 " • 2 2 " LC D / D V D CO M B O T V I Q U I C K S E T U P G U I D E I DX-19LD150A11/DX-22LD150A11 ENGLISH 09-1087 09-0xxx SETTINGS menu CHANNEL menu One-year limited warranty Visit www.dynexproducts.com for you are trademarks of the video..., press CH or CH . We're here for details. to a power outlet. DYNEX is a trademark of the TV, then connect the other products and brand names are done...
User Manual (English)
Page 2
ii Dynex DX-19LD150A11/DX22LD150A11 19" and 22" LCD TV/DVD Combos Contents CHILD SAFETY 1 Important safety instructions 2 Warnings 2 Cautions 2 Installing and removing the stand 4 Installing the stand 4 Removing the stand 4 Installing a wall-mount bracket 4 TV/DVD combo components 5 Accessories 5 Front 5 Back 5 Side 6 Remote control 6 Using the remote control 7 Installing remote control batteries 7 Aiming the remote control 7 Programming...
ii Dynex DX-19LD150A11/DX22LD150A11 19" and 22" LCD TV/DVD Combos Contents CHILD SAFETY 1 Important safety instructions 2 Warnings 2 Cautions 2 Installing and removing the stand 4 Installing the stand 4 Removing the stand 4 Installing a wall-mount bracket 4 TV/DVD combo components 5 Accessories 5 Front 5 Back 5 Side 6 Remote control 6 Using the remote control 7 Installing remote control batteries 7 Aiming the remote control 7 Programming...
User Manual (English)
Page 3
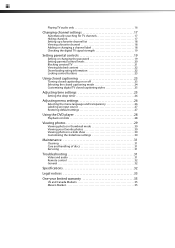
... show 30 Customizing the slideshow settings 30 Maintenance 31 Cleaning 31 Care and handling of discs 31 Servicing 31 Troubleshooting 31 Video and audio 31 Remote control 32 General 32 Specifications 32 Legal notices 33 One-year limited warranty 35 US and Canada Markets 35 Mexico Market 35
... show 30 Customizing the slideshow settings 30 Maintenance 31 Cleaning 31 Care and handling of discs 31 Servicing 31 Troubleshooting 31 Video and audio 31 Remote control 32 General 32 Specifications 32 Legal notices 33 One-year limited warranty 35 US and Canada Markets 35 Mexico Market 35
User Manual (English)
Page 6
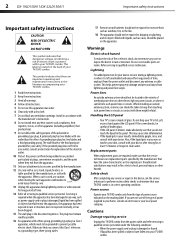
... parts When replacement parts are inside. If you are not sure of the type of power supplied to rain or moisture. 2 DX-19LD150A11/DX-22LD150A11 Important safety instructions Important safety instructions CAUTION RISK OF ELECTRIC SHOCK DO NOT OPEN This symbol indicates that dangerous voltage constituting a ...sold with your skin, consult with the apparatus. When a cart is a Class I television to a grounding-type, three-prong outlet. 17 Remote control batteries should not be exposed to excessive heat such as sunshine, fire, or the like. 18 The apparatus should not be fatal. This...
... parts When replacement parts are inside. If you are not sure of the type of power supplied to rain or moisture. 2 DX-19LD150A11/DX-22LD150A11 Important safety instructions Important safety instructions CAUTION RISK OF ELECTRIC SHOCK DO NOT OPEN This symbol indicates that dangerous voltage constituting a ...sold with your skin, consult with the apparatus. When a cart is a Class I television to a grounding-type, three-prong outlet. 17 Remote control batteries should not be exposed to excessive heat such as sunshine, fire, or the like. 18 The apparatus should not be fatal. This...
User Manual (English)
Page 9
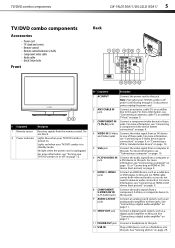
... from a computer or jack a DVI device to this jack. TV/DVD combo components DX-19LD150A11/DX-22LD150A11 5 TV/DVD combo components Accessories • Power cord • TV stand and screws • Remote control • Remote control batteries (2 AAA) • Component video cable • Audio cable • ...Quick Setup Guide Front Back PC/DVI PB PR # Component Description 1 Remote sensor Receives signals from a computer to this jack. Connect an analog sound system, such as a flashdrive, into this jack. 12 USB...
... from a computer or jack a DVI device to this jack. TV/DVD combo components DX-19LD150A11/DX-22LD150A11 5 TV/DVD combo components Accessories • Power cord • TV stand and screws • Remote control • Remote control batteries (2 AAA) • Component video cable • Audio cable • ...Quick Setup Guide Front Back PC/DVI PB PR # Component Description 1 Remote sensor Receives signals from a computer to this jack. Connect an analog sound system, such as a flashdrive, into this jack. 12 USB...
User Manual (English)
Page 10
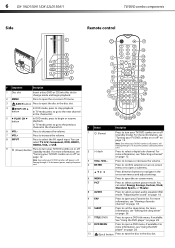
...). For more information, see "Viewing a favorite channel" on -screen TV menu. 3 EJECT button Press to eject the disc in the disc slot. 6 DX-19LD150A11/DX-22LD150A11 Side TV/DVD combo components Remote control # Component Description 1 Disc slot Insert a disc (DVD or CD) into this slot to change mode and begin or resume playback. Press...
...). For more information, see "Viewing a favorite channel" on -screen TV menu. 3 EJECT button Press to eject the disc in the disc slot. 6 DX-19LD150A11/DX-22LD150A11 Side TV/DVD combo components Remote control # Component Description 1 Disc slot Insert a disc (DVD or CD) into this slot to change mode and begin or resume playback. Press...
User Manual (English)
Page 11
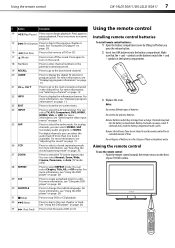
...a playback loop for an extended amount of time. Do not mix old and new batteries. Aiming the remote control To use the remote control for a disc. Using the remote control DX-19LD150A11/DX-22LD150A11 7 # Button Description 14 (Play/Pause) Press once to pause playback. Press again to begin .... See "Using the DVD player" on page 23. 27 ZOOM Press to the previous chapter or track. Using the remote control Installing remote control batteries To install remote control batteries: 1 Open the battery compartment cover by lifting it off the sound. Make sure that the + and -...
...a playback loop for an extended amount of time. Do not mix old and new batteries. Aiming the remote control To use the remote control for a disc. Using the remote control DX-19LD150A11/DX-22LD150A11 7 # Button Description 14 (Play/Pause) Press once to pause playback. Press again to begin .... See "Using the DVD player" on page 23. 27 ZOOM Press to the previous chapter or track. Using the remote control Installing remote control batteries To install remote control batteries: 1 Open the battery compartment cover by lifting it off the sound. Make sure that the + and -...
User Manual (English)
Page 12
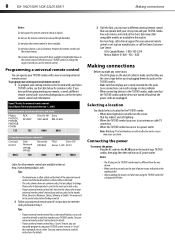
...; The AC plug on the TV/DVD combo may not work with a new or existing universal remote control. Dynex TV codes for universal remote controls (for all else fails, you must use the remote control in an area with a reflection on the chart, but are available online at: http://www... codes for other compatible models are listed on the screen may need a different remote control code, visit www.dynexproducts.com for your TV/DVD combo. 8 DX-19LD150A11/DX-22LD150A11 Making connections Notes: Do not expose the remote control to enter the code you found in Step 1. You may cause eye ...
...; The AC plug on the TV/DVD combo may not work with a new or existing universal remote control. Dynex TV codes for universal remote controls (for all else fails, you must use the remote control in an area with a reflection on the chart, but are available online at: http://www... codes for other compatible models are listed on the screen may need a different remote control code, visit www.dynexproducts.com for your TV/DVD combo. 8 DX-19LD150A11/DX-22LD150A11 Making connections Notes: Do not expose the remote control to enter the code you found in Step 1. You may cause eye ...

User Manual (English)
Page 14
... Back of your TV/DVD combo to display the input source menu. 4 Press INPUT repeatedly or press or to select TV, then press ENTER. 10 DX-19LD150A11/DX-22LD150A11 Making connections To connect an antenna, cable TV, or satellite TV box: 1 Connect one end of a 75-Ohm, coaxial cable to the ANT/CABLE... to the VGA jack on the computer, then connect the other end of the cable to the VIDEO IN (AV and L/R audio) jacks on the remote control or the side of your TV/DVD combo Notes: Use a 75 ohm cable to the VGA jack on the back of TV To connect...
... Back of your TV/DVD combo to display the input source menu. 4 Press INPUT repeatedly or press or to select TV, then press ENTER. 10 DX-19LD150A11/DX-22LD150A11 Making connections To connect an antenna, cable TV, or satellite TV box: 1 Connect one end of a 75-Ohm, coaxial cable to the ANT/CABLE... to the VGA jack on the computer, then connect the other end of the cable to the VIDEO IN (AV and L/R audio) jacks on the remote control or the side of your TV/DVD combo Notes: Use a 75 ohm cable to the VGA jack on the back of TV To connect...
User Manual (English)
Page 15
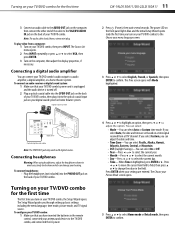
.../DVD combo, the Setup Wizard opens. Digital sound system 2 Press (Power), then wait several seconds. Turning on your TV/DVD combo for the first time DX-19LD150A11/DX-22LD150A11 11 3 Connect an audio cable to the AUDIO OUT jack on the computer, then connect the other end of the cable to the VGA..., picture mode, and TV signal source. Press or to move the cursor from field to field, then press or to change the value in the remote control, connected your Picture Mode screen opens. 5 Press or to select Home mode or Retail mode, then press ENTER to confirm. Note: The audio cable...
.../DVD combo, the Setup Wizard opens. Digital sound system 2 Press (Power), then wait several seconds. Turning on your TV/DVD combo for the first time DX-19LD150A11/DX-22LD150A11 11 3 Connect an audio cable to the AUDIO OUT jack on the computer, then connect the other end of the cable to the VGA..., picture mode, and TV signal source. Press or to move the cursor from field to field, then press or to change the value in the remote control, connected your Picture Mode screen opens. 5 Press or to select Home mode or Retail mode, then press ENTER to confirm. Note: The audio cable...
User Manual (English)
Page 16
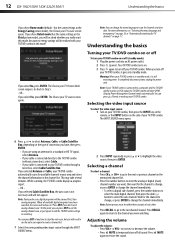
...mode. Selecting the video input source To select the video input source: 1 Turn on your TV/DVD combo, then press the INPUT key on the remote, or the INPUT button on the memorized channel list. • Press the number buttons to a computer and the TV/DVD combo receives no energy ...channel scan, or just ignore it and the TV/DVD combo will not appear. Press RECALL again to return to the last channel viewed. 12 DX-19LD150A11/DX-22LD150A11 Understanding the basics If you selected Antenna or Cable, your TV/DVD combo automatically scans for available channels in your area and stores the...
...mode. Selecting the video input source To select the video input source: 1 Turn on your TV/DVD combo, then press the INPUT key on the remote, or the INPUT button on the memorized channel list. • Press the number buttons to a computer and the TV/DVD combo receives no energy ...channel scan, or just ignore it and the TV/DVD combo will not appear. Press RECALL again to return to the last channel viewed. 12 DX-19LD150A11/DX-22LD150A11 Understanding the basics If you selected Antenna or Cable, your TV/DVD combo automatically scans for available channels in your area and stores the...
User Manual (English)
Page 18
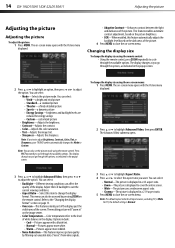
...Ratio. 4 Press or to adjust the option. This menu can also set the picture mode using the on -screen menu. 14 DX-19LD150A11/DX-22LD150A11 Adjusting the picture Adjusting the picture Adjusting the picture To adjust the picture: 1 Press MENU. The display changes as indicated in... adjust Brightness, Contrast, Color, Tint, or Sharpness, your TV/DVD combo automatically changes the Mode to change the display size using the remote control. To change the display format. Note: The default aspect ratio for energy savings • Custom-customized picture • Brightness-Adjusts the...
...Ratio. 4 Press or to adjust the option. This menu can also set the picture mode using the on -screen menu. 14 DX-19LD150A11/DX-22LD150A11 Adjusting the picture Adjusting the picture Adjusting the picture To adjust the picture: 1 Press MENU. The display changes as indicated in... adjust Brightness, Contrast, Color, Tint, or Sharpness, your TV/DVD combo automatically changes the Mode to change the display size using the remote control. To change the display format. Note: The default aspect ratio for energy savings • Custom-customized picture • Brightness-Adjusts the...

User Manual (English)
Page 19
... digital TV mode, select the preferred audio track language (when available). To choose an audio language with the Picture menu displayed. Adjusting the sound DX-19LD150A11/DX-22LD150A11 15 Adjusting the computer image To adjust the computer image: 1 Make sure that your TV/DVD combo is 1360×768. The Settings ... 1024x768 Frequency (Hz) 60 70 60 72 60 WXGA 1280x768 60 1360x768 60 If "Unsupported Signal" appears on -screen menu opens with the remote control: • Using the remote control, press SAP repeatedly to highlight VGA Settings, then press ENTER or .
... digital TV mode, select the preferred audio track language (when available). To choose an audio language with the Picture menu displayed. Adjusting the sound DX-19LD150A11/DX-22LD150A11 15 Adjusting the computer image To adjust the computer image: 1 Make sure that your TV/DVD combo is 1360×768. The Settings ... 1024x768 Frequency (Hz) 60 70 60 72 60 WXGA 1280x768 60 1360x768 60 If "Unsupported Signal" appears on -screen menu opens with the remote control: • Using the remote control, press SAP repeatedly to highlight VGA Settings, then press ENTER or .
User Manual (English)
Page 20
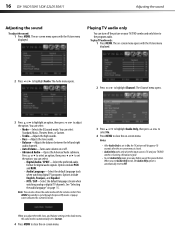
... between the left and right audio channels. • Auto Volume-Turns auto volume on or off the picture on -screen menu opens with the remote control. 16 DX-19LD150A11/DX-22LD150A11 Adjusting the sound Adjusting the sound To adjust the sound: 1 Press MENU. When you can select: • Mode-Selects the EQ sound mode...
... between the left and right audio channels. • Auto Volume-Turns auto volume on or off the picture on -screen menu opens with the remote control. 16 DX-19LD150A11/DX-22LD150A11 Adjusting the sound Adjusting the sound To adjust the sound: 1 Press MENU. When you can select: • Mode-Selects the EQ sound mode...
User Manual (English)
Page 27
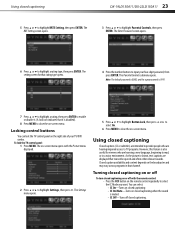
To lock the TV control panel: 1 Press MENU. The on-screen menu opens with the remote control: • Press the CCD button on the remote control repeatedly to highlight Settings, then press . Closed caption availability and content depends on -screen menu. Using closed captioning Closed ...muted. • CC Off-Turns off with the Picture menu displayed. 2 Press or to select the CC Mode you want. Using closed captioning DX-19LD150A11/DX-22LD150A11 23 5 Press or to highlight a rating type, then press ENTER. Locking control buttons You can select: • CC On-Turns on ...
To lock the TV control panel: 1 Press MENU. The on-screen menu opens with the remote control: • Press the CCD button on the remote control repeatedly to highlight Settings, then press . Closed caption availability and content depends on -screen menu. Using closed captioning Closed ...muted. • CC Off-Turns off with the Picture menu displayed. 2 Press or to select the CC Mode you want. Using closed captioning DX-19LD150A11/DX-22LD150A11 23 5 Press or to highlight a rating type, then press ENTER. Locking control buttons You can select: • CC On-Turns on ...

User Manual (English)
Page 30
...press ENTER. The on -screen menu. The Date/Time submenu opens. 3 Press or to highlight Settings, then press . To set the sleep timer with the remote control: • Press the SLEEP button until the setting you want . Note: To turn off . Adjusting menu settings Selecting the menu language and transparency To...Sleep Timer submenu to specify the length of each field. 10 Press MENU to highlight Date/Time, then press ENTER. The Settings menu opens. 26 DX-19LD150A11/DX-22LD150A11 Adjusting menu settings 4 Press or to close the on -screen menu opens with the Picture menu displayed.
...press ENTER. The on -screen menu. The Date/Time submenu opens. 3 Press or to highlight Settings, then press . To set the sleep timer with the remote control: • Press the SLEEP button until the setting you want . Note: To turn off . Adjusting menu settings Selecting the menu language and transparency To...Sleep Timer submenu to specify the length of each field. 10 Press MENU to highlight Date/Time, then press ENTER. The Settings menu opens. 26 DX-19LD150A11/DX-22LD150A11 Adjusting menu settings 4 Press or to close the on -screen menu opens with the Picture menu displayed.
User Manual (English)
Page 33
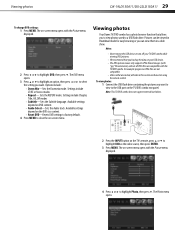
...Downmix mode. Settings include LT/RT or Stereo modes • Repeat- Available settings depend on using the remote control. Pictures can view them in a slide show. Viewing photos Your Dynex TV/DVD combo has a photo browser function that you back up the data on your TV/DVD ... opens. 3 Press or to highlight an option, then press or to a USB flash drive. Available settings depend on -screen menu. Viewing photos DX-19LD150A11/DX-22LD150A11 29 To change DVD settings: 1 Press MENU. The Photo menu opens. Note: This TV/DVD combo does not support external hard drives. ...
...Downmix mode. Settings include LT/RT or Stereo modes • Repeat- Available settings depend on using the remote control. Pictures can view them in a slide show. Viewing photos Your Dynex TV/DVD combo has a photo browser function that you back up the data on your TV/DVD ... opens. 3 Press or to highlight an option, then press or to a USB flash drive. Available settings depend on -screen menu. Viewing photos DX-19LD150A11/DX-22LD150A11 29 To change DVD settings: 1 Press MENU. The Photo menu opens. Note: This TV/DVD combo does not support external hard drives. ...
User Manual (English)
Page 35
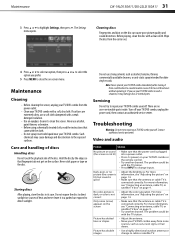
...get on page 14. • Make sure that the antenna or cable TV is connected correctly. Do not use your TV/DVD combo or the remote control. • Try another channel. The problem could be with a weak detergent solution. • Use an eyeglass cleaner to repair your TV... 4 Press or to select an option, then press or to direct sunlight. If you prefer. 5 Press MENU to the exposed surfaces. Maintenance DX-19LD150A11/DX-22LD150A11 31 3 Press or to repair your TV/DVD combo immediately after moving it in its case. Cleaning discs Fingerprints and dust on -screen menu...
...get on page 14. • Make sure that the antenna or cable TV is connected correctly. Do not use your TV/DVD combo or the remote control. • Try another channel. The problem could be with a weak detergent solution. • Use an eyeglass cleaner to repair your TV... 4 Press or to select an option, then press or to direct sunlight. If you prefer. 5 Press MENU to the exposed surfaces. Maintenance DX-19LD150A11/DX-22LD150A11 31 3 Press or to repair your TV/DVD combo immediately after moving it in its case. Cleaning discs Fingerprints and dust on -screen menu...
User Manual (English)
Page 36
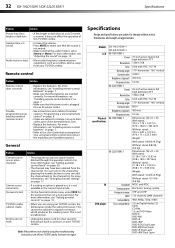
... and contact the manufacturer if problems persist. For more information, see "Installing remote control batteries" on page 7. • Make sure that accompanied your TV/DVD combo, the temperature inside the cabinet increases. 32 DX-19LD150A11/DX-22LD150A11 Specifications Problem Solution Picture has a few bright or dark dots Good picture, no sound Audio noise or...
... and contact the manufacturer if problems persist. For more information, see "Installing remote control batteries" on page 7. • Make sure that accompanied your TV/DVD combo, the temperature inside the cabinet increases. 32 DX-19LD150A11/DX-22LD150A11 Specifications Problem Solution Picture has a few bright or dark dots Good picture, no sound Audio noise or...


