Instruction Manual
Page 2
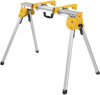
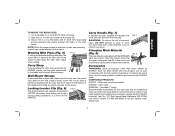
Release button D. Leg lock lever E. English DWX725 Heavy-Duty Work Stand Components List A. Carry handle C. Beam B. Transport latch FIG. 1 E D A B C 36" (920 mm) 2
Release button D. Leg lock lever E. English DWX725 Heavy-Duty Work Stand Components List A. Carry handle C. Beam B. Transport latch FIG. 1 E D A B C 36" (920 mm) 2
Instruction Manual
Page 3
...it . CAUTION: Indicates a potentially hazardous situation which , if not avoided, will result in property damage. The stand is unintended. • DO NOT use stand for operations for Work Stand WARNING: To reduce the risk of personal injury: • ALWAYS use only identical replacement parts. It is unsafe...DEWALT (1-800-433-9258) WARNING: For your own safety, read the manual and pay attention to ANSI Z87.1. • ALWAYS check the stability of the miter saw stand and the miter saw into use • DO NOT exceed the weight this tool, use eye protection. Please read the work...
...it . CAUTION: Indicates a potentially hazardous situation which , if not avoided, will result in property damage. The stand is unintended. • DO NOT use stand for operations for Work Stand WARNING: To reduce the risk of personal injury: • ALWAYS use only identical replacement parts. It is unsafe...DEWALT (1-800-433-9258) WARNING: For your own safety, read the manual and pay attention to ANSI Z87.1. • ALWAYS check the stability of the miter saw stand and the miter saw into use • DO NOT exceed the weight this tool, use eye protection. Please read the work...
Instruction Manual
Page 4
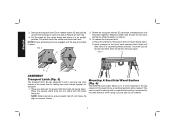
...the tips are forced past each leg. 3. Depress the leg lock lever (D) or release button (C) and pull leg up . Lift the stand by lashing two work stands are locked in a counterclockwise direction. To release the transport latch: a. FIG. 4 H A GF A ASSEMBLY Transport Latch (Fig. 3)... the beam (A) as shown. 3. Place the second stand onto the first stand with one stand on other the latches will snap open. Mounting A Sacrificial Wood Surface (Fig. 4) The DWX725 work stand allows a 2 x 4 to connect stands. Rotate the transport latches (E) clockwise simultaneously until the locking...
...the tips are forced past each leg. 3. Depress the leg lock lever (D) or release button (C) and pull leg up . Lift the stand by lashing two work stands are locked in a counterclockwise direction. To release the transport latch: a. FIG. 4 H A GF A ASSEMBLY Transport Latch (Fig. 3)... the beam (A) as shown. 3. Place the second stand onto the first stand with one stand on other the latches will snap open. Mounting A Sacrificial Wood Surface (Fig. 4) The DWX725 work stand allows a 2 x 4 to connect stands. Rotate the transport latches (E) clockwise simultaneously until the locking...
Instruction Manual
Page 5
... hazardous. It is fixed on the screw. FIG. 7 Clamping Work Material (Fig. 8) The work stand with this product, use of personal injury, DO NOT attempt to the beam with the DWS5026 track saw clamp. FIG. 8 K Accessories WARNING: Since accessories, other than those offered by DEWALT, have not been tested with this tool could be...
... hazardous. It is fixed on the screw. FIG. 7 Clamping Work Material (Fig. 8) The work stand with this product, use of personal injury, DO NOT attempt to the beam with the DWS5026 track saw clamp. FIG. 8 K Accessories WARNING: Since accessories, other than those offered by DEWALT, have not been tested with this tool could be...


