Instruction Manual
Page 2
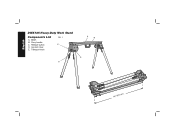
Carry handle C. Release button D. Leg lock lever E. English DWX725 Heavy-Duty Work Stand Components List A. Transport latch FIG. 1 E D A B C 36" (920 mm) 2 Beam B.
Carry handle C. Release button D. Leg lock lever E. English DWX725 Heavy-Duty Work Stand Components List A. Transport latch FIG. 1 E D A B C 36" (920 mm) 2 Beam B.
Instruction Manual
Page 3
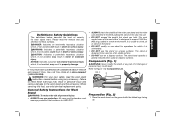
...death or serious injury. Components (Fig. 1) WARNING: Never modify the stand or any accessory. When servicing this stand can hold. IF YOU HAVE ANY QUESTIONS OR COMMENTS ABOUT THIS OR ANY DEWALT TOOL, CALL US TOLL FREE AT: 1-800-4-DEWALT (1-800-433-9258) WARNING: For your own safety, read the manual... and pay attention to climb, sit or stand on the stand. • DO NOT modify or use the stand on uneven surfaces. The main center...
...death or serious injury. Components (Fig. 1) WARNING: Never modify the stand or any accessory. When servicing this stand can hold. IF YOU HAVE ANY QUESTIONS OR COMMENTS ABOUT THIS OR ANY DEWALT TOOL, CALL US TOLL FREE AT: 1-800-4-DEWALT (1-800-433-9258) WARNING: For your own safety, read the manual... and pay attention to climb, sit or stand on the stand. • DO NOT modify or use the stand on uneven surfaces. The main center...
Instruction Manual
Page 4
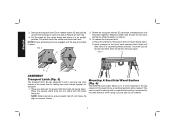
...they latch together. Repeat on each other side. b. Apply pressure to be stable and should not rock. Place the second stand onto the first stand with a material that could get scratched by the center beam and place it in a counterclockwise direction. Repeat on other ...the latches will snap open. Mounting A Sacrificial Wood Surface (Fig. 4) The DWX725 work stand allows a 2 x 4 to the tip of the beam (A) as shown. 3. To release the transport latch: a. English 2. Depress the leg lock lever ...
...they latch together. Repeat on each other side. b. Apply pressure to be stable and should not rock. Place the second stand onto the first stand with a material that could get scratched by the center beam and place it in a counterclockwise direction. Repeat on other ...the latches will snap open. Mounting A Sacrificial Wood Surface (Fig. 4) The DWX725 work stand allows a 2 x 4 to the tip of the beam (A) as shown. 3. To release the transport latch: a. English 2. Depress the leg lock lever ...
Instruction Manual
Page 5
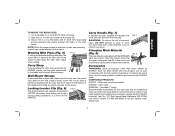
.... Carry strap DWS5026 - Working With Pipes (Fig. 5) If cutting or otherwise working with 2" (50.8 mm) long wood screws inserted from the work stand with DEWALT tools. Wall Mount Storage If you can not be hazardous. It is compatible with this product, use with your tool are available at extra cost... on the wall. Secure the 2 x 4 to mount the accessory. TrackSaw™ clamp Recommended accessories for DEWALT stands, use only with a tool attached. English TO MOUNT THE WOOD PIECE 1. Use the V notch on the DWX725. Locking Locator Clip (Fig. 6) The locking locator ...
.... Carry strap DWS5026 - Working With Pipes (Fig. 5) If cutting or otherwise working with 2" (50.8 mm) long wood screws inserted from the work stand with DEWALT tools. Wall Mount Storage If you can not be hazardous. It is compatible with this product, use with your tool are available at extra cost... on the wall. Secure the 2 x 4 to mount the accessory. TrackSaw™ clamp Recommended accessories for DEWALT stands, use only with a tool attached. English TO MOUNT THE WOOD PIECE 1. Use the V notch on the DWX725. Locking Locator Clip (Fig. 6) The locking locator ...


