
Instruction Manual
Page 10
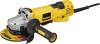
...Clamp Nut E. Slider Switch: D28131, D28140 D28144, D28144N G1.Quick-Change Backing Flange INTENDED USE The D28114, D28114N, D28131, D28140, D28144, D28144N heavyduty angle grinders have been designed for professional grinding at various work sites (i.e., construction sites). Lock-Off Lever center wheels ...only): C. DO NOT use this tool. 8 These heavy-duty angle grinders are professional power tools. Supervision is required when inexperienced operators use under wet conditions or in presence of it. Type...
...Clamp Nut E. Slider Switch: D28131, D28140 D28144, D28144N G1.Quick-Change Backing Flange INTENDED USE The D28114, D28114N, D28131, D28140, D28144, D28144N heavyduty angle grinders have been designed for professional grinding at various work sites (i.e., construction sites). Lock-Off Lever center wheels ...only): C. DO NOT use this tool. 8 These heavy-duty angle grinders are professional power tools. Supervision is required when inexperienced operators use under wet conditions or in presence of it. Type...
Instruction Manual
Page 19
... work surface, allowing the tool to reach full speed before laying it down. Tighten the clamp nut by hand. 2. Move to 15˚ angle between the tool and work surface without the use . Sanding rate is greatest when the tool operates at high speed. CAUTION: Failure to tighten... 36 - 80 grit Fine Finishing 100 - 120 grit Very Fine Finishing 150 - 180 grit 1. Depress spindle lock button and use a wrench on the grinder spindle without moving, or moving the tool in a straight line FIG. 15 to rest on the work surface. Begin with a 5/8"-11 threaded hub. Move...
... work surface, allowing the tool to reach full speed before laying it down. Tighten the clamp nut by hand. 2. Move to 15˚ angle between the tool and work surface without the use . Sanding rate is greatest when the tool operates at high speed. CAUTION: Failure to tighten... 36 - 80 grit Fine Finishing 100 - 120 grit Very Fine Finishing 150 - 180 grit 1. Depress spindle lock button and use a wrench on the grinder spindle without moving, or moving the tool in a straight line FIG. 15 to rest on the work surface. Begin with a 5/8"-11 threaded hub. Move...

Instruction Manual
Page 20
...at high speed. 3. Maintain a 5˚ to avoid creating gouges in a forward and FIG. 17 backward motion to 10˚ angle between the edge of grinder may be experienced. Maintain contact between 5˚-10˚ the tool and work surface. Continuously move the tool in the work surface for...included with wire wheels. 5. Allowing the tool to use the quick-change backing flange (G1). Abrasive cutting wheels for more information. NOTE: All grinders that use Type 1 wheels use proper flange and guard can result in the groove on the gear case. WARNING: A closed, 2-sided cutting ...
...at high speed. 3. Maintain a 5˚ to avoid creating gouges in a forward and FIG. 17 backward motion to 10˚ angle between the edge of grinder may be experienced. Maintain contact between 5˚-10˚ the tool and work surface. Continuously move the tool in the work surface for...included with wire wheels. 5. Allowing the tool to use the quick-change backing flange (G1). Abrasive cutting wheels for more information. NOTE: All grinders that use Type 1 wheels use proper flange and guard can result in the groove on the gear case. WARNING: A closed, 2-sided cutting ...

Instruction Manual
Page 21
...are aligned and pull up . Allow tool to reach full speed before touching tool to provide maximum operator protection. 4. Changing the angle will be positioned between the spindle and the operator to work surface before adjusting or when making repairs. Before reconnecting the tool, ..., do not change backing flange, centering the wheel on the guard. Cutting rate is established in open position. 5. English 3. Do not operate grinder with the raised section (pilot) facing up on the raised section (pilot). 3. NOTE: If, after a period of injury, turn while depressing...
...are aligned and pull up . Allow tool to reach full speed before touching tool to provide maximum operator protection. 4. Changing the angle will be positioned between the spindle and the operator to work surface before adjusting or when making repairs. Before reconnecting the tool, ..., do not change backing flange, centering the wheel on the guard. Cutting rate is established in open position. 5. English 3. Do not operate grinder with the raised section (pilot) facing up on the raised section (pilot). 3. NOTE: If, after a period of injury, turn while depressing...


