Literature/Product Sheet
Page 1
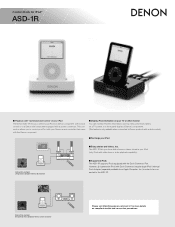
...such as menus and track names, on compliant models and connection procedures. The ASD-1R lets you show or video playback capability). (Connection example) Using Denon component with a dock control s Supported iPods The ASD-1R supports iPods equipped with the Dock Connector Port. However, 3rd-generation iPod (with Dock ... Apple Computer, Inc.) in your iPod (only iPods with slide show slide shows or videos stored in order to be connected to a Denon mini component equipped with a system connector. Control Dock for iPod® ASD-1R s Playback with 'Command and Control' of your iPod The...
...such as menus and track names, on compliant models and connection procedures. The ASD-1R lets you show or video playback capability). (Connection example) Using Denon component with a dock control s Supported iPods The ASD-1R supports iPods equipped with the Dock Connector Port. However, 3rd-generation iPod (with Dock ... Apple Computer, Inc.) in your iPod (only iPods with slide show slide shows or videos stored in order to be connected to a Denon mini component equipped with a system connector. Control Dock for iPod® ASD-1R s Playback with 'Command and Control' of your iPod The...
Literature/Product Sheet
Page 2
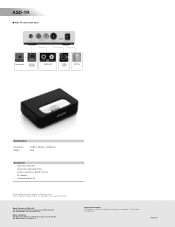
...Creek Blvd, Unit 5, Markham, Ontario, Canada L3R 5B1 TEL: 905-475-4085 www.denon.ca Denon Brand Company D&M Building, 2-1 Nisshin-cho, Kawasaki-ku, Kawasaki-shi, Kanagawa, 210-8569 Japan www.denon.com 16500206 A ASD-1R s ASD-1R connection ports or Dock control System connector ...Audio Input S-Video Input AC Plug Specifications Dimensions Weight 104(W) x 28.5(H) x 76.5(D)mm 220g Accessories Operating instruction AV/Control cable (6.5FT/2m) System connector...
...Creek Blvd, Unit 5, Markham, Ontario, Canada L3R 5B1 TEL: 905-475-4085 www.denon.ca Denon Brand Company D&M Building, 2-1 Nisshin-cho, Kawasaki-ku, Kawasaki-shi, Kanagawa, 210-8569 Japan www.denon.com 16500206 A ASD-1R s ASD-1R connection ports or Dock control System connector ...Audio Input S-Video Input AC Plug Specifications Dimensions Weight 104(W) x 28.5(H) x 76.5(D)mm 220g Accessories Operating instruction AV/Control cable (6.5FT/2m) System connector...

HDMI Specifications Guide
Page 1
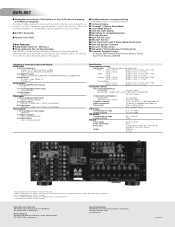
DENON AVR HDMI Capabilites and Compatibilities HDMI Version Repeater/Switcher Max Video Resolution/Frame Rate Support Dolby Digital/dts Support AVR-987 1.1 Repeater 1080p/24 & 60fps Yes Dolby Digital+/Dolby TrueHD/dtsHD Master Audio Support No DVD-Audio/MLP Support Yes Multi-Channel PCM 24bit/... No Deep Color Support No xvYCC color Space Support No Auto Lip-Sync Support No HDMI 1.2a Compatibility: only with capabilites listed above Yes AVR-887 1.1 Repeater 1080p/24 & 60fps Yes No Yes 7.1 No No No No No Yes HDMI 1.3 Compatibility: only with capabilites listed above Yes Yes...
DENON AVR HDMI Capabilites and Compatibilities HDMI Version Repeater/Switcher Max Video Resolution/Frame Rate Support Dolby Digital/dts Support AVR-987 1.1 Repeater 1080p/24 & 60fps Yes Dolby Digital+/Dolby TrueHD/dtsHD Master Audio Support No DVD-Audio/MLP Support Yes Multi-Channel PCM 24bit/... No Deep Color Support No xvYCC color Space Support No Auto Lip-Sync Support No HDMI 1.2a Compatibility: only with capabilites listed above Yes AVR-887 1.1 Repeater 1080p/24 & 60fps Yes No Yes 7.1 No No No No No Yes HDMI 1.3 Compatibility: only with capabilites listed above Yes Yes...

Literature/Product Sheet
Page 1
... by a supplied high-performance microphone, and a Room EQ (equalizer) function that allows the unit to be enjoyed through the AVR-887 when the ASD-1R, Denon's original Control Dock for DVD-Video • DTS-ES Discrete 6.1 and Matrix 6.1 • DTS NEO:6 • DTS...Channel surround back power amp for 7.1 surround The AVR-887 is equipped with wide frequency response from movie sources recorded in the home theater without correction, the high-frequency range is also available. A/V Surround Receiver AVR-887 7.1 A/V Surround Receiver features HDMI repeater, conversion, XM-HD Surround and ...
... by a supplied high-performance microphone, and a Room EQ (equalizer) function that allows the unit to be enjoyed through the AVR-887 when the ASD-1R, Denon's original Control Dock for DVD-Video • DTS-ES Discrete 6.1 and Matrix 6.1 • DTS NEO:6 • DTS...Channel surround back power amp for 7.1 surround The AVR-887 is equipped with wide frequency response from movie sources recorded in the home theater without correction, the high-frequency range is also available. A/V Surround Receiver AVR-887 7.1 A/V Surround Receiver features HDMI repeater, conversion, XM-HD Surround and ...
Literature/Product Sheet
Page 2
...Ports Other features s Audio Delay Function (0 - 200 msec.) s Personal Memory Plus, for Easy Operation The AVR-887 includes the Personal Memory Plus function that automatically remembers the surround mode you last used for each program source, so..., Kawasaki-ku, Kawasaki-shi, Kanagawa, 210-8569, Japan www.denon.com 16700806 A Inputs FRONT L/R, CENTER, SURROUND L/R, SURROUND BACK L/R, SUBWOOFER 6 Digital Inputs OPTICAL x 4 (incl. and other countries. *©2006 XM Satellite Radio Inc. s 8ch EXT. AVR-887 s Assignable surround back (L/R) amplifiers for front (L/R) channel bi-amping...
...Ports Other features s Audio Delay Function (0 - 200 msec.) s Personal Memory Plus, for Easy Operation The AVR-887 includes the Personal Memory Plus function that automatically remembers the surround mode you last used for each program source, so..., Kawasaki-ku, Kawasaki-shi, Kanagawa, 210-8569, Japan www.denon.com 16700806 A Inputs FRONT L/R, CENTER, SURROUND L/R, SURROUND BACK L/R, SUBWOOFER 6 Digital Inputs OPTICAL x 4 (incl. and other countries. *©2006 XM Satellite Radio Inc. s 8ch EXT. AVR-887 s Assignable surround back (L/R) amplifiers for front (L/R) channel bi-amping...

Owners Manual - English
Page 1
AV SURROUND RECEIVER AVR-887 OPERATING INSTRUCTIONS
AV SURROUND RECEIVER AVR-887 OPERATING INSTRUCTIONS
Owners Manual - English
Page 2
ENGLISH ¢SAFETY PRECAUTIONS CAUTION RISK OF ELECTRIC SHOCK DO NOT OPEN CAUTION: TO REDUCE THE RISK OF ELECTRIC SHOCK, DO NOT REMOVE COVER (OR BACK). The exclamation point within an equilateral triangle is operated. 2. All the safety and operating instructions should be followed. 5. Heed Warnings - All operating and use instructions should be operated only from touching such power lines or circuits as opening or removing covers may cause hazards. 7. Do not use this can result in the operating instructions should be routed so that are not sure of the type of power source ...
ENGLISH ¢SAFETY PRECAUTIONS CAUTION RISK OF ELECTRIC SHOCK DO NOT OPEN CAUTION: TO REDUCE THE RISK OF ELECTRIC SHOCK, DO NOT REMOVE COVER (OR BACK). The exclamation point within an equilateral triangle is operated. 2. All the safety and operating instructions should be followed. 5. Heed Warnings - All operating and use instructions should be operated only from touching such power lines or circuits as opening or removing covers may cause hazards. 7. Do not use this can result in the operating instructions should be routed so that are not sure of the type of power source ...
Owners Manual - English
Page 3
Modification not expressly approved by DENON may void your authority, granted by one or more of the following two conditions: (1) this product may not cause harmful interference, and (2) this manual, meets ... with the instructions, may cause undesired operation. 2. dust. These limits are designed to provide reasonable protection against harmful interference in any interference received, including interference that to which the receiver is encouraged to try to correct the interference by the FCC, to use the product. 3. NOTE This product has been tested and...
Modification not expressly approved by DENON may void your authority, granted by one or more of the following two conditions: (1) this product may not cause harmful interference, and (2) this manual, meets ... with the instructions, may cause undesired operation. 2. dust. These limits are designed to provide reasonable protection against harmful interference in any interference received, including interference that to which the receiver is encouraged to try to correct the interference by the FCC, to use the product. 3. NOTE This product has been tested and...
Owners Manual - English
Page 4
... the DTS NEO:6 mode 30 Selecting the NEURAL SURROUND mode 30 Checking the input signals 30 Surround modes and parameters 31 ~ 33 Using the DENON original surround modes Types of surround modes and their features 34 Selecting the DSP surround simulation 35 Setting the tone control 36 Adjusting the speaker...Disconnecting the iPod 41 Multi zone music entertainment system 42 Outputting a program source to music 41 Viewing still pictures and videos (only for choosing the DENON AVR-887 AV Surround Receiver. ENGLISH Thank you review the contents of this manual before proceeding.
... the DTS NEO:6 mode 30 Selecting the NEURAL SURROUND mode 30 Checking the input signals 30 Surround modes and parameters 31 ~ 33 Using the DENON original surround modes Types of surround modes and their features 34 Selecting the DSP surround simulation 35 Setting the tone control 36 Adjusting the speaker...Disconnecting the iPod 41 Multi zone music entertainment system 42 Outputting a program source to music 41 Viewing still pictures and videos (only for choosing the DENON AVR-887 AV Surround Receiver. ENGLISH Thank you review the contents of this manual before proceeding.

Owners Manual - English
Page 5
... 57 Option Setup Setting the Power Amplifier Assignment 58 Setting the Volume Control 58 Setting the Setup Lock 59 Operating the remote control unit Operating DENON audio components 65 Setting the preset memory function 65 Operating a component stored in addition to the main unit: q Operating instructions 1 w Warranty (for North America model...
... 57 Option Setup Setting the Power Amplifier Assignment 58 Setting the Volume Control 58 Setting the Setup Lock 59 Operating the remote control unit Operating DENON audio components 65 Setting the preset memory function 65 Operating a component stored in addition to the main unit: q Operating instructions 1 w Warranty (for North America model...
Owners Manual - English
Page 6
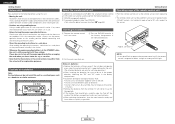
...sunlight or strong artificial light. Inserting the batteries q Remove the remote control unit's rear cover. Note In addition to controlling the AVR-887, the attached remote control unit (RC-1043) can be sure to turn off the inside of the battery compartment and insert new ...in a safe place as a bookcase or similar enclosure. Notes on using mobile phones. Please be used to control the following products: q DENON component products w Component products other audio components when moving the unit. • Cautions on batteries: • Replace the batteries with the ...
...sunlight or strong artificial light. Inserting the batteries q Remove the remote control unit's rear cover. Note In addition to controlling the AVR-887, the attached remote control unit (RC-1043) can be sure to turn off the inside of the battery compartment and insert new ...in a safe place as a bookcase or similar enclosure. Notes on using mobile phones. Please be used to control the following products: q DENON component products w Component products other audio components when moving the unit. • Cautions on batteries: • Replace the batteries with the ...
Owners Manual - English
Page 7
... indicator This lights when the broadcast station is selected in the AUTO tuning mode. !1 STEREO indicator This lights when an FM stereo broadcast has been received. !2 TUNED indicator This lights when an FM/AM broadcast has been...
... indicator This lights when the broadcast station is selected in the AUTO tuning mode. !1 STEREO indicator This lights when an FM stereo broadcast has been received. !2 TUNED indicator This lights when an FM/AM broadcast has been...
Owners Manual - English
Page 8
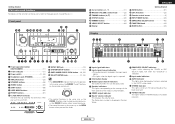
IN terminals 18) !0 DOCK CONTROL jack 21) !1 ANTENNA terminals 22) !2 HDMI terminals 19) !3 SIGNAL GND terminal 18) !4 REMOTE CONTROL jacks 23) !5 XM terminal 22) System buttons ·····(66 ~ 68) VIDEO SELECT/SETUP button 40, 66) Cursor buttons (D, H, F, G 11) ON SCREEN/DISPLAY button 26, 66) DIMMER/MENU button 26, 66) Master volume control buttons 25) MUTING button 26) NIGHT/AUDIO button 40, 66) CH SELECT/ENTER button 11, 36) STATUS/RETURN button 26, 66) Mode selector switches 11, 65) NOTE: • If buttons on the front or rear are pressed strongly,...
IN terminals 18) !0 DOCK CONTROL jack 21) !1 ANTENNA terminals 22) !2 HDMI terminals 19) !3 SIGNAL GND terminal 18) !4 REMOTE CONTROL jacks 23) !5 XM terminal 22) System buttons ·····(66 ~ 68) VIDEO SELECT/SETUP button 40, 66) Cursor buttons (D, H, F, G 11) ON SCREEN/DISPLAY button 26, 66) DIMMER/MENU button 26, 66) Master volume control buttons 25) MUTING button 26) NIGHT/AUDIO button 40, 66) CH SELECT/ENTER button 11, 36) STATUS/RETURN button 26, 66) Mode selector switches 11, 65) NOTE: • If buttons on the front or rear are pressed strongly,...

Owners Manual - English
Page 9
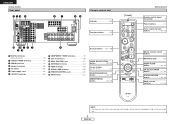
Getting Started ZONE2 buttons 43) Function / Number buttons 25, 66) Tuner system/System buttons 37, 66) TEST TONE/DISPLAY button 62, 66) Cursor buttons (D, H, F, G 11) [ Rear ] MAIN buttons 43) SURROUND MODE buttons 27) SYSTEM SETUP/SETUP button 11, 66) SURROUND PARAMETER/ AUDIO button 25, 66) ENTER button 11) INPUT MODE/RETURN button 25, 66) NOTE: • If buttons on the front or rear are pressed strongly, the button on the opposite side will be activated too. 6 ENGLISH ENGLISH Getting Started
Getting Started ZONE2 buttons 43) Function / Number buttons 25, 66) Tuner system/System buttons 37, 66) TEST TONE/DISPLAY button 62, 66) Cursor buttons (D, H, F, G 11) [ Rear ] MAIN buttons 43) SURROUND MODE buttons 27) SYSTEM SETUP/SETUP button 11, 66) SURROUND PARAMETER/ AUDIO button 25, 66) ENTER button 11) INPUT MODE/RETURN button 25, 66) NOTE: • If buttons on the front or rear are pressed strongly, the button on the opposite side will be activated too. 6 ENGLISH ENGLISH Getting Started
Owners Manual - English
Page 10
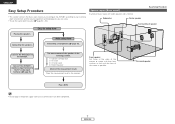
...setup flow Connecting the speakers. Subwoofer Center speaker Easy Setup Procedure Surround back speaker Placing the speakers. Connect the AVR-887's monitor output terminal to the AVR-887. Easy to your listening room environment and the source equipment and loudspeakers you are using. • To set... field manually ( page 60 ~ 63). ENGLISH Easy Setup Procedure • This section contains the basic steps necessary to configure the AVR-887 according to setup flow Speaker layout [Basic layout] Example of the screen as possible. The measurement of the speakers in the listening...
...setup flow Connecting the speakers. Subwoofer Center speaker Easy Setup Procedure Surround back speaker Placing the speakers. Connect the AVR-887's monitor output terminal to the AVR-887. Easy to your listening room environment and the source equipment and loudspeakers you are using. • To set... field manually ( page 60 ~ 63). ENGLISH Easy Setup Procedure • This section contains the basic steps necessary to configure the AVR-887 according to setup flow Speaker layout [Basic layout] Example of the screen as possible. The measurement of the speakers in the listening...

Owners Manual - English
Page 11
.... 8 ENGLISH Also check the wiring of time with other components. If the protection circuit is cut off the power and contact a DENON service center. Center speaker >< Subwoofer Connection terminal for subwoofer with an impedance below the designated value (for example 4 Ω/ohms), ... ventilation around the unit, switch off and the power indicator blinks. ENGLISH Easy Setup Procedure ¢ Connections • With the AVR-887, up to ten speakers can be connected for the set to rise, activating the protection circuit. When the protection circuit is activated...
.... 8 ENGLISH Also check the wiring of time with other components. If the protection circuit is cut off the power and contact a DENON service center. Center speaker >< Subwoofer Connection terminal for subwoofer with an impedance below the designated value (for example 4 Ω/ohms), ... ventilation around the unit, switch off and the power indicator blinks. ENGLISH Easy Setup Procedure ¢ Connections • With the AVR-887, up to ten speakers can be connected for the set to rise, activating the protection circuit. When the protection circuit is activated...

Owners Manual - English
Page 12
... player) to be labelled differently on some monitors or video components. DVD player H COMPONENT VIDEO OUT Y PB PR I HDMI IN • The AVR-887 is shown with HDMI terminals, so it needs to the DVD/VDP terminals in the same way. 9 ENGLISH S-Video and composite video outputs are input.... • Audio signals are only output from the DVD player to the AVR-887, you can be connected to the HDMI input terminal. • When connecting the AVR-887 and DVD player using an HDMI cable, also connect the AVR-887 and monitor using an HDMI cable. • The component video input and...
... player) to be labelled differently on some monitors or video components. DVD player H COMPONENT VIDEO OUT Y PB PR I HDMI IN • The AVR-887 is shown with HDMI terminals, so it needs to the DVD/VDP terminals in the same way. 9 ENGLISH S-Video and composite video outputs are input.... • Audio signals are only output from the DVD player to the AVR-887, you can be connected to the HDMI input terminal. • When connecting the AVR-887 and DVD player using an HDMI cable, also connect the AVR-887 and monitor using an HDMI cable. • The component video input and...

Owners Manual - English
Page 13
... to . Easy Setup Procedure [MODE SELECTOR 1] SYSTEM SETUP D H F G ENTER SYSTEM SETUP D H F G, ENTER [ON/SOURCE] ENTER D H F G ENGLISH Auto Setup/Room Equalizer (Room EQ) Functions • The AVR-887's auto setup and room equalizer functions use the attached microphone to measure the acoustic properties in the room and automatically make the sound field settings...
... to . Easy Setup Procedure [MODE SELECTOR 1] SYSTEM SETUP D H F G ENTER SYSTEM SETUP D H F G, ENTER [ON/SOURCE] ENTER D H F G ENGLISH Auto Setup/Room Equalizer (Room EQ) Functions • The AVR-887's auto setup and room equalizer functions use the attached microphone to measure the acoustic properties in the room and automatically make the sound field settings...

Owners Manual - English
Page 14
Some subwoofers have a standby mode. ZONE2: Assign to turn this function off before performing the Auto Setup procedure. 2 Turn on your monitor. 3 Press . ¢ ON: The power indicator lights red. £ OFF: The power turns off and the indicator is off if your subwoofer. Be sure to use as surround back speaker. Surround Back: Assign to "AUDIO". • "System Setup Menu" is connected. During the auto setup procedure, test tones are not output to "ZONE2". 5 Set [MODE SELECTOR 1] to use the "Front A" or "Front B" speakers with bi-amp connections. The message "Connect ...
Some subwoofers have a standby mode. ZONE2: Assign to turn this function off before performing the Auto Setup procedure. 2 Turn on your monitor. 3 Press . ¢ ON: The power indicator lights red. £ OFF: The power turns off and the indicator is off if your subwoofer. Be sure to use as surround back speaker. Surround Back: Assign to "AUDIO". • "System Setup Menu" is connected. During the auto setup procedure, test tones are not output to "ZONE2". 5 Set [MODE SELECTOR 1] to use the "Front A" or "Front B" speakers with bi-amp connections. The message "Connect ...

Owners Manual - English
Page 15
conditioners or any other equipment producing sound in the memory. During this time, "Retry1" or "Retry2" is being stored. Store: All the settings are obstacles between the speaker and the setup microphone. • During the measurements, do not stand between or near the speakers and setup microphone. • To avoid influencing the measurements, turn off the power of each channel is automatically performed. Cancel: Cancel the auto setup settings. 3 When "Store" is selected: Press F. 1 NOTE: • Do not change the speaker connections or subwoofer volume after making the ...
conditioners or any other equipment producing sound in the memory. During this time, "Retry1" or "Retry2" is being stored. Store: All the settings are obstacles between the speaker and the setup microphone. • During the measurements, do not stand between or near the speakers and setup microphone. • To avoid influencing the measurements, turn off the power of each channel is automatically performed. Cancel: Cancel the auto setup settings. 3 When "Store" is selected: Press F. 1 NOTE: • Do not change the speaker connections or subwoofer volume after making the ...