Literature/Product Sheet
Page 1
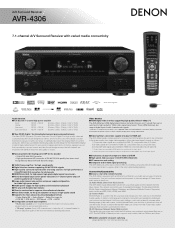
...-compliant display when viewing video material. Until now, radio stations could only be heard if you were within listening range of sound. A/V Surround Receiver AVR-4306 7.1-channel A/V Surround Receiver with varied media connectivity Audio Section s Full discrete 7-channel high power amplifier Front 130 W + 130 W (8 ohms, 20Hz - 20kHz, 0.05 % THD) Center 130 W (8 ohms, 20Hz - 20kHz, 0.05 % THD) Surround 130 W + 130 W (8 ohms, 20Hz - 20kHz, 0.05 % THD) Surround back 130 W + 130 W (8 ohms, 20Hz - 20kHz, 0.05 % THD) s 'New DDSC-Digital...
...-compliant display when viewing video material. Until now, radio stations could only be heard if you were within listening range of sound. A/V Surround Receiver AVR-4306 7.1-channel A/V Surround Receiver with varied media connectivity Audio Section s Full discrete 7-channel high power amplifier Front 130 W + 130 W (8 ohms, 20Hz - 20kHz, 0.05 % THD) Center 130 W (8 ohms, 20Hz - 20kHz, 0.05 % THD) Surround 130 W + 130 W (8 ohms, 20Hz - 20kHz, 0.05 % THD) Surround back 130 W + 130 W (8 ohms, 20Hz - 20kHz, 0.05 % THD) s 'New DDSC-Digital...
Literature/Product Sheet
Page 2
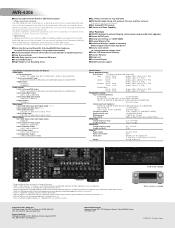
... s Auto Surround Back Channels ON function, for auto-detection of supporting sources s Auto Surround mode s Audio Delay function (max. 6 frames or 200 msec) s 3 User Mode Buttons s Night Mode for not disturbing others s EL remote controller for easy operation s XM Satellite Radio Ready with Digital Audio) MONITOR 2 Sets Component Video Output MONITOR-1, MONITOR-2 3 Sets Composite Output VCR-1, VCR-2, MONITOR 3 Sets S-Video Output VCR-1, VCR-2, MONITOR 1 Sets Multi Zone Output ZONE2 (Composite& S-Video) Specifications Power Amplifier Section Rated output *THD figures are power amp stage...
... s Auto Surround Back Channels ON function, for auto-detection of supporting sources s Auto Surround mode s Audio Delay function (max. 6 frames or 200 msec) s 3 User Mode Buttons s Night Mode for not disturbing others s EL remote controller for easy operation s XM Satellite Radio Ready with Digital Audio) MONITOR 2 Sets Component Video Output MONITOR-1, MONITOR-2 3 Sets Composite Output VCR-1, VCR-2, MONITOR 3 Sets S-Video Output VCR-1, VCR-2, MONITOR 1 Sets Multi Zone Output ZONE2 (Composite& S-Video) Specifications Power Amplifier Section Rated output *THD figures are power amp stage...

Owners Manual
Page 4
... preset stations 41 Recalling preset stations 41 XM Satellite Radio Checking the XM signal strength and Radio ID 42 Channel selection 42 Category search 42 Direct access of channels 43 Playing the iPod Connecting the iPod 44 Listening to Internet radio 47, 48 Presetting (registering) Internet radio stations 48 Registering Internet radio stations in your favorite music sources. As this manual before you begin hookup and operation that you for component video outputs and HDMI output 15 Connecting equipment with home theater sources such as DVD...
... preset stations 41 Recalling preset stations 41 XM Satellite Radio Checking the XM signal strength and Radio ID 42 Channel selection 42 Category search 42 Direct access of channels 43 Playing the iPod Connecting the iPod 44 Listening to Internet radio 47, 48 Presetting (registering) Internet radio stations 48 Registering Internet radio stations in your favorite music sources. As this manual before you begin hookup and operation that you for component video outputs and HDMI output 15 Connecting equipment with home theater sources such as DVD...

Owners Manual
Page 7
... Component In Assignment 71, 72 Setting the Video Convert 72 Setting the HDMI Out Setup 72, 73 Setting the Audio Delay 73 Setting the On Screen Display (OSD 73 Advanced Playback Setting the 2ch Direct / Stereo 74 Setting the Dolby Digital Setup 74 Setting the Auto Surround Mode 75 Setting the Manual EQ Setup 75 Procedure for North America model only 1 e Service station list 1 r Power supply cord 1 t Remote control unit (RC-1024 1 y LR6/AA alkaline batteries 2 u AM loop antenna 1 i FM indoor antenna 1 o Setup microphone (DM-S205 1 r t y u i o Before using the SPEAKER...
... Component In Assignment 71, 72 Setting the Video Convert 72 Setting the HDMI Out Setup 72, 73 Setting the Audio Delay 73 Setting the On Screen Display (OSD 73 Advanced Playback Setting the 2ch Direct / Stereo 74 Setting the Dolby Digital Setup 74 Setting the Auto Surround Mode 75 Setting the Manual EQ Setup 75 Procedure for North America model only 1 e Service station list 1 r Power supply cord 1 t Remote control unit (RC-1024 1 y LR6/AA alkaline batteries 2 u AM loop antenna 1 i FM indoor antenna 1 o Setup microphone (DM-S205 1 r t y u i o Before using the SPEAKER...

Owners Manual
Page 8
... connected to AC line voltage. The PRE OUT terminals, PHONES jack and SPEAKER terminals include a muting circuit. Preparing the remote control unit The included remote control unit (RC-1024) can be used to operate not only the AVR-4306 but this distance will be very high after the power switch is turned on or the input source, surround mode or any other remote control units, so it can be used to operate non-DENON remote control...
... connected to AC line voltage. The PRE OUT terminals, PHONES jack and SPEAKER terminals include a muting circuit. Preparing the remote control unit The included remote control unit (RC-1024) can be used to operate not only the AVR-4306 but this distance will be very high after the power switch is turned on or the input source, surround mode or any other remote control units, so it can be used to operate non-DENON remote control...

Owners Manual
Page 9
... to the input signal. o DENON LINK indicator This lights during playback in a DENON LINK connection. !0 AL24 indicator The AL24 indicator lights when the PURE DIRECT, DIRECT, STEREO, MULTI CH PURE DIRECT, MULTI CH DIRECT, MULTI CH IN mode is selected in System Setup. IN button 26) #5 ANALOG button 28) #6 INPUT MODE button 26) qw e rt q Input signal indicator The respective indicator will light. r Output signal channel indicator The audio channels that can be output light. u MULTI (zone) indicator ZONE2 mode is inputted. y Master volume indicator This displays the volume level.
... to the input signal. o DENON LINK indicator This lights during playback in a DENON LINK connection. !0 AL24 indicator The AL24 indicator lights when the PURE DIRECT, DIRECT, STEREO, MULTI CH PURE DIRECT, MULTI CH DIRECT, MULTI CH IN mode is selected in System Setup. IN button 26) #5 ANALOG button 28) #6 INPUT MODE button 26) qw e rt q Input signal indicator The respective indicator will light. r Output signal channel indicator The audio channels that can be output light. u MULTI (zone) indicator ZONE2 mode is inputted. y Master volume indicator This displays the volume level.
Owners Manual
Page 19
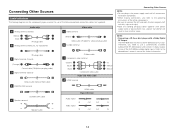
... optional connection cables (not supplied). Connecting Other Sources Cable indications The hookup diagrams on the subsequent pages assume the use a commercially available outboard DD RF demodulator and connect its digital output to one of the AVR-4306 available digital inputs. NOTE: • Connecting a LD (laser disc) player with power supply cords or placing them near a power transformer will result in the power supply cord until all connections have a DD RF demodulator function. Audio cable A Analog terminal (Stereo) (White) (Red) L L R R Pin-plug cable B Analog...
... optional connection cables (not supplied). Connecting Other Sources Cable indications The hookup diagrams on the subsequent pages assume the use a commercially available outboard DD RF demodulator and connect its digital output to one of the AVR-4306 available digital inputs. NOTE: • Connecting a LD (laser disc) player with power supply cords or placing them near a power transformer will result in the power supply cord until all connections have a DD RF demodulator function. Audio cable A Analog terminal (Stereo) (White) (Red) L L R R Pin-plug cable B Analog...

Owners Manual
Page 25
... 1-cable connection (using a commercially available cable) with their original resolution, so the image will not be displayed if the resolutions of the input signal and the monitor being used . • When "Through" is a hybrid CD, only the audio signals in length. To provide audio output from AVR-4306's audio output connector, select "Amp" at the System Setup. Monitor TV J HDMI IN DVD player J HDMI OUT Connecting Other Sources NOTE: • The audio signals on the source device (player) to support a copyright protection system...
... 1-cable connection (using a commercially available cable) with their original resolution, so the image will not be displayed if the resolutions of the input signal and the monitor being used . • When "Through" is a hybrid CD, only the audio signals in length. To provide audio output from AVR-4306's audio output connector, select "Amp" at the System Setup. Monitor TV J HDMI IN DVD player J HDMI OUT Connecting Other Sources NOTE: • The audio signals on the source device (player) to support a copyright protection system...

Owners Manual
Page 31
... watch video while listening to sound, select the input source to which the video signal is set for the HDMI video output. The surround speakers switch as shown below each time the INPUT MODE button is automatically turned off temporarily (MUTING) Use this mode. • If the subwoofer output level seems too high, set . • In play modes other than the external input mode, the signals connected to "ON". IN) terminals Press the EXT. IN), the surround mode (DIRECT, STEREO, STANDARD, 7CH STEREO, WIDE SCREEN or DSP SIMULATION...
... watch video while listening to sound, select the input source to which the video signal is set for the HDMI video output. The surround speakers switch as shown below each time the INPUT MODE button is automatically turned off temporarily (MUTING) Use this mode. • If the subwoofer output level seems too high, set . • In play modes other than the external input mode, the signals connected to "ON". IN) terminals Press the EXT. IN), the surround mode (DIRECT, STEREO, STANDARD, 7CH STEREO, WIDE SCREEN or DSP SIMULATION...
Owners Manual
Page 33
... button is set the input mode to PURE DIRECT, DIRECT, STEREO, MULTI CH PURE DIRECT, MULTI CH DIRECT or MULTI CH IN. Details of all speakers to the digital input terminals (OPTICAL/COAXIAL) and set manually after performing the Auto Setup procedure. 28 Flat: This the frequency response of the different correction curves are played in the Manual EQ Setup. Manual: Selects the setting value that supports HDCD playback. The "DIG." indicator lights when digital signals are being input with a player that was set to "DTS". 2 Input mode display...
... button is set the input mode to PURE DIRECT, DIRECT, STEREO, MULTI CH PURE DIRECT, MULTI CH DIRECT or MULTI CH IN. Details of all speakers to the digital input terminals (OPTICAL/COAXIAL) and set manually after performing the Auto Setup procedure. 28 Flat: This the frequency response of the different correction curves are played in the Manual EQ Setup. Manual: Selects the setting value that supports HDCD playback. The "DIG." indicator lights when digital signals are being input with a player that was set to "DTS". 2 Input mode display...

Owners Manual
Page 35
... Operation PURE DIRECT DIRECT/STEREO PURE DIRECT DIRECT/STEREO Playing audio sources (CDs and DVDs) 2-channel playback modes Basic Operation 2 STEREO mode Use this mode to adjust the tone and achieve the desired sound. • The AVR-4306 is equipped with extremely high quality. Press the DIRECT/STEREO button to select the PURE DIRECT mode. • The system setup function cannot be reproduced with high sound quality. To use the system setup function, cancel the PURE DIRECT mode. • If the HDMI input terminal is selected, video outputs are outputted in the PURE DIRECT mode...
... Operation PURE DIRECT DIRECT/STEREO PURE DIRECT DIRECT/STEREO Playing audio sources (CDs and DVDs) 2-channel playback modes Basic Operation 2 STEREO mode Use this mode to adjust the tone and achieve the desired sound. • The AVR-4306 is equipped with extremely high quality. Press the DIRECT/STEREO button to select the PURE DIRECT mode. • The system setup function cannot be reproduced with high sound quality. To use the system setup function, cancel the PURE DIRECT mode. • If the HDMI input terminal is selected, video outputs are outputted in the PURE DIRECT mode...

Owners Manual
Page 37
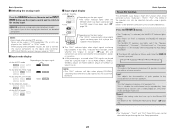
... digital matrix processing for playback. • ES DSCRT: When a signal identifying the source as a discrete 6.1-channel source is included in the DTS signals, the surround back signals included in the following order when the ON SCREEN button is pressed repeatedly: OSD-1 Audio input signal OSD-2 Monitor information OSD-3 Input/output OSD-4 Auto surround mode OSD-5 USER MODE 1 OSD-6 USER MODE 2 OSD-7 USER MODE 3 OSD-8~14 Tuner preset stations NOTE: • OSD-2: The monitor's resolution is displayed when an HDMI monitor is connected to the AVR-4306...
... digital matrix processing for playback. • ES DSCRT: When a signal identifying the source as a discrete 6.1-channel source is included in the DTS signals, the surround back signals included in the following order when the ON SCREEN button is pressed repeatedly: OSD-1 Audio input signal OSD-2 Monitor information OSD-3 Input/output OSD-4 Auto surround mode OSD-5 USER MODE 1 OSD-6 USER MODE 2 OSD-7 USER MODE 3 OSD-8~14 Tuner preset stations NOTE: • OSD-2: The monitor's resolution is displayed when an HDMI monitor is connected to the AVR-4306...

Owners Manual
Page 38
... the surround parameter screen regardless of the respective components. 3 Press the SURROUND PARAMETER button. • The surround parameter menu is set "SB CH OUT" to "OFF". The mode switches as shown below each time the STANDARD button is not recorded in the normal 5.1channel mode without using the surround back speaker(s) when the software is pressed. When the surround back speaker is displayed. 33 Example:When playing software that has a Dolby Digital...
... the surround parameter screen regardless of the respective components. 3 Press the SURROUND PARAMETER button. • The surround parameter menu is set "SB CH OUT" to "OFF". The mode switches as shown below each time the STANDARD button is not recorded in the normal 5.1channel mode without using the surround back speaker(s) when the software is pressed. When the surround back speaker is displayed. 33 Example:When playing software that has a Dolby Digital...

Owners Manual
Page 41
... Dolby Surround and Dolby Digital 5.1-channel sources. When the input source is equipped with reflected sounds coming from all directions. This mode provides the longest reverberation signals. The surround parameters, tone control settings and playback level balance for the different output channels are memorized for that source last time it in until the indicator of the selected USER MODE button lights. 9 MATRIX Select this to synthetically recreate the sound field. Basic Operation DENON original surround modes The AVR-4306 is switched, the modes set for each surround mode...
... Dolby Surround and Dolby Digital 5.1-channel sources. When the input source is equipped with reflected sounds coming from all directions. This mode provides the longest reverberation signals. The surround parameters, tone control settings and playback level balance for the different output channels are memorized for that source last time it in until the indicator of the selected USER MODE button lights. 9 MATRIX Select this to synthetically recreate the sound field. Basic Operation DENON original surround modes The AVR-4306 is switched, the modes set for each surround mode...

Owners Manual
Page 52
... radio station for the first time. 1 Select the input source to the router. "Update?" Computer 2 Network settings When using a broadband router (DHCP function), the network settings are used for Network Audio operations. Basic Operation FUNCTION CURSOR ENTER 2 Connections Connect one side of the Ethernet cable (CAT-5) to the ETHERNET terminal on the AVR-4306's rear panel, the other side to "AUX/Net". • The "Network Audio" menu screen appears. 2 DTU (Digital tuner) system buttons The digital tuner system buttons shown on the display when connecting...
... radio station for the first time. 1 Select the input source to the router. "Update?" Computer 2 Network settings When using a broadband router (DHCP function), the network settings are used for Network Audio operations. Basic Operation FUNCTION CURSOR ENTER 2 Connections Connect one side of the Ethernet cable (CAT-5) to the ETHERNET terminal on the AVR-4306's rear panel, the other side to "AUX/Net". • The "Network Audio" menu screen appears. 2 DTU (Digital tuner) system buttons The digital tuner system buttons shown on the display when connecting...

Owners Manual
Page 69
... noise, or by powering off . For operating instructions, refer to the manual of the component on . • The unit is turned. This function eliminates the need to output the PCM signal and Network Audio signals (Internet radio music server, USB) being input from the digital input terminal (optical/coaxial) is a PCM signal, it is not possible to perform complicated resetting when the power is switched on which stores the input and output setting conditions as shown below...
... noise, or by powering off . For operating instructions, refer to the manual of the component on . • The unit is turned. This function eliminates the need to output the PCM signal and Network Audio signals (Internet radio music server, USB) being input from the digital input terminal (optical/coaxial) is a PCM signal, it is not possible to perform complicated resetting when the power is switched on which stores the input and output setting conditions as shown below...

Owners Manual
Page 73
... H button to select "Input Function Lev." Example: When "CD" is possible to assign the iPod Dock's audio and video signals to the player's operating instructions. +15dB (default) recommended. (0, +5, +10 and +15 can be assigned, then press the ENTER button. Connect the iPod cable directly to the player's operating instructions. • Surr. When "Yes" is selected for adjusting the main volume each time the AUX button is pressed. • When a function other than "AUX" is assigned to "iPod Function" and "iPod Dock" is set to "NotUsed", remote control operation...
... H button to select "Input Function Lev." Example: When "CD" is possible to assign the iPod Dock's audio and video signals to the player's operating instructions. +15dB (default) recommended. (0, +5, +10 and +15 can be assigned, then press the ENTER button. Connect the iPod cable directly to the player's operating instructions. • Surr. When "Yes" is selected for adjusting the main volume each time the AUX button is pressed. • When a function other than "AUX" is assigned to "iPod Function" and "iPod Dock" is set to "NotUsed", remote control operation...

Owners Manual
Page 96
... 2 Volume Control This sets the volume level of each zone. Net Audio Preset Ch Power On = ON Setup Lock = OFF 78, 79 79 79 7. The proxy-related settings can be changed specifically for the individual surround modes. Default settings ON OFF ON eng Page 80 80 81 91 Advanced Setup - Advanced Playback Advanced Playback 1 2ch Direct/Stereo The speaker settings can be assigned to set iPod charging when the AVR-4306 and iPod are made for playing in the standby mode...
... 2 Volume Control This sets the volume level of each zone. Net Audio Preset Ch Power On = ON Setup Lock = OFF 78, 79 79 79 7. The proxy-related settings can be changed specifically for the individual surround modes. Default settings ON OFF ON eng Page 80 80 81 91 Advanced Setup - Advanced Playback Advanced Playback 1 2ch Direct/Stereo The speaker settings can be assigned to set iPod charging when the AVR-4306 and iPod are made for playing in the standby mode...

Owners Manual
Page 101
... DTS-compatible digital output is required to (same as for the first time, turn down -mixed to the SL and SR channels beforehand. While offering high compatibility with a DTS 5.1-channel decoder. 96 Though maximum performance is achieved when sound tracks recorded with this noise is played with the amplifier set the mode to 2 "ANALOG" or "PCM". 1 Optical or coaxial digital output Set the input mode to play DTS-ES Matrix 6.1 encoded sources with the conventional DTS Digital Surround...
... DTS-compatible digital output is required to (same as for the first time, turn down -mixed to the SL and SR channels beforehand. While offering high compatibility with a DTS 5.1-channel decoder. 96 Though maximum performance is achieved when sound tracks recorded with this noise is played with the amplifier set the mode to 2 "ANALOG" or "PCM". 1 Optical or coaxial digital output Set the input mode to play DTS-ES Matrix 6.1 encoded sources with the conventional DTS Digital Surround...
Owners Manual
Page 110
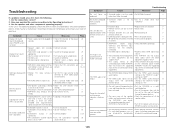
...3 remote control unit is being input. • Properly select HDMI signal input 71 source. • The connected monitor equipment • The AVR-4306 will not output 20 or other equipments do not video signal unless the other support HDCP. Symptom Display not lit and sound not produced when POWER switch set . • Set a surround mode other than the PURE DIRECT mode. • DVD player's audio output setting • Make the DVD player's initial is produced. supply cord plug. • Speaker cables not securely • Connect securely. 7 connected. • FUNCTION...
...3 remote control unit is being input. • Properly select HDMI signal input 71 source. • The connected monitor equipment • The AVR-4306 will not output 20 or other equipments do not video signal unless the other support HDCP. Symptom Display not lit and sound not produced when POWER switch set . • Set a surround mode other than the PURE DIRECT mode. • DVD player's audio output setting • Make the DVD player's initial is produced. supply cord plug. • Speaker cables not securely • Connect securely. 7 connected. • FUNCTION...


