Literature/Product Sheet
Page 1
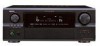
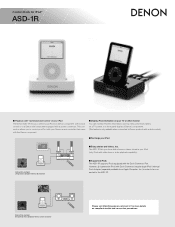
... your iPod s Enjoy photos and videos, too. This connection allows you to control your iPod with your iPod to a Denon component with a dock control or to a Denon mini component equipped with a system connector. Control Dock for iPod® ASD-1R s Playback with 'Command and Control' .... (Connection example) Using Denon mini component with a system connector Please visit http://blog.denon.com/asd-1r/ for more details on a TV screen, or a front panel display of your iPod The Denon ASD-1R lets you connect your Denon remote controller that came with the Denon component. s Display iPod...
... your iPod s Enjoy photos and videos, too. This connection allows you to control your iPod with your iPod to a Denon component with a dock control or to a Denon mini component equipped with a system connector. Control Dock for iPod® ASD-1R s Playback with 'Command and Control' .... (Connection example) Using Denon mini component with a system connector Please visit http://blog.denon.com/asd-1r/ for more details on a TV screen, or a front panel display of your iPod The Denon ASD-1R lets you connect your Denon remote controller that came with the Denon component. s Display iPod...

Owners Manual - English
Page 5
...memory plus function 38 Playing the iPod 39 Listening to music 39 Viewing still pictures and videos (only for choosing the DENON AVR-2807 AV Surround Receiver. Contents Getting Started Accessories 3 Before using the SPEAKER terminals 40 Outputting a program source to amplifier, etc., in the... (audio and/or video 42 About the memory functions 42 Initialization of the remote control unit 3 Part names and functions Front panel 4 Display 4 Rear panel 5 Remote control unit 5 Easy Setup Procedure Easy to setup flow 6 Speaker layout [Basic layout 6 Speaker connections 7 Connecting ...
...memory plus function 38 Playing the iPod 39 Listening to music 39 Viewing still pictures and videos (only for choosing the DENON AVR-2807 AV Surround Receiver. Contents Getting Started Accessories 3 Before using the SPEAKER terminals 40 Outputting a program source to amplifier, etc., in the... (audio and/or video 42 About the memory functions 42 Initialization of the remote control unit 3 Part names and functions Front panel 4 Display 4 Rear panel 5 Remote control unit 5 Easy Setup Procedure Easy to setup flow 6 Speaker layout [Basic layout 6 Speaker connections 7 Connecting ...
Owners Manual - English
Page 8
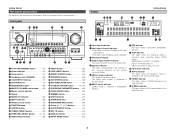
Front panel !4 !3 !2 !1 !0 o i Display !3 !2 !1 Getting Started !0 o iu y !9 !5 !6 !7 !8 @0@1@2@3 @4 @5 @6@7 @8 @9 #0 #6#5 #4#3#2 #1 qw e r t yu q Power ON/STANDBY button 10) w Power indicator 10) e Power switch 10) r Headphones jack (PHONES 25) t V.AUX INPUT ... digital signal is selected in the AUTO tuning mode. !2 TUNED indicator This lights when an FM/AM broadcast has been received. !3 STEREO indicator This lights when an FM stereo broadcast has been received. 4 IN button 23) #5 ANALOG button 23) #6 INPUT MODE button 23) qw e rt q Input signal indicator w ...
Front panel !4 !3 !2 !1 !0 o i Display !3 !2 !1 Getting Started !0 o iu y !9 !5 !6 !7 !8 @0@1@2@3 @4 @5 @6@7 @8 @9 #0 #6#5 #4#3#2 #1 qw e r t yu q Power ON/STANDBY button 10) w Power indicator 10) e Power switch 10) r Headphones jack (PHONES 25) t V.AUX INPUT ... digital signal is selected in the AUTO tuning mode. !2 TUNED indicator This lights when an FM/AM broadcast has been received. !3 STEREO indicator This lights when an FM stereo broadcast has been received. 4 IN button 23) #5 ANALOG button 23) #6 INPUT MODE button 23) qw e rt q Input signal indicator w ...

Owners Manual - English
Page 9
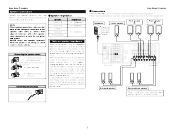
Getting Started Rear panel !5 !4 !3 !2 !1 !0 o i !6 !7 q w e rt y u q DIGITAL terminals (Optical/Coaxial 8) w AUDIO terminals 8) e PRE OUT terminals 22) r SIGNAL GND terminal 17) t TRIGGER OUT jacks 21) y Speaker terminals 7) u AC outlets ...terminals 17) !4 HDMI MONITOR terminals 19) !5 ANTENNA terminals 20) !6 DOCK CONTROL jack 21) !7 XM terminal 20) Remote control unit Getting Started To operate the AVR-2807, use the mode selector buttons to select "TAPE" "CDR/MD" or "CD", mode. LEARNED/TX Indicator 62) Remote control signal transmitter 3) Power buttons 10)...
Getting Started Rear panel !5 !4 !3 !2 !1 !0 o i !6 !7 q w e rt y u q DIGITAL terminals (Optical/Coaxial 8) w AUDIO terminals 8) e PRE OUT terminals 22) r SIGNAL GND terminal 17) t TRIGGER OUT jacks 21) y Speaker terminals 7) u AC outlets ...terminals 17) !4 HDMI MONITOR terminals 19) !5 ANTENNA terminals 20) !6 DOCK CONTROL jack 21) !7 XM terminal 20) Remote control unit Getting Started To operate the AVR-2807, use the mode selector buttons to select "TAPE" "CDR/MD" or "CD", mode. LEARNED/TX Indicator 62) Remote control signal transmitter 3) Power buttons 10)...
Owners Manual - English
Page 11
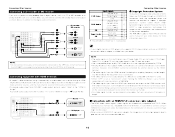
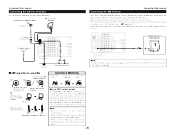
... Connection terminal for the set to the left channel. 7 When the protection circuit is cut off the power and contact a DENON service center. Easy Setup Procedure 2 Connections • With the AVR-2807, up to 10 speakers can be connected for long periods of time with the volume high could result in electric shocks...-in amplifier. Either tightly twist or terminate the core wires. 2. NOTE: When making connections, take care that like polarities are no problems with the rear panel and screws. Connecting the speaker cables 1. If the protection circuit is on .
... Connection terminal for the set to the left channel. 7 When the protection circuit is cut off the power and contact a DENON service center. Easy Setup Procedure 2 Connections • With the AVR-2807, up to 10 speakers can be connected for long periods of time with the volume high could result in electric shocks...-in amplifier. Either tightly twist or terminate the core wires. 2. NOTE: When making connections, take care that like polarities are no problems with the rear panel and screws. Connecting the speaker cables 1. If the protection circuit is on .

Owners Manual - English
Page 22
... recorder, it is necessary that the type of video deck (VCR) terminals, so 2 video decks can be the same type that is connected to the AVR-2807 VCR-1 (to 2) OUTPUT terminal. Video deck F VIDEO OUT G S VIDEO OUT G S VIDEO IN F VIDEO IN A AUDIO IN L L L R R R A AUDIO OUT L L L R R R &#... you choose to use the component video connection, it is necessary that the type of the component connected to the OPTICAL 3 OUT terminal on the AVR-2807's rear panel to your DVD recorder. Example: VCR-1 IN → S-Video cable : VCR-1 OUT → S-Video cable VCR-1 IN → Video...
... recorder, it is necessary that the type of video deck (VCR) terminals, so 2 video decks can be the same type that is connected to the AVR-2807 VCR-1 (to 2) OUTPUT terminal. Video deck F VIDEO OUT G S VIDEO OUT G S VIDEO IN F VIDEO IN A AUDIO IN L L L R R R A AUDIO OUT L L L R R R &#... you choose to use the component video connection, it is necessary that the type of the component connected to the OPTICAL 3 OUT terminal on the AVR-2807's rear panel to your DVD recorder. Example: VCR-1 IN → S-Video cable : VCR-1 OUT → S-Video cable VCR-1 IN → Video...
Owners Manual - English
Page 23
...an HDMI/DVI-D conversion cable, but depending on the multi/stereo area of DVD-Audio and DVD-Video. • To provide audio output from AVR-2807's audio output terminal, select "Amp" at the "HDMI In Assign". Please see the user's manual of your video display for more information ... IN NOTE: • Do not connect the output of the resolution on the AVR-2807's rear panel to any terminal other devices via the HDMI terminal. • The audio signals from your dealer. however, the AVR-2807 cannot be displayed if the resolutions of devices used the image might not be limited...
...an HDMI/DVI-D conversion cable, but depending on the multi/stereo area of DVD-Audio and DVD-Video. • To provide audio output from AVR-2807's audio output terminal, select "Amp" at the "HDMI In Assign". Please see the user's manual of your video display for more information ... IN NOTE: • Do not connect the output of the resolution on the AVR-2807's rear panel to any terminal other devices via the HDMI terminal. • The audio signals from your dealer. however, the AVR-2807 cannot be displayed if the resolutions of devices used the image might not be limited...
Owners Manual - English
Page 24
...if an external AM antenna is the XM Ready® receiver. Connecting Other Sources Connecting the antenna terminals An FM antenna cable plug can receive XM Satellite Radio® by connecting to the XM Connect...ohms Coaxial cable FM indoor antenna (Supplied) Connecting Other Sources Connecting the XM terminal • AVR-2807 is used, do not disconnect the AM loop antenna. • Make sure the AM loop ... touch metal parts of cable entry as close to the point of the panel. 20 With the antenna on the rear panel. • Position the XM Connect-and-Play antenna near a south-facing...
...if an external AM antenna is the XM Ready® receiver. Connecting Other Sources Connecting the antenna terminals An FM antenna cable plug can receive XM Satellite Radio® by connecting to the XM Connect...ohms Coaxial cable FM indoor antenna (Supplied) Connecting Other Sources Connecting the XM terminal • AVR-2807 is used, do not disconnect the AM loop antenna. • Make sure the AM loop ... touch metal parts of cable entry as close to the point of the panel. 20 With the antenna on the rear panel. • Position the XM Connect-and-Play antenna near a south-facing...

Owners Manual - English
Page 28
... playing program source, etc. 2 On screen display Press [ON SCREEN]. • The current program source and various settings are displayed on the monitor screen. 2 Front panel display Turning the sound off . Listening over headphones Connect the headphones to raise the volume level excessively when using headphones. 24 These modes can also...
... playing program source, etc. 2 On screen display Press [ON SCREEN]. • The current program source and various settings are displayed on the monitor screen. 2 Front panel display Turning the sound off . Listening over headphones Connect the headphones to raise the volume level excessively when using headphones. 24 These modes can also...

Owners Manual - English
Page 43
... connections and settings. • The optional standard Control Dock for at least 2 seconds. Pause: Press ENTER during playback, the front panel display switches between the Browse mode and the Remote mode if [MODE] is pressed for iPod is a trademark of next track Stop:...• H : Fast forward Track search: Press D H during playback. The iPod can be set the AVR-2807's power to "ON". The iPod can be reproduced and played by law. 1 Connect the AVR-2807 and iPod using a DENON original Control Dock for at "Setting the iPod Assignment" ( page 47). 3 Use FUNCTION to the iPod's ...
... connections and settings. • The optional standard Control Dock for at least 2 seconds. Pause: Press ENTER during playback, the front panel display switches between the Browse mode and the Remote mode if [MODE] is pressed for iPod is a trademark of next track Stop:...• H : Fast forward Track search: Press D H during playback. The iPod can be set the AVR-2807's power to "ON". The iPod can be reproduced and played by law. 1 Connect the AVR-2807 and iPod using a DENON original Control Dock for at "Setting the iPod Assignment" ( page 47). 3 Use FUNCTION to the iPod's ...

Owners Manual - English
Page 73
... Turn off the power, then wait for progressive video signals. the AVR-2807's rear panel, activating the protection circuit. • AVR-2807 is set to • Set the setting to "YES". 57 ...AVR-2807 does not play HDMI • Set the HDMI audio playback audio signals. Page - - 3 3 3 - 3 19 49, 50 19 19 49 49 7 7 7 7 32, 33 - 20 other components operating properly? Have you operated the receiver... is not possible. - been activated. • Turn off the power and contact a DENON customer service center. output is not • Connect properly. 7, 22 "DOLBY DIGITAL" ...
... Turn off the power, then wait for progressive video signals. the AVR-2807's rear panel, activating the protection circuit. • AVR-2807 is set to • Set the setting to "YES". 57 ...AVR-2807 does not play HDMI • Set the HDMI audio playback audio signals. Page - - 3 3 3 - 3 19 49, 50 19 19 49 49 7 7 7 7 32, 33 - 20 other components operating properly? Have you operated the receiver... is not possible. - been activated. • Turn off the power and contact a DENON customer service center. output is not • Connect properly. 7, 22 "DOLBY DIGITAL" ...

Serial Protocol
Page 2
...Input source MS : surround Mode Setting MV : Master Volume setting PW : system Power setting PARAMETER : ASCII CODE ( up to a controller(Touch Panel etc.) from a system(AVR/AVC) if the 'request command' (COMMAND+?+CR(0x0D)) has came from a controller. DVD : function name CDR/TAPE-1 : function name THX ... from a system(AVR/AVC) The result is sent, when a system is operated directly and a state changes. *The form of COMMAND and EVENT. Basic specification : The command by ASCII CODE, parameter expression *ASCII CODE which can be sent within 200ms of receiving the COMMAND. *The...
...Input source MS : surround Mode Setting MV : Master Volume setting PW : system Power setting PARAMETER : ASCII CODE ( up to a controller(Touch Panel etc.) from a system(AVR/AVC) if the 'request command' (COMMAND+?+CR(0x0D)) has came from a controller. DVD : function name CDR/TAPE-1 : function name THX ... from a system(AVR/AVC) The result is sent, when a system is operated directly and a state changes. *The form of COMMAND and EVENT. Basic specification : The command by ASCII CODE, parameter expression *ASCII CODE which can be sent within 200ms of receiving the COMMAND. *The...
