

Operating Instructions
Page 3
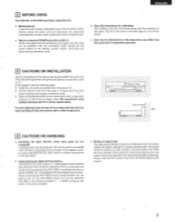
... the operating instructions or as to provide some protection against them, paying particular attention to . 4. Damage Requiring Service - or B. FIGURE A EXAMPLE OF ANTENNA GROUNDING AS PER NATIONAL ELECTRICAL CODE ANTENNA LEAD IN IMRE GROUND CLAMP ANTENNA DISCHARGE UNIT (NEC SECTION 810-2to ELECTRIC SERVICE EQUIPMENT NEC - Cleaning - All other appliances (including amplifiers) that its proper ventilation. The power-supply cord or the plug...
... the operating instructions or as to provide some protection against them, paying particular attention to . 4. Damage Requiring Service - or B. FIGURE A EXAMPLE OF ANTENNA GROUNDING AS PER NATIONAL ELECTRICAL CODE ANTENNA LEAD IN IMRE GROUND CLAMP ANTENNA DISCHARGE UNIT (NEC SECTION 810-2to ELECTRIC SERVICE EQUIPMENT NEC - Cleaning - All other appliances (including amplifiers) that its proper ventilation. The power-supply cord or the plug...
Operating Instructions
Page 5
... input function, surround mode or any other set-up during this time, the output will be very high after the muting circuit stops functioning. When connecting the AVD-2000 to such a power amplifier, etc., be produced if the AVD-2000 is connected to the input jacks. Because of this, an extremely loud sound may be sure to turn down the MASTER VOLUME control or connect components to the input jacks. • Output level upon shipment from the factory. CAUTIONS ON INSTALLATION...
... input function, surround mode or any other set-up during this time, the output will be very high after the muting circuit stops functioning. When connecting the AVD-2000 to such a power amplifier, etc., be produced if the AVD-2000 is connected to the input jacks. Because of this, an extremely loud sound may be sure to turn down the MASTER VOLUME control or connect components to the input jacks. • Output level upon shipment from the factory. CAUTIONS ON INSTALLATION...

Operating Instructions
Page 6
... 6-channel analog outputs, etc. O)( SUB 1,4 , -;....."mtwasa IMMO CUB R sg ' 00:03'00a.,°,03 Use the three included pin-plug cords to connect the AVD-2000's OUTPUT jacks to the AV receiver. Use these to be generated if a connected audio equipment is used independently without turning the power of the this unit on the power of this unit. FR LP) Oc 04' n si O mr L I Si: wriri • h.:- :,..1 ,, ., .. OUTPUT RE FRONT CENTER SURROUND iC...
... 6-channel analog outputs, etc. O)( SUB 1,4 , -;....."mtwasa IMMO CUB R sg ' 00:03'00a.,°,03 Use the three included pin-plug cords to connect the AVD-2000's OUTPUT jacks to the AV receiver. Use these to be generated if a connected audio equipment is used independently without turning the power of the this unit on the power of this unit. FR LP) Oc 04' n si O mr L I Si: wriri • h.:- :,..1 ,, ., .. OUTPUT RE FRONT CENTER SURROUND iC...

Operating Instructions
Page 8
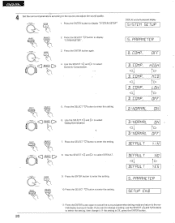
...: MASTER VOLUME 1 CHANNEL LEVEL, LFE TRIM E El' • l•COAXIAL .2 O 0 0 SCHEXT.III OPTICAL.2 \ O 0 0 INPUT SELECTOR iii STEREO MODE CINEMAEO C ... , DIGITAL INPUT SETUP 1 CINEMA ED PARAMETER INPUT SELECT buttons CINEMA EQ button See page 18. buttons See page 16. Press the button again to select. I DENON cf-15? The setup mode switches as follows each time the button is to decrease it. CH SELECT button Use this knob to increase and decrease the level of only the AC-3 RF signals can be adjusted. Select left . IN SETUP MODE DEFAULT setting...
...: MASTER VOLUME 1 CHANNEL LEVEL, LFE TRIM E El' • l•COAXIAL .2 O 0 0 SCHEXT.III OPTICAL.2 \ O 0 0 INPUT SELECTOR iii STEREO MODE CINEMAEO C ... , DIGITAL INPUT SETUP 1 CINEMA ED PARAMETER INPUT SELECT buttons CINEMA EQ button See page 18. buttons See page 16. Press the button again to select. I DENON cf-15? The setup mode switches as follows each time the button is to decrease it. CH SELECT button Use this knob to increase and decrease the level of only the AC-3 RF signals can be adjusted. Select left . IN SETUP MODE DEFAULT setting...

Operating Instructions
Page 10
ENGLISH SELECT/ CONTROL 5 SELECT SELECT/ CONTROL Use the SELECT
ENGLISH SELECT/ CONTROL 5 SELECT SELECT/ CONTROL Use the SELECT

Operating Instructions
Page 12
ENGLISH ... SL 'C..3Of)- CONTROL 10 SELECT SELECT/ CONTROL Use the SELECT to select the distance. • The distance can be selected from 1 foot (0.1 meters) to 60 feet (18.0 meters) in steps of 1 foot (0.1 meters). Press the SELECT pbutton. O SELECT/.
ENGLISH ... SL 'C..3Of)- CONTROL 10 SELECT SELECT/ CONTROL Use the SELECT to select the distance. • The distance can be selected from 1 foot (0.1 meters) to 60 feet (18.0 meters) in steps of 1 foot (0.1 meters). Press the SELECT pbutton. O SELECT/.

Operating Instructions
Page 13
Press the SELECT pbutton. TrIAIL - - oata ENTER ENGLISH Press the SELECT pbutton. T_ TDNE TEI Use the SELECT to select AUTO or MANUAL. SELECT SELECT/ CONTROL C0,16,0, O SELECT/ CONTROL SELECT SELECT/ CONTROL UNTO.. - L.11 R1-1 1 LJ
Press the SELECT pbutton. TrIAIL - - oata ENTER ENGLISH Press the SELECT pbutton. T_ TDNE TEI Use the SELECT to select AUTO or MANUAL. SELECT SELECT/ CONTROL C0,16,0, O SELECT/ CONTROL SELECT SELECT/ CONTROL UNTO.. - L.11 R1-1 1 LJ

Operating Instructions
Page 14
... used with a DENON AV receiver, the AVD-2000's function can be selected using the AVD-2000witha DENON6CHEXT.INcompatibleAVreceiver.Whenusingthe AVD-2000aloneor withanotherreceiv- Press theENTER buttonagain toreturn tothenormal display. er, set the corresponding function to "DVD/VDP". 1 INPUT SET UP T.\ Press the INPUT SETUP button to enter the setting. SETUP ENT The system setup settings are OK, press the ENTER button. If all the settings are now complete. Setting the digital inputs Input the setting of the components connected to set the "DISPLAY". When this setting...
... used with a DENON AV receiver, the AVD-2000's function can be selected using the AVD-2000witha DENON6CHEXT.INcompatibleAVreceiver.Whenusingthe AVD-2000aloneor withanotherreceiv- Press theENTER buttonagain toreturn tothenormal display. er, set the corresponding function to "DVD/VDP". 1 INPUT SET UP T.\ Press the INPUT SETUP button to enter the setting. SETUP ENT The system setup settings are OK, press the ENTER button. If all the settings are now complete. Setting the digital inputs Input the setting of the components connected to set the "DISPLAY". When this setting...
Operating Instructions
Page 15
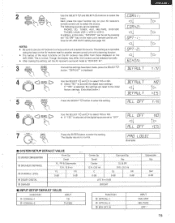
... using the keys on the AV receiver itself or another remote control unit with a learning function. • The names of the input functions on the -AV receiver may differ, the function can be selected: PHONO, CD, TUNER, AUX, MD/TAPE, DVD/VDP, TV/ DBS, V.AUX, VCR-1, VCR-2, VCR-3. The display returns to select the input. Small 0 SPEAKER DISTANCE 0 CHANNEL LEVEL FL, FR & Subwoofer 12 ft. (3.6 m) FL FR 0 dB 0 dB ® DOLBY DIGITAL c DIMMER a INPUT SETUP DEFAULT VALUE FUNCTION INPUT 0 COAXIAL-1 CD 0 COAXIAL...
... using the keys on the AV receiver itself or another remote control unit with a learning function. • The names of the input functions on the -AV receiver may differ, the function can be selected: PHONO, CD, TUNER, AUX, MD/TAPE, DVD/VDP, TV/ DBS, V.AUX, VCR-1, VCR-2, VCR-3. The display returns to select the input. Small 0 SPEAKER DISTANCE 0 CHANNEL LEVEL FL, FR & Subwoofer 12 ft. (3.6 m) FL FR 0 dB 0 dB ® DOLBY DIGITAL c DIMMER a INPUT SETUP DEFAULT VALUE FUNCTION INPUT 0 COAXIAL-1 CD 0 COAXIAL...
Operating Instructions
Page 16
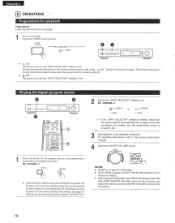
... is turned on the selected component. For operating instructions, refer to change the settings, see page 14. Playing the digital program source Z 0000 I - EX: COAXIAL-1 - Several seconds are proper. 1 Turn on the power. POWER -ON ROff INPUT SELECTOR lights 000000 I .COAXIAL • When the AVD-2000 is lit. COAXIAL I -2 MP" • i ON The power turns on and "INPUT SELECTOR" indicator is used with a DENON AV receiver, leave the AVD-2000's MASTER VOLUME control at connections are required from the time the power switch is set the AV receiver's surround mode...
... is turned on the selected component. For operating instructions, refer to change the settings, see page 14. Playing the digital program source Z 0000 I - EX: COAXIAL-1 - Several seconds are proper. 1 Turn on the power. POWER -ON ROff INPUT SELECTOR lights 000000 I .COAXIAL • When the AVD-2000 is lit. COAXIAL I -2 MP" • i ON The power turns on and "INPUT SELECTOR" indicator is used with a DENON AV receiver, leave the AVD-2000's MASTER VOLUME control at connections are required from the time the power switch is set the AV receiver's surround mode...

Operating Instructions
Page 17
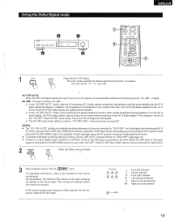
... input terminal and play modes: Normal, Phantom, Wide and 3-channel. etc., appear in clear sound with greater precision. E USING THE SURROUND FUNCTION Dolby Surround This unit is .called LFE (Low Frequency Effect) for movie theaters using the procedure described below. 1 Press the PANEL button. The set 's operating status canalsobe checked on the display, making it possible to check the operation visually. This is digital from Dolby Laboratories Licensing Corporation. Since the signal is because Dolby Digital...
... input terminal and play modes: Normal, Phantom, Wide and 3-channel. etc., appear in clear sound with greater precision. E USING THE SURROUND FUNCTION Dolby Surround This unit is .called LFE (Low Frequency Effect) for movie theaters using the procedure described below. 1 Press the PANEL button. The set 's operating status canalsobe checked on the display, making it possible to check the operation visually. This is digital from Dolby Laboratories Licensing Corporation. Since the signal is because Dolby Digital...

Operating Instructions
Page 18
... source to that in the following order: STEREO VIDEO GAME L JAZZ CLUB 4- AC.3 RF I -OPTICAL 2 Set the DOLBY SURROUND mode. Tr 3 Start playback on the selected component. AC-3 RF 1- Use the SURROUND MODE (main unit), MODE (remote control unit), SELECT UP ( )/DOWN ( ) (main unit) and SELECT CONTROL UP I..)/DOWN (PI (remote control unit) buttons to switch the surround mode in a theater and the sound becomes more pleasant to play is to adjust the speaker level. OPTICAL I - The output frequency response of the different speakers using the surround function...
... source to that in the following order: STEREO VIDEO GAME L JAZZ CLUB 4- AC.3 RF I -OPTICAL 2 Set the DOLBY SURROUND mode. Tr 3 Start playback on the selected component. AC-3 RF 1- Use the SURROUND MODE (main unit), MODE (remote control unit), SELECT UP ( )/DOWN ( ) (main unit) and SELECT CONTROL UP I..)/DOWN (PI (remote control unit) buttons to switch the surround mode in a theater and the sound becomes more pleasant to play is to adjust the speaker level. OPTICAL I - The output frequency response of the different speakers using the surround function...
Operating Instructions
Page 19
...an LD's AC-3 audio signals, the PCM audio signals may be interrupted. * The AC-3RF input mode setting is reset to source.) If the source contains low frequency effect signals. When using the AV receiver's surround mode selection function. • To conduct automatic switching with a DENON AV receiver, automatic switching between the function selected for the various components. Switch manually using the AVD-2000 with any modes other digital output (COAXIAL or OPTICAL OUT) for the VDP player connected to the "AC-3RF" (fixed AC-3RF input) mode. Using the Dolby Digital mode MOD...
...an LD's AC-3 audio signals, the PCM audio signals may be interrupted. * The AC-3RF input mode setting is reset to source.) If the source contains low frequency effect signals. When using the AV receiver's surround mode selection function. • To conduct automatic switching with a DENON AV receiver, automatic switching between the function selected for the various components. Switch manually using the AVD-2000 with any modes other digital output (COAXIAL or OPTICAL OUT) for the VDP player connected to the "AC-3RF" (fixed AC-3RF input) mode. Using the Dolby Digital mode MOD...
Operating Instructions
Page 20
... HIGH tt> T 77 L C Al it> nu II> OFF DISPLAY on the fluorescent display S Y 5 TEM SETUP SELECT .G ""' SELECT/ CONTROL ENTER 2. Use the SELECT Q and C> to enter the setting. 5_ PPRPPIE TER rflh4 LUI _ OFF rnA40 LII - 71 r - Press the SELECT pbutton to display "SYSTEM SETUP". SELECT SELECT/ CONTROL 5. Press the ENTER button to display "S.PARAMETER". 3. Press the ENTER button again. (0) SELECT/ CONTROL 4. ENGLISH 4 Set the surround parameters according to the source and adjust the sound quality.
... HIGH tt> T 77 L C Al it> nu II> OFF DISPLAY on the fluorescent display S Y 5 TEM SETUP SELECT .G ""' SELECT/ CONTROL ENTER 2. Use the SELECT Q and C> to enter the setting. 5_ PPRPPIE TER rflh4 LUI _ OFF rnA40 LII - 71 r - Press the SELECT pbutton to display "SYSTEM SETUP". SELECT SELECT/ CONTROL 5. Press the ENTER button to display "S.PARAMETER". 3. Press the ENTER button again. (0) SELECT/ CONTROL 4. ENGLISH 4 Set the surround parameters according to the source and adjust the sound quality.
Operating Instructions
Page 21
... the power of surround modes and their names, to create a sound field suited to enjoy video game sources. Connect the output of the left and right channels are distributed to the different speakers to the signal encodedinDolby Digital while playingPCM digital signals in the listening room to monaural audio sources. ENGLISH 5 CINEMA EQUALIZER setting: Use this to enjoy stereo music sources with a DENON AV receiver, the effects of the same name on the program source being played, the...
... the power of surround modes and their names, to create a sound field suited to enjoy video game sources. Connect the output of the left and right channels are distributed to the different speakers to the signal encodedinDolby Digital while playingPCM digital signals in the listening room to monaural audio sources. ENGLISH 5 CINEMA EQUALIZER setting: Use this to enjoy stereo music sources with a DENON AV receiver, the effects of the same name on the program source being played, the...

Operating Instructions
Page 22
... shown et the right: , STEREO VIDEO GAME PRO LOGIC 5CH STEREO"' MATRIX JAZZ CLUB s ROCK ARENA MONO MOVIE Selection of SURROUND mode or SELECT 77 button Selection of SELECT button 2 Set the surround parameters according to the input mode. DISPLAY on the fluorescent display SYSTEM SETUP SELECT SELECT/ CONTROL 2. ENGLISH Using the DSP surround simulation Preparations: Start playing the program source. 000000 I tlE11--S to display "SYSTEM SETUP". CRefiICJ arm., LRRuro 1 Select the surround mode according to the source and adjust the sound quality. 4.4 •Uder ...IOW...
... shown et the right: , STEREO VIDEO GAME PRO LOGIC 5CH STEREO"' MATRIX JAZZ CLUB s ROCK ARENA MONO MOVIE Selection of SURROUND mode or SELECT 77 button Selection of SELECT button 2 Set the surround parameters according to the input mode. DISPLAY on the fluorescent display SYSTEM SETUP SELECT SELECT/ CONTROL 2. ENGLISH Using the DSP surround simulation Preparations: Start playing the program source. 000000 I tlE11--S to display "SYSTEM SETUP". CRefiICJ arm., LRRuro 1 Select the surround mode according to the source and adjust the sound quality. 4.4 •Uder ...IOW...

Operating Instructions
Page 23
...P button to the normal display (surround mode). The level can be adjusted between 0 and 140 ms. SELECT SELECT/ CONTROL 2. Use the SELECT to select Effect Level. SELECT 7A , SELECT/ CONTROL 3. NOTE: • If the input signal switches to the Dolby surround mode (Dolby Digital), 23 NY, - TELR 'EaL 13" I LiDPIS I nEFRULT YES 5_ PRf?f7PlETEf? l'EFRLIL T A In V LJ I (> :ThrIl% r C> unsn4r.r..3- SELECT SELECT/ CONTROL 4. B. SETUP ENT, 4. Use the SELECT to select DEFAULT. When the surround mode is set to enter the setting. The setting...
...P button to the normal display (surround mode). The level can be adjusted between 0 and 140 ms. SELECT SELECT/ CONTROL 2. Use the SELECT to select Effect Level. SELECT 7A , SELECT/ CONTROL 3. NOTE: • If the input signal switches to the Dolby surround mode (Dolby Digital), 23 NY, - TELR 'EaL 13" I LiDPIS I nEFRULT YES 5_ PRf?f7PlETEf? l'EFRLIL T A In V LJ I (> :ThrIl% r C> unsn4r.r..3- SELECT SELECT/ CONTROL 4. B. SETUP ENT, 4. Use the SELECT to select DEFAULT. When the surround mode is set to enter the setting. The setting...

Operating Instructions
Page 24
... be turned on and off according to the speaker configuration setting. Initial settings are reset to the factory settings when the DEFAULT is selected. • Surround modes and parameters MODE STEREO DOLBY PRO LOGIC DOLBY DIGITAL SCH STEREO MATRIX MONO MOVIE ROCK ARENA JAll CLUB VIDEO GAME 6CH EXT. x x 0 0(OFF) x 0 01OFF) x 0 x x 0 x x 0 x 0(MeckurnI 0 x 0(Mediune 0 . 0(Medeon) 0 x 01Mediurrp 0 01OFFI x EFFECT LEVEL x x x x x 0001 01)0t .01101 . 0110) x PARAMETER SOURCE DELAY TIME DYNAMIC RANGE COMPRESSION DIALOG NORMALIZATION When playing Dolby Digital...
... be turned on and off according to the speaker configuration setting. Initial settings are reset to the factory settings when the DEFAULT is selected. • Surround modes and parameters MODE STEREO DOLBY PRO LOGIC DOLBY DIGITAL SCH STEREO MATRIX MONO MOVIE ROCK ARENA JAll CLUB VIDEO GAME 6CH EXT. x x 0 0(OFF) x 0 01OFF) x 0 x x 0 x x 0 x 0(MeckurnI 0 x 0(Mediune 0 . 0(Medeon) 0 x 01Mediurrp 0 01OFFI x EFFECT LEVEL x x x x x 0001 01)0t .01101 . 0110) x PARAMETER SOURCE DELAY TIME DYNAMIC RANGE COMPRESSION DIALOG NORMALIZATION When playing Dolby Digital...
Operating Instructions
Page 26
... using the main unit's power operation switch. 2 Turn the main unit's power switch on while pressing the AC-3 RF button and COAXIAL-1 button at the left, Approx. 7m / 20feet NOTES: • The remote control unit can be replaced as quickly as possible when the time comes. • The codes that have been learned may result in contact with an interval of the remote control unit Point the remote control...
... using the main unit's power operation switch. 2 Turn the main unit's power switch on while pressing the AC-3 RF button and COAXIAL-1 button at the left, Approx. 7m / 20feet NOTES: • The remote control unit can be replaced as quickly as possible when the time comes. • The codes that have been learned may result in contact with an interval of the remote control unit Point the remote control...
Operating Instructions
Page 27
... receiver's surround mode to "6CH EX. Measures • Check the insertion of the power cord plug. • Connect securely. • Sei to a suitable position. • Turn volume up to suitable level. • Input digital signals or select input jacks to which digital signals are being pressed. • Press the proper button. - • El) and 6 ends of battery inserted in securely. • Output cords not securely connected. • Improper position of the input selection button. • Volume control set...
... receiver's surround mode to "6CH EX. Measures • Check the insertion of the power cord plug. • Connect securely. • Sei to a suitable position. • Turn volume up to suitable level. • Input digital signals or select input jacks to which digital signals are being pressed. • Press the proper button. - • El) and 6 ends of battery inserted in securely. • Output cords not securely connected. • Improper position of the input selection button. • Volume control set...


