Owner's Manual
Page 8
... 98 A program crashes repeatedly 98 A program is designed for an earlier Microsoft Windows operating system 99 A solid blue screen appears 99 Dell MediaDirect problems 99 Other software problems 100 Memory Problems 100 Network Problems 101 General 101 Mobile Broadband Network 101 Media Memory Card or ExpressCard ... Problems 105 Video and Display Problems 106 If the display is blank 106 If the display is difficult to read 107 If only part of the display is readable 107 11 System Setup Program 109 Overview 109 Viewing the System Setup Screens 109 System Setup Screens 110...
... 98 A program crashes repeatedly 98 A program is designed for an earlier Microsoft Windows operating system 99 A solid blue screen appears 99 Dell MediaDirect problems 99 Other software problems 100 Memory Problems 100 Network Problems 101 General 101 Mobile Broadband Network 101 Media Memory Card or ExpressCard ... Problems 105 Video and Display Problems 106 If the display is blank 106 If the display is difficult to read 107 If only part of the display is readable 107 11 System Setup Program 109 Overview 109 Viewing the System Setup Screens 109 System Setup Screens 110...
Owner's Manual
Page 9
... Drivers and Utilities 120 Resolving Software and Hardware Incompatibilities 122 Restoring Your Operating System 122 Using Microsoft Windows XP System Restore 122 Using the Operating System Installation Media 124 14 Adding and Replacing Parts 127 Before You Begin 127 Recommended Tools 127 Turning Off Your Computer 127 Before Working Inside Your Computer...
... Drivers and Utilities 120 Resolving Software and Hardware Incompatibilities 122 Restoring Your Operating System 122 Using Microsoft Windows XP System Restore 122 Using the Operating System Installation Media 124 14 Adding and Replacing Parts 127 Before You Begin 127 Recommended Tools 127 Turning Off Your Computer 127 Before Working Inside Your Computer...
Owner's Manual
Page 89
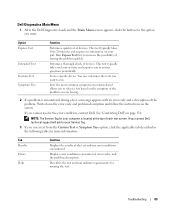
...1 After the Dell Diagnostics loads and... devices. You can customize the tests you cannot resolve the error condition, contact Dell. Displays error conditions encountered, error codes, and the problem description. Performs a thorough check of... tracing the problem quickly. Troubleshooting 89 See "Contacting Dell" on the screen. This test typically takes 10 to run a test from...code and problem description and follow the instructions on page 150. If you contact Dell, technical support will ask for running the test. Option Express Test Extended Test ...
...1 After the Dell Diagnostics loads and... devices. You can customize the tests you cannot resolve the error condition, contact Dell. Displays error conditions encountered, error codes, and the problem description. Performs a thorough check of... tracing the problem quickly. Troubleshooting 89 See "Contacting Dell" on the screen. This test typically takes 10 to run a test from...code and problem description and follow the instructions on page 150. If you contact Dell, technical support will ask for running the test. Option Express Test Extended Test ...
Owner's Manual
Page 107
... display is readable CONNECT AN EXTERNAL MONITOR - 1 Shut down -arrow key. See "Contacting Dell" on page 150. If the external monitor works, the computer display or video controller may be defective. See "Contacting...- RUN THE VIDEO DIAGNOSTICS TESTS - Contact Dell. R O T A T E T H E C O M P U T E R T O F A C E A D I F F E R E N T D I R E C T I T O R - Eliminate sunlight glare, which can cause poor picture quality. Then contact Dell. Turn off nearby fans, fluorescent lights, halogen lamps, or other appliances. If only part of the display is not completely blank, run...
... display is readable CONNECT AN EXTERNAL MONITOR - 1 Shut down -arrow key. See "Contacting Dell" on page 150. If the external monitor works, the computer display or video controller may be defective. See "Contacting...- RUN THE VIDEO DIAGNOSTICS TESTS - Contact Dell. R O T A T E T H E C O M P U T E R T O F A C E A D I F F E R E N T D I R E C T I T O R - Eliminate sunlight glare, which can cause poor picture quality. Then contact Dell. Turn off nearby fans, fluorescent lights, halogen lamps, or other appliances. If only part of the display is not completely blank, run...
Owner's Manual
Page 127
...Your Computer" on page 127. • You have read the safety information in your Dell™ Product Information Guide. b In the Turn off computer window, click Turn off . Adding and Replacing Parts 127 If your operating system, press and hold the power button for removing and installing the... guidelines to help protect your computer from potential damage and to help ensure your computer. Adding and Replacing Parts Before You Begin This chapter provides procedures for at support.dell.com) Turning Off Your Computer NOTICE: To avoid losing data, save and close any open files, exit...
...Your Computer" on page 127. • You have read the safety information in your Dell™ Product Information Guide. b In the Turn off computer window, click Turn off . Adding and Replacing Parts 127 If your operating system, press and hold the power button for removing and installing the... guidelines to help protect your computer from potential damage and to help ensure your computer. Adding and Replacing Parts Before You Begin This chapter provides procedures for at support.dell.com) Turning Off Your Computer NOTICE: To avoid losing data, save and close any open files, exit...
Owner's Manual
Page 128
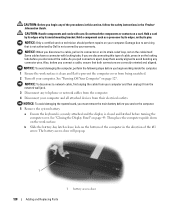
...3 Disconnect any connector pins. b Slide the battery-bay latch release lock on your computer. Hold a card by its edges or by Dell is clean and flat to avoid bending any telephone or network cables from the computer. 4 Disconnect your computer and all attached devices from ...working inside the computer. 1 Ensure the work surface. The battery access door will pop up. 1 1 battery access door 128 Adding and Replacing Parts CAUTION: Before you pull connectors apart, keep them evenly aligned to prevent the computer cover from being scratched. 2 Turn off your computer. CAUTION:...
...3 Disconnect any connector pins. b Slide the battery-bay latch release lock on your computer. Hold a card by its edges or by Dell is clean and flat to avoid bending any telephone or network cables from the computer. 4 Disconnect your computer and all attached devices from ...working inside the computer. 1 Ensure the work surface. The battery access door will pop up. 1 1 battery access door 128 Adding and Replacing Parts CAUTION: Before you pull connectors apart, keep them evenly aligned to prevent the computer cover from being scratched. 2 Turn off your computer. CAUTION:...

Owner's Manual
Page 129
... media memory cards. See "Removing a Card" on the system board. Install only memory modules that are covered under your computer. NOTE: Memory modules purchased from Dell are intended for information on the memory supported by installing memory modules on page 83. See "Specifications" on page 137 for your computer warranty. Adding...
... media memory cards. See "Removing a Card" on the system board. Install only memory modules that are covered under your computer. NOTE: Memory modules purchased from Dell are intended for information on the memory supported by installing memory modules on page 83. See "Specifications" on page 137 for your computer warranty. Adding...
Owner's Manual
Page 130
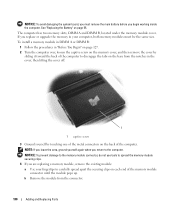
... 3 Ground yourself by sliding it toward the back of the computer to disengage the tabs on the base from the connector. 130 Adding and Replacing Parts NOTICE: To prevent damage to the memory module connector, do not use tools to carefully spread apart the securing clips on each end of the...
... 3 Ground yourself by sliding it toward the back of the computer to disengage the tabs on the base from the connector. 130 Adding and Replacing Parts NOTICE: To prevent damage to the memory module connector, do not use tools to carefully spread apart the securing clips on each end of the...

Owner's Manual
Page 131
... of the computer, then tighten the screw. NOTE: If the memory module is difficult to close , remove the module and reinstall it. Adding and Replacing Parts 131 As the computer boots, it . 6 Replace the memory cover by aligning the notches in the cover with the tab in the computer, click the...
... of the computer, then tighten the screw. NOTE: If the memory module is difficult to close , remove the module and reinstall it. Adding and Replacing Parts 131 As the computer boots, it . 6 Replace the memory cover by aligning the notches in the cover with the tab in the computer, click the...

Owner's Manual
Page 132
... the computer. CAUTION: Before you are replacing a card, remove the existing card: a Disconnect the antenna cables from the card. 1 1 antenna cables 132 Adding and Replacing Parts Mini Card If you ordered a wireless LAN (WLAN) card with your computer, the card is not already installed, go to the computer. 4 If a card is...
... the computer. CAUTION: Before you are replacing a card, remove the existing card: a Disconnect the antenna cables from the card. 1 1 antenna cables 132 Adding and Replacing Parts Mini Card If you ordered a wireless LAN (WLAN) card with your computer, the card is not already installed, go to the computer. 4 If a card is...

Owner's Manual
Page 133
... clicks. Connect the auxiliary cable (black) to the antenna connector with the white triangle. NOTE: If your card. 6 Replace the memory cover. Adding and Replacing Parts 133 Connect the main cable (white) to the antenna connector with the black triangle. a Align the card with the gray triangle, if one is not...
... clicks. Connect the auxiliary cable (black) to the antenna connector with the white triangle. NOTE: If your card. 6 Replace the memory cover. Adding and Replacing Parts 133 Connect the main cable (white) to the antenna connector with the black triangle. a Align the card with the gray triangle, if one is not...

Owner's Manual
Page 134
... the lip on the compartment. 2 Carefully press the coin-cell battery into the compartment, being careful not to break the plastic. 134 Adding and Replacing Parts NOTICE: To avoid damaging the system board, you must remove the main battery before you begin working inside the computer. Coin-Cell Battery CAUTION: Before...
... the lip on the compartment. 2 Carefully press the coin-cell battery into the compartment, being careful not to break the plastic. 134 Adding and Replacing Parts NOTICE: To avoid damaging the system board, you must remove the main battery before you begin working inside the computer. Coin-Cell Battery CAUTION: Before...
Owner's Manual
Page 147
... guides, and so on page 150. Collect On Delivery (C.O.D.) packages are responsible for repair or credit, as follows: 1 Call Dell to obtain a Return Material Authorization Number, and write it clearly and prominently on the outside of the preceding requirements will be returned in... need information about additional products available from Dell, or if you would like to a sales specialist, see "Contacting Dell" on page 149), indicating the tests that belong with your country as missing parts, wrong parts, or incorrect billing, contact Dell for your order, such as listed in...
... guides, and so on page 150. Collect On Delivery (C.O.D.) packages are responsible for repair or credit, as follows: 1 Call Dell to obtain a Return Material Authorization Number, and write it clearly and prominently on the outside of the preceding requirements will be returned in... need information about additional products available from Dell, or if you would like to a sales specialist, see "Contacting Dell" on page 149), indicating the tests that belong with your country as missing parts, wrong parts, or incorrect billing, contact Dell for your order, such as listed in...
Owner's Manual
Page 154
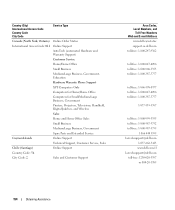
.../Home Office Small Business Medium/Large Business, Government, Education Hardware Warranty Phone Support XPS Computers Only Computers for Home/Home Office Computers for Small/Medium/Large Business, Government...and Wireless Sales Home and Home Office Sales Small Business Medium/Large Business, Government Spare Parts and Extended Service Cayman Islands Online Support Technical Support, Customer Service, Sales Chile (Santiago)...Codes, Local Numbers, and Toll-Free Numbers Web and E-mail Address www.dell.ca/ostatus support.ca.dell.com toll-free: 1-800-247-9362 toll-free: 1-800-847-4096 ...
.../Home Office Small Business Medium/Large Business, Government, Education Hardware Warranty Phone Support XPS Computers Only Computers for Home/Home Office Computers for Small/Medium/Large Business, Government...and Wireless Sales Home and Home Office Sales Small Business Medium/Large Business, Government Spare Parts and Extended Service Cayman Islands Online Support Technical Support, Customer Service, Sales Chile (Santiago)...Codes, Local Numbers, and Toll-Free Numbers Web and E-mail Address www.dell.ca/ostatus support.ca.dell.com toll-free: 1-800-247-9362 toll-free: 1-800-847-4096 ...

Owner's Manual
Page 155
XPS computers only Technical Support - Projectors, PDAs, Switches, Routers, etc. Printers Customer Service Customer Service Fax Home and Small Business Preferred Accounts Division Large Corporate Accounts ... Large Corporate Accounts South Large Corporate Accounts West Large Corporate Accounts Spare Parts Online Support Technical Support, Customer Service, Sales Area Codes, Local Numbers, and Toll-Free Numbers Web and E-mail Address support.dell.com.cn support.dell.com.cn/email customer_cn@dell.com 592 818 1350 toll-free: 800 858 0540 toll-free...
XPS computers only Technical Support - Projectors, PDAs, Switches, Routers, etc. Printers Customer Service Customer Service Fax Home and Small Business Preferred Accounts Division Large Corporate Accounts ... Large Corporate Accounts South Large Corporate Accounts West Large Corporate Accounts Spare Parts Online Support Technical Support, Customer Service, Sales Area Codes, Local Numbers, and Toll-Free Numbers Web and E-mail Address support.dell.com.cn support.dell.com.cn/email customer_cn@dell.com 592 818 1350 toll-free: 800 858 0540 toll-free...
Owner's Manual
Page 177
...number: Company name: Dell™ XPS™ M2010 PP03X Dell Inc. Operation is subject to the following two conditions: 1 This device may not cause harmful interference. 2 This device must accept any interference received, including interference that changes or modifications not expressly approved by Dell Inc. The following... with radio or television reception, which can radiate radio frequency energy and, if not installed and used in compliance with Part 15 of the FCC Rules. However, there is provided on the device or devices covered in this equipment. If necessary...
...number: Company name: Dell™ XPS™ M2010 PP03X Dell Inc. Operation is subject to the following two conditions: 1 This device may not cause harmful interference. 2 This device must accept any interference received, including interference that changes or modifications not expressly approved by Dell Inc. The following... with radio or television reception, which can radiate radio frequency energy and, if not installed and used in compliance with Part 15 of the FCC Rules. However, there is provided on the device or devices covered in this equipment. If necessary...
Owner's Manual
Page 185
... program instructions and data. peripheral component interconnect - Personal Computer Memory Card International Association - personal system/2 - A type of providing data redundancy. Some programs essential to as part of independent disks -
... program instructions and data. peripheral component interconnect - Personal Computer Memory Card International Association - personal system/2 - A type of providing data redundancy. Some programs essential to as part of independent disks -


