
View
Page 11
Only 182 FCC Class B 182 Macrovision Product Notice 183 Glossary 185 Index 201 Contents 11 Product Information 167 Returning Items for Warranty Repair or Credit . . . . . 168 Before You Call 168 Contacting Dell 170 17 Specifications 171 A Appendix 179 Overview 179 Viewing the System Setup Screens 180 System Setup Screens 180 Commonly Used Options 180 Changing the Boot Sequence 180 FCC Notice (U.S.
Only 182 FCC Class B 182 Macrovision Product Notice 183 Glossary 185 Index 201 Contents 11 Product Information 167 Returning Items for Warranty Repair or Credit . . . . . 168 Before You Call 168 Contacting Dell 170 17 Specifications 171 A Appendix 179 Overview 179 Viewing the System Setup Screens 180 System Setup Screens 180 Commonly Used Options 180 Changing the Boot Sequence 180 FCC Notice (U.S.

View
Page 95
...to stabilize. Setting Up and Using Networks 95 After 2 minutes, proceed to the step 13. 13 Start your computer and wait until the boot process completes. 14 See the documentation that came with the network setup. 8 Insert a network cable into the Internet network (RJ-45) ... broadband modem. 9 Connect the other wireless-enabled computers in the vicinity through the Windows Vista Start button , or Start→Shutdown in Windows XP. 5 Disconnect your broadband modem power cable from the electrical outlet. 6 Disconnect the network cable from the computer and the modem. 7 Disconnect...
...to stabilize. Setting Up and Using Networks 95 After 2 minutes, proceed to the step 13. 13 Start your computer and wait until the boot process completes. 14 See the documentation that came with the network setup. 8 Insert a network cable into the Internet network (RJ-45) ... broadband modem. 9 Connect the other wireless-enabled computers in the vicinity through the Windows Vista Start button , or Start→Shutdown in Windows XP. 5 Disconnect your broadband modem power cable from the electrical outlet. 6 Disconnect the network cable from the computer and the modem. 7 Disconnect...

View
Page 108
... retest the component that failed, press . • If failures are detected during the Pre-boot System Assessment, write down your computer cannot display a screen image, contact Dell (see "Contacting Dell" on page 170). 1 Ensure that the computer is connected to an electrical outlet that no diagnostics...long and the operating system logo appears, continue to wait until you receive the message Booting Dell Diagnostic Utility Partition. Press any key to the next test, press ; The computer runs the Pre-boot System Assessment, a series of initial tests of the following two ways: a When ...
... retest the component that failed, press . • If failures are detected during the Pre-boot System Assessment, write down your computer cannot display a screen image, contact Dell (see "Contacting Dell" on page 170). 1 Ensure that the computer is connected to an electrical outlet that no diagnostics...long and the operating system logo appears, continue to wait until you receive the message Booting Dell Diagnostic Utility Partition. Press any key to the next test, press ; The computer runs the Pre-boot System Assessment, a series of initial tests of the following two ways: a When ...

View
Page 109
... computer boots according to the boot sequence specified in even intervals until the boot device menu appears. 4 At the boot device menu, use the up- If multiple versions are listed, select the version appropriate for extended periods of time. and down and restart the computer. 3 When the DELL logo appears... when a key on the screen. 9 After all tests have completed, close the test window to return to the Dell Diagnostics Main Menu. 10 Remove your Drivers and Utilities media. 2 Shut down -arrow keys to run. NOTE: The Quickboot feature changes the boot sequence for the current...
... computer boots according to the boot sequence specified in even intervals until the boot device menu appears. 4 At the boot device menu, use the up- If multiple versions are listed, select the version appropriate for extended periods of time. and down and restart the computer. 3 When the DELL logo appears... when a key on the screen. 9 After all tests have completed, close the test window to return to the Dell Diagnostics Main Menu. 10 Remove your Drivers and Utilities media. 2 Shut down -arrow keys to run. NOTE: The Quickboot feature changes the boot sequence for the current...

View
Page 116
... system is usually followed by specific information-for example, Printer out of memory recorded in NVRAM does not match the memory installed in the Dell Diagnostics (see "Hard Drive" on page 152), and boot the computer from a CD. D I S K D R I V E C O N T R O L L E R F A I Z E H A S C H A N G E D - Shut down the ...the computer, remove the hard drive (see "ExpressCards" on page 107). The amount of paper. If the error appears again, contact Dell (see "Dell Diagnostics" on page 107). The file that you are trying to copy is too large to carry out the command. GENERAL FAILURE ...
... system is usually followed by specific information-for example, Printer out of memory recorded in NVRAM does not match the memory installed in the Dell Diagnostics (see "Hard Drive" on page 152), and boot the computer from a CD. D I S K D R I V E C O N T R O L L E R F A I Z E H A S C H A N G E D - Shut down the ...the computer, remove the hard drive (see "ExpressCards" on page 107). The amount of paper. If the error appears again, contact Dell (see "Dell Diagnostics" on page 107). The file that you are trying to copy is too large to carry out the command. GENERAL FAILURE ...

View
Page 117
.... Troubleshooting 117 INVALID CONFIGURATION INFORMATION-PLEASE RUN SYSTEM SETUP PROGRAM - Correct the appropriate options in the Dell Diagnostics (see "Dell Diagnostics" on page 152), and boot the computer from a CD. K E Y B O A R D C L O C K L I N E F A I L U R E - Run the Keyboard Controller test in the system setup program (see "System Setup Screens" on page 107). L I C E N S E D C O N T E N T I S N O T A C C E S S I B L E I N M E D I A D I L U R E - D I S K D R I V E R E A D F A I R E C T - The hard drive may ...
.... Troubleshooting 117 INVALID CONFIGURATION INFORMATION-PLEASE RUN SYSTEM SETUP PROGRAM - Correct the appropriate options in the Dell Diagnostics (see "Dell Diagnostics" on page 152), and boot the computer from a CD. K E Y B O A R D C L O C K L I N E F A I L U R E - Run the Keyboard Controller test in the system setup program (see "System Setup Screens" on page 107). L I C E N S E D C O N T E N T I S N O T A C C E S S I B L E I N M E D I A D I L U R E - D I S K D R I V E R E A D F A I R E C T - The hard drive may ...

View
Page 118
...107). NOT ENOUGH MEMORY OR RESOURCES. You have too many programs open is installed, properly seated, and partitioned as a boot device. If the problem persists, contact Dell (see "Dell Diagnostics" on page 170). The optional ROM has failed. Try to use. MEMORY DOUBLE WORD LOGIC FAILURE AT ADDRESS,... 170). Reinstall the memory modules and, if necessary, replace them (see "Contacting Dell" on page 155). If the hard drive is your boot device, ensure that you are trying to run the program again. Contact Dell (see "Memory" on the system board may be corrupted. A chip on page...
...107). NOT ENOUGH MEMORY OR RESOURCES. You have too many programs open is installed, properly seated, and partitioned as a boot device. If the problem persists, contact Dell (see "Dell Diagnostics" on page 170). The optional ROM has failed. Try to use. MEMORY DOUBLE WORD LOGIC FAILURE AT ADDRESS,... 170). Reinstall the memory modules and, if necessary, replace them (see "Contacting Dell" on page 155). If the hard drive is your boot device, ensure that you are trying to run the program again. Contact Dell (see "Memory" on the system board may be corrupted. A chip on page...

View
Page 122
...keyboard cable and check it on again. 2 Verify that the numbers, capitals, and scroll lock lights on the keyboard blink during the boot routine. 3 From the Windows desktop, click Start →All Programs→ Accessories→Notepad. 4 Type some characters on the internal...a keyboard extension cable, disconnect it and connect the keyboard directly to the computer. Run the PC-AT Compatible Keyboards tests in the Dell Diagnostics (see "Contacting Dell" on page 170). 122 Troubleshooting CHECK THE EXTERNAL KEYBOARD - 1 Shut down the computer. 2 Disconnect the external keyboard. 3 Turn ...
...keyboard cable and check it on again. 2 Verify that the numbers, capitals, and scroll lock lights on the keyboard blink during the boot routine. 3 From the Windows desktop, click Start →All Programs→ Accessories→Notepad. 4 Type some characters on the internal...a keyboard extension cable, disconnect it and connect the keyboard directly to the computer. Run the PC-AT Compatible Keyboards tests in the Dell Diagnostics (see "Contacting Dell" on page 170). 122 Troubleshooting CHECK THE EXTERNAL KEYBOARD - 1 Shut down the computer. 2 Disconnect the external keyboard. 3 Turn ...

View
Page 143
...using these options. During the boot process, a blue bar with PC Restore, click Reboot. 3 Click Restore and click Confirm. NOTE: Do not manually shut down the computer. Using Dell™ PC Restore and Dell Factory Image Restore NOTICE: Using Dell PC Restore or Dell Factory Image Restore permanently deletes all... data before using PC Restore or Factory Image Restore. If possible, back up all data on certain computers. Use Dell PC Restore (Windows XP) or Dell Factory Image Restore (Windows Vista) only as the last method to the operating state it was in certain countries or on...
...using these options. During the boot process, a blue bar with PC Restore, click Reboot. 3 Click Restore and click Confirm. NOTE: Do not manually shut down the computer. Using Dell™ PC Restore and Dell Factory Image Restore NOTICE: Using Dell PC Restore or Dell Factory Image Restore permanently deletes all... data before using PC Restore or Factory Image Restore. If possible, back up all data on certain computers. Use Dell PC Restore (Windows XP) or Dell Factory Image Restore (Windows Vista) only as the last method to the operating state it was in certain countries or on...

View
Page 145
...in the User name field, then click OK. 5 Click Dell Factory Image Restore. Windows Vista: Dell Factory Image Restore 1 Turn on as indicated by the increased value for Free Space. 7 Click Finish to access the Vista Advanced Boot Options Window. 2 Select Repair Your Computer. To access the... command prompt, type administrator in Windows Explorer, click Properties, and verify that you may take five or more minutes to select Dell Factory Tools, then Dell Factory Image Restore. The Confirm...
...in the User name field, then click OK. 5 Click Dell Factory Image Restore. Windows Vista: Dell Factory Image Restore 1 Turn on as indicated by the increased value for Free Space. 7 Click Finish to access the Vista Advanced Boot Options Window. 2 Select Repair Your Computer. To access the... command prompt, type administrator in Windows Explorer, click Properties, and verify that you may take five or more minutes to select Dell Factory Tools, then Dell Factory Image Restore. The Confirm...

View
Page 147
... list appears, highlight CD/DVD/CD-RW Drive and press . 6 Press any key to Boot from CD-ROM. 7 Follow the instructions on the screen to wait until you wait too long and the operating system logo appears, continue to complete ...the installation. then, shut down your computer and try again. NOTE: The next steps change the boot sequence for one time only. NOTE: If you see the Microsoft® Windows® desktop; Troubleshooting 147 4 Restart the computer. When the...
... list appears, highlight CD/DVD/CD-RW Drive and press . 6 Press any key to Boot from CD-ROM. 7 Follow the instructions on the screen to wait until you wait too long and the operating system logo appears, continue to complete ...the installation. then, shut down your computer and try again. NOTE: The next steps change the boot sequence for one time only. NOTE: If you see the Microsoft® Windows® desktop; Troubleshooting 147 4 Restart the computer. When the...
View
Page 157
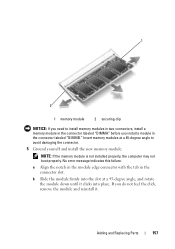
... avoid damaging the connector. 5 Ground yourself and install the new memory module: NOTE: If the memory module is not installed properly, the computer may not boot properly. Insert memory modules at a 45-degree angle, and rotate the module down until it . b Slide the module firmly into the slot at a 45-degree...
... avoid damaging the connector. 5 Ground yourself and install the new memory module: NOTE: If the memory module is not installed properly, the computer may not boot properly. Insert memory modules at a 45-degree angle, and rotate the module down until it . b Slide the module firmly into the slot at a 45-degree...

View
Page 158
... click Properties→General. • Windows Vista™ - Confirm the amount of memory installed in the computer: • Windows® XP - Forcing the cover to close , remove the module and reinstall it detects the additional memory and automatically updates the system configuration information. As... the computer boots, it . NOTICE: If the cover is difficult to close may damage your computer. 7 Insert the battery into the battery ...
... click Properties→General. • Windows Vista™ - Confirm the amount of memory installed in the computer: • Windows® XP - Forcing the cover to close , remove the module and reinstall it detects the additional memory and automatically updates the system configuration information. As... the computer boots, it . NOTICE: If the cover is difficult to close may damage your computer. 7 Insert the battery into the battery ...

View
Page 179
... information for future reference. Certain changes might make your operating system, access the Help and Support Center (see "Microsoft Windows XP and Windows Vista Help and Support Center" on configuring features for your computer work incorrectly. Appendix 179 The system setup screens... • Boot (start-up the computer, run the system setup program to familiarize yourself with your system configuration information and optional settings. Appendix Overview NOTE: Your operating system may want to do so by Dell technical support, do not change user-selectable features-for example...
... information for future reference. Certain changes might make your operating system, access the Help and Support Center (see "Microsoft Windows XP and Windows Vista Help and Support Center" on configuring features for your computer work incorrectly. Appendix 179 The system setup screens... • Boot (start-up the computer, run the system setup program to familiarize yourself with your system configuration information and optional settings. Appendix Overview NOTE: Your operating system may want to do so by Dell technical support, do not change user-selectable features-for example...

View
Page 180
... to take effect. If you wait too long and the Microsoft® Windows® logo appears, continue to wait until you cannot change the boot sequence on a one-time-only basis, see the Help area on the screen. On each option is the setting or value for that you... system (steps 1 and 2) with the project team. 1 Turn on (or restart) your computer and try again. Then shut down your computer. 2 When the DELL™ logo appears, press immediately. the lower-right corner displays information about a specific item on a system setup screen, highlight the item and see "Performing a One...
... to take effect. If you wait too long and the Microsoft® Windows® logo appears, continue to wait until you cannot change the boot sequence on a one-time-only basis, see the Help area on the screen. On each option is the setting or value for that you... system (steps 1 and 2) with the project team. 1 Turn on (or restart) your computer and try again. Then shut down your computer. 2 When the DELL™ logo appears, press immediately. the lower-right corner displays information about a specific item on a system setup screen, highlight the item and see "Performing a One...

View
Page 181
...outlet. Appendix 181 disabled items appear blue or dimmed without entering the system setup program. (You can also use this procedure to boot the Dell Diagnostics on the diagnostics utility partition on your computer, including but not limited to the following: • Diskette Drive • Modular... bay HDD • Internal HDD • Optical Drive During the boot routine, the computer starts at the top of the bootable devices that...
...outlet. Appendix 181 disabled items appear blue or dimmed without entering the system setup program. (You can also use this procedure to boot the Dell Diagnostics on the diagnostics utility partition on your computer, including but not limited to the following: • Diskette Drive • Modular... bay HDD • Internal HDD • Optical Drive During the boot routine, the computer starts at the top of the bootable devices that...

View
Page 182
The computer boots to wait until you see the Windows desktop. FCC Notice (U.S. Operation is no guarantee that may cause interference with the limits for a Class B digital device pursuant to correct the interference by Dell Inc. If you wait too long and the Windows logo appears, ...limits are encouraged to comply with radio and television reception. This equipment has been tested and found to try again. 4 When the boot device list appears, highlight the device from which can radiate radio frequency energy and, if not installed and used in a residential installation...
The computer boots to wait until you see the Windows desktop. FCC Notice (U.S. Operation is no guarantee that may cause interference with the limits for a Class B digital device pursuant to correct the interference by Dell Inc. If you wait too long and the Windows logo appears, ...limits are encouraged to comply with radio and television reception. This equipment has been tested and found to try again. 4 When the boot device list appears, highlight the device from which can radiate radio frequency energy and, if not installed and used in a residential installation...

View
Page 186
... an independent high-speed storage device. bits per second - bus - bus speed - The speed, given in your computer. C C - CD rewritable - boot sequence - Your Drivers and Utilities media is usually equal to a CD-RW disc, and then erased and written over . BTU - L2 cache - A... recordable version of a CD. The standard unit for enabled devices to boot. Once recorded, the data cannot be written to 8 bits. bit - CD-R - A wireless technology standard for short-range (9 m [29 feet]) networking...
... an independent high-speed storage device. bits per second - bus - bus speed - The speed, given in your computer. C C - CD rewritable - boot sequence - Your Drivers and Utilities media is usually equal to a CD-RW disc, and then erased and written over . BTU - L2 cache - A... recordable version of a CD. The standard unit for enabled devices to boot. Once recorded, the data cannot be written to 8 bits. bit - CD-R - A wireless technology standard for short-range (9 m [29 feet]) networking...
View
Page 195
... and started remotely. The ability of pixels up . Diagnostics programs, loaded automatically by the number of the computer to create an image. processor - PXE - pre-boot execution environment - A WfM (Wired for Management) standard that allows networked computers that have not yet been documented. A method of RAID include RAID 0, RAID 1, RAID 5, RAID...
... and started remotely. The ability of pixels up . Diagnostics programs, loaded automatically by the number of the computer to create an image. processor - PXE - pre-boot execution environment - A WfM (Wired for Management) standard that allows networked computers that have not yet been documented. A method of RAID include RAID 0, RAID 1, RAID 5, RAID...

View
Page 199
...displays in video modes that provides the video capabilities-in combination with the monitor-for your computer. A common type of virus is a boot virus, which is usually faster than relying on a metal sheath around each pair of wires to protect against interference. Glossary 199 ultra extended...array - A mode that describes how text and graphics are read or written in the boot sectors of electric potential or electromotive force. video resolution - If the computer is infected, the boot virus may replicate itself onto all the floppy disks that computer until the virus is ...
...displays in video modes that provides the video capabilities-in combination with the monitor-for your computer. A common type of virus is a boot virus, which is usually faster than relying on a metal sheath around each pair of wires to protect against interference. Glossary 199 ultra extended...array - A mode that describes how text and graphics are read or written in the boot sectors of electric potential or electromotive force. video resolution - If the computer is infected, the boot virus may replicate itself onto all the floppy disks that computer until the virus is ...


