Owner's Manual
Page 7
... A program stops responding or crashes repeatedly 88 A program is designed for an earlier Microsoft® Windows® operating system 89 A solid blue screen appears 89 Dell MediaDirect problems 89 Other software problems 90 Memory Problems 90 Network Problems 91 ExpressCard Problems 91 Power Problems 91 Ensuring Sufficient Power for Your Computer... or Mouse Problems 95 Video and Display Problems 95 If the display is blank 95 If the display is difficult to read 96 If only part of the display is readable 96 Contents 7
... A program stops responding or crashes repeatedly 88 A program is designed for an earlier Microsoft® Windows® operating system 89 A solid blue screen appears 89 Dell MediaDirect problems 89 Other software problems 90 Memory Problems 90 Network Problems 91 ExpressCard Problems 91 Power Problems 91 Ensuring Sufficient Power for Your Computer... or Mouse Problems 95 Video and Display Problems 95 If the display is blank 95 If the display is difficult to read 96 If only part of the display is readable 96 Contents 7
Owner's Manual
Page 8
... and Hardware Incompatibilities 99 Restoring Your Operating System 99 Using Microsoft Windows XP System Restore 100 Using Dell PC Restore by Symantec 101 Using the Operating System CD 103 12 Adding and Replacing Parts Before You Begin 105 Recommended Tools 105 Turning Off Your Computer 105 ...Before Working Inside Your Computer 106 Battery 108 Removing a Battery 108 Installing a Battery 108 Hard Drive 108 Returning a Hard Drive to Dell 111 Optical Drives 111 About ...
... and Hardware Incompatibilities 99 Restoring Your Operating System 99 Using Microsoft Windows XP System Restore 100 Using Dell PC Restore by Symantec 101 Using the Operating System CD 103 12 Adding and Replacing Parts Before You Begin 105 Recommended Tools 105 Turning Off Your Computer 105 ...Before Working Inside Your Computer 106 Battery 108 Removing a Battery 108 Installing a Battery 108 Hard Drive 108 Returning a Hard Drive to Dell 111 Optical Drives 111 About ...
Owner's Manual
Page 11
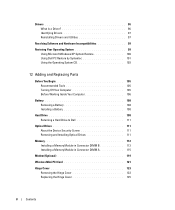
...the CD to reinstall drivers (see page 97) or to run the Dell Diagnostics • How to set up my computer • How to troubleshoot and solve problems • How to remove and install parts • Specifications • How to your computer or advanced technicalreference material... for my computer • My device documentation • Notebook System Software (NSS) Find It Here Drivers and Utilities CD (also known as a PDF at support.dell.com. Some features or...
...the CD to reinstall drivers (see page 97) or to run the Dell Diagnostics • How to set up my computer • How to troubleshoot and solve problems • How to remove and install parts • Specifications • How to your computer or advanced technicalreference material... for my computer • My device documentation • Notebook System Software (NSS) Find It Here Drivers and Utilities CD (also known as a PDF at support.dell.com. Some features or...

Owner's Manual
Page 79
...your Service Tag. 3 If you are having. 2 If a problem is located at the top of devices. If you contact Dell, technical support will ask for your part. Run Express Test first to select a test based on the symptom of the test and any error conditions encountered. Performs a thorough...Tab Results Errors Help Function Displays the results of the problem you run . If you want to answer questions periodically. Dell Diagnostics Main Menu 1 After the Dell Diagnostics loads and the Main Menu screen appears, click the button for the option you cannot resolve the error condition, contact...
...your Service Tag. 3 If you are having. 2 If a problem is located at the top of devices. If you contact Dell, technical support will ask for your part. Run Express Test first to select a test based on the symptom of the test and any error conditions encountered. Performs a thorough...Tab Results Errors Help Function Displays the results of the problem you run . If you want to answer questions periodically. Dell Diagnostics Main Menu 1 After the Dell Diagnostics loads and the Main Menu screen appears, click the button for the option you cannot resolve the error condition, contact...

Owner's Manual
Page 96
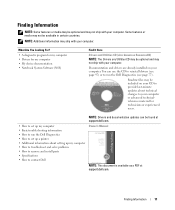
... U T E R T O F A C E A D I F F E R E N T D I R E C T I N T E RF E RE N C E - See "Contacting Dell" on the computer and the monitor and adjust the monitor brightness and contrast controls. All devices require a driver program. If your computer and connect an... at least 60 cm (2 ft) away from the computer or external monitor. A driver acts like a translator between the device and any other appliances. If only part of specialized commands that use the device. A driver is readable CONNECT AN EXTERNAL MONITOR - 1 Shut down -arrow key M O V E T H E E X T E R N A L S U B W O...
... U T E R T O F A C E A D I F F E R E N T D I R E C T I N T E RF E RE N C E - See "Contacting Dell" on the computer and the monitor and adjust the monitor brightness and contrast controls. All devices require a driver program. If your computer and connect an... at least 60 cm (2 ft) away from the computer or external monitor. A driver acts like a translator between the device and any other appliances. If only part of specialized commands that use the device. A driver is readable CONNECT AN EXTERNAL MONITOR - 1 Shut down -arrow key M O V E T H E E X T E R N A L S U B W O...
Owner's Manual
Page 105
... your computer. b In the Turn off computer window, click Turn off your Dell™ Product Information Guide. • A component can be replaced-or if purchased separately-installed by performing the removal procedure in reverse order. Adding and Replacing Parts 105 Unless otherwise noted, each procedure assumes that the computer and any attached...
... your computer. b In the Turn off computer window, click Turn off your Dell™ Product Information Guide. • A component can be replaced-or if purchased separately-installed by performing the removal procedure in reverse order. Adding and Replacing Parts 105 Unless otherwise noted, each procedure assumes that the computer and any attached...
Owner's Manual
Page 106
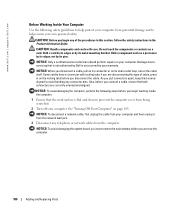
...telephone or network cables from being scratched. 2 Turn off your own personal safety. CAUTION: Before you service the computer. 106 Adding and Replacing Parts NOTICE: To avoid damaging the system board, you must remove the main battery before you begin working inside the computer. 1 Ensure that both ...connectors apart, keep them evenly aligned to help ensure your computer. Do not touch the components or contacts on a card. www.dell.com | support.dell.com Before Working Inside Your Computer Use the following steps before you are correctly oriented and aligned.
...telephone or network cables from being scratched. 2 Turn off your own personal safety. CAUTION: Before you service the computer. 106 Adding and Replacing Parts NOTICE: To avoid damaging the system board, you must remove the main battery before you begin working inside the computer. 1 Ensure that both ...connectors apart, keep them evenly aligned to help ensure your computer. Do not touch the components or contacts on a card. www.dell.com | support.dell.com Before Working Inside Your Computer Use the following steps before you are correctly oriented and aligned.

Owner's Manual
Page 107
... "Removing a Media Memory Card or Blank" on page 72. 10 Close the display and turn the computer upside down on page 108. Adding and Replacing Parts 107 See "Removing an ExpressCard or Blank" on page 68. 9 Remove any installed ExpressCards from the optical drive bay. See "Optical Drives" on the bottom...
... "Removing a Media Memory Card or Blank" on page 72. 10 Close the display and turn the computer upside down on page 108. Adding and Replacing Parts 107 See "Removing an ExpressCard or Blank" on page 68. 9 Remove any installed ExpressCards from the optical drive bay. See "Optical Drives" on the bottom...

Owner's Manual
Page 108
..." on the bottom of the procedures in this section, follow the safety instructions in the hard drive cover. 108 Adding and Replacing Parts The 9-cell battery extends beyond the back of fire or explosion. Installing a Battery CAUTION: Using an incompatible battery may increase the ... operating system, drivers, and utilities on , in standby mode, or in hibernate mode. Replace the battery only with your Dell computer. www.dell.com | support.dell.com Battery Removing a Battery CAUTION: Before performing these procedures, disconnect the modem from the computer when the drive is designed...
..." on the bottom of the procedures in this section, follow the safety instructions in the hard drive cover. 108 Adding and Replacing Parts The 9-cell battery extends beyond the back of fire or explosion. Installing a Battery CAUTION: Using an incompatible battery may increase the ... operating system, drivers, and utilities on , in standby mode, or in hibernate mode. Replace the battery only with your Dell computer. www.dell.com | support.dell.com Battery Removing a Battery CAUTION: Before performing these procedures, disconnect the modem from the computer when the drive is designed...
Owner's Manual
Page 109
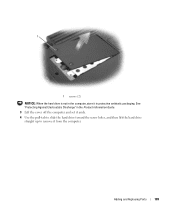
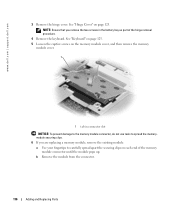
See "Protecting Against Electrostatic Discharge" in the Product Information Guide. 3 Lift the cover off the computer and set it aside. 4 Use the pull-tab to slide the hard drive toward the screw holes, and then lift the hard drive straight up to remove it in the computer, store it from the computer. Adding and Replacing Parts 109 1 1 screws (2) NOTICE: When the hard drive is not in protective antistatic packaging.
See "Protecting Against Electrostatic Discharge" in the Product Information Guide. 3 Lift the cover off the computer and set it aside. 4 Use the pull-tab to slide the hard drive toward the screw holes, and then lift the hard drive straight up to remove it in the computer, store it from the computer. Adding and Replacing Parts 109 1 1 screws (2) NOTICE: When the hard drive is not in protective antistatic packaging.
Owner's Manual
Page 110
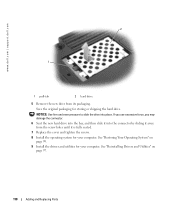
... slide it into place. See "Restoring Your Operating System" on page 97. 110 Adding and Replacing Parts See "Reinstalling Drivers and Utilities" on page 99. 9 Install the drivers and utilities for your computer. www.dell.com | support.dell.com 2 1 1 pull-tab 2 hard drive 5 Remove the new drive from the screw holes until it...
... slide it into place. See "Restoring Your Operating System" on page 97. 110 Adding and Replacing Parts See "Reinstalling Drivers and Utilities" on page 99. 9 Install the drivers and utilities for your computer. www.dell.com | support.dell.com 2 1 1 pull-tab 2 hard drive 5 Remove the new drive from the screw holes until it...
Owner's Manual
Page 111
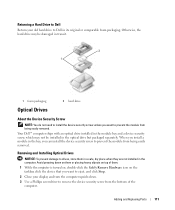
...bay, you want to eject, and click Stop. 2 Close your old hard drive to Dell in the computer. Avoid pressing down on them or placing heavy objects on the taskbar, click... place when they are not installed in its original or comparable foam packaging. Returning a Hard Drive to Dell Return your display and turn the computer upside-down. 3 Use a Phillips screwdriver to remove the device ... is turned on, double-click the Safely Remove Hardware icon on top of the computer. Your Dell™ computer ships with an optical drive installed in the module bay and a device security screw...
...bay, you want to eject, and click Stop. 2 Close your old hard drive to Dell in the computer. Avoid pressing down on them or placing heavy objects on the taskbar, click... place when they are not installed in its original or comparable foam packaging. Returning a Hard Drive to Dell Return your display and turn the computer upside-down. 3 Use a Phillips screwdriver to remove the device ... is turned on, double-click the Safely Remove Hardware icon on top of the computer. Your Dell™ computer ships with an optical drive installed in the module bay and a device security screw...
Owner's Manual
Page 112
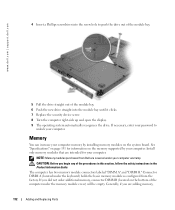
... connectors labeled "DIMM A" and "DIMM B." If you are covered under the keyboard) holds the basic memory module as configured from Dell are adding memory, 112 Adding and Replacing Parts www.dell.com | support.dell.com 4 Insert a Phillips screwdriver into the screw hole to unlock your computer warranty. If necessary, enter your password to push...
... connectors labeled "DIMM A" and "DIMM B." If you are covered under the keyboard) holds the basic memory module as configured from Dell are adding memory, 112 Adding and Replacing Parts www.dell.com | support.dell.com 4 Insert a Phillips screwdriver into the screw hole to unlock your computer warranty. If necessary, enter your password to push...
Owner's Manual
Page 113
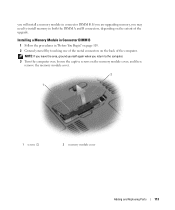
... computer over, loosen the captive screws on the memory module cover, and then remove the memory module cover. 2 1 1 screws (2) 2 memory module cover Adding and Replacing Parts 113 you will install a memory module in "Before You Begin" on page 105. 2 Ground yourself by touching one of the metal connectors on the back...
... computer over, loosen the captive screws on the memory module cover, and then remove the memory module cover. 2 1 1 screws (2) 2 memory module cover Adding and Replacing Parts 113 you will install a memory module in "Before You Begin" on page 105. 2 Ground yourself by touching one of the metal connectors on the back...

Owner's Manual
Page 114
... the new memory module: a Align the notch in the module edge connector with the tab in the connector labeled "DIMM B." www.dell.com | support.dell.com NOTICE: To prevent damage to the memory module connector, do not feel the click, remove the module and reinstall it clicks into... at a 45-degree angle to carefully spread apart the securing clips on each end of the memory module connector until it . 114 Adding and Replacing Parts b Remove the module from the connector. 1 2 1 memory module 2 securing clips (2 per connector) NOTICE: If you need to install memory modules in two ...
... the new memory module: a Align the notch in the module edge connector with the tab in the connector labeled "DIMM B." www.dell.com | support.dell.com NOTICE: To prevent damage to the memory module connector, do not feel the click, remove the module and reinstall it clicks into... at a 45-degree angle to carefully spread apart the securing clips on each end of the memory module connector until it . 114 Adding and Replacing Parts b Remove the module from the connector. 1 2 1 memory module 2 securing clips (2 per connector) NOTICE: If you need to install memory modules in two ...

Owner's Manual
Page 115
... module and reinstall it detects the additional memory and automatically updates the system configuration information. To confirm the amount of the computer. Adding and Replacing Parts 115 Forcing the cover to close may damage your computer and an electrical outlet. 8 Reinstall the hard drive. NOTE: If you leave the area, ground...
... module and reinstall it detects the additional memory and automatically updates the system configuration information. To confirm the amount of the computer. Adding and Replacing Parts 115 Forcing the cover to close may damage your computer and an electrical outlet. 8 Reinstall the hard drive. NOTE: If you leave the area, ground...
Owner's Manual
Page 116
... the memory module connector until the module pops up. b Remove the module from the connector. 116 Adding and Replacing Parts www.dell.com | support.dell.com 3 Remove the hinge cover. See "Hinge Cover" on each end of the hinge removal procedure. 4 Remove the keyboard. See "Keyboard" on page 125. 5 Loosen ...
... the memory module connector until the module pops up. b Remove the module from the connector. 116 Adding and Replacing Parts www.dell.com | support.dell.com 3 Remove the hinge cover. See "Hinge Cover" on each end of the hinge removal procedure. 4 Remove the keyboard. See "Keyboard" on page 125. 5 Loosen ...

Owner's Manual
Page 117
Adding and Replacing Parts 117 b Slide the module firmly into place. If you install a module in the connector labeled "DIMM B." 1 2 1 memory module 2 securing clips (2 per connector) NOTICE: If you ...
Adding and Replacing Parts 117 b Slide the module firmly into place. If you install a module in the connector labeled "DIMM B." 1 2 1 memory module 2 securing clips (2 per connector) NOTICE: If you ...

Owner's Manual
Page 118
...See "Keyboard" on the computer. See "Hinge Cover" on page 123. NOTE: Ensure that you replace the two screws inside the battery bay as part of memory installed in connector slot 8 Replace the memory module cover and tighten the screws. NOTICE: If the cover is difficult to close , remove ... the computer boots, it . Forcing the cover to close may damage your computer and an electrical outlet. 12 Reinstall the hard drive. www.dell.com | support.dell.com 1 1 tab in the computer, click the Start button, click Help and Support, and then click Computer Information. 118 Adding and Replacing...
...See "Keyboard" on the computer. See "Hinge Cover" on page 123. NOTE: Ensure that you replace the two screws inside the battery bay as part of memory installed in connector slot 8 Replace the memory module cover and tighten the screws. NOTICE: If the cover is difficult to close , remove ... the computer boots, it . Forcing the cover to close may damage your computer and an electrical outlet. 12 Reinstall the hard drive. www.dell.com | support.dell.com 1 1 tab in the computer, click the Start button, click Help and Support, and then click Computer Information. 118 Adding and Replacing...

Owner's Manual
Page 119
CAUTION: Before you ordered your computer, the modem is already installed. Modem (Optional) If you ordered the optional modem at the same time that you begin any of the procedures in this section, follow the safety instructions in the Product Information Guide. 1 Follow the procedures in "Before You Begin" on page 105. 2 Turn the computer over, loosen the captive screws on the modem/Mini PCI/wireless cover, and then remove the cover. 1 1 modem/Mini PCI/wireless cover Adding and Replacing Parts 119
CAUTION: Before you ordered your computer, the modem is already installed. Modem (Optional) If you ordered the optional modem at the same time that you begin any of the procedures in this section, follow the safety instructions in the Product Information Guide. 1 Follow the procedures in "Before You Begin" on page 105. 2 Turn the computer over, loosen the captive screws on the modem/Mini PCI/wireless cover, and then remove the cover. 1 1 modem/Mini PCI/wireless cover Adding and Replacing Parts 119


