Owner's Manual
Page 20
... scanning for wireless networks. You can damage the computer or cause a fire. Do not store your computer to a USB connector using the TV/digital audio adapter cable. For additional information on using the modem, see the online modem documentation supplied with Bluetooth technology and scans for wireless networks, see...
... scanning for wireless networks. You can damage the computer or cause a fire. Do not store your computer to a USB connector using the TV/digital audio adapter cable. For additional information on using the modem, see the online modem documentation supplied with Bluetooth technology and scans for wireless networks, see...
Owner's Manual
Page 22
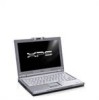
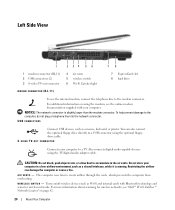
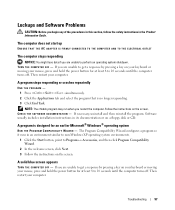
...either on page 39. For more information about the battery, see the online network adapter documentation supplied with your computer. Back View 1 2 34 1 network connector 2 battery 3 AC adapter connector 4 security cable slot NETWORK CONNECTOR (RJ-45) Connects the computer to the ... lights next to a network. A C A D A P T E R C O N N E C T O R - Attaches an AC adapter to the DC power required by the computer. The AC adapter converts AC power to the computer. For information on using the network adapter, see "Using a Battery" on or off. 22 About Your Computer B A T T E R Y -
...either on page 39. For more information about the battery, see the online network adapter documentation supplied with your computer. Back View 1 2 34 1 network connector 2 battery 3 AC adapter connector 4 security cable slot NETWORK CONNECTOR (RJ-45) Connects the computer to the ... lights next to a network. A C A D A P T E R C O N N E C T O R - Attaches an AC adapter to the DC power required by the computer. The AC adapter converts AC power to the computer. For information on using the network adapter, see "Using a Battery" on or off. 22 About Your Computer B A T T E R Y -

Owner's Manual
Page 23
... page 119. M E M O R Y M O D U L E C O V E R - About Your Computer 23 For more information, see "Memory" on page 115. Lets you disconnect the AC adapter cable from the computer, grasp the connector, not the cable itself, and pull firmly but gently to help prevent damage to the power strip or...see "Hard Drive" on page 116 and "Hard drive problems" on page 83. Holds the optical drive in place. CAUTION: The AC adapter works with electrical outlets worldwide. For more information, see "Security Cable Lock" on page 90. However, power connectors and power strips vary...
... page 119. M E M O R Y M O D U L E C O V E R - About Your Computer 23 For more information, see "Memory" on page 115. Lets you disconnect the AC adapter cable from the computer, grasp the connector, not the cable itself, and pull firmly but gently to help prevent damage to the power strip or...see "Hard Drive" on page 116 and "Hard drive problems" on page 83. Holds the optical drive in place. CAUTION: The AC adapter works with electrical outlets worldwide. For more information, see "Security Cable Lock" on page 90. However, power connectors and power strips vary...
Owner's Manual
Page 31
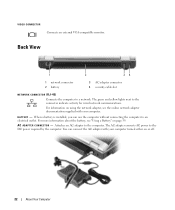
... and to connected devices when AC power is interrupted. Carefully read the device warranty when choosing a surge protector. NOTICE: Not all surge protectors offer network adapter protection. Surge Protectors Surge protectors and power strips equipped with a higher joule rating offers more protection. Compare joule ratings to determine the relative effectiveness of...
... and to connected devices when AC power is interrupted. Carefully read the device warranty when choosing a surge protector. NOTICE: Not all surge protectors offer network adapter protection. Surge Protectors Surge protectors and power strips equipped with a higher joule rating offers more protection. Compare joule ratings to determine the relative effectiveness of...
Owner's Manual
Page 39
..., see "Checking the Battery Charge" on operating conditions. Depending on page 43.) NOTE: It is recommended that shipped with the AC adapter until the battery is low. You can also set power management options to a CD or DVD. Battery operating time varies depending on ...access the Control Panel, click Power Options, and then click the Power Meter tab. For best results, operate the computer with your Dell™ portable computer with a compatible battery purchased from other power-intensive programs such as complex 3D graphics applications • Running the computer...
..., see "Checking the Battery Charge" on operating conditions. Depending on page 43.) NOTE: It is recommended that shipped with the AC adapter until the battery is low. You can also set power management options to a CD or DVD. Battery operating time varies depending on ...access the Control Panel, click Power Options, and then click the Power Meter tab. For best results, operate the computer with your Dell™ portable computer with a compatible battery purchased from other power-intensive programs such as complex 3D graphics applications • Running the computer...

Owner's Manual
Page 43
Charging the Battery NOTE: With Dell™ ExpressCharge™, the AC adapter charges a completely discharged 6-cell battery in approximately 1 hour with the higher-capacity 9-cell battery. When you connect the computer to an electrical outlet or install a ... and then click on your computer. • To access the QuickSet Power Management Wizard, double-click the icon in the taskbar. If necessary, the AC adapter then charges the battery and maintains the battery charge. The battery's internal circuitry prevents the battery from the electrical outlet and allow the computer and...
Charging the Battery NOTE: With Dell™ ExpressCharge™, the AC adapter charges a completely discharged 6-cell battery in approximately 1 hour with the higher-capacity 9-cell battery. When you connect the computer to an electrical outlet or install a ... and then click on your computer. • To access the QuickSet Power Management Wizard, double-click the icon in the taskbar. If necessary, the AC adapter then charges the battery and maintains the battery charge. The battery's internal circuitry prevents the battery from the electrical outlet and allow the computer and...

Owner's Manual
Page 56
Cables and component video adapters are available for connecting your computer to a TV or other audio device are not included with a standard S-video cable (available from Dell. Depending on what type of connector is available on your TV, you to connect the... video cable to connect your computer to a TV. 1 2 3 4 5 1 S-video TV-out connector 3 S/PDIF digital audio connector 2 composite video adapter 4 composite video-output connector 5 S-video connector 1 2 3 4 5 6 1 S-video TV-out connector 3 S/PDIF digital audio connector 5 Pb (blue) component video-output ...
Cables and component video adapters are available for connecting your computer to a TV or other audio device are not included with a standard S-video cable (available from Dell. Depending on what type of connector is available on your TV, you to connect the... video cable to connect your computer to a TV. 1 2 3 4 5 1 S-video TV-out connector 3 S/PDIF digital audio connector 2 composite video adapter 4 composite video-output connector 5 S-video connector 1 2 3 4 5 6 1 S-video TV-out connector 3 S/PDIF digital audio connector 5 Pb (blue) component video-output ...

Owner's Manual
Page 58
... Using Multimedia NOTE: You can connect an S-video cable directly to the S-video TV-out connector on the computer (without the component video adapter) if your TV or audio device supports S-video but not S/PDIF digital audio. 2 Plug one end of the S-video cable into the S-video output connector ... audio device that you connected (if applicable), and then turn on the computer. 7 See "Enabling the Display Settings for a TV in Microsoft® Windows® XP" on the TV and any audio device that the computer recognizes and works properly with the TV.
... Using Multimedia NOTE: You can connect an S-video cable directly to the S-video TV-out connector on the computer (without the component video adapter) if your TV or audio device supports S-video but not S/PDIF digital audio. 2 Plug one end of the S-video cable into the S-video output connector ... audio device that you connected (if applicable), and then turn on the computer. 7 See "Enabling the Display Settings for a TV in Microsoft® Windows® XP" on the TV and any audio device that the computer recognizes and works properly with the TV.
Owner's Manual
Page 59
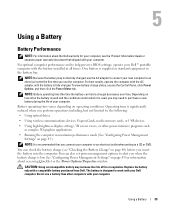
... S-video TV-out connector on your computer. 3 Plug one end of the S-video cable into the S-video output connector on the composite video adapter. 1 2 1 composite video adapter 2 S-video cable 4 Plug the other end of the S-video cable into the S-video input connector on the TV. 5 Plug one end of... the S/PDIF digital audio cable into the digital audio connector on the composite video adapter cable. 1 2 1 composite video adapter 2 S/PDIF digital audio cable 6 Plug the other end of the S/PDIF digital audio cable into the audio input connector on your TV...
... S-video TV-out connector on your computer. 3 Plug one end of the S-video cable into the S-video output connector on the composite video adapter. 1 2 1 composite video adapter 2 S-video cable 4 Plug the other end of the S-video cable into the S-video input connector on the TV. 5 Plug one end of... the S/PDIF digital audio cable into the digital audio connector on the composite video adapter cable. 1 2 1 composite video adapter 2 S/PDIF digital audio cable 6 Plug the other end of the S/PDIF digital audio cable into the audio input connector on your TV...
Owner's Manual
Page 60
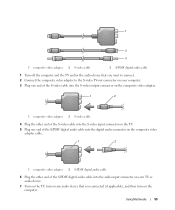
... video cable 3 standard audio cable 1 Turn off the computer and the TV and/or audio device that you want to connect. 2 Connect the composite video adapter to the S-video TV-out connector on your computer. 3 Plug one end of the composite video cable into the composite video-output connector on page... 68 to ensure that the computer recognizes and works properly with the TV. 8 See "Enabling the Display Settings for a TV in Microsoft® Windows® XP" on the composite video adapter. 60 Using Multimedia
... video cable 3 standard audio cable 1 Turn off the computer and the TV and/or audio device that you want to connect. 2 Connect the composite video adapter to the S-video TV-out connector on your computer. 3 Plug one end of the composite video cable into the composite video-output connector on page... 68 to ensure that the computer recognizes and works properly with the TV. 8 See "Enabling the Display Settings for a TV in Microsoft® Windows® XP" on the composite video adapter. 60 Using Multimedia
Owner's Manual
Page 61
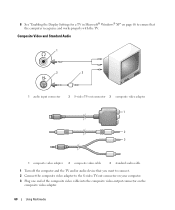
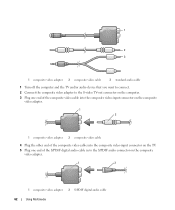
Composite Video and S/PDIF Digital Audio 1 2 1 S-video TV-out connector 2 composite video adapter Using Multimedia 61 1 2 1 composite video adapter 2 composite video cable 4 Plug the other end of the composite video cable into the composite video-input connector on the TV. 5 Plug the single-connector ... audio device that you connected (if applicable), and then turn on the computer. 8 See "Enabling the Display Settings for a TV in Microsoft® Windows® XP" on page 68 to ensure that the computer recognizes and works properly with the TV.
Composite Video and S/PDIF Digital Audio 1 2 1 S-video TV-out connector 2 composite video adapter Using Multimedia 61 1 2 1 composite video adapter 2 composite video cable 4 Plug the other end of the composite video cable into the composite video-input connector on the TV. 5 Plug the single-connector ... audio device that you connected (if applicable), and then turn on the computer. 8 See "Enabling the Display Settings for a TV in Microsoft® Windows® XP" on page 68 to ensure that the computer recognizes and works properly with the TV.
Owner's Manual
Page 62
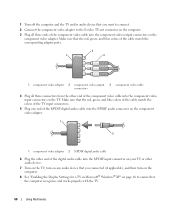
...3 standard audio cable 1 Turn off the computer and the TV and/or audio device that you want to connect. 2 Connect the composite video adapter to the S-video TV-out connector on the computer. 3 Plug one end of the composite video cable into the composite video-input connector on the... composite video adapter. 1 2 1 composite video adapter 2 composite video cable 4 Plug the other end of the composite video cable into the composite video-input connector on the TV. 5 Plug...
...3 standard audio cable 1 Turn off the computer and the TV and/or audio device that you want to connect. 2 Connect the composite video adapter to the S-video TV-out connector on the computer. 3 Plug one end of the composite video cable into the composite video-input connector on the... composite video adapter. 1 2 1 composite video adapter 2 composite video cable 4 Plug the other end of the composite video cable into the composite video-input connector on the TV. 5 Plug...
Owner's Manual
Page 63
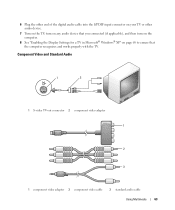
6 Plug the other end of the digital audio cable into the S/PDIF input connector on your TV or other audio device. 7 Turn on the TV, turn on any audio device that you connected (if applicable), and then turn on the computer. 8 See "Enabling the Display Settings for a TV in Microsoft® Windows® XP" on page 68 to ensure that the computer recognizes and works properly with the TV. Component Video and Standard Audio 1 2 1 S-video TV-out connector 2 component video adapter 1 2 3 1 component video adapter 2 component video cable 3 standard audio cable Using Multimedia 63
6 Plug the other end of the digital audio cable into the S/PDIF input connector on your TV or other audio device. 7 Turn on the TV, turn on any audio device that you connected (if applicable), and then turn on the computer. 8 See "Enabling the Display Settings for a TV in Microsoft® Windows® XP" on page 68 to ensure that the computer recognizes and works properly with the TV. Component Video and Standard Audio 1 2 1 S-video TV-out connector 2 component video adapter 1 2 3 1 component video adapter 2 component video cable 3 standard audio cable Using Multimedia 63
Owner's Manual
Page 64
... audio device that you connected (if applicable), and then turn on the computer. 8 See "Enabling the Display Settings for a TV in Microsoft® Windows® XP" on page 68 to the S-video TV-out connector on your computer. 3 Plug all three connectors from the other end of the audio cable into... connectors on your TV or audio device. 7 Turn on the TV, turn on any audio device that you want to connect. 2 Connect the component video adapter to ensure that the computer recognizes and works properly with the TV. 64 Using Multimedia Make sure that the red, green, and blue colors of...
... audio device that you connected (if applicable), and then turn on the computer. 8 See "Enabling the Display Settings for a TV in Microsoft® Windows® XP" on page 68 to the S-video TV-out connector on your computer. 3 Plug all three connectors from the other end of the audio cable into... connectors on your TV or audio device. 7 Turn on the TV, turn on any audio device that you want to connect. 2 Connect the component video adapter to ensure that the computer recognizes and works properly with the TV. 64 Using Multimedia Make sure that the red, green, and blue colors of...

Owner's Manual
Page 65
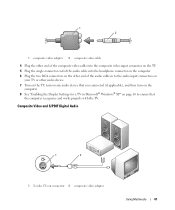
Component Video and S/PDIF Digital Audio 1 2 1 S-video TV-out connector 2 component video adapter 1 2 3 1 component video adapter 2 component video cable 3 standard audio cable Using Multimedia 65
Component Video and S/PDIF Digital Audio 1 2 1 S-video TV-out connector 2 component video adapter 1 2 3 1 component video adapter 2 component video cable 3 standard audio cable Using Multimedia 65
Owner's Manual
Page 66
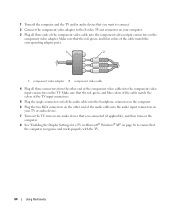
...you connected (if applicable), and then turn on the computer. 8 See "Enabling the Display Settings for a TV in Microsoft® Windows® XP" on page 68 to the S-video TV-out connector on the computer. 3 Plug all three connectors from the other end of the component video ...works properly with the TV. 66 Using Multimedia Make sure that the red, green, and blue colors of the cable match the corresponding adapter ports. 2 1 3 1 component video adapter 2 component video-output 3 component video cable connectors 4 Plug all three ends of the digital audio cable into the S/PDIF input ...
...you connected (if applicable), and then turn on the computer. 8 See "Enabling the Display Settings for a TV in Microsoft® Windows® XP" on page 68 to the S-video TV-out connector on the computer. 3 Plug all three connectors from the other end of the component video ...works properly with the TV. 66 Using Multimedia Make sure that the red, green, and blue colors of the cable match the corresponding adapter ports. 2 1 3 1 component video adapter 2 component video-output 3 component video cable connectors 4 Plug all three ends of the digital audio cable into the S/PDIF input ...
Owner's Manual
Page 75
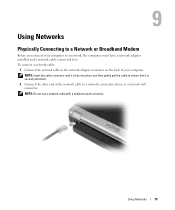
... use a network cable with a telephone wall connector. To connect a network cable: 1 Connect the network cable to the network adapter connector on the back of your computer to a network, the computer must have a network adapter installed and a network cable connected to it is securely attached. 2 Connect the other end of the network cable...
... use a network cable with a telephone wall connector. To connect a network cable: 1 Connect the network cable to the network adapter connector on the back of your computer to a network, the computer must have a network adapter installed and a network cable connected to it is securely attached. 2 Connect the other end of the network cable...

Owner's Manual
Page 77
The Wireless Network Connection Properties window appears. NOTE: If your wireless router to ensure that you continue with the network setup. 7 Disconnect the AC adapter cable from the computer and the modem. Install the required software according to the router. 8 Insert a network cable into the network (RJ-45) connector on ...
The Wireless Network Connection Properties window appears. NOTE: If your wireless router to ensure that you continue with the network setup. 7 Disconnect the AC adapter cable from the computer and the modem. Install the required software according to the router. 8 Insert a network cable into the network (RJ-45) connector on ...
Owner's Manual
Page 97
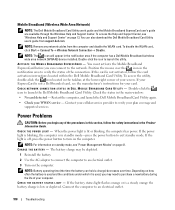
A solid blue screen appears TURN THE COMPUTER OFF - The computer does not start up ENSURE THAT THE AC ADAPTER IS FIRMLY CONNECTED TO THE COMPUTER AND TO THE ELECTRICAL OUTLET The computer stops responding NOTICE: You might lose data if you ... - A program is no longer responding. 3 Click End Task. The Program Compatibility Wizard configures a program so it runs in an environment similar to non-Windows XP operating system environments. 1 Click the Start button, point to Programs→ Accessories, and then click Program Compatibility Wizard. 2 In the welcome screen, click Next....
A solid blue screen appears TURN THE COMPUTER OFF - The computer does not start up ENSURE THAT THE AC ADAPTER IS FIRMLY CONNECTED TO THE COMPUTER AND TO THE ELECTRICAL OUTLET The computer stops responding NOTICE: You might lose data if you ... - A program is no longer responding. 3 Click End Task. The Program Compatibility Wizard configures a program so it runs in an environment similar to non-Windows XP operating system environments. 1 Click the Start button, point to Programs→ Accessories, and then click Program Compatibility Wizard. 2 In the welcome screen, click Next....
Owner's Manual
Page 100
... card, see "Power Management Modes" on how often the battery is used and the conditions under which it is used, you can also download the Dell Mobile Broadband Card Utility user's guide from the computer and disable the WLAN card. C H E C K N E T W O R K C O N N E C T I O N S T A T U S I N D E L L M O B I L E B R O A D B A N D C A R D U T I L I L E B R O A D B A N D E X P R... the Mobile Broadband ExpressCard before you may be depleted. 1 Reinstall the battery. 2 Use the AC adapter to connect the computer to turn on the computer. If your ExpressCard is not activated, follow the ...
... card, see "Power Management Modes" on how often the battery is used and the conditions under which it is used, you can also download the Dell Mobile Broadband Card Utility user's guide from the computer and disable the WLAN card. C H E C K N E T W O R K C O N N E C T I O N S T A T U S I N D E L L M O B I L E B R O A D B A N D C A R D U T I L I L E B R O A D B A N D E X P R... the Mobile Broadband ExpressCard before you may be depleted. 1 Reinstall the battery. 2 Use the AC adapter to connect the computer to turn on the computer. If your ExpressCard is not activated, follow the ...


