Owner's Manual
Page 8
... Problems 103 Video and Display Problems 104 If the display is blank 104 If the display is difficult to read 104 If only part of the display is readable 105 Drivers 105 What Is a Driver 105 Identifying Drivers 105 Reinstalling Drivers and Utilities 106 Resolving Software ...and Hardware Incompatibilities 108 Restoring Your Operating System 108 Using Microsoft Windows XP System Restore 108 Using Dell PC Restore by Symantec 110 Using the Operating System CD 112 12 Adding and Replacing Parts 113 Before You Begin 113 Recommended Tools 113 Turning Off Your Computer 113 ...
... Problems 103 Video and Display Problems 104 If the display is blank 104 If the display is difficult to read 104 If only part of the display is readable 105 Drivers 105 What Is a Driver 105 Identifying Drivers 105 Reinstalling Drivers and Utilities 106 Resolving Software ...and Hardware Incompatibilities 108 Restoring Your Operating System 108 Using Microsoft Windows XP System Restore 108 Using Dell PC Restore by Symantec 110 Using the Operating System CD 112 12 Adding and Replacing Parts 113 Before You Begin 113 Recommended Tools 113 Turning Off Your Computer 113 ...

Owner's Manual
Page 86
... the diagnostics utility partition on your computer and try again. When the DELL logo appears, press immediately. Run Express Test first to the next test, press ; If the Pre-boot System Assessment completes successfully, you want . Then shut down your part. This test typically takes 10 to retest the component that appears...
... the diagnostics utility partition on your computer and try again. When the DELL logo appears, press immediately. Run Express Test first to the next test, press ; If the Pre-boot System Assessment completes successfully, you want . Then shut down your part. This test typically takes 10 to retest the component that appears...
Owner's Manual
Page 105
... driver is readable CONNECT AN EXTERNAL MONITOR - 1 Shut down your computer and connect an external monitor to you with your computer. If only part of specialized commands that only its own set of the display is a program that you : • Upgrade your operating system. • ... device such as the keyboard driver, come with required drivers already installed-no further installation or configuration is needed. Troubleshooting 105 Contact Dell. Identifying Drivers If you want to install drivers if you are not on the computer and the monitor, and adjust the monitor ...
... driver is readable CONNECT AN EXTERNAL MONITOR - 1 Shut down your computer and connect an external monitor to you with your computer. If only part of specialized commands that only its own set of the display is a program that you : • Upgrade your operating system. • ... device such as the keyboard driver, come with required drivers already installed-no further installation or configuration is needed. Troubleshooting 105 Contact Dell. Identifying Drivers If you want to install drivers if you are not on the computer and the monitor, and adjust the monitor ...
Owner's Manual
Page 113
... Shut Down→ Shut down your operating system, press and hold the power button for removing and installing the components in your Dell™ Product Information Guide. • A component can be replaced-or if purchased separately-installed by performing the removal procedure in reverse... order. Adding and Replacing Parts Before You Begin This section provides procedures for several seconds until the computer turns off your computer. 1 Shut down the operating system...
... Shut Down→ Shut down your operating system, press and hold the power button for removing and installing the components in your Dell™ Product Information Guide. • A component can be replaced-or if purchased separately-installed by performing the removal procedure in reverse... order. Adding and Replacing Parts Before You Begin This section provides procedures for several seconds until the computer turns off your computer. 1 Shut down the operating system...
Owner's Manual
Page 114
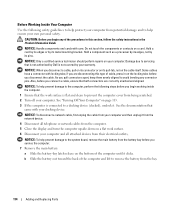
... its pins. NOTICE: When you disconnect a cable, pull on its connector or on your own personal safety. See the documentation that is not authorized by Dell is not covered by its metal mounting bracket. Before Working Inside Your Computer Use the following steps before you connect a cable, ensure that the work.... CAUTION: Before you pull connectors apart, keep them evenly aligned to the system board, remove the main battery from the bay. 114 Adding and Replacing Parts
... its pins. NOTICE: When you disconnect a cable, pull on its connector or on your own personal safety. See the documentation that is not authorized by Dell is not covered by its metal mounting bracket. Before Working Inside Your Computer Use the following steps before you connect a cable, ensure that the work.... CAUTION: Before you pull connectors apart, keep them evenly aligned to the system board, remove the main battery from the bay. 114 Adding and Replacing Parts
Owner's Manual
Page 115
Adding and Replacing Parts 115 When you are replacing the battery, ensure that you begin any of the procedures in this section, follow the removal procedure in the base ...
Adding and Replacing Parts 115 When you are replacing the battery, ensure that you begin any of the procedures in this section, follow the removal procedure in the base ...
Owner's Manual
Page 116
... drives from a source other than Dell, you begin any of the hard drive. CAUTION: Before you need to install an operating system, drivers, and utilities on the new hard drive (see "Turning Off Your Computer" on page 106). 116 Adding and Replacing Parts Do not remove the hard drive... while the computer is hot, do not touch the metal housing of the procedures in this section, follow the safety instructions in hibernate mode. NOTICE: Hard drives are installing a hard drive from sources other than Dell. NOTICE: To prevent...
... drives from a source other than Dell, you begin any of the hard drive. CAUTION: Before you need to install an operating system, drivers, and utilities on the new hard drive (see "Turning Off Your Computer" on page 106). 116 Adding and Replacing Parts Do not remove the hard drive... while the computer is hot, do not touch the metal housing of the procedures in this section, follow the safety instructions in hibernate mode. NOTICE: Hard drives are installing a hard drive from sources other than Dell. NOTICE: To prevent...
Owner's Manual
Page 117
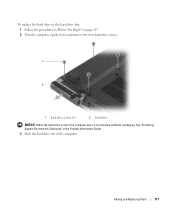
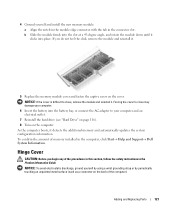
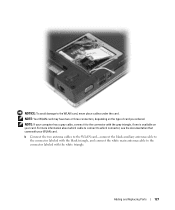
See "Protecting Against Electrostatic Discharge" in protective antistatic packaging. Adding and Replacing Parts 117 To replace the hard drive in the hard drive bay: 1 Follow the procedures in "Before You Begin" on page 113. 2 Turn the computer upside-down and remove the four hard drive screws. 1 2 1 hard drive screws (4) 2 hard drive NOTICE: When the hard drive is not in the computer, store it in the Product Information Guide. 3 Slide the hard drive out of the computer.
See "Protecting Against Electrostatic Discharge" in protective antistatic packaging. Adding and Replacing Parts 117 To replace the hard drive in the hard drive bay: 1 Follow the procedures in "Before You Begin" on page 113. 2 Turn the computer upside-down and remove the four hard drive screws. 1 2 1 hard drive screws (4) 2 hard drive NOTICE: When the hard drive is not in the computer, store it in the Product Information Guide. 3 Slide the hard drive out of the computer.

Owner's Manual
Page 118
... System" on page 108). 10 Install the drivers and utilities for your computer (see "Reinstalling Drivers and Utilities" on page 106). 118 Adding and Replacing Parts 4 Remove the hard drive from the hard drive carrier by carefully bending the carrier plastics. 1 2 1 hard drive 2 hard drive carrier 5 Remove the new drive from...
... System" on page 108). 10 Install the drivers and utilities for your computer (see "Reinstalling Drivers and Utilities" on page 106). 118 Adding and Replacing Parts 4 Remove the hard drive from the hard drive carrier by carefully bending the carrier plastics. 1 2 1 hard drive 2 hard drive carrier 5 Remove the new drive from...
Owner's Manual
Page 119
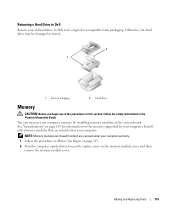
NOTE: Memory modules purchased from Dell are intended for information on the memory supported by installing memory modules on the memory module cover, and then remove the memory module cover. Adding and Replacing Parts 119 See "Specifications" on page 163 for your computer warranty. 1 Follow ...modules that are covered under your computer. You can increase your computer memory by your old hard drive to Dell in the Product Information Guide. Returning a Hard Drive to Dell Return your computer. Otherwise, the hard drive may be damaged in transit. 2 1 1 foam packaging 2 ...
NOTE: Memory modules purchased from Dell are intended for information on the memory supported by installing memory modules on the memory module cover, and then remove the memory module cover. Adding and Replacing Parts 119 See "Specifications" on page 163 for your computer warranty. 1 Follow ...modules that are covered under your computer. You can increase your computer memory by your old hard drive to Dell in the Product Information Guide. Returning a Hard Drive to Dell Return your computer. Otherwise, the hard drive may be damaged in transit. 2 1 1 foam packaging 2 ...
Owner's Manual
Page 120
... not installed properly, the computer may not boot properly. b Remove the module from the connector. No error message indicates this failure. 120 Adding and Replacing Parts NOTICE: To prevent damage to the memory module connector, do not use tools to carefully spread apart the securing clips on the back of the...
... not installed properly, the computer may not boot properly. b Remove the module from the connector. No error message indicates this failure. 120 Adding and Replacing Parts NOTICE: To prevent damage to the memory module connector, do not use tools to carefully spread apart the securing clips on the back of the...
Owner's Manual
Page 121
... NOTICE: If the cover is difficult to your computer. 6 Insert the battery into place. To confirm the amount of the computer). Adding and Replacing Parts 121 If you begin any of the procedures in this section, follow the safety instructions in the connector slot. As the computer boots, it clicks... (see "Hard Drive" on page 116). 8 Turn on the back of memory installed in the computer, click Start→ Help and Support→ Dell System Information. b Slide the module firmly into the slot at a 45-degree angle, and rotate the module down until it detects the additional memory and...
... NOTICE: If the cover is difficult to your computer. 6 Insert the battery into place. To confirm the amount of the computer). Adding and Replacing Parts 121 If you begin any of the procedures in this section, follow the safety instructions in the connector slot. As the computer boots, it clicks... (see "Hard Drive" on page 116). 8 Turn on the back of memory installed in the computer, click Start→ Help and Support→ Dell System Information. b Slide the module firmly into the slot at a 45-degree angle, and rotate the module down until it detects the additional memory and...
Owner's Manual
Page 122
... lift the cover on the back of the hinge cover. NOTICE: To avoid damage to the right side of the computer). 122 Adding and Replacing Parts
... lift the cover on the back of the hinge cover. NOTICE: To avoid damage to the right side of the computer). 122 Adding and Replacing Parts
Owner's Manual
Page 123
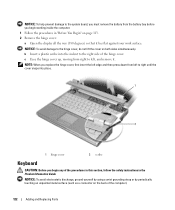
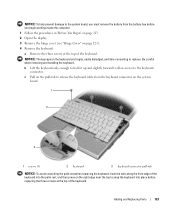
... 113. 2 Open the display. 3 Remove the hinge cover (see "Hinge Cover" on the right edge near the top to the keyboard connector. Adding and Replacing Parts 123 NOTICE: To help prevent damage to replace. Be careful when removing and handling the keyboard. NOTICE: The keycaps on the keyboard are fragile, easily...
... 113. 2 Open the display. 3 Remove the hinge cover (see "Hinge Cover" on the right edge near the top to the keyboard connector. Adding and Replacing Parts 123 NOTICE: To help prevent damage to replace. Be careful when removing and handling the keyboard. NOTICE: The keycaps on the keyboard are fragile, easily...
Owner's Manual
Page 124
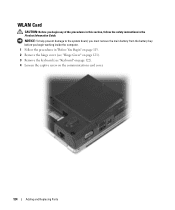
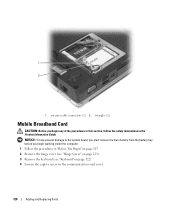
WLAN Card CAUTION: Before you begin any of the procedures in this section, follow the safety instructions in "Before You Begin" on page 113. 2 Remove the hinge cover (see "Hinge Cover" on page 121). 3 Remove the keyboard (see "Keyboard" on page 122). 4 Loosen the captive screw on the communications card cover. 124 Adding and Replacing Parts NOTICE: To help prevent damage to the system board, you must remove the main battery from the battery bay before you begin working inside the computer. 1 Follow the procedures in the Product Information Guide.
WLAN Card CAUTION: Before you begin any of the procedures in this section, follow the safety instructions in "Before You Begin" on page 113. 2 Remove the hinge cover (see "Hinge Cover" on page 121). 3 Remove the keyboard (see "Keyboard" on page 122). 4 Loosen the captive screw on the communications card cover. 124 Adding and Replacing Parts NOTICE: To help prevent damage to the system board, you must remove the main battery from the battery bay before you begin working inside the computer. 1 Follow the procedures in the Product Information Guide.
Owner's Manual
Page 125
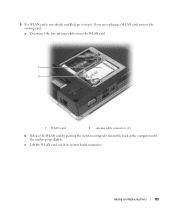
5 If a WLAN card is not already installed, go to step 6. Adding and Replacing Parts 125 c Lift the WLAN card out of the computer until the card pops up slightly. If you are replacing a WLAN card, remove the existing card: a Disconnect the two antenna cables from the WLAN card. 1 2 1 WLAN card 2 antenna cable connectors (2) b Release the WLAN card by pushing the metal securing tabs toward the back of its system board connector.
5 If a WLAN card is not already installed, go to step 6. Adding and Replacing Parts 125 c Lift the WLAN card out of the computer until the card pops up slightly. If you are replacing a WLAN card, remove the existing card: a Disconnect the two antenna cables from the WLAN card. 1 2 1 WLAN card 2 antenna cable connectors (2) b Release the WLAN card by pushing the metal securing tabs toward the back of its system board connector.
Owner's Manual
Page 126
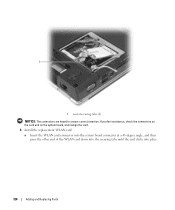
If you feel resistance, check the connectors on the card and on the system board, and realign the card. 6 Install the replacement WLAN card: a Insert the WLAN card connector into the system board connector at a 45-degree angle, and then press the other end of the WLAN card down into the securing tabs until the card clicks into place. 126 Adding and Replacing Parts 1 1 metal securing tabs (2) NOTICE: The connectors are keyed to ensure correct insertion.
If you feel resistance, check the connectors on the card and on the system board, and realign the card. 6 Install the replacement WLAN card: a Insert the WLAN card connector into the system board connector at a 45-degree angle, and then press the other end of the WLAN card down into the securing tabs until the card clicks into place. 126 Adding and Replacing Parts 1 1 metal securing tabs (2) NOTICE: The connectors are keyed to ensure correct insertion.
Owner's Manual
Page 127
... labeled with the black triangle, and connect the white main antenna cable to the WLAN card, never place cables under the card. Adding and Replacing Parts 127 NOTE: Your WLAN card may have two or three connectors, depending on your WLAN card.
... labeled with the black triangle, and connect the white main antenna cable to the WLAN card, never place cables under the card. Adding and Replacing Parts 127 NOTE: Your WLAN card may have two or three connectors, depending on your WLAN card.
Owner's Manual
Page 128
... Cover" on page 121). 3 Remove the keyboard (see "Keyboard" on page 122). 4 Loosen the captive screw on the communications card cover. 128 Adding and Replacing Parts
... Cover" on page 121). 3 Remove the keyboard (see "Keyboard" on page 122). 4 Loosen the captive screw on the communications card cover. 128 Adding and Replacing Parts
Owner's Manual
Page 129
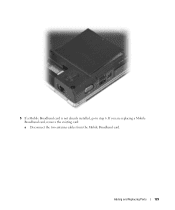
Adding and Replacing Parts 129 5 If a Mobile Broadband card is not already installed, go to step 6. If you are replacing a Mobile Broadband card, remove the existing card: a Disconnect the two antenna cables from the Mobile Broadband card.
Adding and Replacing Parts 129 5 If a Mobile Broadband card is not already installed, go to step 6. If you are replacing a Mobile Broadband card, remove the existing card: a Disconnect the two antenna cables from the Mobile Broadband card.


