
Setting Up and Using 3D TV
Page 5
... the NVIDIA Control Panel window, click Stereoscopic 3D to expand the selection (if not already expanded) and then click Set keyboard shortcuts. 3 Click the box displaying the shortcut you want to change. 4 Press the desired key combination. 5 Click OK to www.nvidia.com. Blu-ray 3D The NVIDIA 3DTV Play application... allows you to watch Blu-ray 3D videos, use the CyberLink Power DVD application installed on using the photo viewer and to download 3D photos, go to save and exit. 3D Photos You can view stereoscopic 3D...
... the NVIDIA Control Panel window, click Stereoscopic 3D to expand the selection (if not already expanded) and then click Set keyboard shortcuts. 3 Click the box displaying the shortcut you want to change. 4 Press the desired key combination. 5 Click OK to www.nvidia.com. Blu-ray 3D The NVIDIA 3DTV Play application... allows you to watch Blu-ray 3D videos, use the CyberLink Power DVD application installed on using the photo viewer and to download 3D photos, go to save and exit. 3D Photos You can view stereoscopic 3D...

Setup Guide
Page 5
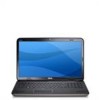
...XPS Laptop 7 Before Setting Up Your Computer 7 Connect the AC Adapter 8 Connect the Network Cable (Optional 9 Press the Power Button 10 Set Up Microsoft Windows 11 Create System Recovery Media (Recommended 12 Install the SIM Card (Optional 14 Enable or Disable Wireless (Optional 16 Set Up Wireless Display...Multimedia Control Keys 38 Control Strip Features 40 Using the Optical Drive 42 Display Features 44 Touch Screen Gestures (Optional 46 Removing and Replacing the Battery 48 Software Features 50 Dell DataSafe Online Backup 51 NVIDIA Optimus Technology 52 Free Fall Sensor 53 3
...XPS Laptop 7 Before Setting Up Your Computer 7 Connect the AC Adapter 8 Connect the Network Cable (Optional 9 Press the Power Button 10 Set Up Microsoft Windows 11 Create System Recovery Media (Recommended 12 Install the SIM Card (Optional 14 Enable or Disable Wireless (Optional 16 Set Up Wireless Display...Multimedia Control Keys 38 Control Strip Features 40 Using the Optical Drive 42 Display Features 44 Touch Screen Gestures (Optional 46 Removing and Replacing the Battery 48 Software Features 50 Dell DataSafe Online Backup 51 NVIDIA Optimus Technology 52 Free Fall Sensor 53 3
Setup Guide
Page 33
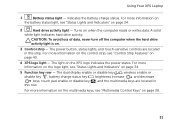
... 38. 31 CAUTION: To avoid loss of data, never turn off the computer when the hard drive activity light is on the XPS logo indicates the power states. For more information on the multimedia keys, see "Status Lights and Indicators" on page 34. 2 Hard drive activity light ...Strip Features" on when the computer reads or writes data. The power button, status lights, and touch-sensitive controls are located in this row. Using Your XPS Laptop 1 Battery status light - Indicates the battery charge status. The dual display enable or disable key , wireless enable or disable key , ...
... 38. 31 CAUTION: To avoid loss of data, never turn off the computer when the hard drive activity light is on the XPS logo indicates the power states. For more information on the multimedia keys, see "Status Lights and Indicators" on page 34. 2 Hard drive activity light ...Strip Features" on when the computer reads or writes data. The power button, status lights, and touch-sensitive controls are located in this row. Using Your XPS Laptop 1 Battery status light - Indicates the battery charge status. The dual display enable or disable key , wireless enable or disable key , ...
Setup Guide
Page 62
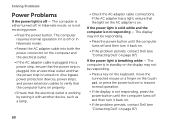
... to resume normal operation. • If the display is not receiving power. • Press the power button. The display may not be responding. • Press the power button until the computer turns off and then turn it back on. • If the problem persists, contact Dell (see "Contacting Dell" on page 87). 60 The computer resumes normal...
... to resume normal operation. • If the display is not receiving power. • Press the power button. The display may not be responding. • Press the power button until the computer turns off and then turn it back on. • If the problem persists, contact Dell (see "Contacting Dell" on page 87). 60 The computer resumes normal...

Setup Guide
Page 69
.... Using Support Tools Hardware Troubleshooter If a device is either not detected during POST (Power On Self Test) to start the Hardware Troubleshooter: 1. Start Dell Diagnostics from your computer. Dell Diagnostics If you experience a problem with your hard drive or from the Drivers and Utilities...Troubleshooter to test displays in the search field and press to enter the System Setup (BIOS) utility. To start the search. 3. Click Start → Help and Support. 2. Type hardware troubleshooter in the system setup program and is active. NOTE: Dell Diagnostics works only...
.... Using Support Tools Hardware Troubleshooter If a device is either not detected during POST (Power On Self Test) to start the Hardware Troubleshooter: 1. Start Dell Diagnostics from your computer. Dell Diagnostics If you experience a problem with your hard drive or from the Drivers and Utilities...Troubleshooter to test displays in the search field and press to enter the System Setup (BIOS) utility. To start the search. 3. Click Start → Help and Support. 2. Type hardware troubleshooter in the system setup program and is active. NOTE: Dell Diagnostics works only...


