
Setup Guide
Page 5
Contents Setting Up Your XPS Laptop 7 Before Setting Up Your Computer 7 Connect the AC Adapter 8 Connect the Network Cable (Optional 9 Press the Power Button 10 Set Up Microsoft Windows 11 Create System Recovery Media (Recommended 12 Install the SIM Card (Optional 14 Enable or ...the Internet (Optional 20 Using Your XPS Laptop 22 Right View Features 22 Left View Features 26 Front View Features 27 Back View Features 28 Computer Base and Keyboard Features 30 Status Lights and Indicators 34 Disabling Battery Charging 35 Touch Pad Gestures 36 Multimedia Control Keys ...
Contents Setting Up Your XPS Laptop 7 Before Setting Up Your Computer 7 Connect the AC Adapter 8 Connect the Network Cable (Optional 9 Press the Power Button 10 Set Up Microsoft Windows 11 Create System Recovery Media (Recommended 12 Install the SIM Card (Optional 14 Enable or ...the Internet (Optional 20 Using Your XPS Laptop 22 Right View Features 22 Left View Features 26 Front View Features 27 Back View Features 28 Computer Base and Keyboard Features 30 Status Lights and Indicators 34 Disabling Battery Charging 35 Touch Pad Gestures 36 Multimedia Control Keys ...

Setup Guide
Page 33
Using Your XPS Laptop 1 Battery status light - A solid white light indicates hard drive activity. The power button, status lights, and touch-sensitive controls are located in this row. For more information on the multimedia keys, see "Control Strip Features" on page 34. ...strip - The dual display enable or disable key , wireless enable or disable key , battery charge status key , brightness increase and decrease keys, touch pad enable or disable key , and the multimedia keys are located in this strip. Indicates the battery charge status. For more information on the...
Using Your XPS Laptop 1 Battery status light - A solid white light indicates hard drive activity. The power button, status lights, and touch-sensitive controls are located in this row. For more information on the multimedia keys, see "Control Strip Features" on page 34. ...strip - The dual display enable or disable key , wireless enable or disable key , battery charge status key , brightness increase and decrease keys, touch pad enable or disable key , and the multimedia keys are located in this strip. Indicates the battery charge status. For more information on the...
Setup Guide
Page 35
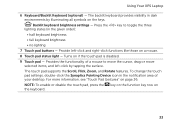
... visibility in the given order): • half keyboard brightness • full keyboard brightness • no lighting 7 Touch pad buttons - NOTE: To enable or disable the touch pad, press the the keyboard. Backlit keyboard brightness settings - key on the function key row on page 36. ...For more information, see "Touch Pad Gestures" on 33 Turns on the keys. Using Your XPS Laptop 6 Keyboard/Backlit Keyboard (...
... visibility in the given order): • half keyboard brightness • full keyboard brightness • no lighting 7 Touch pad buttons - NOTE: To enable or disable the touch pad, press the the keyboard. Backlit keyboard brightness settings - key on the function key row on page 36. ...For more information, see "Touch Pad Gestures" on 33 Turns on the keys. Using Your XPS Laptop 6 Keyboard/Backlit Keyboard (...
Setup Guide
Page 43
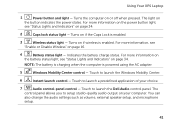
...Indicators" on or off when pressed. NOTE: The battery is charging when the computer is enabled. Using Your XPS Laptop 1 Power button and light - Turns the computer on page 34. 2 Caps lock status light - For more information, see... "Status Lights and Indicators" on if wireless is powered using the AC adapter. 5 Windows Mobility Center control - Touch to launch the Windows Mobility Center. 6 Instant launch control - Turns on page 34. Touch to launch the Dell...
...Indicators" on or off when pressed. NOTE: The battery is charging when the computer is enabled. Using Your XPS Laptop 1 Power button and light - Turns the computer on page 34. 2 Caps lock status light - For more information, see... "Status Lights and Indicators" on if wireless is powered using the AC adapter. 5 Windows Mobility Center control - Touch to launch the Windows Mobility Center. 6 Instant launch control - Turns on page 34. Touch to launch the Dell...
Setup Guide
Page 63
...Press a key on the keyboard, move the connected mouse or a finger on the touch pad, or press the power button to resume normal operation. • If the display is not responding, press the power button until the computer turns off and then turn it back on. • If the .../manuals). • Reseat the memory module(s) into the connector(s) (see the Service Manual at support.dell.com/manuals). • If the problem persists, contact Dell (see "Contacting Dell" on page 87). If you are : • Power, keyboard, and mouse extension cables. • Too many devices connected to a power strip...
...Press a key on the keyboard, move the connected mouse or a finger on the touch pad, or press the power button to resume normal operation. • If the display is not responding, press the power button until the computer turns off and then turn it back on. • If the .../manuals). • Reseat the memory module(s) into the connector(s) (see the Service Manual at support.dell.com/manuals). • If the problem persists, contact Dell (see "Contacting Dell" on page 87). If you are : • Power, keyboard, and mouse extension cables. • Too many devices connected to a power strip...

Service Manual
Page 11
... unpainted metal surface to ground the system board. 6 Disconnect all attached devices from your computer, ground yourself by touching an unpainted metal surface, such as the metal at the back of the computer. CAUTION: To help prevent damage to the system board, remove the... main battery (see "Removing the Battery" on page 13) before working inside your computer. CAUTION: Before touching anything inside the computer. 7 Remove the battery (see "Removing the Battery" on page 13). 8 Turn the computer top-side up, open the display, and ...
... unpainted metal surface to ground the system board. 6 Disconnect all attached devices from your computer, ground yourself by touching an unpainted metal surface, such as the metal at the back of the computer. CAUTION: To help prevent damage to the system board, remove the... main battery (see "Removing the Battery" on page 13) before working inside your computer. CAUTION: Before touching anything inside the computer. 7 Remove the battery (see "Removing the Battery" on page 13). 8 Turn the computer top-side up, open the display, and ...

Service Manual
Page 31
2 1 1 top cover 2 palm-rest assembly CAUTION: Carefully separate the palm-rest assembly from the top cover to avoid damage to the palm-rest assembly. 7 Without pulling hard on the palm-rest assembly, place it away from the display as shown in the following illustration. 8 Lift the connector latch and pull the pull-tab to disconnect the touch-pad cable and the power button cable from the system-board connectors. 9 Lift the palm-rest assembly off the top cover. Palm-Rest Assembly 31
2 1 1 top cover 2 palm-rest assembly CAUTION: Carefully separate the palm-rest assembly from the top cover to avoid damage to the palm-rest assembly. 7 Without pulling hard on the palm-rest assembly, place it away from the display as shown in the following illustration. 8 Lift the connector latch and pull the pull-tab to disconnect the touch-pad cable and the power button cable from the system-board connectors. 9 Lift the palm-rest assembly off the top cover. Palm-Rest Assembly 31

Service Manual
Page 32
... cable connector Replacing the Palm-Rest Assembly 1 Follow the instructions in "Before You Begin" on page 9. 2 Slide the touch-pad cable and the power button cable into the system-board connectors and press down on the connector latches to secure the cables. 3 Align the tabs on the palm-rest assembly ...
... cable connector Replacing the Palm-Rest Assembly 1 Follow the instructions in "Before You Begin" on page 9. 2 Slide the touch-pad cable and the power button cable into the system-board connectors and press down on the connector latches to secure the cables. 3 Align the tabs on the palm-rest assembly ...

Service Manual
Page 35
...on your warranty. CAUTION: Only a certified service technician should perform repairs on page 13) before working inside the computer. Removing the Power-Button Board 1 Follow the instructions in "Before You Begin" on page 9. 2 Remove the battery (see "Removing the Battery" on your ... a wrist grounding strap or by your computer. Power-Button Board 35 8 Power-Button Board WARNING: Before working inside your computer, read the safety information that is not authorized by Dell™ is not covered by periodically touching an unpainted metal surface (such as a connector on ...
...on your warranty. CAUTION: Only a certified service technician should perform repairs on page 13) before working inside the computer. Removing the Power-Button Board 1 Follow the instructions in "Before You Begin" on page 9. 2 Remove the battery (see "Removing the Battery" on your ... a wrist grounding strap or by your computer. Power-Button Board 35 8 Power-Button Board WARNING: Before working inside your computer, read the safety information that is not authorized by Dell™ is not covered by periodically touching an unpainted metal surface (such as a connector on ...


