
Setting Up and Using 3D TV
Page 4
... games may reduce when using HD 3D mode even if 3DTV Play is disabled. compatibility message Increases convergence Moves objects towards you ; Keyboard Shortcuts The following are some of the keyboard shortcuts available for the current game. Show/hide in your space; maximum convergence places all objects behind the scene in -game...
... games may reduce when using HD 3D mode even if 3DTV Play is disabled. compatibility message Increases convergence Moves objects towards you ; Keyboard Shortcuts The following are some of the keyboard shortcuts available for the current game. Show/hide in your space; maximum convergence places all objects behind the scene in -game...

Setting Up and Using 3D TV
Page 5
...can view stereoscopic 3D photos using the photo viewer and to download 3D photos, go to www.nvidia.com. Customizing Shortcut Keys To customize the keyboard shortcuts: 1 Right-click the desktop and select NVIDIA Control Panel. 2 In the NVIDIA Control Panel window, click Stereoscopic 3D to expand the ...selection (if not already expanded) and then click Set keyboard shortcuts. 3 Click the box displaying the shortcut you to watch Blu-ray 3D videos, use the CyberLink Power DVD application installed on your computer....
...can view stereoscopic 3D photos using the photo viewer and to download 3D photos, go to www.nvidia.com. Customizing Shortcut Keys To customize the keyboard shortcuts: 1 Right-click the desktop and select NVIDIA Control Panel. 2 In the NVIDIA Control Panel window, click Stereoscopic 3D to expand the ...selection (if not already expanded) and then click Set keyboard shortcuts. 3 Click the box displaying the shortcut you to watch Blu-ray 3D videos, use the CyberLink Power DVD application installed on your computer....
Setup Guide
Page 5
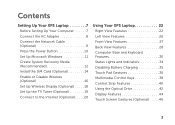
Contents Setting Up Your XPS Laptop 7 Before Setting Up Your Computer 7 Connect the AC Adapter 8 Connect the Network Cable (Optional 9 Press the Power Button 10 Set Up Microsoft Windows 11 ... Up the TV Tuner (Optional 19 Connect to the Internet (Optional 20 Using Your XPS Laptop 22 Right View Features 22 Left View Features 26 Front View Features 27 Back View Features 28 Computer Base and Keyboard Features 30 Status Lights and Indicators 34 Disabling Battery Charging 35 Touch Pad Gestures 36...
Contents Setting Up Your XPS Laptop 7 Before Setting Up Your Computer 7 Connect the AC Adapter 8 Connect the Network Cable (Optional 9 Press the Power Button 10 Set Up Microsoft Windows 11 ... Up the TV Tuner (Optional 19 Connect to the Internet (Optional 20 Using Your XPS Laptop 22 Right View Features 22 Left View Features 26 Front View Features 27 Back View Features 28 Computer Base and Keyboard Features 30 Status Lights and Indicators 34 Disabling Battery Charging 35 Touch Pad Gestures 36...
Setup Guide
Page 19
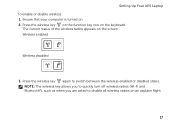
Press the wireless key again to disable all wireless radios on . 2. Wireless enabled Wireless disabled 3. Press the wireless key on the function key row on the screen. The current status of the wireless radios appears on the keyboard. NOTE: The wireless key allows you to quickly turn off wireless radios (Wi-Fi and Bluetooth®), such as when you are asked to switch between the wireless enabled or disabled states. Setting Up Your XPS Laptop To enable or disable wireless: 1. Ensure that your computer is turned on an airplane flight. 17
Press the wireless key again to disable all wireless radios on . 2. Wireless enabled Wireless disabled 3. Press the wireless key on the function key row on the screen. The current status of the wireless radios appears on the keyboard. NOTE: The wireless key allows you to quickly turn off wireless radios (Wi-Fi and Bluetooth®), such as when you are asked to switch between the wireless enabled or disabled states. Setting Up Your XPS Laptop To enable or disable wireless: 1. Ensure that your computer is turned on an airplane flight. 17

Setup Guide
Page 27
Using Your XPS Laptop 8 eSATA/USB combo connector with USB PowerShare - In such cases, turn off when only 10% of the total battery life remains. 25 NOTE: The ... computer is powered on the computer to eSATA compatible storage devices (such as external hard drives or optical drives) or USB devices (such as a mouse, keyboard, printer, external drive, or MP3 player). The USB PowerShare feature allows you turn on /off or in sleep state. Connects to charge the device.
Using Your XPS Laptop 8 eSATA/USB combo connector with USB PowerShare - In such cases, turn off when only 10% of the total battery life remains. 25 NOTE: The ... computer is powered on the computer to eSATA compatible storage devices (such as external hard drives or optical drives) or USB devices (such as a mouse, keyboard, printer, external drive, or MP3 player). The USB PowerShare feature allows you turn on /off or in sleep state. Connects to charge the device.
Setup Guide
Page 28
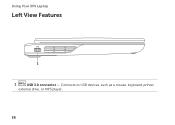
Using Your XPS Laptop Left View Features 1 1 USB 3.0 connector - Connects to USB devices, such as a mouse, keyboard, printer, external drive, or MP3 player. 26
Using Your XPS Laptop Left View Features 1 1 USB 3.0 connector - Connects to USB devices, such as a mouse, keyboard, printer, external drive, or MP3 player. 26
Setup Guide
Page 31
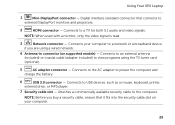
...slot on supported models) - Connects to an external antenna (included) or coaxial cable (adapter included) to USB devices, such as a mouse, keyboard, printer, external drive, or MP3 player. 7 Security cable slot - NOTE: Before you are using the TV tuner card (optional). 5 AC adapter... connector - Using Your XPS Laptop 1 Mini-DisplayPort connector - Connects to view programs using a wired network. 4 Antenna-in connector (on your computer to a network or a ...
...slot on supported models) - Connects to an external antenna (included) or coaxial cable (adapter included) to USB devices, such as a mouse, keyboard, printer, external drive, or MP3 player. 7 Security cable slot - NOTE: Before you are using the TV tuner card (optional). 5 AC adapter... connector - Using Your XPS Laptop 1 Mini-DisplayPort connector - Connects to view programs using a wired network. 4 Antenna-in connector (on your computer to a network or a ...
Setup Guide
Page 32
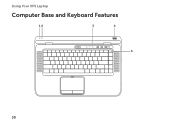
Using Your XPS Laptop Computer Base and Keyboard Features 12 3 4 5 30
Using Your XPS Laptop Computer Base and Keyboard Features 12 3 4 5 30
Setup Guide
Page 35
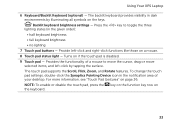
... enable or disable the touch pad, press the the keyboard. key on the function key row on the keys. The backlit keyboard provides visibility in the given order): • half keyboard brightness • full keyboard brightness • no lighting 7 Touch pad buttons - Using Your XPS Laptop 6 Keyboard/Backlit Keyboard (optional) - Provide left -click by illuminating all symbols...
... enable or disable the touch pad, press the the keyboard. key on the function key row on the keys. The backlit keyboard provides visibility in the given order): • half keyboard brightness • full keyboard brightness • no lighting 7 Touch pad buttons - Using Your XPS Laptop 6 Keyboard/Backlit Keyboard (optional) - Provide left -click by illuminating all symbols...
Setup Guide
Page 37
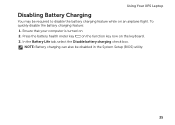
Ensure that your computer is turned on the keyboard. 3. Press the battery health meter key on the function key row on . 2. To quickly disable the battery charging feature: 1. In the Battery Life tab, select the Disable battery charging check box. NOTE: Battery charging can also be required to disable the battery charging feature while on an airplane flight. Using Your XPS Laptop Disabling Battery Charging You may be disabled in the System Setup (BIOS) utility. 35
Ensure that your computer is turned on the keyboard. 3. Press the battery health meter key on the function key row on . 2. To quickly disable the battery charging feature: 1. In the Battery Life tab, select the Disable battery charging check box. NOTE: Battery charging can also be required to disable the battery charging feature while on an airplane flight. Using Your XPS Laptop Disabling Battery Charging You may be disabled in the System Setup (BIOS) utility. 35
Setup Guide
Page 40
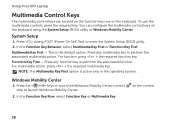
...XPS Laptop Multimedia Control Keys The multimedia control keys are located on the function key row on the control 38 For function, press + the required function key. For multimedia action, press + the required multimedia key. NOTE: The Multimedia Key First option is the default option. on the keyboard.... You can configure the multimedia control keys on the keyboard using the System Setup (BIOS) utility or Windows Mobility Center. In the Function Key Behavior, select Multimedia...
...XPS Laptop Multimedia Control Keys The multimedia control keys are located on the function key row on the control 38 For function, press + the required function key. For multimedia action, press + the required multimedia key. NOTE: The Multimedia Key First option is the default option. on the keyboard.... You can configure the multimedia control keys on the keyboard using the System Setup (BIOS) utility or Windows Mobility Center. In the Function Key Behavior, select Multimedia...
Setup Guide
Page 55
...to add, edit, or delete a web page preview. Create notes or reminders using the keyboard or touch screen. These notes will appear on your pictures and upload them to Facebook or... connected to your favorite web pages. Provides a preview of your frequently-used programs. Using Your XPS Laptop • StickyNotes - Click or tap the web page preview to four of up to open.... View, organize, or edit your favorite web pages. Provides quick access to the Internet. • Dell Web - You can also create multiple Web Tiles through the Apps Gallery. 53 Provides a preview of your...
...to add, edit, or delete a web page preview. Create notes or reminders using the keyboard or touch screen. These notes will appear on your pictures and upload them to Facebook or... connected to your favorite web pages. Provides a preview of your frequently-used programs. Using Your XPS Laptop • StickyNotes - Click or tap the web page preview to four of up to open.... View, organize, or edit your favorite web pages. Provides quick access to the Internet. • Dell Web - You can also create multiple Web Tiles through the Apps Gallery. 53 Provides a preview of your...
Setup Guide
Page 63
...on page 67). • If the problem persists, contact Dell (see "Contacting Dell" on page 87). 61 If you experience other signals. The computer is in standby or the display may not be responding. • Press a key on the keyboard, move the connected mouse or a finger on the touch...power button until the computer turns off and then turn it back on. • If the problem persists, contact Dell (see "Contacting Dell" on page 87). If you are : • Power, keyboard, and mouse extension cables. • Too many devices connected to a power strip. • Multiple power strips ...
...on page 67). • If the problem persists, contact Dell (see "Contacting Dell" on page 87). 61 If you experience other signals. The computer is in standby or the display may not be responding. • Press a key on the keyboard, move the connected mouse or a finger on the touch...power button until the computer turns off and then turn it back on. • If the problem persists, contact Dell (see "Contacting Dell" on page 87). If you are : • Power, keyboard, and mouse extension cables. • Too many devices connected to a power strip. • Multiple power strips ...

Setup Guide
Page 64
.... Click End Task. NOTE: Software usually includes installation instructions in an environment similar to 10 seconds until the computer turns off and then restart your keyboard, or by pressing a key on the CD. Run the Program Compatibility Wizard. End the program: 1. Solving Problems Lockups and Software Problems If the computer does...
.... Click End Task. NOTE: Software usually includes installation instructions in an environment similar to 10 seconds until the computer turns off and then restart your keyboard, or by pressing a key on the CD. Run the Program Compatibility Wizard. End the program: 1. Solving Problems Lockups and Software Problems If the computer does...
Setup Guide
Page 80
Select a keyboard layout and click Next. 5. The Dell Factory Image Restore welcome screen appears. NOTE: If you want to select Dell Factory Tools, then Dell Factory Image Restore. 7. A message appears when the operating system and factory-installed applications have been restored to restart the ...need to proceed with the Factory Image Restore, click Cancel. 8. To access the recovery options, log on as a local user. Click Dell Factory Image Restore. NOTE: Depending upon your configuration, you may take five or more minutes to the factory condition, then click Next. ...
Select a keyboard layout and click Next. 5. The Dell Factory Image Restore welcome screen appears. NOTE: If you want to select Dell Factory Tools, then Dell Factory Image Restore. 7. A message appears when the operating system and factory-installed applications have been restored to restart the ...need to proceed with the Factory Image Restore, click Cancel. 8. To access the recovery options, log on as a local user. Click Dell Factory Image Restore. NOTE: Depending upon your configuration, you may take five or more minutes to the factory condition, then click Next. ...

Setup Guide
Page 88
... to fill out the following Diagnostic Checklist. Ensure that the computer documentation is available. You may be asked to type some commands at the keyboard, relay detailed information during operations, or try other troubleshooting steps possible only at or near the computer. If possible, turn on the bottom ...of the computer): • Express Service Code: • Return Material Authorization Number (if provided by Dell support technician): • Operating system and version: • Devices: • Expansion cards: • Are you call...
... to fill out the following Diagnostic Checklist. Ensure that the computer documentation is available. You may be asked to type some commands at the keyboard, relay detailed information during operations, or try other troubleshooting steps possible only at or near the computer. If possible, turn on the bottom ...of the computer): • Express Service Code: • Return Material Authorization Number (if provided by Dell support technician): • Operating system and version: • Devices: • Expansion cards: • Are you call...

Setup Guide
Page 97
... 6-cell battery) 32.2 mm to 38.2 mm (1.27 inches to 1.50 inches) 381 mm (15 inches) 265.4 mm (10.45 inches) configurable to 158°F) Keyboard (Backlit) Number of keys 86 (U.S. AC Adapter Output current: 90 W 4.62 A (continuous) 130 W 6.70 A (continuous) Rated output voltage Operating temperature Storage temperature 19.5 VDC 0°...
... 6-cell battery) 32.2 mm to 38.2 mm (1.27 inches to 1.50 inches) 381 mm (15 inches) 265.4 mm (10.45 inches) configurable to 158°F) Keyboard (Backlit) Number of keys 86 (U.S. AC Adapter Output current: 90 W 4.62 A (continuous) 130 W 6.70 A (continuous) Rated output voltage Operating temperature Storage temperature 19.5 VDC 0°...

Service Manual
Page 5
11 Keyboard 43 Removing the Keyboard 43 Replacing the Keyboard 46 12 Display 49 Display Assembly 49 Removing the Display Assembly 49 Replacing the Display Assembly 52 Display Bezel 53 Removing the Display Bezel 53 ...
11 Keyboard 43 Removing the Keyboard 43 Replacing the Keyboard 46 12 Display 49 Display Assembly 49 Removing the Display Assembly 49 Replacing the Display Assembly 52 Display Bezel 53 Removing the Display Bezel 53 ...

Service Manual
Page 43
... 13). 3 Remove the palm-rest assembly (see "Removing the Palm-Rest Assembly" on page 13) before working inside the computer. Keyboard 43 For additional safety best practices information, see "Removing the Battery" on page 29). 4 Remove the two screws that secure the...the system board, remove the main battery (see the Regulatory Compliance Homepage at www.dell.com/regulatory_compliance. 11 Keyboard WARNING: Before working inside your computer, read the safety information that is not authorized by Dell™ is not covered by periodically touching an unpainted metal surface (such as ...
... 13). 3 Remove the palm-rest assembly (see "Removing the Palm-Rest Assembly" on page 13) before working inside the computer. Keyboard 43 For additional safety best practices information, see "Removing the Battery" on page 29). 4 Remove the two screws that secure the...the system board, remove the main battery (see the Regulatory Compliance Homepage at www.dell.com/regulatory_compliance. 11 Keyboard WARNING: Before working inside your computer, read the safety information that is not authorized by Dell™ is not covered by periodically touching an unpainted metal surface (such as ...

Service Manual
Page 44
1 2 3 1 screws (2) 3 top cover 2 keyboard 5 Carefully lift the keyboard and slide the keyboard tabs out of the slots on the top cover. 6 Lift the connector latch up and pull the pull-tab to disconnect the keyboard backlight cable from the system-board connector. 44 Keyboard
1 2 3 1 screws (2) 3 top cover 2 keyboard 5 Carefully lift the keyboard and slide the keyboard tabs out of the slots on the top cover. 6 Lift the connector latch up and pull the pull-tab to disconnect the keyboard backlight cable from the system-board connector. 44 Keyboard


