

Setup Guide
Page 4
...indicates important information that helps you purchased a Dell™ n Series computer, any references in this text: Dell, the DELL logo, XPS, Solution Station, and DellConnect are trademarks of Dell Inc.; Blu‑ray Disc is a ...Dell under license. CAUTION: A CAUTION indicates either trademarks or registered trademarks of your computer. WARNING: A WARNING indicates a potential for property damage, personal injury, or death. If you make better use of Microsoft Corporation in trademarks and trade names other than its own. Trademarks used by Bluetooth SIG, Inc. Bluetooth...
...indicates important information that helps you purchased a Dell™ n Series computer, any references in this text: Dell, the DELL logo, XPS, Solution Station, and DellConnect are trademarks of Dell Inc.; Blu‑ray Disc is a ...Dell under license. CAUTION: A CAUTION indicates either trademarks or registered trademarks of your computer. WARNING: A WARNING indicates a potential for property damage, personal injury, or death. If you make better use of Microsoft Corporation in trademarks and trade names other than its own. Trademarks used by Bluetooth SIG, Inc. Bluetooth...
Setup Guide
Page 19
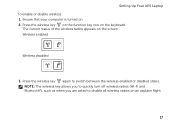
Ensure that your computer is turned on the keyboard. Wireless enabled Wireless disabled 3. NOTE: The wireless key allows you to quickly turn off wireless radios (Wi-Fi and Bluetooth®), such as when you are asked to switch between the wireless enabled or disabled states. Press the wireless key on the function key row on . 2. The current status of the wireless radios appears on an airplane flight. 17 Press the wireless key again to disable all wireless radios on the screen. Setting Up Your XPS Laptop To enable or disable wireless: 1.
Ensure that your computer is turned on the keyboard. Wireless enabled Wireless disabled 3. NOTE: The wireless key allows you to quickly turn off wireless radios (Wi-Fi and Bluetooth®), such as when you are asked to switch between the wireless enabled or disabled states. Press the wireless key on the function key row on . 2. The current status of the wireless radios appears on an airplane flight. 17 Press the wireless key again to disable all wireless radios on the screen. Setting Up Your XPS Laptop To enable or disable wireless: 1.

Setup Guide
Page 94
...) external V.92 56 K USB modem Network adapter 10/100/1000 Ethernet LAN on system board Wireless WLAN, WWAN (optional), WiMAX/Wi-Fi abgn/agn, and Bluetooth® wireless technology (optional)/ WiDi (optional) TV TV tuner card (optional) Audio Audio controller Speakers Volume controls Realtek ALC665 2 x 1.5 Watt + 2.5 Watt software program menus and...
...) external V.92 56 K USB modem Network adapter 10/100/1000 Ethernet LAN on system board Wireless WLAN, WWAN (optional), WiMAX/Wi-Fi abgn/agn, and Bluetooth® wireless technology (optional)/ WiDi (optional) TV TV tuner card (optional) Audio Audio controller Speakers Volume controls Realtek ALC665 2 x 1.5 Watt + 2.5 Watt software program menus and...

Service Manual
Page 2
All rights reserved. Regulatory model: P11F series Regulatory type: P11F001 October 2010 Rev. and is used in this text: Dell™, the DELL logo, and XPS™ are either trademarks or registered trademarks of your computer. Bluetooth® is strictly forbidden. CAUTION: A CAUTION indicates potential damage to change without the written permission of data if...
All rights reserved. Regulatory model: P11F series Regulatory type: P11F001 October 2010 Rev. and is used in this text: Dell™, the DELL logo, and XPS™ are either trademarks or registered trademarks of your computer. Bluetooth® is strictly forbidden. CAUTION: A CAUTION indicates potential damage to change without the written permission of data if...

Service Manual
Page 6
14 Top Cover 65 Removing the Top Cover 65 Replacing the Top Cover 69 15 Fan 71 Removing the Fan 71 Replacing the Fan 72 16 Subwoofer 75 Removing the Subwoofer 75 Replacing the Subwoofer 76 17 Internal Card With Bluetooth Wireless Technology 79 Removing the Bluetooth Card 79 Replacing the Bluetooth Card 80 18 AC-Adapter Connector 83 Removing the AC-Adapter Connector 83 Replacing the AC-Adapter Connector 84 19 USB Board 87 Removing the USB Board 87 6 Contents
14 Top Cover 65 Removing the Top Cover 65 Replacing the Top Cover 69 15 Fan 71 Removing the Fan 71 Replacing the Fan 72 16 Subwoofer 75 Removing the Subwoofer 75 Replacing the Subwoofer 76 17 Internal Card With Bluetooth Wireless Technology 79 Removing the Bluetooth Card 79 Replacing the Bluetooth Card 80 18 AC-Adapter Connector 83 Removing the AC-Adapter Connector 83 Replacing the AC-Adapter Connector 84 19 USB Board 87 Removing the USB Board 87 6 Contents

Service Manual
Page 68
. 1 1 1 top-cover assembly 15 Remove heat sink (see "Removing the Heat Sink" on page 95). 16 Remove the system board (see "Removing the System Board" on page 103). 17 Remove the Bluetooth card (see "Removing the Bluetooth Card" on page 79). 18 Remove the AC-adapter connector (see "Removing the AC-Adapter Connector" on page 83). 19 Remove the USB board (see "Removing the USB Board" on page 87). 20 Remove the TV tuner connector (see "Removing the TV Tuner Connector" on page 91). 21 Remove the speakers (see "Removing the Speakers" on page 109). 68 Top Cover
. 1 1 1 top-cover assembly 15 Remove heat sink (see "Removing the Heat Sink" on page 95). 16 Remove the system board (see "Removing the System Board" on page 103). 17 Remove the Bluetooth card (see "Removing the Bluetooth Card" on page 79). 18 Remove the AC-adapter connector (see "Removing the AC-Adapter Connector" on page 83). 19 Remove the USB board (see "Removing the USB Board" on page 87). 20 Remove the TV tuner connector (see "Removing the TV Tuner Connector" on page 91). 21 Remove the speakers (see "Removing the Speakers" on page 109). 68 Top Cover

Service Manual
Page 69
... "Replacing the USB Board" on page 88). 5 Replace the AC-adapter connector (see "Replacing the AC-Adapter Connector" on page 84). 6 Replace the Bluetooth card (see "Replacing the Bluetooth Card" on page 80). 7 Replace the system board (see "Replacing the System Board" on page 105). 8 Replace the heat sink (see "Replacing the...
... "Replacing the USB Board" on page 88). 5 Replace the AC-adapter connector (see "Replacing the AC-Adapter Connector" on page 84). 6 Replace the Bluetooth card (see "Replacing the Bluetooth Card" on page 80). 7 Replace the system board (see "Replacing the System Board" on page 105). 8 Replace the heat sink (see "Replacing the...

Service Manual
Page 79
... inside the computer. Internal Card With Bluetooth Wireless Technology 79 Damage due to the system board, remove the main battery (see the Regulatory Compliance Homepage at www.dell.com/regulatory_compliance. 17 Internal Card With Bluetooth Wireless Technology WARNING: Before working inside ...your computer, read the safety information that is not authorized by Dell™ is not covered by periodically touching an...
... inside the computer. Internal Card With Bluetooth Wireless Technology 79 Damage due to the system board, remove the main battery (see the Regulatory Compliance Homepage at www.dell.com/regulatory_compliance. 17 Internal Card With Bluetooth Wireless Technology WARNING: Before working inside ...your computer, read the safety information that is not authorized by Dell™ is not covered by periodically touching an...

Service Manual
Page 80
... from the connector on the system board. 11 Lift the Bluetooth card from the slot on the top cover. 1 4 3 2 1 Bluetooth-card cable connector 3 Bluetooth card slot 2 Bluetooth card 4 Bluetooth-card cable Replacing the Bluetooth Card 1 Follow the instructions in "Before You Begin" on page 9. 2 Slide the Bluetooth card into the slot on the top cover. 3 Connect the...
... from the connector on the system board. 11 Lift the Bluetooth card from the slot on the top cover. 1 4 3 2 1 Bluetooth-card cable connector 3 Bluetooth card slot 2 Bluetooth card 4 Bluetooth-card cable Replacing the Bluetooth Card 1 Follow the instructions in "Before You Begin" on page 9. 2 Slide the Bluetooth card into the slot on the top cover. 3 Connect the...

Service Manual
Page 81
... screws and ensure that no stray screws remain inside the computer. Failure to do so may result in damage to the computer. Internal Card With Bluetooth Wireless Technology 81 CAUTION: Before turning on page 14).
... screws and ensure that no stray screws remain inside the computer. Failure to do so may result in damage to the computer. Internal Card With Bluetooth Wireless Technology 81 CAUTION: Before turning on page 14).

Service Manual
Page 82
82 Internal Card With Bluetooth Wireless Technology
82 Internal Card With Bluetooth Wireless Technology

Service Manual
Page 104
9 Disconnect the USB board cable and speaker cable from the connectors on the system board. 1 2 1 USB board cable connector 2 speaker cable connector 10 Turn the top cover over. 11 Remove the heat sink (see "Removing the Heat Sink" on page 95). 12 Remove the processor module (see "Removing the Processor Module" on page 99). 13 Disconnect the Bluetooth cable and AC-adapter cable from the connector on the system board. 14 Remove the five screws that secure the system board to the top cover. 104 System Board
9 Disconnect the USB board cable and speaker cable from the connectors on the system board. 1 2 1 USB board cable connector 2 speaker cable connector 10 Turn the top cover over. 11 Remove the heat sink (see "Removing the Heat Sink" on page 95). 12 Remove the processor module (see "Removing the Processor Module" on page 99). 13 Disconnect the Bluetooth cable and AC-adapter cable from the connector on the system board. 14 Remove the five screws that secure the system board to the top cover. 104 System Board

Service Manual
Page 105
Replacing the System Board 1 Follow the instructions in "Before You Begin" on page 9. 2 Align the connectors on the system board with the slots on the top cover and place the system board on the top cover, and lift the system board off the top cover. System Board 105 2 1 3 4 1 AC-adapter connector 3 system board 2 screws (5) 4 Bluetooth-board cable connector 15 Carefully ease the connectors on the system board out of the slots on the top cover. 3 Replace the five screws that secure the system board to the top cover.
Replacing the System Board 1 Follow the instructions in "Before You Begin" on page 9. 2 Align the connectors on the system board with the slots on the top cover and place the system board on the top cover, and lift the system board off the top cover. System Board 105 2 1 3 4 1 AC-adapter connector 3 system board 2 screws (5) 4 Bluetooth-board cable connector 15 Carefully ease the connectors on the system board out of the slots on the top cover. 3 Replace the five screws that secure the system board to the top cover.

Service Manual
Page 106
... no stray screws remain inside the computer. Failure to do so may result in damage to the computer. 15 Turn on page 14). 4 Connect the Bluetooth cable and AC-adapter cable to the connectors on the system board. 5 Replace the processor module (see "Replacing the Processor Module" on page 101). 6 Replace...
... no stray screws remain inside the computer. Failure to do so may result in damage to the computer. 15 Turn on page 14). 4 Connect the Bluetooth cable and AC-adapter cable to the connectors on the system board. 5 Replace the processor module (see "Replacing the Processor Module" on page 101). 6 Replace...


