

NVIDIA 3D TV: Frequently Asked Questions
Page 1
Support for 3D effects in window mode will be made available by NVIDIA as 3D video streaming only in window mode? This issue maybe application-specific and may occur when applications are moved from the computer to see a list of supported 3D TVs. Also ensure that the latest updates have been ...
Support for 3D effects in window mode will be made available by NVIDIA as 3D video streaming only in window mode? This issue maybe application-specific and may occur when applications are moved from the computer to see a list of supported 3D TVs. Also ensure that the latest updates have been ...

Setup Guide
Page 7
Contents Getting Help 79 Technical Support and Customer Service 80 DellConnect 80 Online Services 81 Automated Order-Status Service 82 Product Information 82 Returning Items for Repair Under Warranty or for Credit 83 Before You Call 85 Contacting Dell 87 Finding More Information and Resources 88 Specifications 90 Appendix 97 Macrovision Product Notice 97 Information for NOM, or Official Mexican Standard (Only for Mexico 98 Index 99 5
Contents Getting Help 79 Technical Support and Customer Service 80 DellConnect 80 Online Services 81 Automated Order-Status Service 82 Product Information 82 Returning Items for Repair Under Warranty or for Credit 83 Before You Call 85 Contacting Dell 87 Finding More Information and Resources 88 Specifications 90 Appendix 97 Macrovision Product Notice 97 Information for NOM, or Official Mexican Standard (Only for Mexico 98 Index 99 5

Setup Guide
Page 29
Provides a fast and convenient way to view and share digital photos, music, videos, and documents stored on page 92. Blanks protect unused slots from other particles. NOTE: Your computer ships with a plastic blank installed in the slot; Save the blank for use when no media card is installed in the media card slot. blanks from dust and other computers may not fit your computer. 27 For the supported memory cards, see "Specifications" on memory cards. Front View Features Using Your XPS Laptop 1 1 9-in-1 Media Card Reader -
Provides a fast and convenient way to view and share digital photos, music, videos, and documents stored on page 92. Blanks protect unused slots from other particles. NOTE: Your computer ships with a plastic blank installed in the slot; Save the blank for use when no media card is installed in the media card slot. blanks from dust and other computers may not fit your computer. 27 For the supported memory cards, see "Specifications" on memory cards. Front View Features Using Your XPS Laptop 1 1 9-in-1 Media Card Reader -
Setup Guide
Page 48
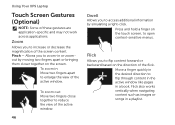
... or zoomout by simulating a right-click. Press and hold a finger on the direction of these gestures are application-specific and may not work across applications. Pinch - To zoom in a playlist. Using Your XPS Laptop Touch Screen Gestures (Optional) NOTE: Some of the flick. Flick also works vertically when navigating content such as...
... or zoomout by simulating a right-click. Press and hold a finger on the direction of these gestures are application-specific and may not work across applications. Pinch - To zoom in a playlist. Using Your XPS Laptop Touch Screen Gestures (Optional) NOTE: Some of the flick. Flick also works vertically when navigating content such as...
Setup Guide
Page 57
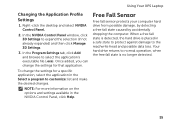
Using Your XPS Laptop Changing the Application Profile Settings 1. In the NVIDIA Control Panel window, click 3D Settings to select the application's executable file (.exe). NOTE: For more ... caused by accidentally dropping the computer. When a free fall state is detected, the hard drive is no longer detected. 55 To change the settings for a specific application, select the application in the NVIDIA Control Panel, click Help. Your hard drive returns to the read/write head and possible data loss. Right...
Using Your XPS Laptop Changing the Application Profile Settings 1. In the NVIDIA Control Panel window, click 3D Settings to select the application's executable file (.exe). NOTE: For more ... caused by accidentally dropping the computer. When a free fall state is detected, the hard drive is no longer detected. 55 To change the settings for a specific application, select the application in the NVIDIA Control Panel, click Help. Your hard drive returns to the read/write head and possible data loss. Right...

Setup Guide
Page 66
... notification area of your computer's model number, service tag, express service code, and service contact information. Using Support Tools Dell Support Center The Dell Support Center helps you find the service, support, and system-specific information you need. The home page also provides links to access: Self Help (Troubleshooting, Security, System Performance, Network...
... notification area of your computer's model number, service tag, express service code, and service contact information. Using Support Tools Dell Support Center The Dell Support Center helps you find the service, support, and system-specific information you need. The home page also provides links to access: Self Help (Troubleshooting, Security, System Performance, Network...
Setup Guide
Page 92
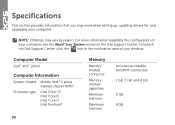
Computer Model Dell™ XPS™ L501X Computer Information System chipset Mobile Intel® 5 series express chipset HM57 Processor type Intel Core™ i3 Intel Core i5 Intel Core i7 Intel Pentium&#.... For more information regarding the configuration of your computer, see the About Your System section in the notification area of your computer. To launch the Dell Support Center, click the icon in the Dell Support Center. Specifications This section provides information that you may vary by region.
Computer Model Dell™ XPS™ L501X Computer Information System chipset Mobile Intel® 5 series express chipset HM57 Processor type Intel Core™ i3 Intel Core i5 Intel Core i7 Intel Pentium&#.... For more information regarding the configuration of your computer, see the About Your System section in the notification area of your computer. To launch the Dell Support Center, click the icon in the Dell Support Center. Specifications This section provides information that you may vary by region.

Setup Guide
Page 93
... connectors to set up 5.1 channel speakers S/PDIF one headphone/digital S/PDIF combo connector Mini-Card one full Mini-Card slot one half Mini-Card slot Specifications Connectors HDMI connector one 19-pin connector Network adapter one RJ45 connector USB two 4-pin USB 3.0-compliant connectors MiniDisplayPort one 20-pin connector eSATA one... MCX connector 91 Memory Memory type 1066 MHz/1333 MHz SODIMM DDR3 NOTE: For instructions on upgrading the memory, see the Service Manual at support.dell.com/manuals.
... connectors to set up 5.1 channel speakers S/PDIF one headphone/digital S/PDIF combo connector Mini-Card one full Mini-Card slot one half Mini-Card slot Specifications Connectors HDMI connector one 19-pin connector Network adapter one RJ45 connector USB two 4-pin USB 3.0-compliant connectors MiniDisplayPort one 20-pin connector eSATA one... MCX connector 91 Memory Memory type 1066 MHz/1333 MHz SODIMM DDR3 NOTE: For instructions on upgrading the memory, see the Service Manual at support.dell.com/manuals.

Setup Guide
Page 94
Specifications Media Card Reader Cards supported Secure Digital (SD) memory card Secure Digital Input Output (SDIO) Secure Digital High Capacity (SDHC) Secure Digital eXtended Capacity (SDXC) ...
Specifications Media Card Reader Cards supported Secure Digital (SD) memory card Secure Digital Input Output (SDIO) Secure Digital High Capacity (SDHC) Secure Digital eXtended Capacity (SDXC) ...

Setup Guide
Page 95
... GeForce GT 435M 1 GB/2 GB DDR3 15.6-inch HD WLED, TrueLife 15.6-inch Full HD RGBLED, TrueLife Multi-touch 15.6-inch HD WLED, TrueLife (Optional) Specifications Display Dimensions: Height Width Diagonal Maximum resolution Refresh rate Operating angle Horizontal viewing angle Vertical viewing angle Pixel pitch 193.54 mm (7.62 inches) 344...
... GeForce GT 435M 1 GB/2 GB DDR3 15.6-inch HD WLED, TrueLife 15.6-inch Full HD RGBLED, TrueLife Multi-touch 15.6-inch HD WLED, TrueLife (Optional) Specifications Display Dimensions: Height Width Diagonal Maximum resolution Refresh rate Operating angle Horizontal viewing angle Vertical viewing angle Pixel pitch 193.54 mm (7.62 inches) 344...

Setup Guide
Page 96
Specifications Battery 9-cell "smart" lithium ion: Height 221.07 mm (8.70 inches) Width 54.35 mm (2.14 inches) Depth 42.53 mm (1.67 inches) Weight 0.49 ...
Specifications Battery 9-cell "smart" lithium ion: Height 221.07 mm (8.70 inches) Width 54.35 mm (2.14 inches) Depth 42.53 mm (1.67 inches) Weight 0.49 ...

Setup Guide
Page 97
and Canada); 87 (Europe); 90 (Japan); 87 (Brazil) Layout QWERTY/AZERTY/Kanji Specifications Touch Pad X/Y position resolution (graphics table mode) Size: 240 cpi Width 100 mm (3.94 inches) Height 56 mm (2.2 inches) Physical Height Width Depth Weight (with 6-...
and Canada); 87 (Europe); 90 (Japan); 87 (Brazil) Layout QWERTY/AZERTY/Kanji Specifications Touch Pad X/Y position resolution (graphics table mode) Size: 240 cpi Width 100 mm (3.94 inches) Height 56 mm (2.2 inches) Physical Height Width Depth Weight (with 6-...
Setup Guide
Page 98
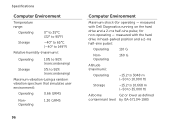
Specifications Computer Environment Temperature range: Operating 0° to 35°C (32° to 95°F) Storage -40° to 65°C (-40° to 149°F) ...): Operating 10% to 90% (noncondensing) Storage 5% to 35,000 ft) Airborne G2 or lower as defined contaminant level by ISA-S71.04-1985 measured with Dell Diagnostics running on the hard drive and a 2-ms half-sine pulse; for operating - measured with the hard drive in head-parked position and a 2-ms half...
Specifications Computer Environment Temperature range: Operating 0° to 35°C (32° to 95°F) Storage -40° to 65°C (-40° to 149°F) ...): Operating 10% to 90% (noncondensing) Storage 5% to 35,000 ft) Airborne G2 or lower as defined contaminant level by ISA-S71.04-1985 measured with Dell Diagnostics running on the hard drive and a 2-ms half-sine pulse; for operating - measured with the hard drive in head-parked position and a 2-ms half...

Setup Guide
Page 103
power strips, using 8 problems, solving 57 products information and purchasing 82 R resources, finding more 88 restoring factory image 77 S setup, before you begin 7 shipping products for return or repair 83 SIM card 14 software features 50 software problems 62 solving problems 57 specifications 90 support email addresses 81 support sites worldwide 81 System Messages 65 System Recovery Media 76 system reinstall options 72 System Restore 73 System Setup 38 entering 38 function key behavior 38 T Touch Pad Gestures 36 Touch screen Gestures 46 TV tuner 19 U USB PowerShare 25 Index 101
power strips, using 8 problems, solving 57 products information and purchasing 82 R resources, finding more 88 restoring factory image 77 S setup, before you begin 7 shipping products for return or repair 83 SIM card 14 software features 50 software problems 62 solving problems 57 specifications 90 support email addresses 81 support sites worldwide 81 System Messages 65 System Recovery Media 76 system reinstall options 72 System Restore 73 System Setup 38 entering 38 function key behavior 38 T Touch Pad Gestures 36 Touch screen Gestures 46 TV tuner 19 U USB PowerShare 25 Index 101

Service Manual
Page 17
...SODIMM connectors. Removing the Memory Module(s) 1 Follow the instructions in the Setup Guide that shipped with your computer or at www.dell.com/regulatory_compliance. Memory Module(s) 17 4 Memory Module(s) WARNING: Before working inside your computer, read the safety information that shipped ... the Battery" on page 13) before working inside the computer. CAUTION: Only a certified service technician should perform repairs on your computer. See "Specifications" in "Before You Begin" on page 9. 2 Remove the battery (see "Removing the Battery" on page 13). 3 Remove the module cover...
...SODIMM connectors. Removing the Memory Module(s) 1 Follow the instructions in the Setup Guide that shipped with your computer or at www.dell.com/regulatory_compliance. Memory Module(s) 17 4 Memory Module(s) WARNING: Before working inside your computer, read the safety information that shipped ... the Battery" on page 13) before working inside the computer. CAUTION: Only a certified service technician should perform repairs on your computer. See "Specifications" in "Before You Begin" on page 9. 2 Remove the battery (see "Removing the Battery" on page 13). 3 Remove the module cover...


