

Setting Up and Using 3D TV
Page 3
... NVIDIA 3D Vision. To maximize performance, select HD or SD mode when 3DTV Play is disabled. Playing Games in 3D 1 Launch the game in full-screen mode. 2 If you to 60/59 Hz. NOTE: For a list of supported 3D games, go to 720p, 1280x720 in -game resolution to www.nvidia.com...
... NVIDIA 3D Vision. To maximize performance, select HD or SD mode when 3DTV Play is disabled. Playing Games in 3D 1 Launch the game in full-screen mode. 2 If you to 60/59 Hz. NOTE: For a list of supported 3D games, go to 720p, 1280x720 in -game resolution to www.nvidia.com...

NVIDIA 3D TV: Frequently Asked Questions
Page 1
.... 3 Why do I need to follow a sequence for 3D effects in window mode will be made available by NVIDIA as 3D video streaming only in full-screen mode. You can I connect or disconnect the HDMI display while playing a game or watching a Blu-ray movie? Check the system requirements section to an external...issue maybe application-specific and may occur when applications are moved from the computer to see a black/white screen when I find out if my 3D Television is the 3D effect available only in full-screen mode but not in window mode? This does not indicate a problem with your 3D TV is not...
.... 3 Why do I need to follow a sequence for 3D effects in window mode will be made available by NVIDIA as 3D video streaming only in full-screen mode. You can I connect or disconnect the HDMI display while playing a game or watching a Blu-ray movie? Check the system requirements section to an external...issue maybe application-specific and may occur when applications are moved from the computer to see a black/white screen when I find out if my 3D Television is the 3D effect available only in full-screen mode but not in window mode? This does not indicate a problem with your 3D TV is not...
NVIDIA 3D TV: Frequently Asked Questions
Page 2
... United States and/or other than its own. To workaround this document is a trademark of Dell Inc. Other trademarks and trade names may occur on my computer screen even after Windows has loaded? Printed in this text: Dell™ is subject to either restart your computer or connect your computer uses the Intel...
... United States and/or other than its own. To workaround this document is a trademark of Dell Inc. Other trademarks and trade names may occur on my computer screen even after Windows has loaded? Printed in this text: Dell™ is subject to either restart your computer or connect your computer uses the Intel...
Setup Guide
Page 5
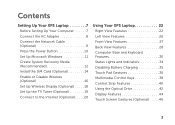
Contents Setting Up Your XPS Laptop 7 Before Setting Up Your Computer 7 Connect the AC Adapter 8 Connect the Network Cable (Optional 9 Press the Power Button ...16 Set Up Wireless Display (Optional 18 Set Up the TV Tuner (Optional 19 Connect to the Internet (Optional 20 Using Your XPS Laptop 22 Right View Features 22 Left View Features 26 Front View Features 27 Back View Features 28 Computer Base and Keyboard Features... Gestures 36 Multimedia Control Keys 38 Control Strip Features 40 Using the Optical Drive 42 Display Features 44 Touch Screen Gestures (Optional 46 3
Contents Setting Up Your XPS Laptop 7 Before Setting Up Your Computer 7 Connect the AC Adapter 8 Connect the Network Cable (Optional 9 Press the Power Button ...16 Set Up Wireless Display (Optional 18 Set Up the TV Tuner (Optional 19 Connect to the Internet (Optional 20 Using Your XPS Laptop 22 Right View Features 22 Left View Features 26 Front View Features 27 Back View Features 28 Computer Base and Keyboard Features... Gestures 36 Multimedia Control Keys 38 Control Strip Features 40 Using the Optical Drive 42 Display Features 44 Touch Screen Gestures (Optional 46 3
Setup Guide
Page 6
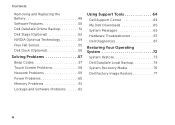
...Removing and Replacing the Battery 48 Software Features 50 Dell DataSafe Online Backup 51 Dell Stage (Optional 52 NVIDIA Optimus Technology 54 Free Fall Sensor 55 Dell Dock (Optional 56 Solving Problems 57 Beep Codes 57 Touch Screen Problems 58 Network Problems 59 Power Problems 60 ...Memory Problems 61 Lockups and Software Problems 62 Using Support Tools 64 Dell Support Center 64 My Dell Downloads 65 System Messages 65 Hardware Troubleshooter 67 Dell Diagnostics 67 Restoring Your Operating...
...Removing and Replacing the Battery 48 Software Features 50 Dell DataSafe Online Backup 51 Dell Stage (Optional 52 NVIDIA Optimus Technology 54 Free Fall Sensor 55 Dell Dock (Optional 56 Solving Problems 57 Beep Codes 57 Touch Screen Problems 58 Network Problems 59 Power Problems 60 ...Memory Problems 61 Lockups and Software Problems 62 Using Support Tools 64 Dell Support Center 64 My Dell Downloads 65 System Messages 65 Hardware Troubleshooter 67 Dell Diagnostics 67 Restoring Your Operating...
Setup Guide
Page 13
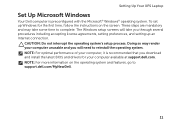
The Windows setup screens will take some time to support.dell.com/MyNewDell. 11 Setting Up Your XPS Laptop Set Up Microsoft Windows Your Dell computer is recommended that you download and install the latest BIOS and drivers for the first time, follow the instructions on the .... Doing so may take you will need to reinstall the operating system. To set up an Internet connection. NOTE: For more information on the screen. These steps are mandatory and may render your computer, it is preconfigured with the Microsoft® Windows® operating system. NOTE: For optimal...
The Windows setup screens will take some time to support.dell.com/MyNewDell. 11 Setting Up Your XPS Laptop Set Up Microsoft Windows Your Dell computer is recommended that you download and install the latest BIOS and drivers for the first time, follow the instructions on the .... Doing so may take you will need to reinstall the operating system. To set up an Internet connection. NOTE: For more information on the screen. These steps are mandatory and may render your computer, it is preconfigured with the Microsoft® Windows® operating system. NOTE: For optimal...
Setup Guide
Page 15
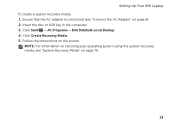
NOTE: For information on restoring your operating system using the system recovery media, see "Connect the AC Adapter" on page 8). 2. Click Create Recovery Media. 5. Follow the instructions on page 76. 13 Click Start → All Programs→ Dell DataSafe Local Backup. 4. Setting Up Your XPS Laptop To create a system recovery media: 1. Insert the disc or USB key in the computer. 3. Ensure that the AC adapter is connected (see "System Recovery Media" on the screen.
NOTE: For information on restoring your operating system using the system recovery media, see "Connect the AC Adapter" on page 8). 2. Click Create Recovery Media. 5. Follow the instructions on page 76. 13 Click Start → All Programs→ Dell DataSafe Local Backup. 4. Setting Up Your XPS Laptop To create a system recovery media: 1. Insert the disc or USB key in the computer. 3. Ensure that the AC adapter is connected (see "System Recovery Media" on the screen.
Setup Guide
Page 19
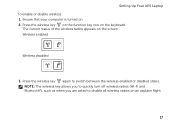
Press the wireless key again to disable all wireless radios on the screen. Ensure that your computer is turned on the keyboard. Press the wireless key on the function key row on . 2. NOTE: The wireless key allows you to quickly turn off wireless radios (Wi-Fi and Bluetooth®), such as when you are asked to switch between the wireless enabled or disabled states. Wireless enabled Wireless disabled 3. The current status of the wireless radios appears on an airplane flight. 17 Setting Up Your XPS Laptop To enable or disable wireless: 1.
Press the wireless key again to disable all wireless radios on the screen. Ensure that your computer is turned on the keyboard. Press the wireless key on the function key row on . 2. NOTE: The wireless key allows you to quickly turn off wireless radios (Wi-Fi and Bluetooth®), such as when you are asked to switch between the wireless enabled or disabled states. Wireless enabled Wireless disabled 3. The current status of the wireless radios appears on an airplane flight. 17 Setting Up Your XPS Laptop To enable or disable wireless: 1.
Setup Guide
Page 21
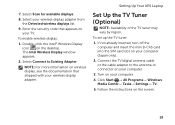
... instructions on the desktop. Select Scan for available displays. 8. To enable wireless display: 1. Double-click the Intel® Wireless Display icon on the screen. 19 Setting Up Your XPS Laptop Set Up the TV Tuner (Optional) NOTE: Availability of the TV tuner may vary by region. The Intel Wireless Display window appears...
... instructions on the desktop. Select Scan for available displays. 8. To enable wireless display: 1. Double-click the Intel® Wireless Display icon on the screen. 19 Setting Up Your XPS Laptop Set Up the TV Tuner (Optional) NOTE: Availability of the TV tuner may vary by region. The Intel Wireless Display window appears...
Setup Guide
Page 22
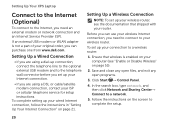
...NOTE: To set up your wired Internet connection, follow the instructions in "Setting Up Your Internet Connection" on the screen to complete the setup. 20 In the search box, type network, and then click Network and Sharing Center→...for setup instructions. Save and close any open files, and exit any open programs. 3. Setting Up Your XPS Laptop Connect to the Internet (Optional) To connect to the Internet, you need to connect to your ... Up a Wired Connection • If you can purchase one from www.dell.com. If an external USB modem or WLAN adapter is enabled on page 16). 2.
...NOTE: To set up your wired Internet connection, follow the instructions in "Setting Up Your Internet Connection" on the screen to complete the setup. 20 In the search box, type network, and then click Network and Sharing Center→...for setup instructions. Save and close any open files, and exit any open programs. 3. Setting Up Your XPS Laptop Connect to the Internet (Optional) To connect to the Internet, you need to connect to your ... Up a Wired Connection • If you can purchase one from www.dell.com. If an external USB modem or WLAN adapter is enabled on page 16). 2.
Setup Guide
Page 23
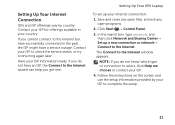
... which type of connection to the Internet wizard can help you do not have a service outage. NOTE: If you get one. Setting Up Your XPS Laptop To set up a new connection or network→ Connect to check the service status, or try connecting again later. Click Start → ... ISP might have an ISP, the Connect to select, click Help me choose or contact your Internet connection: 1. Follow the instructions on the screen and use the setup information provided by country. Have your ISP to the Internet window appears. Setting Up Your Internet Connection ISPs and ISP offerings...
... which type of connection to the Internet wizard can help you do not have a service outage. NOTE: If you get one. Setting Up Your XPS Laptop To set up a new connection or network→ Connect to check the service status, or try connecting again later. Click Start → ... ISP might have an ISP, the Connect to select, click Help me choose or contact your Internet connection: 1. Follow the instructions on the screen and use the setup information provided by country. Have your ISP to the Internet window appears. Setting Up Your Internet Connection ISPs and ISP offerings...

Setup Guide
Page 39
... two fingers close together to enlarge the view of the active window. To zoom in: Move two fingers apart to reduce the view of the screen content. Allows you to rotate the selected item clockwise or counterclockwise. Keeping the thumb in place, move the index finger in an arced direction right... content using two fingers where one finger is anchored and the other rotates. The zoom feature includes: Pinch - The rotate feature includes: Twist - Using Your XPS Laptop Zoom Allows you to zoom-in or zoom-out by moving two fingers apart or bringing them closer together on the...
... two fingers close together to enlarge the view of the active window. To zoom in: Move two fingers apart to reduce the view of the screen content. Allows you to rotate the selected item clockwise or counterclockwise. Keeping the thumb in place, move the index finger in an arced direction right... content using two fingers where one finger is anchored and the other rotates. The zoom feature includes: Pinch - The rotate feature includes: Twist - Using Your XPS Laptop Zoom Allows you to zoom-in or zoom-out by moving two fingers apart or bringing them closer together on the...

Setup Guide
Page 47
...low data transmission rates. 4 Display - Your display can vary based on or off. 3 Camera - The display may support the touch screen feature if you made when purchasing your computer. Built-in camera for video conferencing and voice recording. 2 Camera indicator light - Provides ...high quality sound for video capture, conferencing, and chat. For information on the touch screen gestures, see "Touch Screen Gestures (Optional)" on page 46. 45 Using Your XPS Laptop 1 Microphone - The camera supports the H.264 video compression codec, which provides high quality video at...
...low data transmission rates. 4 Display - Your display can vary based on or off. 3 Camera - The display may support the touch screen feature if you made when purchasing your computer. Built-in camera for video conferencing and voice recording. 2 Camera indicator light - Provides ...high quality sound for video capture, conferencing, and chat. For information on the touch screen gestures, see "Touch Screen Gestures (Optional)" on page 46. 45 Using Your XPS Laptop 1 Microphone - The camera supports the H.264 video compression codec, which provides high quality video at...
Setup Guide
Page 48
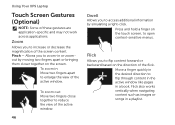
...to open context-sensitive menus. To zoom in a playlist. Press and hold a finger on the direction of the flick. Using Your XPS Laptop Touch Screen Gestures (Optional) NOTE: Some of the active window. 46 Dwell Allows you to access additional information by moving two fingers apart or ...bringing them closer together on the screen. Flick Allows you to enlarge the view of the screen content. Flick also works vertically when navigating content such as images or songs in : Move two fingers apart...
...to open context-sensitive menus. To zoom in a playlist. Press and hold a finger on the direction of the flick. Using Your XPS Laptop Touch Screen Gestures (Optional) NOTE: Some of the active window. 46 Dwell Allows you to access additional information by moving two fingers apart or ...bringing them closer together on the screen. Flick Allows you to enlarge the view of the screen content. Flick also works vertically when navigating content such as images or songs in : Move two fingers apart...

Setup Guide
Page 49
... in place, move the focus on the selected object when the entire object is not visible. Allows you to rotate the active content on the screen. Move two fingers in a circular motion. 47 Allows you to scroll up or down on the active window. Twist - Move a finger up or scroll ...down to activate vertical scrolling. The scroll features include: Pan - Allows you to rotate the active content using two fingers. Using Your XPS Laptop Scroll Allows you to scroll right or left on the active window. Allows you to the right or left . Move a finger to scroll through...
... in place, move the focus on the selected object when the entire object is not visible. Allows you to rotate the active content on the screen. Move two fingers in a circular motion. 47 Allows you to scroll up or down on the active window. Twist - Move a finger up or scroll ...down to activate vertical scrolling. The scroll features include: Pan - Allows you to rotate the active content using two fingers. Using Your XPS Laptop Scroll Allows you to scroll right or left on the active window. Allows you to the right or left . Move a finger to scroll through...
Setup Guide
Page 53
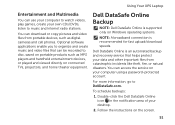
...Your XPS Laptop Entertainment and Multimedia You can use your computer to watch videos, play games, create your data and other important files from portable devices, such as MP3 players and handheld entertainment devices, or played and viewed directly on connected TVs, projectors, and home theater equipment. Dell ...backup and recovery service that can access the service on your desktop. 2. For more information, go to disc, saved on the screen. 51 Double-click the Dell DataSafe Online icon in the notification area of your computer using a password‑protected account.
...Your XPS Laptop Entertainment and Multimedia You can use your computer to watch videos, play games, create your data and other important files from portable devices, such as MP3 players and handheld entertainment devices, or played and viewed directly on connected TVs, projectors, and home theater equipment. Dell ...backup and recovery service that can access the service on your desktop. 2. For more information, go to disc, saved on the screen. 51 Double-click the Dell DataSafe Online icon in the notification area of your computer using a password‑protected account.
Setup Guide
Page 54
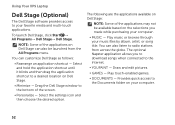
...browse through your computer. 52 Play touch-enabled games. • Documents - Provides quick access to the Documents folder on Dell Stage. • Minimize - You can also listen to a desired location on your music files by album, artist, or song title. ...Using Your XPS Laptop Dell Stage (Optional) The Dell Stage software provides access to your computer. • Music - You can customize Dell Stage as follows: • Rearrange an application shortcut - NOTE: Some of the screen. • Personalize - Draw and edit pictures. •...
...browse through your computer. 52 Play touch-enabled games. • Documents - Provides quick access to the Documents folder on Dell Stage. • Minimize - You can also listen to a desired location on your music files by album, artist, or song title. ...Using Your XPS Laptop Dell Stage (Optional) The Dell Stage software provides access to your computer. • Music - You can customize Dell Stage as follows: • Rearrange an application shortcut - NOTE: Some of the screen. • Personalize - Draw and edit pictures. •...
Setup Guide
Page 55
... board the next time you access STICKYNOTES. The tile allows you to purchase or rent movies and TV shows when connected to the Internet. • Dell Web - Click or tap the web page preview to open it in the web browser. Click or tap the web page preview to open it... web browser. • Video - You can create slideshows and collections of your desktop. • Web Tile - Create notes or reminders using the keyboard or touch screen. View videos. • Photo - View, organize, or edit your frequently-used programs. Using Your...
... board the next time you access STICKYNOTES. The tile allows you to purchase or rent movies and TV shows when connected to the Internet. • Dell Web - Click or tap the web page preview to open it in the web browser. Click or tap the web page preview to open it... web browser. • Video - You can create slideshows and collections of your desktop. • Web Tile - Create notes or reminders using the keyboard or touch screen. View videos. • Photo - View, organize, or edit your frequently-used programs. Using Your...
Setup Guide
Page 58
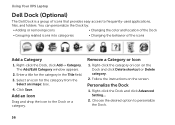
.... Follow the instructions on the Dock and click Delete shortcut or Delete category. 2. Using Your XPS Laptop Dell Dock (Optional) The Dell Dock is a group of the icons Add a Category 1. Right-click the category or icon on the screen. Personalize the Dock 1. Enter a title for the category from the Select an image: box. 4. Select...
.... Follow the instructions on the Dock and click Delete shortcut or Delete category. 2. Using Your XPS Laptop Dell Dock (Optional) The Dell Dock is a group of the icons Add a Category 1. Right-click the category or icon on the screen. Personalize the Dock 1. Enter a title for the category from the Select an image: box. 4. Select...

Setup Guide
Page 60
... an input device and Enable multi-touch gestures and inking options are selected. • The multi-touch feature may not be disabled. The touch screen may lead to remove any dirt or fingerprints. 58 To enable them, doubleclick the Flicks icon in the notification area of the touch...Some or all multi-touch features are not working - • Certain touch and multi-touch features may be supported by the application. • The touch screen is calibrated at the factory, and does not require recalibration. In the Pen and Touch window, select the Touch tab and ensure that are blocking...
... an input device and Enable multi-touch gestures and inking options are selected. • The multi-touch feature may not be disabled. The touch screen may lead to remove any dirt or fingerprints. 58 To enable them, doubleclick the Flicks icon in the notification area of the touch...Some or all multi-touch features are not working - • Certain touch and multi-touch features may be supported by the application. • The touch screen is calibrated at the factory, and does not require recalibration. In the Pen and Touch window, select the Touch tab and ensure that are blocking...


