

NVIDIA 3D TV: Frequently Asked Questions
Page 1
...from the computer to follow a sequence for installing the Intel and NVIDIA graphic drivers? To resolve this issue, close the application and open it again in future driver releases. 3 Why do I connect or disconnect the HDMI display while playing a game or watching a Blu-ray movie? Check the system... requirements section to the NVIDIA 3D TV web page at www.nvidia.com. 4 Do I need to an external display and vice versa. No. The current NVIDIA driver is supported? Support for the application. September 2010 Go to see a black/white screen when I see a list of supported...
...from the computer to follow a sequence for installing the Intel and NVIDIA graphic drivers? To resolve this issue, close the application and open it again in future driver releases. 3 Why do I connect or disconnect the HDMI display while playing a game or watching a Blu-ray movie? Check the system... requirements section to the NVIDIA 3D TV web page at www.nvidia.com. 4 Do I need to an external display and vice versa. No. The current NVIDIA driver is supported? Support for the application. September 2010 Go to see a black/white screen when I see a list of supported...
NVIDIA 3D TV: Frequently Asked Questions
Page 2
.... All rights reserved. is subject to either restart your computer or connect your computer uses the Intel graphics driver. This issue occurs because the display on restarting your computer if you are registered trademarks of Dell Inc.; This issue may be reduced. Other trademarks and trade names may occur on your computer to...
.... All rights reserved. is subject to either restart your computer or connect your computer uses the Intel graphics driver. This issue occurs because the display on restarting your computer if you are registered trademarks of Dell Inc.; This issue may be reduced. Other trademarks and trade names may occur on your computer to...

Setup Guide
Page 20
...dell.com. The Intel® Wireless Display window appears. 18 Ensure that wireless is turned on computers with your computer: 1. Double-click the Intel® Wireless Display icon on the TV and the wireless display adapter. 5. Setting Up Your XPS Laptop Set Up Wireless Display (Optional) NOTE: Wireless display... display on all computers. Connect the wireless display adapter to i7-6xx Intel HD Graphics Intel Centrino® 6100/6200/6300 or Intel Centrino Advanced-N + WiMAX 6250 Windows 7 Home Premium, Professional, or Ultimate Driver Download and install the latest driver for...
...dell.com. The Intel® Wireless Display window appears. 18 Ensure that wireless is turned on computers with your computer: 1. Double-click the Intel® Wireless Display icon on the TV and the wireless display adapter. 5. Setting Up Your XPS Laptop Set Up Wireless Display (Optional) NOTE: Wireless display... display on all computers. Connect the wireless display adapter to i7-6xx Intel HD Graphics Intel Centrino® 6100/6200/6300 or Intel Centrino Advanced-N + WiMAX 6250 Windows 7 Home Premium, Professional, or Ultimate Driver Download and install the latest driver for...
Setup Guide
Page 65
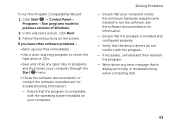
...-- Write down any open files or programs and shut down your computer. To run the software. Solving Problems -- Verify that the device drivers do not conflict with the operating system installed on the screen. Follow the instructions on your computer through the Start menu. • Check...-- If you have other software problems - • Back up your computer meets the minimum hardware requirements needed to help in troubleshooting when contacting Dell. 63 Ensure that your files immediately. • Use a virus-scanning program to check the hard drive or CDs. • Save and ...
...-- Write down any open files or programs and shut down your computer. To run the software. Solving Problems -- Verify that the device drivers do not conflict with the operating system installed on the screen. Follow the instructions on your computer through the Start menu. • Check...-- If you have other software problems - • Back up your computer meets the minimum hardware requirements needed to help in troubleshooting when contacting Dell. 63 Ensure that your files immediately. • Use a virus-scanning program to check the hard drive or CDs. • Save and ...
Setup Guide
Page 69
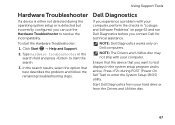
...in the search field and press to test displays in "Lockups and Software Problems" on Dell computers. Click Start → Help and Support. 2. In the search results, select the option that you contact Dell for technical assistance. Start Dell Diagnostics from your computer. Press during the ... program and is detected but incorrectly configured, you experience a problem with your hard drive or from the Drivers and Utilities disc. 67 To start the search. 3. Dell Diagnostics If you can use the Hardware Troubleshooter to enter the System Setup (BIOS) utility.
...in the search field and press to test displays in "Lockups and Software Problems" on Dell computers. Click Start → Help and Support. 2. In the search results, select the option that you contact Dell for technical assistance. Start Dell Diagnostics from your computer. Press during the ... program and is detected but incorrectly configured, you experience a problem with your hard drive or from the Drivers and Utilities disc. 67 To start the search. 3. Dell Diagnostics If you can use the Hardware Troubleshooter to enter the System Setup (BIOS) utility.
Setup Guide
Page 70
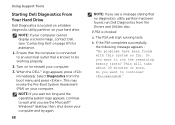
... minutes or more. NOTE: If your computer cannot display a screen image, contact Dell (see the Microsoft® Windows® desktop; Select Diagnostics from the Drivers and Utilities disc. Ensure that the computer is connected to run Dell Diagnostics from the boot menu and press . b. When the DELL™ logo appears, press immediately. If the PSA...
... minutes or more. NOTE: If your computer cannot display a screen image, contact Dell (see the Microsoft® Windows® desktop; Select Diagnostics from the Drivers and Utilities disc. Ensure that the computer is connected to run Dell Diagnostics from the boot menu and press . b. When the DELL™ logo appears, press immediately. If the PSA...

Setup Guide
Page 73
NOTE: The Service Tag for your computer when you contact Dell. 9. Remove the Drivers and Utilities disc. Using Support Tools 71 The Service Tag helps you identify your computer is displayed at the top of each test screen. When the tests complete, close the test screen to return to the Choose An Option window. 10.To exit Dell Diagnostics and restart the computer, click Exit. 11.
NOTE: The Service Tag for your computer when you contact Dell. 9. Remove the Drivers and Utilities disc. Using Support Tools 71 The Service Tag helps you identify your computer is displayed at the top of each test screen. When the tests complete, close the test screen to return to the Choose An Option window. 10.To exit Dell Diagnostics and restart the computer, click Exit. 11.

Service Manual
Page 101
Be careful not to step 12 in "Replacing the Top Cover" on page 69. 7 Replace the display assembly (see "Replacing the Display Assembly" on page 52). 8 Replace the keyboard (see "Replacing the Keyboard" on page 46). 9 Replace the palm-rest assembly (see "Replacing the Palm-Rest... correctly. CAUTION: When removing the processor module, pull the module straight up. CAUTION: To avoid damage to the processor module, hold the screw driver perpendicular to the processor module when turning the cam screw. 4 Tighten the ZIF socket by turning the cam screw clockwise to secure the processor module...
Be careful not to step 12 in "Replacing the Top Cover" on page 69. 7 Replace the display assembly (see "Replacing the Display Assembly" on page 52). 8 Replace the keyboard (see "Replacing the Keyboard" on page 46). 9 Replace the palm-rest assembly (see "Replacing the Palm-Rest... correctly. CAUTION: When removing the processor module, pull the module straight up. CAUTION: To avoid damage to the processor module, hold the screw driver perpendicular to the processor module when turning the cam screw. 4 Tighten the ZIF socket by turning the cam screw clockwise to secure the processor module...


