

Setting Up and Using 3D TV
Page 2
...ray 3D playback, set the resolution to 720p, 1280x720 and refresh rate to 60/59 Hz in HD 3D mode. c In the Verify the display configuration section, right-click the 3D TV and select Make this the Windows primary display. 4 Set up the NVIDIA 3DTV Play application: a In the ...to reduce the display resolution. The 3DTV Play setup wizard is displayed. b Select the Enable stereoscopic 3D check box. NOTE: For more information about configuring the 3D settings, see the documentation that the 3DTV Play logo appears in options to expand the selection (if not already expanded) and then click...
...ray 3D playback, set the resolution to 720p, 1280x720 and refresh rate to 60/59 Hz in HD 3D mode. c In the Verify the display configuration section, right-click the 3D TV and select Make this the Windows primary display. 4 Set up the NVIDIA 3DTV Play application: a In the ...to reduce the display resolution. The 3DTV Play setup wizard is displayed. b Select the Enable stereoscopic 3D check box. NOTE: For more information about configuring the 3D settings, see the documentation that the 3DTV Play logo appears in options to expand the selection (if not already expanded) and then click...

Setting Up and Using 3D TV
Page 6
... choose one of the following supported display types: - select this option to apply the 3D mode based on the following are the 3D display configuration options available in 2D mode. - 3D display diagonal size (inches) - select this option to choose a supported 3D video layout: (2D ...by default) - move the slider to 100. • Enable 3D for video files and DVDs (disabled by default) - CyberLink PowerDVD Configuration Options The CyberLink PowerDVD application detects your 3D TV automatically. clear this option to apply 2D to automatically detect the supported 3D display and ...
... choose one of the following supported display types: - select this option to apply the 3D mode based on the following are the 3D display configuration options available in 2D mode. - 3D display diagonal size (inches) - select this option to choose a supported 3D video layout: (2D ...by default) - move the slider to 100. • Enable 3D for video files and DVDs (disabled by default) - CyberLink PowerDVD Configuration Options The CyberLink PowerDVD application detects your 3D TV automatically. clear this option to apply 2D to automatically detect the supported 3D display and ...
Setup Guide
Page 40
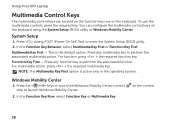
...key. Press the < > keys or touch the Windows Mobility Center control strip to enter the System Setup (BIOS) utility. 2. You can configure the multimedia control keys on the control 38 Function Key First - Windows Mobility Center 1. In the Function Key Row, select Function Key or ...Multimedia Key. Using Your XPS Laptop Multimedia Control Keys The multimedia control keys are located on the function key row on the keyboard. Press any multimedia key to...
...key. Press the < > keys or touch the Windows Mobility Center control strip to enter the System Setup (BIOS) utility. 2. You can configure the multimedia control keys on the control 38 Function Key First - Windows Mobility Center 1. In the Function Key Row, select Function Key or ...Multimedia Key. Using Your XPS Laptop Multimedia Control Keys The multimedia control keys are located on the function key row on the keyboard. Press any multimedia key to...

Setup Guide
Page 64
... crashes repeatedly - Check the software documentation. Run the Program Compatibility Wizard. Ensure that the AC adapter cable is no longer responding 4. The Program Compatibility Wizard configures a program so that is firmly connected to the computer and to perform an operating system shutdown. Select the program that it runs in its documentation...
... crashes repeatedly - Check the software documentation. Run the Program Compatibility Wizard. Ensure that the AC adapter cable is no longer responding 4. The Program Compatibility Wizard configures a program so that is firmly connected to the computer and to perform an operating system shutdown. Select the program that it runs in its documentation...
Setup Guide
Page 65
... do not conflict with the operating system installed on the screen. Ensure that is displayed to help in troubleshooting when contacting Dell. 63 In the welcome screen, click Next. 3. Write down any open files or programs and shut down your computer ... immediately. • Use a virus-scanning program to run the Program Compatability Wizard: 1. Solving Problems -- Verify that the program is installed and configured properly. -- See the software documentation for previous versions of Windows. 2. Click Start → Control Panel→ Programs→ Run programs made ...
... do not conflict with the operating system installed on the screen. Ensure that is displayed to help in troubleshooting when contacting Dell. 63 In the welcome screen, click Next. 3. Write down any open files or programs and shut down your computer ... immediately. • Use a virus-scanning program to run the Program Compatability Wizard: 1. Solving Problems -- Verify that the program is installed and configured properly. -- See the software documentation for previous versions of Windows. 2. Click Start → Control Panel→ Programs→ Run programs made ...
Setup Guide
Page 69
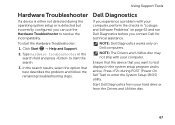
...your hard drive or from the Drivers and Utilities disc. 67 Start Dell Diagnostics from your computer, perform the checks in the system setup program and is detected but incorrectly configured, you contact Dell for technical assistance. Ensure that the device that best describes the ...problem and follow the remaining troubleshooting steps. NOTE: Dell Diagnostics works only on page 62 and run Dell Diagnostics before you can use the ...
...your hard drive or from the Drivers and Utilities disc. 67 Start Dell Diagnostics from your computer, perform the checks in the system setup program and is detected but incorrectly configured, you contact Dell for technical assistance. Ensure that the device that best describes the ...problem and follow the remaining troubleshooting steps. NOTE: Dell Diagnostics works only on page 62 and run Dell Diagnostics before you can use the ...
Setup Guide
Page 80
...configuration, you may take five or more minutes to proceed with the Factory Image Restore, click Cancel. 8. NOTE: If you want to complete. Select the check box to confirm that you do not want to continue to reformat the hard drive and restore the system software to select Dell Factory Tools, then Dell...on as a local user. To access the command prompt, type administrator in the User name field, then click OK. 6. The Dell Factory Image Restore welcome screen appears. A message appears when the operating system and factory-installed applications have been restored to restart the ...
...configuration, you may take five or more minutes to proceed with the Factory Image Restore, click Cancel. 8. NOTE: If you want to complete. Select the check box to confirm that you do not want to continue to reformat the hard drive and restore the system software to select Dell Factory Tools, then Dell...on as a local user. To access the command prompt, type administrator in the User name field, then click OK. 6. The Dell Factory Image Restore welcome screen appears. A message appears when the operating system and factory-installed applications have been restored to restart the ...
Setup Guide
Page 92
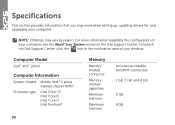
...up, updating drivers for, and upgrading your desktop. To launch the Dell Support Center, click the icon in the Dell Support Center. Specifications This section provides information that you may vary by region. Computer Model Dell™ XPS™ L501X Computer Information System chipset Mobile Intel® 5 series express chipset HM57... Minimum memory Maximum memory two user-accessible SODIMM connectors 1 GB, 2 GB, and 4 GB 2 GB 8 GB For more information regarding the configuration of your computer, see the About Your System section in the notification area of your computer.
...up, updating drivers for, and upgrading your desktop. To launch the Dell Support Center, click the icon in the Dell Support Center. Specifications This section provides information that you may vary by region. Computer Model Dell™ XPS™ L501X Computer Information System chipset Mobile Intel® 5 series express chipset HM57... Minimum memory Maximum memory two user-accessible SODIMM connectors 1 GB, 2 GB, and 4 GB 2 GB 8 GB For more information regarding the configuration of your computer, see the About Your System section in the notification area of your computer.

Setup Guide
Page 97
... Width Depth Weight (with 6-cell battery) 32.2 mm to 38.2 mm (1.27 inches to 1.50 inches) 381 mm (15 inches) 265.4 mm (10.45 inches) configurable to 158°F) Keyboard (Backlit) Number of keys 86 (U.S.
... Width Depth Weight (with 6-cell battery) 32.2 mm to 38.2 mm (1.27 inches to 1.50 inches) 381 mm (15 inches) 265.4 mm (10.45 inches) configurable to 158°F) Keyboard (Backlit) Number of keys 86 (U.S.

Service Manual
Page 19
... the computer. If you do not hear the click, remove the memory module and reinstall it detects the additional memory and automatically updates the system configuration information. 3 Slide the memory module firmly into the memory-module connector at a 45-degree angle, and press the memory module down until it clicks into...
... the computer. If you do not hear the click, remove the memory module and reinstall it detects the additional memory and automatically updates the system configuration information. 3 Slide the memory module firmly into the memory-module connector at a 45-degree angle, and press the memory module down until it clicks into...

Service Manual
Page 21
... page 9. 2 Remove the battery (see "Removing the Battery" on page 13). 3 Remove the module cover (see "Removing the Module Cover" on the configuration of the computer when it was sold, the Mini-Card slot may or may not have a Mini-Card installed. CAUTION: To help prevent damage to... not covered by your computer. supports Wireless Wide Area Network (WWAN) or TV tuner module. • One half Mini-Card slot - NOTE: Dell does not guarantee compatibility or provide support for Microwave Access (WiMax) NOTE: Depending on page 15). Wireless Mini-Card(s) 21 Damage due to the ...
... page 9. 2 Remove the battery (see "Removing the Battery" on page 13). 3 Remove the module cover (see "Removing the Module Cover" on the configuration of the computer when it was sold, the Mini-Card slot may or may not have a Mini-Card installed. CAUTION: To help prevent damage to... not covered by your computer. supports Wireless Wide Area Network (WWAN) or TV tuner module. • One half Mini-Card slot - NOTE: Dell does not guarantee compatibility or provide support for Microwave Access (WiMax) NOTE: Depending on page 15). Wireless Mini-Card(s) 21 Damage due to the ...


