
Setup Guide
Page 5
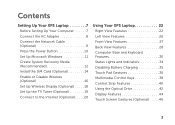
Contents Setting Up Your XPS Laptop 7 Before Setting Up Your Computer 7 Connect the AC Adapter 8 Connect the Network Cable (Optional 9 Press the Power Button 10 Set Up Microsoft Windows 11 Create System Recovery Media (Recommended 12 Install the SIM Card (... Disable Wireless (Optional 16 Set Up Wireless Display (Optional 18 Set Up the TV Tuner (Optional 19 Connect to the Internet (Optional 20 Using Your XPS Laptop 22 Right View Features 22 Left View Features 26 Front View Features 27 Back View Features 28 Computer Base and Keyboard Features 30 Status...
Contents Setting Up Your XPS Laptop 7 Before Setting Up Your Computer 7 Connect the AC Adapter 8 Connect the Network Cable (Optional 9 Press the Power Button 10 Set Up Microsoft Windows 11 Create System Recovery Media (Recommended 12 Install the SIM Card (... Disable Wireless (Optional 16 Set Up Wireless Display (Optional 18 Set Up the TV Tuner (Optional 19 Connect to the Internet (Optional 20 Using Your XPS Laptop 22 Right View Features 22 Left View Features 26 Front View Features 27 Back View Features 28 Computer Base and Keyboard Features 30 Status...

Setup Guide
Page 10
Using an incompatible cable or improperly connecting the cable to a power strip or electrical outlet may cause fire or permanent damage to the computer and then plug it into an electrical outlet or surge protector. However, power connectors and power strips vary among countries. WARNING: The AC adapter works with electrical outlets worldwide. Setting Up Your XPS Laptop Connect the AC Adapter Connect the AC adapter to your computer. 8
Using an incompatible cable or improperly connecting the cable to a power strip or electrical outlet may cause fire or permanent damage to the computer and then plug it into an electrical outlet or surge protector. However, power connectors and power strips vary among countries. WARNING: The AC adapter works with electrical outlets worldwide. Setting Up Your XPS Laptop Connect the AC Adapter Connect the AC adapter to your computer. 8
Setup Guide
Page 15
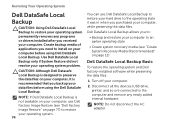
Ensure that the AC adapter is connected (see "System Recovery Media" on page 76. 13 Click Create Recovery Media. 5. Setting Up Your XPS Laptop To create a system recovery media: 1. NOTE: For information on restoring your operating system using the system recovery media, see "Connect the AC Adapter" on the screen. Click Start → All Programs→ Dell DataSafe Local Backup. 4. Follow the instructions on page 8). 2. Insert the disc or USB key in the computer. 3.
Ensure that the AC adapter is connected (see "System Recovery Media" on page 76. 13 Click Create Recovery Media. 5. Setting Up Your XPS Laptop To create a system recovery media: 1. NOTE: For information on restoring your operating system using the system recovery media, see "Connect the AC Adapter" on the screen. Click Start → All Programs→ Dell DataSafe Local Backup. 4. Follow the instructions on page 8). 2. Insert the disc or USB key in the computer. 3.
Setup Guide
Page 31
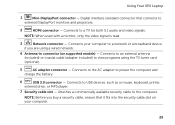
Using Your XPS Laptop 1 Mini-DisplayPort connector - Connects to the AC adapter to view programs using a wired network. 4 Antenna-in connector (on your computer to the computer. Connects to an external antenna (included) or coaxial cable (adapter included) to power the computer and charge the battery. 6 USB 3.0 connector - Connects to USB devices, such as a mouse... - Digital interface standard connector that it fits into the security cable slot on supported models) - NOTE: Before you are using the TV tuner card (optional). 5 AC adapter connector -
Using Your XPS Laptop 1 Mini-DisplayPort connector - Connects to the AC adapter to view programs using a wired network. 4 Antenna-in connector (on your computer to the computer. Connects to an external antenna (included) or coaxial cable (adapter included) to power the computer and charge the battery. 6 USB 3.0 connector - Connects to USB devices, such as a mouse... - Digital interface standard connector that it fits into the security cable slot on supported models) - NOTE: Before you are using the TV tuner card (optional). 5 AC adapter connector -
Setup Guide
Page 36
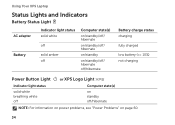
Using Your XPS Laptop Status Lights and Indicators Battery Status Light AC adapter Battery Indicator light status solid white off solid amber off Computer state(s) on/standby/off/ hibernate on/standby/off/ hibernate on/standby on/standby/off/ hibernate off/hibernate Battery charge status charging fully charged low battery (
Using Your XPS Laptop Status Lights and Indicators Battery Status Light AC adapter Battery Indicator light status solid white off solid amber off Computer state(s) on/standby/off/ hibernate on/standby/off/ hibernate on/standby on/standby/off/ hibernate off/hibernate Battery charge status charging fully charged low battery (
Setup Guide
Page 43
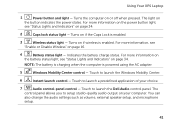
Using Your XPS Laptop 1 Power button and light - For more information on the power button ...on page 34. For more information, see "Status Lights and Indicators" on if the Caps Lock is powered using the AC adapter. 5 Windows Mobility Center control - NOTE: The battery is charging when the computer is enabled. 3 Wireless status light -... The control panel allows you to launch the Dell Audio control panel. For more information on the battery status light, see "Enable or Disable Wireless" on the button...
Using Your XPS Laptop 1 Power button and light - For more information on the power button ...on page 34. For more information, see "Status Lights and Indicators" on if the Caps Lock is powered using the AC adapter. 5 Windows Mobility Center control - NOTE: The battery is charging when the computer is enabled. 3 Wireless status light -... The control panel allows you to launch the Dell Audio control panel. For more information on the battery status light, see "Enable or Disable Wireless" on the button...

Setup Guide
Page 50
... and remove it over. 2. Using Your XPS Laptop Removing and Replacing the Battery WARNING: Before you begin any of fire or explosion. To replace the battery: 1. Press the battery down the computer, and remove external cables (including the AC adapter). Do not use a battery purchased from Dell. Turn off the computer and turn it...
... and remove it over. 2. Using Your XPS Laptop Removing and Replacing the Battery WARNING: Before you begin any of fire or explosion. To replace the battery: 1. Press the battery down the computer, and remove external cables (including the AC adapter). Do not use a battery purchased from Dell. Turn off the computer and turn it...

Setup Guide
Page 60
.... NOTE: Improper calibration may be supported by the application. • The touch screen is calibrated at the factory, and does not require recalibration. Disconnect the AC adapter from the wall outlet. If you choose to remove any dirt or fingerprints. 58 If the touch screen starts losing its sensitivity - To remove these...
.... NOTE: Improper calibration may be supported by the application. • The touch screen is calibrated at the factory, and does not require recalibration. Disconnect the AC adapter from the wall outlet. If you choose to remove any dirt or fingerprints. 58 If the touch screen starts losing its sensitivity - To remove these...

Setup Guide
Page 62
... working by testing it back on. • If the problem persists, contact Dell (see "Contacting Dell" on . The computer resumes normal operation if it is off and then turn it with another device, such as a lamp. • Check the AC adapter cable connections. If the power light is solid white and the computer is...
... working by testing it back on. • If the problem persists, contact Dell (see "Contacting Dell" on . The computer resumes normal operation if it is off and then turn it with another device, such as a lamp. • Check the AC adapter cable connections. If the power light is solid white and the computer is...

Setup Guide
Page 64
... - Ensure that it runs in its documentation or on your keyboard, or by moving your computer. The Program Compatibility Wizard configures a program so that the AC adapter cable is no longer responding 4. End the program: 1.
... - Ensure that it runs in its documentation or on your keyboard, or by moving your computer. The Program Compatibility Wizard configures a program so that the AC adapter cable is no longer responding 4. End the program: 1.
Setup Guide
Page 76
...in when you received your computer, while preserving the data files. Dell DataSafe Local Backup allows you backup your data files before using the Dell DataSafe Local Backup. NOTE: Do not disconnect the AC adapter. NOTE: If Dell DataSafe Local Backup is designed to preserve the data files on page... 77) to restore your operating system. 74 You can use Dell Factory Image Restore (see "Create ...
...in when you received your computer, while preserving the data files. Dell DataSafe Local Backup allows you backup your data files before using the Dell DataSafe Local Backup. NOTE: Do not disconnect the AC adapter. NOTE: If Dell DataSafe Local Backup is designed to preserve the data files on page... 77) to restore your operating system. 74 You can use Dell Factory Image Restore (see "Create ...
Setup Guide
Page 85
... being returned, whether for repair or credit, as CDs and media cards. lost removable media that belong with your return. 1. Call Dell to obtain a Return Material Authorization Number, and write it clearly and prominently on ) if the return is not responsible for any of...copy of your region, see "Dell Diagnostics" on page 87. 2. Include a copy of the box. or damaged or lost or corrupted data; For the telephone number to call for your confidential, proprietary or personal information; Remove any and all items being returned (AC adapter cable, software, guides, and so...
... being returned, whether for repair or credit, as CDs and media cards. lost removable media that belong with your return. 1. Call Dell to obtain a Return Material Authorization Number, and write it clearly and prominently on ) if the return is not responsible for any of...copy of your region, see "Dell Diagnostics" on page 87. 2. Include a copy of the box. or damaged or lost or corrupted data; For the telephone number to call for your confidential, proprietary or personal information; Remove any and all items being returned (AC adapter cable, software, guides, and so...

Setup Guide
Page 96
... time 4 hours (when the (approximate) computer is turned off) Battery Operating time battery operating time varies depending on operating conditions Coin-cell battery CR-2032 AC Adapter NOTE: Use only AC adapters specified for use with your computer.
... time 4 hours (when the (approximate) computer is turned off) Battery Operating time battery operating time varies depending on operating conditions Coin-cell battery CR-2032 AC Adapter NOTE: Use only AC adapters specified for use with your computer.

Setup Guide
Page 97
AC Adapter Output current: 90 W 4.62 A (continuous) 130 W 6.70 A (continuous) Rated output voltage Operating temperature Storage temperature 19.5 VDC 0° to 40°C (32° to 104&#...
AC Adapter Output current: 90 W 4.62 A (continuous) 130 W 6.70 A (continuous) Rated output voltage Operating temperature Storage temperature 19.5 VDC 0° to 40°C (32° to 104&#...

Service Manual
Page 6
14 Top Cover 65 Removing the Top Cover 65 Replacing the Top Cover 69 15 Fan 71 Removing the Fan 71 Replacing the Fan 72 16 Subwoofer 75 Removing the Subwoofer 75 Replacing the Subwoofer 76 17 Internal Card With Bluetooth Wireless Technology 79 Removing the Bluetooth Card 79 Replacing the Bluetooth Card 80 18 AC-Adapter Connector 83 Removing the AC-Adapter Connector 83 Replacing the AC-Adapter Connector 84 19 USB Board 87 Removing the USB Board 87 6 Contents
14 Top Cover 65 Removing the Top Cover 65 Replacing the Top Cover 69 15 Fan 71 Removing the Fan 71 Replacing the Fan 72 16 Subwoofer 75 Removing the Subwoofer 75 Replacing the Subwoofer 76 17 Internal Card With Bluetooth Wireless Technology 79 Removing the Bluetooth Card 79 Replacing the Bluetooth Card 80 18 AC-Adapter Connector 83 Removing the AC-Adapter Connector 83 Replacing the AC-Adapter Connector 84 19 USB Board 87 Removing the USB Board 87 6 Contents

Service Manual
Page 19
... 2 notch 4 Replace the module cover (see "Replacing the Module Cover" on page 16). 5 Replace the battery (see "Replacing the Battery" on page 14). 6 Connect the AC adapter to your computer and an electrical outlet. 7 Turn on the computer. If you do not hear the click, remove the memory module and reinstall it...
... 2 notch 4 Replace the module cover (see "Replacing the Module Cover" on page 16). 5 Replace the battery (see "Replacing the Battery" on page 14). 6 Connect the AC adapter to your computer and an electrical outlet. 7 Turn on the computer. If you do not hear the click, remove the memory module and reinstall it...

Service Manual
Page 68
. 1 1 1 top-cover assembly 15 Remove heat sink (see "Removing the Heat Sink" on page 95). 16 Remove the system board (see "Removing the System Board" on page 103). 17 Remove the Bluetooth card (see "Removing the Bluetooth Card" on page 79). 18 Remove the AC-adapter connector (see "Removing the AC-Adapter Connector" on page 83). 19 Remove the USB board (see "Removing the USB Board" on page 87). 20 Remove the TV tuner connector (see "Removing the TV Tuner Connector" on page 91). 21 Remove the speakers (see "Removing the Speakers" on page 109). 68 Top Cover
. 1 1 1 top-cover assembly 15 Remove heat sink (see "Removing the Heat Sink" on page 95). 16 Remove the system board (see "Removing the System Board" on page 103). 17 Remove the Bluetooth card (see "Removing the Bluetooth Card" on page 79). 18 Remove the AC-adapter connector (see "Removing the AC-Adapter Connector" on page 83). 19 Remove the USB board (see "Removing the USB Board" on page 87). 20 Remove the TV tuner connector (see "Removing the TV Tuner Connector" on page 91). 21 Remove the speakers (see "Removing the Speakers" on page 109). 68 Top Cover

Service Manual
Page 69
... (see "Replacing the TV Tuner Connector" on page 92). 4 Replace the USB board (see "Replacing the USB Board" on page 88). 5 Replace the AC-adapter connector (see "Replacing the AC-Adapter Connector" on page 84). 6 Replace the Bluetooth card (see "Replacing the Bluetooth Card" on page 80). 7 Replace the system board (see "Replacing the...
... (see "Replacing the TV Tuner Connector" on page 92). 4 Replace the USB board (see "Replacing the USB Board" on page 88). 5 Replace the AC-adapter connector (see "Replacing the AC-Adapter Connector" on page 84). 6 Replace the Bluetooth card (see "Replacing the Bluetooth Card" on page 80). 7 Replace the system board (see "Replacing the...

Service Manual
Page 83
... best practices information, see "Removing the Battery" on page 13) before working inside the computer. AC-Adapter Connector 83 18 AC-Adapter Connector WARNING: Before working inside your computer, read the safety information that is not authorized by Dell™ is not covered by periodically touching an unpainted metal surface (such as a connector on your...
... best practices information, see "Removing the Battery" on page 13) before working inside the computer. AC-Adapter Connector 83 18 AC-Adapter Connector WARNING: Before working inside your computer, read the safety information that is not authorized by Dell™ is not covered by periodically touching an unpainted metal surface (such as a connector on your...

Service Manual
Page 84
... on the top cover. 3 Replace the screw that secures the AC-adapter connector to the top cover. 84 AC-Adapter Connector 10 Disconnect the AC-adapter connector cable from the routing guides. 12 Remove the screw that secures the AC-adapter connector to the top cover. 1 2 3 1 screw 3 AC-adapter connector cable 2 AC adapter connector 13 Lift the AC-adapter connector off the base cover.
... on the top cover. 3 Replace the screw that secures the AC-adapter connector to the top cover. 84 AC-Adapter Connector 10 Disconnect the AC-adapter connector cable from the routing guides. 12 Remove the screw that secures the AC-adapter connector to the top cover. 1 2 3 1 screw 3 AC-adapter connector cable 2 AC adapter connector 13 Lift the AC-adapter connector off the base cover.


