Owner's Manual
Page 1
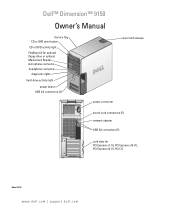
Dell™ Dimension™ 9150 Owner's Manual Service Tag CD or DVD eject button CD or DVD activity light FlexBays (2) for optional floppy drive or optional Media Card Reader microphone connector headphone connector diagnostic lights hard-drive activity light power button USB 2.0 connectors (2) cover latch release power connector sound-card connectors (5) network adapter USB 2.0 connectors (5) card slots for PCI Express x1 (1), PCI Express x16 (1), PCI Express x4 (1), PCI (3) Model DCTA www.dell.com | support.dell.com
Dell™ Dimension™ 9150 Owner's Manual Service Tag CD or DVD eject button CD or DVD activity light FlexBays (2) for optional floppy drive or optional Media Card Reader microphone connector headphone connector diagnostic lights hard-drive activity light power button USB 2.0 connectors (2) cover latch release power connector sound-card connectors (5) network adapter USB 2.0 connectors (5) card slots for PCI Express x1 (1), PCI Express x16 (1), PCI Express x4 (1), PCI (3) Model DCTA www.dell.com | support.dell.com
Owner's Manual
Page 4
... in System Setup 36 Enabling the QRT feature in the Operating system 36 2 Solving Problems 37 Troubleshooting Tips 37 Battery Problems 37 Drive Problems 38 CD and DVD drive problems 38 Hard drive problems 39 E-Mail, Modem, and Internet Problems 39 Error Messages 41 Media Card Reader Problems 42 Keyboard Problems 42 Lockups and...
... in System Setup 36 Enabling the QRT feature in the Operating system 36 2 Solving Problems 37 Troubleshooting Tips 37 Battery Problems 37 Drive Problems 38 CD and DVD drive problems 38 Hard drive problems 39 E-Mail, Modem, and Internet Problems 39 Error Messages 41 Media Card Reader Problems 42 Keyboard Problems 42 Lockups and...
Owner's Manual
Page 6
... 77 PCI Express Cards 81 Drive Panels 89 Removing the Drive Panel 89 Removing the Drive-Panel Insert 90 Replacing the Drive-Panel Insert 90 Replacing the Drive Panel 91 Drives 92 General Installation Guidelines 92 Hard Drive 92 Removing a Hard Drive 93 Installing a Hard Drive 94 Adding a Second Hard Drive 95 Floppy Drive 96 Removing a Floppy Drive 96 Installing a Floppy Drive 98 Media Card Reader 99...
... 77 PCI Express Cards 81 Drive Panels 89 Removing the Drive Panel 89 Removing the Drive-Panel Insert 90 Replacing the Drive-Panel Insert 90 Replacing the Drive Panel 91 Drives 92 General Installation Guidelines 92 Hard Drive 92 Removing a Hard Drive 93 Installing a Hard Drive 94 Adding a Second Hard Drive 95 Floppy Drive 96 Removing a Floppy Drive 96 Installing a Floppy Drive 98 Media Card Reader 99...
Owner's Manual
Page 11
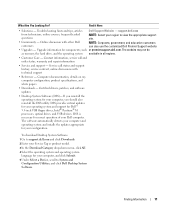
... Under Select a Device, scroll to System and Configuration Utilities, and click Dell Desktop System Software. Online discussion with technical support • Reference - The website may not be as memory, the hard drive, and the operating system available in all regions. • Customer Care -... Troubleshooting hints and tips, articles from technicians, online courses, frequently asked questions Dell Support Website - DSS provides critical updates for your ...
... Under Select a Device, scroll to System and Configuration Utilities, and click Dell Desktop System Software. Online discussion with technical support • Reference - The website may not be as memory, the hard drive, and the operating system available in all regions. • Customer Care -... Troubleshooting hints and tips, articles from technicians, online courses, frequently asked questions Dell Support Website - DSS provides critical updates for your ...
Owner's Manual
Page 19
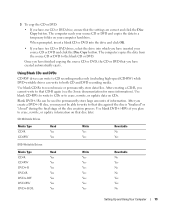
... process. After you create a DVD+/-R disc, you have inserted your source CD or DVD and click the Disc Copy button. The computer reads your computer hard drive. The computer copies the data from the source CD or DVD to a temporary folder on that disc later. When prompted, insert a blank CD or DVD... into the drive and click OK. • If you have two CD or DVD drives, select the drive into which you plan to erase, rewrite, or update information on your source CD or DVD and copies the...
... process. After you create a DVD+/-R disc, you have inserted your source CD or DVD and click the Disc Copy button. The computer reads your computer hard drive. The computer copies the data from the source CD or DVD to a temporary folder on that disc later. When prompted, insert a blank CD or DVD... into the drive and click OK. • If you have two CD or DVD drives, select the drive into which you plan to erase, rewrite, or update information on your source CD or DVD and copies the...
Owner's Manual
Page 24
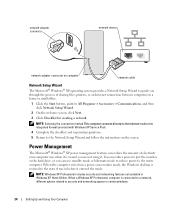
...networking appear in before it entered the mode. NOTE: Windows XP Professional includes security and networking features not available in a home or small office. 1 Click the Start button, point to just the monitor or the hard drive, or you can reduce the amount of electricity your computer... uses when it is on the screen. network adapter connector network device network adapter connector on computer network cable Network Setup Wizard The Microsoft® Windows® XP operating system provides a...
...networking appear in before it entered the mode. NOTE: Windows XP Professional includes security and networking features not available in a home or small office. 1 Click the Start button, point to just the monitor or the hard drive, or you can reduce the amount of electricity your computer... uses when it is on the screen. network adapter connector network device network adapter connector on computer network cable Network Setup Wizard The Microsoft® Windows® XP operating system provides a...
Owner's Manual
Page 25
...mode settings, hibernate mode settings, and other power settings in before it entered hibernate mode. If the computer's hard drive becomes corrupted, Windows XP recreates the hibernate file automatically. Standby Mode Standby mode conserves power by turning off the computer. The computer may ...computer out of the computer memory, Dell creates an appropriately sized hibernate mode file before shipping the computer to exit from standby mode, press a key on the hard drive and then completely turning off the display and the hard drive after a defined period of inactivity, ...
...mode settings, hibernate mode settings, and other power settings in before it entered hibernate mode. If the computer's hard drive becomes corrupted, Windows XP recreates the hibernate file automatically. Standby Mode Standby mode conserves power by turning off the computer. The computer may ...computer out of the computer memory, Dell creates an appropriately sized hibernate mode file before shipping the computer to exit from standby mode, press a key on the hard drive and then completely turning off the display and the hard drive after a defined period of inactivity, ...
Owner's Manual
Page 26
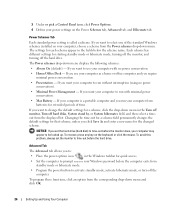
...If you want to use your computer as a home or office computer and you want to time-out before the hard drive. To avoid this problem, always set the hard drive (hard disk) to select one of the standard Windows schemes installed on your computer is called a scheme. If you require... minimal power conservation. • Presentation - Each scheme has different settings for each scheme appear in the Turn off monitor, Turn off the hard drive. If you use your power settings on the keyboard or click the mouse. 3 Under or pick a Control Panel icon, click Power Options. ...
...If you want to use your computer as a home or office computer and you want to time-out before the hard drive. To avoid this problem, always set the hard drive (hard disk) to select one of the standard Windows schemes installed on your computer is called a scheme. If you require... minimal power conservation. • Presentation - Each scheme has different settings for each scheme appear in the Turn off monitor, Turn off the hard drive. If you use your power settings on the keyboard or click the mouse. 3 Under or pick a Control Panel icon, click Power Options. ...
Owner's Manual
Page 28
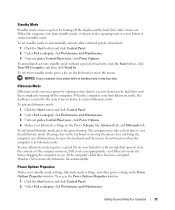
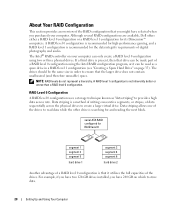
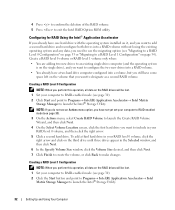
...access rate. The Intel® RAID controller on your computer. If a third drive is not inherently better or worse than a RAID level 0 configuration. Although several RAID configurations are available, Dell offers either a RAID level 0 configuration or a RAID level 1 configuration for... level 1 configuration is present, then that drive can be made part of a RAID level 0 configuration using two or three physical drives. serial ATA RAID configured for RAID level 0 segment 1 segment 3 segment 5 hard drive 1 segment 2 segment 4 segment 6 hard drive 2 Another advantage of a RAID level 0...
...access rate. The Intel® RAID controller on your computer. If a third drive is not inherently better or worse than a RAID level 0 configuration. Although several RAID configurations are available, Dell offers either a RAID level 0 configuration or a RAID level 1 configuration for... level 1 configuration is present, then that drive can be made part of a RAID level 0 configuration using two or three physical drives. serial ATA RAID configured for RAID level 0 segment 1 segment 3 segment 5 hard drive 1 segment 2 segment 4 segment 6 hard drive 2 Another advantage of a RAID level 0...

Owner's Manual
Page 29
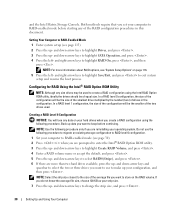
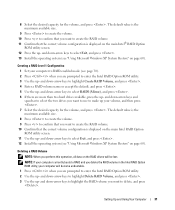
... want to configure your computer for RAID if you did not select a RAID configuration when you have at least two hard drives installed in your computer. serial ATA RAID configured for its data redundancy advantages. You can then be rebuilt using two 120-GB... hard drives collectively has a maximum of two methods to configure RAID hard drive volumes. You must have installed the operating system Setting Up and Using Your Computer 29 RAID Level 1 Configuration...
... want to configure your computer for RAID if you did not select a RAID configuration when you have at least two hard drives installed in your computer. serial ATA RAID configured for its data redundancy advantages. You can then be rebuilt using two 120-GB... hard drives collectively has a maximum of two methods to configure RAID hard drive volumes. You must have installed the operating system Setting Up and Using Your Computer 29 RAID Level 1 Configuration...
Owner's Manual
Page 30
...configuration. and down -arrow keys to select RAID0(Stripe), and press . 6 If there are reinstalling your hard drives when you want to keep before starting any of the two drives used to create a RAID configuration using the following procedure only if you want to RAID-enabled mode before ...used . Setting Your Computer to RAID level 0 configuration. 1 Set your strip size. 7 Press the up - NOTE: For more than two hard drives available, press the up - In a RAID level 0 configuration, the size of drives in this document. Back up - NOTE: Use the following procedure.
...configuration. and down -arrow keys to select RAID0(Stripe), and press . 6 If there are reinstalling your hard drives when you want to keep before starting any of the two drives used to create a RAID configuration using the following procedure only if you want to RAID-enabled mode before ...used . Setting Your Computer to RAID level 0 configuration. 1 Set your strip size. 7 Press the up - NOTE: For more than two hard drives available, press the up - In a RAID level 0 configuration, the size of drives in this document. Back up - NOTE: Use the following procedure.
Owner's Manual
Page 31
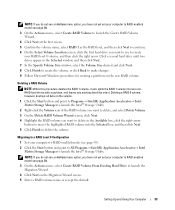
...keys to select RAID1(Mirror), and press . 6 If there are more than two hard drives available, press the up - The default value is displayed on the main Intel&#...down -arrow keys to select Exit, and press . 13 Install the operating system (see "Using Microsoft Windows XP System Restore" on the main Intel RAID Option ROM utility screen. 11 Use the up - and down ...5 Use the up - and down -arrow keys to RAID-enabled mode (see "Using Microsoft Windows XP System Restore" on the RAID drives will become unbootable. 1 Press when you are prompted to enter the Intel RAID Option ROM utility. ...
...keys to select RAID1(Mirror), and press . 6 If there are more than two hard drives available, press the up - The default value is displayed on the main Intel&#...down -arrow keys to select Exit, and press . 13 Install the operating system (see "Using Microsoft Windows XP System Restore" on the main Intel RAID Option ROM utility screen. 11 Use the up - and down ...5 Use the up - and down -arrow keys to RAID-enabled mode (see "Using Microsoft Windows XP System Restore" on the RAID drives will become unbootable. 1 Press when you are prompted to enter the Intel RAID Option ROM utility. ...
Owner's Manual
Page 32
...your computer to RAID-enabled mode (see "Migrating to a RAID Level 0 Configuration" on it, and you want to add a second hard drive and reconfigure both drives into a RAID volume without losing the existing operating system and any data, you want to launch the Intel® Storage Utility. 32 ... Create RAID Volume to launch the Create RAID Volume Wizard, and then click Next. 4 On the Select Volume Location screen, click the first hard drive you need to use the migrating option (see page 30). 2 Click the Start button and point to Programs→ Intel(R) Application Accelerator→...
...your computer to RAID-enabled mode (see "Migrating to a RAID Level 0 Configuration" on it, and you want to add a second hard drive and reconfigure both drives into a RAID volume without losing the existing operating system and any data, you want to launch the Intel® Storage Utility. 32 ... Create RAID Volume to launch the Create RAID Volume Wizard, and then click Next. 4 On the Select Volume Location screen, click the first hard drive you need to use the migrating option (see page 30). 2 Click the Start button and point to Programs→ Intel(R) Application Accelerator→...
Owner's Manual
Page 33
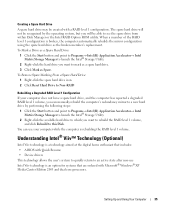
... the volume name, select RAID 1 as the RAID level, and then click Next to continue. 6 On the Select Volume Location screen, click the first hard drive you want to delete in the Selected window, and then click Next. 7 In the Specify Volume Size window, select the Volume Size desired and click... option, you have not yet set your computer to RAID-enabled mode (see page 30). 3 On the Actions menu, select Create RAID Volume From Existing Hard Drive to launch the Migration Wizard. 4 Click Next on the Migration Wizard screen. 5 Enter a RAID volume name or accept the default. Migrating to a RAID ...
... the volume name, select RAID 1 as the RAID level, and then click Next to continue. 6 On the Select Volume Location screen, click the first hard drive you want to delete in the Selected window, and then click Next. 7 In the Specify Volume Size window, select the Volume Size desired and click... option, you have not yet set your computer to RAID-enabled mode (see page 30). 3 On the Actions menu, select Create RAID Volume From Existing Hard Drive to launch the Migration Wizard. 4 Click Next on the Migration Wizard screen. 5 Enter a RAID volume name or accept the default. Migrating to a RAID ...

Owner's Manual
Page 34
...Hard Drive screen, double-click the hard drive to select the member drive that you want to keep on the RAID volume). 7 On the Select Source Hard Drive screen, double-click the hard drive from which you want , and click Next. NOTE: Select the hard drive that you want to use your source hard drive (it should be the hard drive...screen, select the Volume Size you want to migrate, and click Next. 9 On the Select Member Hard Drive screen, double-click the hard drive(s) to select the member drive(s) to keep on the first Migration Wizard screen. 5 Enter a RAID volume name or accept the...
...Hard Drive screen, double-click the hard drive to select the member drive that you want to keep on the RAID volume). 7 On the Select Source Hard Drive screen, double-click the hard drive from which you want , and click Next. NOTE: Select the hard drive that you want to use your source hard drive (it should be the hard drive...screen, select the Volume Size you want to migrate, and click Next. 9 On the Select Member Hard Drive screen, double-click the hard drive(s) to select the member drive(s) to keep on the first Migration Wizard screen. 5 Enter a RAID volume name or accept the...
Owner's Manual
Page 35
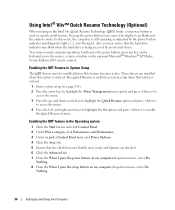
... computer is broken, the computer automatically rebuilds the mirror configuration using the spare hard drive as Spare. Creating a Spare Hard Drive A spare hard drive may be created with Microsoft® Windows® XP Media Center Edition 2005 and dual core processors. To Mark a Drive as a Spare Hard Drive: 1 Click the Start button and point to Programs→ Intel(R) Application Accelerator...
... computer is broken, the computer automatically rebuilds the mirror configuration using the spare hard drive as Spare. Creating a Spare Hard Drive A spare hard drive may be created with Microsoft® Windows® XP Media Center Edition 2005 and dual core processors. To Mark a Drive as a Spare Hard Drive: 1 Click the Start button and point to Programs→ Intel(R) Application Accelerator...
Owner's Manual
Page 36
Also, you may blink when the hard drive is being lit. These drivers are checked. 6 Click the Advanced tab. 7 From the When I press the power...click Performance and Maintenance. 3 Under or pick a Control Panel icon, click Power Options. 4 Click the Away tab. 5 Ensure that the hard drive indicator may notice that the check boxes for Enable away mode and Options are installed when this feature is ordered. Pressing the power button once...before this mode, the computer is still operating as a quick on the optional Microsoft® Windows® XP Media Center Edition 2005 remote control.
Also, you may blink when the hard drive is being lit. These drivers are checked. 6 Click the Advanced tab. 7 From the When I press the power...click Performance and Maintenance. 3 Under or pick a Control Panel icon, click Power Options. 4 Click the Away tab. 5 Ensure that the hard drive indicator may notice that the check boxes for Enable away mode and Options are installed when this feature is ordered. Pressing the power button once...before this mode, the computer is still operating as a quick on the optional Microsoft® Windows® XP Media Center Edition 2005 remote control.
Owner's Manual
Page 39
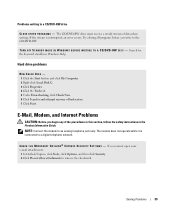
... network. NOTE: Connect the modem to the CD/DVD-RW. C H E C K T H E M I C R O S O F T O U T L O O K ® E X P R E S S S E C U R I T Y S E T T I N G T O A C D / D V D - Solving Problems 39 TU R N O F F S T A N D B Y M O D E I N W I N D O W S B E F O R E W R I T I N G S - Search for and attempt recovery of bad sectors. 7 Click Start. Hard drive problems RUN CHECK DISK - 1 Click the Start button and click My Computer. 2 Right-click Local Disk C:. 3 Click Properties. 4 Click the Tools tab. 5 Under Error-checking...
... network. NOTE: Connect the modem to the CD/DVD-RW. C H E C K T H E M I C R O S O F T O U T L O O K ® E X P R E S S S E C U R I T Y S E T T I N G T O A C D / D V D - Solving Problems 39 TU R N O F F S T A N D B Y M O D E I N W I N D O W S B E F O R E W R I T I N G S - Search for and attempt recovery of bad sectors. 7 Click Start. Hard drive problems RUN CHECK DISK - 1 Click the Start button and click My Computer. 2 Right-click Local Disk C:. 3 Click Properties. 4 Click the Tools tab. 5 Under Error-checking...
Owner's Manual
Page 44
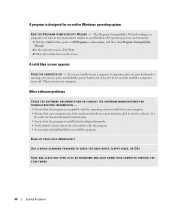
... screen, click Next. 3 Follow the instructions on your computer. BACK UP YOUR FILES IMMEDIATELY USE A VIRUS-SCANNING PROGRAM TO CHECK THE HARD DRIVE, FLOPPY DISKS, OR CDS SAVE AND CLOSE ANY OPEN FILES OR PROGRAMS AND SHUT DOWN YOUR COMPUTER THROUGH THE START MENU 44 Solving Problems...necessary, uninstall and then reinstall the program. The Program Compatibility Wizard configures a program so it runs in an environment similar to non-Windows XP operating system environments. 1 Click the Start button, point to 10 seconds until the computer turns off. A program is compatible with the ...
... screen, click Next. 3 Follow the instructions on your computer. BACK UP YOUR FILES IMMEDIATELY USE A VIRUS-SCANNING PROGRAM TO CHECK THE HARD DRIVE, FLOPPY DISKS, OR CDS SAVE AND CLOSE ANY OPEN FILES OR PROGRAMS AND SHUT DOWN YOUR COMPUTER THROUGH THE START MENU 44 Solving Problems...necessary, uninstall and then reinstall the program. The Program Compatibility Wizard configures a program so it runs in an environment similar to non-Windows XP operating system environments. 1 Click the Start button, point to 10 seconds until the computer turns off. A program is compatible with the ...
Owner's Manual
Page 54
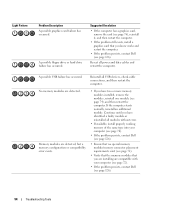
A possible floppy drive or hard drive failure has occurred. A possible USB failure has occurred. Memory modules ...working memory of the same type into your computer (see page 72). • If the problem persists, contact Dell (see page 126). If the computer starts normally, reinstall an additional module. Light Pattern Problem Description A possible... No memory modules are compatible with your computer (see page 74). • If the problem persists, contact Dell (see page 126). • Ensure that no special memory module/memory connector placement requirements exist (see page 72...
A possible floppy drive or hard drive failure has occurred. A possible USB failure has occurred. Memory modules ...working memory of the same type into your computer (see page 72). • If the problem persists, contact Dell (see page 126). If the computer starts normally, reinstall an additional module. Light Pattern Problem Description A possible... No memory modules are compatible with your computer (see page 74). • If the problem persists, contact Dell (see page 126). • Ensure that no special memory module/memory connector placement requirements exist (see page 72...


