
User's Manual
Page 8
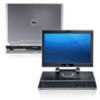
6 5 4 3 1 2 Feature 1 Touchscreen display 2 Docking port 3 Noble lock port 4 Right speaker 5 Power and sleep/wake button 6 Power/Battery-status indicator Functionality Touch the display to use on-screen controls including buttons, menu items, and the on or off. Connect to secure your computer on -screen keyboard. Allows you to a Dell Powered Stand (optional). Press and release to turn your computer using a Noble lock. Indicates the power/battery charge status. (see battery status table) 8 │ Features Provides audio output for video and music playback.
6 5 4 3 1 2 Feature 1 Touchscreen display 2 Docking port 3 Noble lock port 4 Right speaker 5 Power and sleep/wake button 6 Power/Battery-status indicator Functionality Touch the display to use on-screen controls including buttons, menu items, and the on or off. Connect to secure your computer on -screen keyboard. Allows you to a Dell Powered Stand (optional). Press and release to turn your computer using a Noble lock. Indicates the power/battery charge status. (see battery status table) 8 │ Features Provides audio output for video and music playback.
User's Manual
Page 19
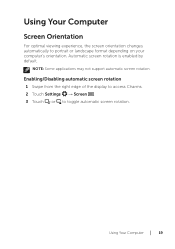
Automatic screen rotation is enabled by default. Using Your Computer │ 19 Enabling/Disabling automatic screen rotation 1 Swipe from the right edge of the display to access Charms. 2 Touch Settings → Screen . 3 Touch or to portrait or landscape format depending on your computer's orientation. NOTE: Some applications may not support automatic screen rotation. Using Your Computer Screen Orientation For optimal viewing experience, the screen orientation changes automatically to toggle automatic screen rotation.
Automatic screen rotation is enabled by default. Using Your Computer │ 19 Enabling/Disabling automatic screen rotation 1 Swipe from the right edge of the display to access Charms. 2 Touch Settings → Screen . 3 Touch or to portrait or landscape format depending on your computer's orientation. NOTE: Some applications may not support automatic screen rotation. Using Your Computer Screen Orientation For optimal viewing experience, the screen orientation changes automatically to toggle automatic screen rotation.

User's Manual
Page 20
...with information on news, sports, weather, stocks, social networks, and so on the Start screen to get more information about the features of the display to access Charms, and then touch the Start icon . The tile‑based user interface gives you direct access to your computer... have the same functionality. Getting more information on Windows 8 Touch the Getting Started With Windows tile on . Windows 8 Start Screen The Windows 8 Start screen displays a list of default and custom Live Tiles, which act as Live Tiles to customize the ...
...with information on news, sports, weather, stocks, social networks, and so on the Start screen to get more information about the features of the display to access Charms, and then touch the Start icon . The tile‑based user interface gives you direct access to your computer... have the same functionality. Getting more information on Windows 8 Touch the Getting Started With Windows tile on . Windows 8 Start Screen The Windows 8 Start screen displays a list of default and custom Live Tiles, which act as Live Tiles to customize the ...

User's Manual
Page 21
Finger gestures Touch Tap gently on the screen with your finger on -screen keyboard. Gestures Your computer has a 10-point multi-touch display. Using Your Computer │ 21 Touch and hold Touch and hold your fingertip. Allows you to: • Select items on the screen including options, entries, images, icons, and so on. • Start applications. • Touch buttons on the screen. • Input text using the on the screen. • Display detailed information about an item • Open the context menu of an item to perform further actions.
Finger gestures Touch Tap gently on the screen with your finger on -screen keyboard. Gestures Your computer has a 10-point multi-touch display. Using Your Computer │ 21 Touch and hold Touch and hold your fingertip. Allows you to: • Select items on the screen including options, entries, images, icons, and so on. • Start applications. • Touch buttons on the screen. • Input text using the on the screen. • Display detailed information about an item • Open the context menu of an item to perform further actions.

User's Manual
Page 22
... at the desired location. Charms provide access to the most recently used application or most recently viewed screen. If your finger on . • Close an app. (Swipe the app to : Drag 1 Touch and hold for a long time brings up the context menu. If the context menu appears, cancel... Move items such as Search, Share, Start, Devices, and Settings options. NOTE: Touching and holding for a shorter duration to be able to the Start screen. on the screen. 2 Keeping your finger in contact with the screen, move your fingertip to the desired location. 3 Take your finger in from the ...
... at the desired location. Charms provide access to the most recently used application or most recently viewed screen. If your finger on . • Close an app. (Swipe the app to : Drag 1 Touch and hold for a long time brings up the context menu. If the context menu appears, cancel... Move items such as Search, Share, Start, Devices, and Settings options. NOTE: Touching and holding for a shorter duration to be able to the Start screen. on the screen. 2 Keeping your finger in contact with the screen, move your fingertip to the desired location. 3 Take your finger in from the ...

User's Manual
Page 23
Reduce the zoom level of the screen closes the application. Using Your Computer │ 23 Touch All apps to show an alphabetical list of all applications installed on your computer. • Swiping-in from the top edge of the application and ... left edge of the display switches the currently running applications. • Swiping slowly from the left edge of the display brings up /down Zoom out Touch the display with two fingers and then move the fingers closer.
Reduce the zoom level of the screen closes the application. Using Your Computer │ 23 Touch All apps to show an alphabetical list of all applications installed on your computer. • Swiping-in from the top edge of the application and ... left edge of the display switches the currently running applications. • Swiping slowly from the left edge of the display brings up /down Zoom out Touch the display with two fingers and then move the fingers closer.

User's Manual
Page 24
...an object by 90 degrees. Finger gestures Zoom in Touch the display with Windows application (on using Windows 8 Start screen, see http://support.dell.com/windows8 and http://windows.microsoft.com/en-US/windows-8/get-started as well as touching the Dell Getting Started with two fingers and then move the ...fingers in a clockwise or counter-clockwise arc. Allows you to: Increase the zoom level of an image or web page. Rotate Touch the display with two or more information on the Metro screen). 24 │...
...an object by 90 degrees. Finger gestures Zoom in Touch the display with Windows application (on using Windows 8 Start screen, see http://support.dell.com/windows8 and http://windows.microsoft.com/en-US/windows-8/get-started as well as touching the Dell Getting Started with two fingers and then move the ...fingers in a clockwise or counter-clockwise arc. Allows you to: Increase the zoom level of an image or web page. Rotate Touch the display with two or more information on the Metro screen). 24 │...

User's Manual
Page 27
... transfers to and from the SD card are complete before removing it from the computer. 1 Touch the bottom left corner to release it from the spring loaded SDcard slot. 5 Pull the SD card out of the screen. NOTE: If a warning message appears stating the SD card cannot be safely removed. Removing ...the SD Card CAUTION: To avoid data loss, ensure all read/write operations to the SD card are complete and try again. 4 Push the SD card inwards to enter Desktop mode. 2 Touch/click Safely...
... transfers to and from the SD card are complete before removing it from the computer. 1 Touch the bottom left corner to release it from the spring loaded SDcard slot. 5 Pull the SD card out of the screen. NOTE: If a warning message appears stating the SD card cannot be safely removed. Removing ...the SD Card CAUTION: To avoid data loss, ensure all read/write operations to the SD card are complete and try again. 4 Push the SD card inwards to enter Desktop mode. 2 Touch/click Safely...

User's Manual
Page 28
...Swipe from the right edge of the display to access Charms. 2 Touch Settings → Power → Shut down to turn off the screen. to turn • Using Charms: 1 Swipe from the right edge of the display to access Charms. 2 Touch Settings → Power → Sleep to turn off the computer. ...28 │ Using Your Computer NOTE: If your computer is in a sleep state (computer is on the screen. Turning Off the Screen • Using the power button: Press and ...
...Swipe from the right edge of the display to access Charms. 2 Touch Settings → Power → Shut down to turn off the screen. to turn • Using Charms: 1 Swipe from the right edge of the display to access Charms. 2 Touch Settings → Power → Sleep to turn off the computer. ...28 │ Using Your Computer NOTE: If your computer is in a sleep state (computer is on the screen. Turning Off the Screen • Using the power button: Press and ...

User's Manual
Page 29
...PC without deleting any of the display to access Charms. 2 Touch Settings → Change PC settings→ General→ Remove everything and reinstall Windows. 3 Touch Get started . 4 Read the instructions on the screen then touch Next. Using Your Computer │ 29 CAUTION: Refreshing your...computer Refreshing your computer restores Windows to the original factory settings without affecting your files. 3 Touch Get started . 4 Read the instructions on the screen then touch Next. Resetting your computer Resetting your computer returns the system software to original factory settings.
...PC without deleting any of the display to access Charms. 2 Touch Settings → Change PC settings→ General→ Remove everything and reinstall Windows. 3 Touch Get started . 4 Read the instructions on the screen then touch Next. Using Your Computer │ 29 CAUTION: Refreshing your...computer Refreshing your computer restores Windows to the original factory settings without affecting your files. 3 Touch Get started . 4 Read the instructions on the screen then touch Next. Resetting your computer Resetting your computer returns the system software to original factory settings.

User's Manual
Page 41
...Computer and Turning On Your Computer. 2 Refresh your computer. 4 Contact Dell's support service. Troubleshooting │ 41 Software updates may need to adjust display settings • Turn off your computer screen to avoid accidental touches, then gently wipe the display with a clean dry cloth. • ...hung state. 1 Reboot the computer. Swipe from the right edge of the display to access Charms and touch Settings → Power → Restart to dell. Computer is The application or not working as expected feature could responding or behaving be in Windows Desktop, ...
...Computer and Turning On Your Computer. 2 Refresh your computer. 4 Contact Dell's support service. Troubleshooting │ 41 Software updates may need to adjust display settings • Turn off your computer screen to avoid accidental touches, then gently wipe the display with a clean dry cloth. • ...hung state. 1 Reboot the computer. Swipe from the right edge of the display to access Charms and touch Settings → Power → Restart to dell. Computer is The application or not working as expected feature could responding or behaving be in Windows Desktop, ...


