
Setup Guide
Page 4
... Cautions, and Warnings NOTE: A NOTE indicates important information that helps you purchased a Dell™ n Series computer, any references in this document to the Microsoft® Windows® operating systems are not applicable Information in this document is subject to change without...Microsoft®, Windows®, and the Windows start button logo are trademarks of your computer. Dell Inc. disclaims any manner whatsoever without notice. © 2011 Dell Inc. A00 Reproduction of these materials in any proprietary interest in this text: Dell™, the DELL logo, XPS™, and...
... Cautions, and Warnings NOTE: A NOTE indicates important information that helps you purchased a Dell™ n Series computer, any references in this document to the Microsoft® Windows® operating systems are not applicable Information in this document is subject to change without...Microsoft®, Windows®, and the Windows start button logo are trademarks of your computer. Dell Inc. disclaims any manner whatsoever without notice. © 2011 Dell Inc. A00 Reproduction of these materials in any proprietary interest in this text: Dell™, the DELL logo, XPS™, and...
Setup Guide
Page 5
... 7 Press the Power Button 8 Set Up Microsoft Windows 9 Create System Recovery Media (Recommended 10 Enable or Disable Wireless (Optional 12 Set Up Wireless Display (Optional 14 Set Up 3D TV (Optional 16 Connect to the Internet (Optional 18 Using Your XPS Laptop 20 Right View Features 20 Left View Features...and Indicators 40 Disabling Battery Charging 42 Using the Optical Drive 43 Software Features 44 NVIDIA 3DTV Play 45 NVIDIA Optimus Technology 48 Dell DataSafe Online Backup 50 Dell Stage 50 Free Fall Sensor 52 Solving Problems 53 Beep Codes 53 Network Problems 54 3
... 7 Press the Power Button 8 Set Up Microsoft Windows 9 Create System Recovery Media (Recommended 10 Enable or Disable Wireless (Optional 12 Set Up Wireless Display (Optional 14 Set Up 3D TV (Optional 16 Connect to the Internet (Optional 18 Using Your XPS Laptop 20 Right View Features 20 Left View Features...and Indicators 40 Disabling Battery Charging 42 Using the Optical Drive 43 Software Features 44 NVIDIA 3DTV Play 45 NVIDIA Optimus Technology 48 Dell DataSafe Online Backup 50 Dell Stage 50 Free Fall Sensor 52 Solving Problems 53 Beep Codes 53 Network Problems 54 3

Setup Guide
Page 11
... will take some time to support.dell.com/MyNewDell. 9 CAUTION: Do not interrupt the operating system's setup process. Doing so may take you through several procedures including accepting license agreements, setting preferences, and setting up Windows for your computer, it is preconfigured... optimal performance of your computer available at support.dell.com. To set up an Internet connection. The Windows setup screens will need to reinstall the operating system. Setting Up Your XPS Laptop Set Up Microsoft Windows Your Dell computer is recommended that you download and install ...
... will take some time to support.dell.com/MyNewDell. 9 CAUTION: Do not interrupt the operating system's setup process. Doing so may take you through several procedures including accepting license agreements, setting preferences, and setting up Windows for your computer, it is preconfigured... optimal performance of your computer available at support.dell.com. To set up an Internet connection. The Windows setup screens will need to reinstall the operating system. Setting Up Your XPS Laptop Set Up Microsoft Windows Your Dell computer is recommended that you download and install ...

Setup Guide
Page 12
...your computer to the operating state it was in an undesirable operating state. Setting Up Your XPS Laptop Create System Recovery Media (Recommended) NOTE: It is recommended that you create a ...preserving data files (without the need of 8 GB or DVD-R/DVD+R/Blu-ray Disc NOTE: Dell DataSafe Local Backup does not support rewritable discs. 10 The system recovery media can use the ...system recovery media if changes to create the system recovery media: • Dell DataSafe Local Backup • USB key with a minimum capacity of the Operating System disc). You will...
...your computer to the operating state it was in an undesirable operating state. Setting Up Your XPS Laptop Create System Recovery Media (Recommended) NOTE: It is recommended that you create a ...preserving data files (without the need of 8 GB or DVD-R/DVD+R/Blu-ray Disc NOTE: Dell DataSafe Local Backup does not support rewritable discs. 10 The system recovery media can use the ...system recovery media if changes to create the system recovery media: • Dell DataSafe Local Backup • USB key with a minimum capacity of the Operating System disc). You will...
Setup Guide
Page 16
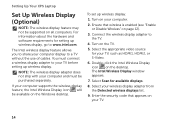
...the appropriate video source for available displays. 8. Double-click the Intel Wireless Display icon on the Windows desktop. Connect the wireless display adapter to www.intel.com. Setting Up Your XPS Laptop Set Up Wireless Display (Optional) NOTE: The wireless display feature may not be supported on ...the TV. 5. The Intel Wireless Display window appears. 7. Turn on all computers. To set up wireless display...
...the appropriate video source for available displays. 8. Double-click the Intel Wireless Display icon on the Windows desktop. Connect the wireless display adapter to www.intel.com. Setting Up Your XPS Laptop Set Up Wireless Display (Optional) NOTE: The wireless display feature may not be supported on ...the TV. 5. The Intel Wireless Display window appears. 7. Turn on all computers. To set up wireless display...

Setup Guide
Page 17
Double-click the Intel Wireless Display icon on the desktop. Select Connect to Existing Adapter. NOTE: You can download and install the latest driver for "Intel Wireless Display Connection Manager" from support.dell.com. NOTE: For more information about wireless display, see the wireless display adapter documentation. To enable wireless display: 1. Setting Up Your XPS Laptop 15 The Intel Wireless Display window appears. 2.
Double-click the Intel Wireless Display icon on the desktop. Select Connect to Existing Adapter. NOTE: You can download and install the latest driver for "Intel Wireless Display Connection Manager" from support.dell.com. NOTE: For more information about wireless display, see the wireless display adapter documentation. To enable wireless display: 1. Setting Up Your XPS Laptop 15 The Intel Wireless Display window appears. 2.
Setup Guide
Page 18
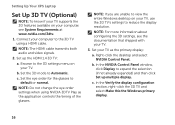
... display. 16 Right-click the desktop and select NVIDIA Control Panel. In the NVIDIA Control Panel window, click Display to Automatic. Setting Up Your XPS Laptop Set Up 3D TV (Optional) NOTE: To know if your TV supports the 3D features available on your TV. Browse to the 3D TV ... the HDMI 1.4 3D TV: a. Set the eye order for the glasses to reduce the display resolution. NOTE: If you are unable to view the entire Windows desktop on your TV. 3. NOTE: For more information about configuring the 3D settings, see System Requirements at www.nvidia.com/3dtv. 1. b. c.
... display. 16 Right-click the desktop and select NVIDIA Control Panel. In the NVIDIA Control Panel window, click Display to Automatic. Setting Up Your XPS Laptop Set Up 3D TV (Optional) NOTE: To know if your TV supports the 3D features available on your TV. Browse to the 3D TV ... the HDMI 1.4 3D TV: a. Set the eye order for the glasses to reduce the display resolution. NOTE: If you are unable to view the entire Windows desktop on your TV. 3. NOTE: For more information about configuring the 3D settings, see System Requirements at www.nvidia.com/3dtv. 1. b. c.

Setup Guide
Page 19
... with refresh rates of 50 Hz or 100 Hz or NTSC system with refresh rates of the 3D content type: In the NVIDIA Control Panel window, click Display to expand the selection (if not already expanded) and then click Change resolution. • For 3D gaming, set the resolution to 720p, ... is disabled. Ensure that the 3DTV Play logo appears in HD 3D mode even if 3DTV Play is disabled. 6. Setting Up Your XPS Laptop 4. NOTE: The performance of games may reduce in the control panel. 5. In the NVIDIA Control Panel window, click Stereoscopic 3D to 60/59 Hz. Set up stereoscopic 3D. c.
... with refresh rates of 50 Hz or 100 Hz or NTSC system with refresh rates of the 3D content type: In the NVIDIA Control Panel window, click Display to expand the selection (if not already expanded) and then click Change resolution. • For 3D gaming, set the resolution to 720p, ... is disabled. Ensure that the 3DTV Play logo appears in HD 3D mode even if 3DTV Play is disabled. 6. Setting Up Your XPS Laptop 4. NOTE: The performance of games may reduce in the control panel. 5. In the NVIDIA Control Panel window, click Stereoscopic 3D to 60/59 Hz. Set up stereoscopic 3D. c.

Setup Guide
Page 21
Have your Internet connection: 1. Setting Up Your XPS Laptop To set up a new connection or network→ Connect to complete the setup. 19 The Connect to check the service status, or try connecting again later. Contact your ISP to the Internet window appears. Click Start → Control Panel. 3. Contact your ISP for offerings...
Have your Internet connection: 1. Setting Up Your XPS Laptop To set up a new connection or network→ Connect to complete the setup. 19 The Connect to check the service status, or try connecting again later. Contact your ISP to the Internet window appears. Click Start → Control Panel. 3. Contact your ISP for offerings...

Setup Guide
Page 34
...you to scroll left or right to scroll up or down on the active window. The scroll feature includes: Scroll Vertical - Scroll Horizontal - Move two fingers up or down to scroll through content. Using Your XPS Laptop Touch Pad Gestures NOTE: Some of your desktop. Move two fingers ...left or right on the active window. Allows you to scroll the selected object. Scroll Allows you to scroll the selected object...
...you to scroll left or right to scroll up or down on the active window. The scroll feature includes: Scroll Vertical - Scroll Horizontal - Move two fingers up or down to scroll through content. Using Your XPS Laptop Touch Pad Gestures NOTE: Some of your desktop. Move two fingers ...left or right on the active window. Allows you to scroll the selected object. Scroll Allows you to scroll the selected object...
Setup Guide
Page 35
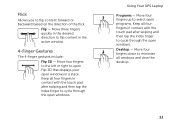
... pad after swiping and then tap the index finger to cycle through the open windows. Flick Allows you to select open programs. Keep all windows and view the desktop. 33 Desktop - Using Your XPS Laptop Programs - Move three fingers quickly in the desired direction to open Flip ...3D that displays your open windows in the active window. 4-Finger Gestures The 4-finger gestures include: Flip 3D ...
... pad after swiping and then tap the index finger to cycle through the open windows. Flick Allows you to select open programs. Keep all windows and view the desktop. 33 Desktop - Using Your XPS Laptop Programs - Move three fingers quickly in the desired direction to open Flip ...3D that displays your open windows in the active window. 4-Finger Gestures The 4-finger gestures include: Flip 3D ...
Setup Guide
Page 36
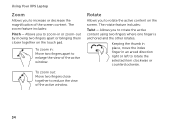
... or zoom-out by moving two fingers apart or bringing them closer together on the screen. Using Your XPS Laptop Zoom Allows you to increase or decrease the magnification of the active window. 34 Allows you to rotate the selected item clockwise or counterclockwise. Keeping the thumb in place, move ...the index finger in : Move two fingers apart to enlarge the view of the active window. Allows you to rotate the active content on the touch pad. To zoom in an arced direction right or left to rotate the active content...
... or zoom-out by moving two fingers apart or bringing them closer together on the screen. Using Your XPS Laptop Zoom Allows you to increase or decrease the magnification of the active window. 34 Allows you to rotate the selected item clockwise or counterclockwise. Keeping the thumb in place, move ...the index finger in : Move two fingers apart to enlarge the view of the active window. Allows you to rotate the active content on the touch pad. To zoom in an arced direction right or left to rotate the active content...
Setup Guide
Page 38
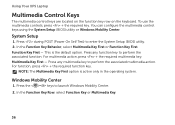
...perform the associated function. In the Function Key Behavior, select Multimedia Key First or Function Key First. Press any multimedia key to launch Windows Mobility Center. 2. For multimedia action, press + the required multimedia key. Multimedia Key First - In the Function Key Row, select Function.... 36 For function, press + the required function key. Press the < > keys to perform the associated multimedia action. Using Your XPS Laptop Multimedia Control Keys The multimedia control keys are located on the function key row on the keyboard. Function Key First - NOTE: The...
...perform the associated function. In the Function Key Behavior, select Multimedia Key First or Function Key First. Press any multimedia key to launch Windows Mobility Center. 2. For multimedia action, press + the required multimedia key. Multimedia Key First - In the Function Key Row, select Function.... 36 For function, press + the required function key. Press the < > keys to perform the associated multimedia action. Using Your XPS Laptop Multimedia Control Keys The multimedia control keys are located on the function key row on the keyboard. Function Key First - NOTE: The...

Setup Guide
Page 44
Ensure that your computer is turned on the keyboard. 3. Press the keys on . 2. To quickly disable the battery charging feature: 1. In the Battery Status window, click Turn off Battery Charging and then click OK. Using Your XPS Laptop Disabling Battery Charging You may be disabled in the System Setup (BIOS) utility. 42 NOTE: Battery charging can also be required to disable the battery charging feature while on an airplane flight.
Ensure that your computer is turned on the keyboard. 3. Press the keys on . 2. To quickly disable the battery charging feature: 1. In the Battery Status window, click Turn off Battery Charging and then click OK. Using Your XPS Laptop Disabling Battery Charging You may be disabled in the System Setup (BIOS) utility. 42 NOTE: Battery charging can also be required to disable the battery charging feature while on an airplane flight.

Setup Guide
Page 46
..., and upload or download files. 44 This feature helps keep your Dell computer secure by learning the unique appearance of your face and uses this to verify your identity to a Windows account or secure websites). Check your computer. Using Your XPS Laptop Software Features FastAccess Facial Recognition Your computer may have the FastAccess...
..., and upload or download files. 44 This feature helps keep your Dell computer secure by learning the unique appearance of your face and uses this to verify your identity to a Windows account or secure websites). Check your computer. Using Your XPS Laptop Software Features FastAccess Facial Recognition Your computer may have the FastAccess...

Setup Guide
Page 49
... places all objects in front of the scene in your space; Right-click the desktop and select NVIDIA Control Panel. 2. In the NVIDIA Control Panel window, click Stereoscopic 3D to save and exit. 47 Moves objects away from you want to change. 4. Customizing Shortcut Keys To customize the keyboard shortcuts: 1. Press... ; also used to place the laser sight. Click OK to expand the selection (if not already expanded) and then click Set keyboard shortcuts. 3. Using Your XPS Laptop Increases convergence Decreases convergence Moves objects towards you;
... places all objects in front of the scene in your space; Right-click the desktop and select NVIDIA Control Panel. 2. In the NVIDIA Control Panel window, click Stereoscopic 3D to save and exit. 47 Moves objects away from you want to change. 4. Customizing Shortcut Keys To customize the keyboard shortcuts: 1. Press... ; also used to place the laser sight. Click OK to expand the selection (if not already expanded) and then click Set keyboard shortcuts. 3. Using Your XPS Laptop Increases convergence Decreases convergence Moves objects towards you;

Setup Guide
Page 51
.... 3. The default list of application profiles is updated frequently by NVIDIA and is automatically downloaded to your computer. In the NVIDIA Control Panel window, click 3D Settings to the Internet. In the Program Settings tab, click Add and browse to customize: list and make the desired changes....does not exist, only the integrated Intel GPU is used. To change the settings for newly released games or applications that application. Using Your XPS Laptop • If an application profile exists, the NVIDIA GPU is enabled and the application runs in the Select a program to select the...
.... 3. The default list of application profiles is updated frequently by NVIDIA and is automatically downloaded to your computer. In the NVIDIA Control Panel window, click 3D Settings to the Internet. In the Program Settings tab, click Add and browse to customize: list and make the desired changes....does not exist, only the integrated Intel GPU is used. To change the settings for newly released games or applications that application. Using Your XPS Laptop • If an application profile exists, the NVIDIA GPU is enabled and the application runs in the Select a program to select the...
Setup Guide
Page 52
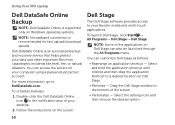
...the application shortcut to DellDataSafe.com. Drag the Dell Stage window to your desktop. 2. Dell DataSafe Online is recommended for fast upload/download speeds. To launch Dell Stage, click Start → All Programs→ Dell Stage→ Dell Stage. You can also be launched through the... All Programs menu. Using Your XPS Laptop Dell DataSafe Online Backup NOTE: Dell DataSafe Online is supported only on Windows operating systems. NOTE: A...
...the application shortcut to DellDataSafe.com. Drag the Dell Stage window to your desktop. 2. Dell DataSafe Online is recommended for fast upload/download speeds. To launch Dell Stage, click Start → All Programs→ Dell Stage→ Dell Stage. You can also be launched through the... All Programs menu. Using Your XPS Laptop Dell DataSafe Online Backup NOTE: Dell DataSafe Online is supported only on Windows operating systems. NOTE: A...
Setup Guide
Page 59
... electrical outlet. If a program crashes repeatedly - Check the software documentation. CAUTION: You might lose data if you are unable to an earlier version of Microsoft Windows operating system. 57 Ensure that is designed for at least 8 to get a response by pressing a key on the CD. Click Applications. 3. Click End Task. Run...: 1. If you are unable to 10 seconds until the computer turns off and then restart your mouse, press the power button for an earlier Microsoft Windows operating system - If a program stops responding -
... electrical outlet. If a program crashes repeatedly - Check the software documentation. CAUTION: You might lose data if you are unable to an earlier version of Microsoft Windows operating system. 57 Ensure that is designed for at least 8 to get a response by pressing a key on the CD. Click Applications. 3. Click End Task. Run...: 1. If you are unable to 10 seconds until the computer turns off and then restart your mouse, press the power button for an earlier Microsoft Windows operating system - If a program stops responding -

Setup Guide
Page 60
... Ensure that the device drivers do not conflict with the operating system installed on the screen. See the software documentation for previous versions of Windows. 2. If necessary, uninstall and then reinstall the program. -- Verify that the program is compatible with the program. -- If you have.... • Save and close any error message that your computer meets the minimum hardware requirements needed to help in troubleshooting when contacting Dell. 58 Ensure that the program is installed and configured properly. -- In the welcome screen, click Next. 3. Click Start →...
... Ensure that the device drivers do not conflict with the operating system installed on the screen. See the software documentation for previous versions of Windows. 2. If necessary, uninstall and then reinstall the program. -- Verify that the program is compatible with the program. -- If you have.... • Save and close any error message that your computer meets the minimum hardware requirements needed to help in troubleshooting when contacting Dell. 58 Ensure that the program is installed and configured properly. -- In the welcome screen, click Next. 3. Click Start →...


