
Setup Guide
Page 6
... Free Fall Sensor 55 Dell Dock (Optional 56 Solving Problems 57 Beep Codes 57 Touch Screen Problems 58 Network Problems 59 Power Problems 60 Memory Problems 61 Lockups and Software Problems 62 Using Support Tools 64 Dell Support Center 64 My Dell Downloads 65 System Messages ...65 Hardware Troubleshooter 67 Dell Diagnostics 67 Restoring Your Operating ...
... Free Fall Sensor 55 Dell Dock (Optional 56 Solving Problems 57 Beep Codes 57 Touch Screen Problems 58 Network Problems 59 Power Problems 60 Memory Problems 61 Lockups and Software Problems 62 Using Support Tools 64 Dell Support Center 64 My Dell Downloads 65 System Messages ...65 Hardware Troubleshooter 67 Dell Diagnostics 67 Restoring Your Operating ...
Setup Guide
Page 13
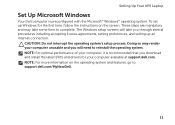
Setting Up Your XPS Laptop Set Up Microsoft Windows Your Dell computer is recommended that you will take some time to complete. NOTE: For more information on the screen. CAUTION: Do not interrupt the operating system's setup process. NOTE: For optimal performance of your computer available at support.dell.com. To set up an Internet... BIOS and drivers for the first time, follow the instructions on the operating system and features, go to reinstall the operating system. The Windows setup screens will need to support.dell.com/MyNewDell. 11
Setting Up Your XPS Laptop Set Up Microsoft Windows Your Dell computer is recommended that you will take some time to complete. NOTE: For more information on the screen. CAUTION: Do not interrupt the operating system's setup process. NOTE: For optimal performance of your computer available at support.dell.com. To set up an Internet... BIOS and drivers for the first time, follow the instructions on the operating system and features, go to reinstall the operating system. The Windows setup screens will need to support.dell.com/MyNewDell. 11
Setup Guide
Page 15
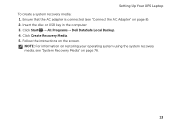
Click Create Recovery Media. 5. NOTE: For information on restoring your operating system using the system recovery media, see "Connect the AC Adapter" on page 8). 2. Insert the disc or USB key in the computer. 3. Setting Up Your XPS Laptop To create a system recovery media: 1. Click Start → All Programs→ Dell DataSafe Local Backup. 4. Follow the instructions on page 76. 13 Ensure that the AC adapter is connected (see "System Recovery Media" on the screen.
Click Create Recovery Media. 5. NOTE: For information on restoring your operating system using the system recovery media, see "Connect the AC Adapter" on page 8). 2. Insert the disc or USB key in the computer. 3. Setting Up Your XPS Laptop To create a system recovery media: 1. Click Start → All Programs→ Dell DataSafe Local Backup. 4. Follow the instructions on page 76. 13 Ensure that the AC adapter is connected (see "System Recovery Media" on the screen.
Setup Guide
Page 19
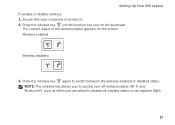
Wireless enabled Wireless disabled 3. Press the wireless key again to disable all wireless radios on the screen. NOTE: The wireless key allows you to quickly turn off wireless radios (Wi-Fi and Bluetooth®), such as when you are asked to switch between the wireless enabled or disabled states. Press the wireless key on the function key row on . 2. Ensure that your computer is turned on the keyboard. The current status of the wireless radios appears on an airplane flight. 17 Setting Up Your XPS Laptop To enable or disable wireless: 1.
Wireless enabled Wireless disabled 3. Press the wireless key again to disable all wireless radios on the screen. NOTE: The wireless key allows you to quickly turn off wireless radios (Wi-Fi and Bluetooth®), such as when you are asked to switch between the wireless enabled or disabled states. Press the wireless key on the function key row on . 2. Ensure that your computer is turned on the keyboard. The current status of the wireless radios appears on an airplane flight. 17 Setting Up Your XPS Laptop To enable or disable wireless: 1.
Setup Guide
Page 21
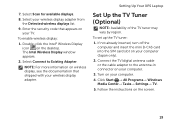
Double-click the Intel® Wireless Display icon on the screen. 19 Select Connect to the antenna-in connector on your wireless display adapter from the Detected wireless displays list. 9. If not already inserted, turn off ... into the SIM card slot on your computer. 4. 7. Turn on wireless display, see the documentation that appears on your wireless display adapter. Setting Up Your XPS Laptop Set Up the TV Tuner (Optional) NOTE: Availability of the TV tuner may vary by region. Click Start → All Programs→ Windows Media...
Double-click the Intel® Wireless Display icon on the screen. 19 Select Connect to the antenna-in connector on your wireless display adapter from the Detected wireless displays list. 9. If not already inserted, turn off ... into the SIM card slot on your computer. 4. 7. Turn on wireless display, see the documentation that appears on your wireless display adapter. Setting Up Your XPS Laptop Set Up the TV Tuner (Optional) NOTE: Availability of the TV tuner may vary by region. Click Start → All Programs→ Windows Media...
Setup Guide
Page 22
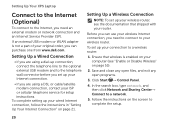
...8594; Control Panel. 4. In the search box, type network, and then click Network and Sharing Center→ Connect to a network. 5. Setting Up Your XPS Laptop Connect to the Internet (Optional) To connect to the Internet, you need to connect to your wireless router. Before you can purchase one from... www.dell.com. Follow the instructions on page 16). 2. Setting Up a Wireless Connection NOTE: To set up your ISP or cellular telephone service for setup...
...8594; Control Panel. 4. In the search box, type network, and then click Network and Sharing Center→ Connect to a network. 5. Setting Up Your XPS Laptop Connect to the Internet (Optional) To connect to the Internet, you need to connect to your wireless router. Before you can purchase one from... www.dell.com. Follow the instructions on page 16). 2. Setting Up a Wireless Connection NOTE: To set up your ISP or cellular telephone service for setup...

Setup Guide
Page 23
...Set up your Internet connection: 1. Contact your ISP to select, click Help me choose or contact your country. Follow the instructions on the screen and use the setup information provided by country. The Connect to the Internet wizard can help you cannot connect to the Internet. If you... get one. Setting Up Your XPS Laptop To set up a new connection or network→ Connect to the Internet but have successfully connected in your ISP. 4. Contact your...
...Set up your Internet connection: 1. Contact your ISP to select, click Help me choose or contact your country. Follow the instructions on the screen and use the setup information provided by country. The Connect to the Internet wizard can help you cannot connect to the Internet. If you... get one. Setting Up Your XPS Laptop To set up a new connection or network→ Connect to the Internet but have successfully connected in your ISP. 4. Contact your...
Setup Guide
Page 39
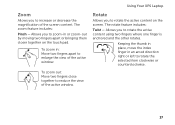
... zoom feature includes: Pinch - Rotate Allows you to zoom-in or zoom-out by moving two fingers apart or bringing them closer together on the screen. To zoom in an arced direction right or left to rotate the selected item clockwise or counterclockwise. Keeping the thumb in place, move the index... Allows you to rotate the active content on the touch pad. To zoom out: Move two fingers close together to reduce the view of the screen content. The rotate feature includes: Twist - Allows you to rotate the active content using two fingers where one finger is anchored and the other rotates...
... zoom feature includes: Pinch - Rotate Allows you to zoom-in or zoom-out by moving two fingers apart or bringing them closer together on the screen. To zoom in an arced direction right or left to rotate the selected item clockwise or counterclockwise. Keeping the thumb in place, move the index... Allows you to rotate the active content on the touch pad. To zoom out: Move two fingers close together to reduce the view of the screen content. The rotate feature includes: Twist - Allows you to rotate the active content using two fingers where one finger is anchored and the other rotates...
Setup Guide
Page 47
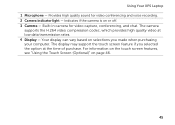
... light - The camera supports the H.264 video compression codec, which provides high quality video at the time of purchase. The display may support the touch screen feature if you made when purchasing your computer. Your display can vary based on selections you selected the option at low data transmission rates. 4 Display... - Indicates if the camera is on page 46. 45 For information on the touch screen features, see "Using the Touch Screen (Optional)" on or off. 3 Camera - Using Your...
... light - The camera supports the H.264 video compression codec, which provides high quality video at the time of purchase. The display may support the touch screen feature if you made when purchasing your computer. Your display can vary based on selections you selected the option at low data transmission rates. 4 Display... - Indicates if the camera is on page 46. 45 For information on the touch screen features, see "Using the Touch Screen (Optional)" on or off. 3 Camera - Using Your...
Setup Guide
Page 48
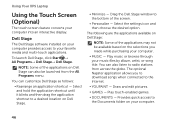
... Draw and edit pictures. • Games - Provides quick access to the bottom of the applications may not be available based on Dell Stage can also be launched from across the globe. NOTE: Some of the applications on the selections you to download songs when connected...computer provides access to radio stations from the All Programs menu. Dell Stage The Dell Stage software installed on Dell Stage: NOTE: Some of the screen. • Personalize - Using Your XPS Laptop Using the Touch Screen (Optional) The touch screen feature converts your music files by album, artist, or song...
... Draw and edit pictures. • Games - Provides quick access to the bottom of the applications may not be available based on Dell Stage can also be launched from across the globe. NOTE: Some of the applications on the selections you to download songs when connected...computer provides access to radio stations from the All Programs menu. Dell Stage The Dell Stage software installed on Dell Stage: NOTE: Some of the screen. • Personalize - Using Your XPS Laptop Using the Touch Screen (Optional) The touch screen feature converts your music files by album, artist, or song...
Setup Guide
Page 49
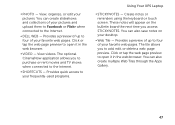
... of your favorite web pages. View, organize, or edit your frequently-used programs. Using Your XPS Laptop • StickyNotes - Provides a preview of up to four of your pictures and upload them... to Facebook or Flickr when connected to the Internet. • Dell Web - Click or tap the web page preview to open it in the web browser. Click... TV shows when connected to your pictures. Create notes or reminders using the keyboard or touch screen. You can also save notes on the bulletin board the next time you access STICKYNOTES. Provides...
... of your favorite web pages. View, organize, or edit your frequently-used programs. Using Your XPS Laptop • StickyNotes - Provides a preview of up to four of your pictures and upload them... to Facebook or Flickr when connected to the Internet. • Dell Web - Click or tap the web page preview to open it in the web browser. Click... TV shows when connected to your pictures. Create notes or reminders using the keyboard or touch screen. You can also save notes on the bulletin board the next time you access STICKYNOTES. Provides...
Setup Guide
Page 50
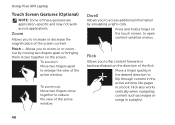
...in : Move two fingers apart to zoom-in a book. Press and hold a finger on the screen. Flick Allows you to flip content forward or backward based on the direction of the screen content. Pinch - To zoom out: Move two fingers close together to flip through content in the ...active window like pages in or zoomout by simulating a right-click. Using Your XPS Laptop Touch Screen Gestures (Optional) NOTE: Some of the active window. Zoom Allows you to increase or decrease the magnification of the flick. Move a finger...
...in : Move two fingers apart to zoom-in a book. Press and hold a finger on the screen. Flick Allows you to flip content forward or backward based on the direction of the screen content. Pinch - To zoom out: Move two fingers close together to flip through content in the ...active window like pages in or zoomout by simulating a right-click. Using Your XPS Laptop Touch Screen Gestures (Optional) NOTE: Some of the active window. Zoom Allows you to increase or decrease the magnification of the flick. Move a finger...
Setup Guide
Page 51
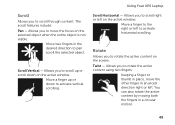
... other finger in place, move the focus on the selected object when the entire object is not visible. Using Your XPS Laptop Scroll Allows you to rotate the active content on the screen. Rotate Allows you to activate horizontal scrolling. Allows you to scroll through content. Move a finger to the right or...
... other finger in place, move the focus on the selected object when the entire object is not visible. Using Your XPS Laptop Scroll Allows you to rotate the active content on the screen. Rotate Allows you to activate horizontal scrolling. Allows you to scroll through content. Move a finger to the right or...
Setup Guide
Page 55
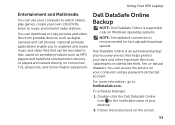
...on Windows operating systems. NOTE: A broadband connection is recommended for fast upload/download speeds. Dell DataSafe Online is supported only on the screen. 53 Dell DataSafe Online Backup NOTE: Dell DataSafe Online is an automated backup and recovery service that can access the service on connected ...viewed directly on your data and other important files from portable devices, such as digital cameras and cell phones. Using Your XPS Laptop Entertainment and Multimedia You can download or copy pictures and video files from catastrophic incidents like theft, fire, or ...
...on Windows operating systems. NOTE: A broadband connection is recommended for fast upload/download speeds. Dell DataSafe Online is supported only on the screen. 53 Dell DataSafe Online Backup NOTE: Dell DataSafe Online is an automated backup and recovery service that can access the service on connected ...viewed directly on your data and other important files from portable devices, such as digital cameras and cell phones. Using Your XPS Laptop Entertainment and Multimedia You can download or copy pictures and video files from catastrophic incidents like theft, fire, or ...

Setup Guide
Page 58
... related icons into categories • Changing the behavior of icons that provides easy access to the Dock or a category. Click Save. Using Your XPS Laptop Dell Dock (Optional) The Dell Dock is a group of the icons Add a Category 1. Right-click the Dock and click Advanced Setting... 2. Select an icon for the category in... the Dock, click Add→ Category. Enter a title for the category from the Select an image: box. 4. Right-click the category or icon on the screen. Follow the instructions on the Dock and click Delete shortcut or Delete category. 2.
... related icons into categories • Changing the behavior of icons that provides easy access to the Dock or a category. Click Save. Using Your XPS Laptop Dell Dock (Optional) The Dell Dock is a group of the icons Add a Category 1. Right-click the Dock and click Advanced Setting... 2. Select an icon for the category in... the Dock, click Add→ Category. Enter a title for the category from the Select an image: box. 4. Right-click the category or icon on the screen. Follow the instructions on the Dock and click Delete shortcut or Delete category. 2.
Setup Guide
Page 60
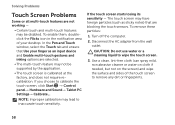
... any dirt or fingerprints. 58 Disconnect the AC adapter from the wall outlet. CAUTION: Do not use water or a cleaning liquid to calibrate the touch screen, click Start → Control panel→ Hardware and Sound→ Tablet PC Settings→ Calibrate... In the Pen and Touch window, select the Touch... not be disabled. Use a clean, lint-free cloth (can spray mild, non abrasive cleaner or water on cloth if needed, but not on the screen) and wipe the surface and sides of your finger as sticky notes) that Use your desktop. To remove these particles: 1. To enable them, doubleclick ...
... any dirt or fingerprints. 58 Disconnect the AC adapter from the wall outlet. CAUTION: Do not use water or a cleaning liquid to calibrate the touch screen, click Start → Control panel→ Hardware and Sound→ Tablet PC Settings→ Calibrate... In the Pen and Touch window, select the Touch... not be disabled. Use a clean, lint-free cloth (can spray mild, non abrasive cleaner or water on cloth if needed, but not on the screen) and wipe the surface and sides of your finger as sticky notes) that Use your desktop. To remove these particles: 1. To enable them, doubleclick ...
Setup Guide
Page 64
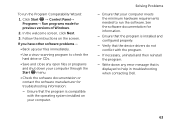
... then restart your mouse, press the power button for an earlier Microsoft® Windows® operating system - If the computer stops responding or a solid blue screen appears - The Program Compatibility Wizard configures a program so that it runs in its documentation or on your keyboard, or by moving your computer. Ensure that...
... then restart your mouse, press the power button for an earlier Microsoft® Windows® operating system - If the computer stops responding or a solid blue screen appears - The Program Compatibility Wizard configures a program so that it runs in its documentation or on your keyboard, or by moving your computer. Ensure that...
Setup Guide
Page 65
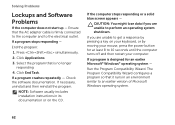
... programs and shut down any error message that is installed and configured properly. -- Verify that the program is compatible with the program. -- In the welcome screen, click Next. 3. See the software documentation for previous versions of Windows. 2. If necessary, uninstall and then reinstall the program. -- If you have other software...8594; Programs→ Run programs made for information. -- Write down your computer meets the minimum hardware requirements needed to help in troubleshooting when contacting Dell. 63 Solving Problems -- To run the software.
... programs and shut down any error message that is installed and configured properly. -- Verify that the program is compatible with the program. -- In the welcome screen, click Next. 3. See the software documentation for previous versions of Windows. 2. If necessary, uninstall and then reinstall the program. -- If you have other software...8594; Programs→ Run programs made for information. -- Write down your computer meets the minimum hardware requirements needed to help in troubleshooting when contacting Dell. 63 Solving Problems -- To run the software.

Setup Guide
Page 67
... backup media. From this website you identify the cause and action needed to resolve the issue. Using Support Tools My Dell Downloads NOTE: My Dell Downloads may display a system message that will help you can download available software for reinstallation or create your new...Dell Downloads: 1. System Messages If your computer has an issue or error, it may not be available in the following examples, see the documentation for either the operating system or the program that was running when the message appeared or contact Dell (see "Contacting Dell" on the screen to DownloadStore.dell...
... backup media. From this website you identify the cause and action needed to resolve the issue. Using Support Tools My Dell Downloads NOTE: My Dell Downloads may display a system message that will help you can download available software for reinstallation or create your new...Dell Downloads: 1. System Messages If your computer has an issue or error, it may not be available in the following examples, see the documentation for either the operating system or the program that was running when the message appeared or contact Dell (see "Contacting Dell" on the screen to DownloadStore.dell...
Setup Guide
Page 70
...down your hard drive. The PSA will take about 30 minutes or more. When the DELL™ logo appears, press immediately. Using Support Tools Starting Dell Diagnostics From Your Hard Drive Dell Diagnostics is located on a hidden diagnostic utility partition on page 87) for assistance. 1....Select Diagnostics from the Drivers and Utilities disc. This will start running tests. NOTE: If your computer cannot display a screen image, contact Dell (see "Contacting Dell" on your computer and try again. 68 NOTE: If you want to an electrical outlet that no diagnostics utility partition...
...down your hard drive. The PSA will take about 30 minutes or more. When the DELL™ logo appears, press immediately. Using Support Tools Starting Dell Diagnostics From Your Hard Drive Dell Diagnostics is located on a hidden diagnostic utility partition on page 87) for assistance. 1....Select Diagnostics from the Drivers and Utilities disc. This will start running tests. NOTE: If your computer cannot display a screen image, contact Dell (see "Contacting Dell" on your computer and try again. 68 NOTE: If you want to an electrical outlet that no diagnostics utility partition...


