Setup Guide
Page 5
... Adapter 8 Connect the Network Cable (Optional 9 Press the Power Button 10 Set Up Microsoft Windows 11 Create System Recovery Media (Recommended 12 Install the SIM Card (Optional 14 Enable or Disable Wireless (Optional 16 Set Up Wireless Display (Optional 18 Set Up the TV Tuner (Optional 19 Connect to the Internet (Optional 20 Using Your XPS Laptop 22 Right View Features 22 Left View Features 26 Back View Features 28 Computer Base and Keyboard Features 30 Status Lights and Indicators 34 Disabling Battery Charging 35 Touch Pad Gestures 36 Multimedia Control Keys...
... Adapter 8 Connect the Network Cable (Optional 9 Press the Power Button 10 Set Up Microsoft Windows 11 Create System Recovery Media (Recommended 12 Install the SIM Card (Optional 14 Enable or Disable Wireless (Optional 16 Set Up Wireless Display (Optional 18 Set Up the TV Tuner (Optional 19 Connect to the Internet (Optional 20 Using Your XPS Laptop 22 Right View Features 22 Left View Features 26 Back View Features 28 Computer Base and Keyboard Features 30 Status Lights and Indicators 34 Disabling Battery Charging 35 Touch Pad Gestures 36 Multimedia Control Keys...

Setup Guide
Page 6
... Removing and Replacing the Battery 50 Software Features 52 Dell DataSafe Online Backup 53 nVidia Optimus Technology (Optional 54 Free Fall Sensor 55 Dell Dock (Optional 56 Solving Problems 57 Beep Codes 57 Touch Screen Problems 58 Network Problems 59 Power Problems 60 Memory Problems 61 Lockups and Software Problems 62 Using Support Tools 64 Dell Support Center 64 My Dell Downloads 65 System Messages 65 Hardware Troubleshooter 67 Dell Diagnostics 67 Restoring Your Operating System 72 System Restore 73 Dell DataSafe Local Backup 74 System Recovery Media 76 Dell Factory...
... Removing and Replacing the Battery 50 Software Features 52 Dell DataSafe Online Backup 53 nVidia Optimus Technology (Optional 54 Free Fall Sensor 55 Dell Dock (Optional 56 Solving Problems 57 Beep Codes 57 Touch Screen Problems 58 Network Problems 59 Power Problems 60 Memory Problems 61 Lockups and Software Problems 62 Using Support Tools 64 Dell Support Center 64 My Dell Downloads 65 System Messages 65 Hardware Troubleshooter 67 Dell Diagnostics 67 Restoring Your Operating System 72 System Restore 73 Dell DataSafe Local Backup 74 System Recovery Media 76 Dell Factory...
Setup Guide
Page 14
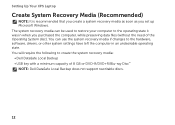
... to create the system recovery media: • Dell DataSafe Local Backup • USB key with a minimum capacity of the Operating System disc). You will require the following to the operating state it was in an undesirable operating state. The system recovery media can use the system recovery media if changes to the hardware, software, drivers, or other system settings have left the computer in when you set up Microsoft Windows. Setting Up Your XPS Laptop Create System Recovery Media...
... to create the system recovery media: • Dell DataSafe Local Backup • USB key with a minimum capacity of the Operating System disc). You will require the following to the operating state it was in an undesirable operating state. The system recovery media can use the system recovery media if changes to the hardware, software, drivers, or other system settings have left the computer in when you set up Microsoft Windows. Setting Up Your XPS Laptop Create System Recovery Media...
Setup Guide
Page 15
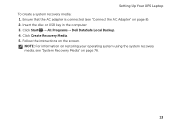
NOTE: For information on restoring your operating system using the system recovery media, see "Connect the AC Adapter" on page 76. 13 Setting Up Your XPS Laptop To create a system recovery media: 1. Ensure that the AC adapter is connected (see "System Recovery Media" on page 8). 2. Click Start → All Programs→ Dell DataSafe Local Backup. 4. Insert the disc or USB key in the computer. 3. Click Create Recovery Media. 5. Follow the instructions on the screen.
NOTE: For information on restoring your operating system using the system recovery media, see "Connect the AC Adapter" on page 76. 13 Setting Up Your XPS Laptop To create a system recovery media: 1. Ensure that the AC adapter is connected (see "System Recovery Media" on page 8). 2. Click Start → All Programs→ Dell DataSafe Local Backup. 4. Insert the disc or USB key in the computer. 3. Click Create Recovery Media. 5. Follow the instructions on the screen.
Setup Guide
Page 16
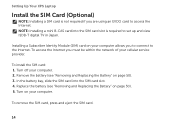
... SIM card slot is not required if you to connect to the Internet. Turn on page 50). 3. NOTE: Installing a mini B-CAS card into the SIM card slot. 4. Installing a Subscriber Identity Module (SIM) card on page 50). 5. Remove the battery (see "Removing and Replacing the Battery" on your cellular service provider. To remove the SIM card, press and eject the SIM card. 14 Setting Up Your XPS Laptop Install the SIM Card (Optional) NOTE: Installing a SIM card is required to set up...
... SIM card slot is not required if you to connect to the Internet. Turn on page 50). 3. NOTE: Installing a mini B-CAS card into the SIM card slot. 4. Installing a Subscriber Identity Module (SIM) card on page 50). 5. Remove the battery (see "Removing and Replacing the Battery" on your cellular service provider. To remove the SIM card, press and eject the SIM card. 14 Setting Up Your XPS Laptop Install the SIM Card (Optional) NOTE: Installing a SIM card is required to set up...
Setup Guide
Page 20
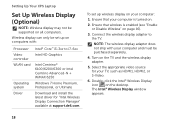
... computer is enabled (see "Enable or Disable Wireless" on . 2. NOTE: The wireless display adapter does not ship with : Processor Video controller WLAN card Operating system Driver Intel® Core™ i3-3xx to the TV. Wireless display can only be purchased separately. 4. The Intel® Wireless Display window appears. 18 Select the appropriate video source for "Intel Wireless Display Connection Manager" available at support.dell.com. Ensure that your computer and must be set up...
... computer is enabled (see "Enable or Disable Wireless" on . 2. NOTE: The wireless display adapter does not ship with : Processor Video controller WLAN card Operating system Driver Intel® Core™ i3-3xx to the TV. Wireless display can only be purchased separately. 4. The Intel® Wireless Display window appears. 18 Select the appropriate video source for "Intel Wireless Display Connection Manager" available at support.dell.com. Ensure that your computer and must be set up...
Setup Guide
Page 21
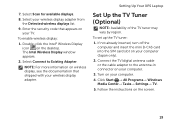
Enter the security code that shipped with your computer (Japan only). 2. Select Connect to the antenna-in connector on your wireless display adapter from the Detected wireless displays list. 9. To enable wireless display: 1. Click Start → All Programs→ Windows Media Center→ Tasks→ Settings→ TV. 5. Select Scan for available displays. 8. The Intel Wireless Display window appears. 2. Setting Up Your XPS Laptop Set Up the TV Tuner (Optional) NOTE: Availability of the TV tuner...
Enter the security code that shipped with your computer (Japan only). 2. Select Connect to the antenna-in connector on your wireless display adapter from the Detected wireless displays list. 9. To enable wireless display: 1. Click Start → All Programs→ Windows Media Center→ Tasks→ Settings→ TV. 5. Select Scan for available displays. 8. The Intel Wireless Display window appears. 2. Setting Up Your XPS Laptop Set Up the TV Tuner (Optional) NOTE: Availability of the TV tuner...
Setup Guide
Page 22
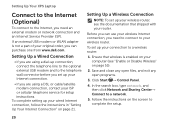
... www.dell.com. Click Start → Control Panel. 4. To set up connection, connect the telephone line to the optional external USB modem and to a network. 5. In the search box, type network, and then click Network and Sharing Center→ Connect to the telephone wall connector before you set up your connection to the Internet, you are using a DSL or cable/satellite modem connection, contact your wireless router, see "Enable or Disable Wireless" on page 21. Setting Up a Wireless Connection...
... www.dell.com. Click Start → Control Panel. 4. To set up connection, connect the telephone line to the optional external USB modem and to a network. 5. In the search box, type network, and then click Network and Sharing Center→ Connect to the telephone wall connector before you set up your connection to the Internet, you are using a DSL or cable/satellite modem connection, contact your wireless router, see "Enable or Disable Wireless" on page 21. Setting Up a Wireless Connection...
Setup Guide
Page 25
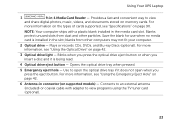
... Optical Drive" on memory cards. Connects to an external antenna (included) or coaxial cable with a plastic blank installed in connector (on page 90. Using Your XPS Laptop 1 9-in the slot; Blanks protect unused slots from other particles. Opens the optical drive tray when pressed. 5 Emergency eject hole - Provides a fast and convenient way to view programs using the TV tuner card (optional). 23 NOTE: Your computer ships with adapter...
... Optical Drive" on memory cards. Connects to an external antenna (included) or coaxial cable with a plastic blank installed in connector (on page 90. Using Your XPS Laptop 1 9-in the slot; Blanks protect unused slots from other particles. Opens the optical drive tray when pressed. 5 Emergency eject hole - Provides a fast and convenient way to view programs using the TV tuner card (optional). 23 NOTE: Your computer ships with adapter...

Setup Guide
Page 31
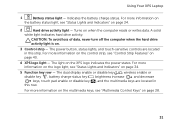
... security cable to power the computer and charge the battery. 4 Security cable slot - Connects to the AC adapter to the computer. Connects to a VGA/DVI connector through an optional mini-DisplayPort adapter. NOTE: The mini-DisplayPort connector also connects to USB devices, such as a mouse, keyboard, printer, external drive, or MP3 player. 29 HDMI supports full high-definition resolutions up to a TV or monitor for both 5.1 audio and video signals. Using Your XPS Laptop 1 HDMI connector - Connects to...
... security cable to power the computer and charge the battery. 4 Security cable slot - Connects to the AC adapter to the computer. Connects to a VGA/DVI connector through an optional mini-DisplayPort adapter. NOTE: The mini-DisplayPort connector also connects to USB devices, such as a mouse, keyboard, printer, external drive, or MP3 player. 29 HDMI supports full high-definition resolutions up to a TV or monitor for both 5.1 audio and video signals. Using Your XPS Laptop 1 HDMI connector - Connects to...
Setup Guide
Page 33
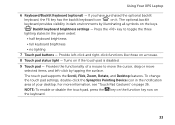
...2 Hard drive activity light - The dual display enable or disable key , wireless enable or disable key , battery charge status key , brightness increase and decrease keys, touch pad enable or disable key , and the multimedia keys are located in this strip. For more information on the multimedia keys, see "Status Lights and Indicators" on page 40. 4 XPS logo light - The light on page 38. 31 For more information on the battery status light, see "Multimedia Control Keys" on the XPS logo indicates the power states. Indicates the battery charge status. Using Your XPS Laptop...
...2 Hard drive activity light - The dual display enable or disable key , wireless enable or disable key , battery charge status key , brightness increase and decrease keys, touch pad enable or disable key , and the multimedia keys are located in this strip. For more information on the multimedia keys, see "Status Lights and Indicators" on page 40. 4 XPS logo light - The light on page 38. 31 For more information on the battery status light, see "Multimedia Control Keys" on the XPS logo indicates the power states. Indicates the battery charge status. Using Your XPS Laptop...
Setup Guide
Page 35
... the optional backlit keyboard, the F6 key has the backlit keyboard icon on a mouse. 8 Touch pad status light - Backlit keyboard brightness settings - To change the touch pad settings, double-click the Synaptics Pointing Device icon in the notification area of a mouse to toggle the three lighting states (in dark environments by tapping the surface. The optional backlit keyboard provides visibility in the given order): • half keyboard brightness • full keyboard brightness • no lighting 7 Touch pad buttons - Provide...
... the optional backlit keyboard, the F6 key has the backlit keyboard icon on a mouse. 8 Touch pad status light - Backlit keyboard brightness settings - To change the touch pad settings, double-click the Synaptics Pointing Device icon in the notification area of a mouse to toggle the three lighting states (in dark environments by tapping the surface. The optional backlit keyboard provides visibility in the given order): • half keyboard brightness • full keyboard brightness • no lighting 7 Touch pad buttons - Provide...
Setup Guide
Page 55
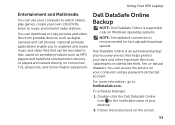
.... Using Your XPS Laptop Entertainment and Multimedia You can use your computer to watch videos, play games, create your desktop. 2. For more information, go to disc, saved on connected TVs, projectors, and home theater equipment. Optional software applications enable you to organize and create music and video files that helps protect your computer using a password‑protected account. Follow the instructions on Windows operating systems. NOTE: A broadband connection is supported...
.... Using Your XPS Laptop Entertainment and Multimedia You can use your computer to watch videos, play games, create your desktop. 2. For more information, go to disc, saved on connected TVs, projectors, and home theater equipment. Optional software applications enable you to organize and create music and video files that helps protect your computer using a password‑protected account. Follow the instructions on Windows operating systems. NOTE: A broadband connection is supported...
Setup Guide
Page 59
..., see "Using Support Tools" on page 64 or "Contacting Dell" on page 87) for advanced service instructions. BIOS ROM checksum failure No RAM detected NOTE: If you cannot solve your computer. Chipset error RAM read/write failure Real Time Clock failure Video card or chip failure Processor failure Display failure 57 WARNING: Only trained service personnel should remove the computer cover. If you installed or replaced the memory module, ensure...
..., see "Using Support Tools" on page 64 or "Contacting Dell" on page 87) for advanced service instructions. BIOS ROM checksum failure No RAM detected NOTE: If you cannot solve your computer. Chipset error RAM read/write failure Real Time Clock failure Video card or chip failure Processor failure Display failure 57 WARNING: Only trained service personnel should remove the computer cover. If you installed or replaced the memory module, ensure...
Setup Guide
Page 60
... to calibrate the touch screen, click Start → Control panel→ Hardware and Sound→ Tablet PC Settings→ Calibrate... If the touch screen starts losing its sensitivity - The touch screen may have foreign particles (such as an input device and Enable multi-touch gestures and inking options are not working - • Certain touch and multi-touch features may lead to remove any dirt or fingerprints. 58 Use a clean, lint-free cloth (can...
... to calibrate the touch screen, click Start → Control panel→ Hardware and Sound→ Tablet PC Settings→ Calibrate... If the touch screen starts losing its sensitivity - The touch screen may have foreign particles (such as an input device and Enable multi-touch gestures and inking options are not working - • Certain touch and multi-touch features may lead to remove any dirt or fingerprints. 58 Use a clean, lint-free cloth (can...
Setup Guide
Page 63
... many devices connected to a power strip. • Multiple power strips connected to see if that hinders reception on your computer - Solving Problems If you encounter interference that resolves the problem. • See the software documentation for minimum memory requirements. Some possible causes of interference are not using to the same electrical outlet. If necessary, install additional memory (see the Service Manual at support.dell.com/manuals). •...
... many devices connected to a power strip. • Multiple power strips connected to see if that hinders reception on your computer - Solving Problems If you encounter interference that resolves the problem. • See the software documentation for minimum memory requirements. Some possible causes of interference are not using to the same electrical outlet. If necessary, install additional memory (see the Service Manual at support.dell.com/manuals). •...
Setup Guide
Page 68
... drive is installed properly and partitioned as a boot device. • Enter system setup and ensure that a parameter has exceeded its normal operating range. A parameter out of range may or may not indicate a potential hard drive problem - Possible system board failure or RTC battery low. No bootable partition on page 87) for assistance. No boot device available - Hard-disk drive read failure - Contact Dell (see the Service Manual at support.dell.com/ manuals). Using Support Tools CMOS checksum error - Hard-disk drive failure - Contact Dell...
... drive is installed properly and partitioned as a boot device. • Enter system setup and ensure that a parameter has exceeded its normal operating range. A parameter out of range may or may not indicate a potential hard drive problem - Possible system board failure or RTC battery low. No bootable partition on page 87) for assistance. No boot device available - Hard-disk drive read failure - Contact Dell (see the Service Manual at support.dell.com/ manuals). Using Support Tools CMOS checksum error - Hard-disk drive failure - Contact Dell...
Setup Guide
Page 69
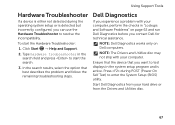
... Support. 2. Ensure that the device that best describes the problem and follow the remaining troubleshooting steps. Start Dell Diagnostics from the Drivers and Utilities disc. 67 In the search results, select the option that you can use the Hardware Troubleshooter to test displays in the system setup program and is either not detected during POST (Power On Self Test) to enter the System Setup (BIOS) utility. Press during the operating system setup...
... Support. 2. Ensure that the device that best describes the problem and follow the remaining troubleshooting steps. Start Dell Diagnostics from the Drivers and Utilities disc. 67 In the search results, select the option that you can use the Hardware Troubleshooter to test displays in the system setup program and is either not detected during POST (Power On Self Test) to enter the System Setup (BIOS) utility. Press during the operating system setup...
Setup Guide
Page 91
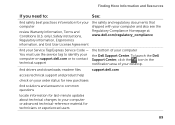
... downloads; To launch the Dell Support Center, click the icon in the notification area of your computer the Dell Support Center. find your Service Tag/Express Service Code - You must use the service tag to identify your computer on your order status for new purchases find safety best practices information for your computer review Warranty information, Terms and Conditions (U.S. readme files support.dell.com access technical support...
... downloads; To launch the Dell Support Center, click the icon in the notification area of your computer the Dell Support Center. find your Service Tag/Express Service Code - You must use the service tag to identify your computer on your order status for new purchases find safety best practices information for your computer review Warranty information, Terms and Conditions (U.S. readme files support.dell.com access technical support...
Setup Guide
Page 92
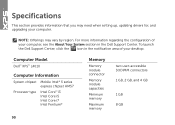
...® 5 series express chipset HM57 Processor type Intel Core™ i3 Intel Core i5 Intel Core i7 Intel Pentium® 90 Memory Memory module connector Memory module capacities Minimum memory Maximum memory two user-accessible SODIMM connectors 1 GB, 2 GB, and 4 GB 1 GB 8 GB Specifications This section provides information that you may vary by region. NOTE: Offerings may need when setting up, updating drivers for, and upgrading your...
...® 5 series express chipset HM57 Processor type Intel Core™ i3 Intel Core i5 Intel Core i7 Intel Pentium® 90 Memory Memory module connector Memory module capacities Minimum memory Maximum memory two user-accessible SODIMM connectors 1 GB, 2 GB, and 4 GB 1 GB 8 GB Specifications This section provides information that you may vary by region. NOTE: Offerings may need when setting up, updating drivers for, and upgrading your...


