
Service Manual
Page 1
XPS 11 Service Manual Computer model: XPS 9P33 Regulatory model: P16T Regulatory type: P16T001
XPS 11 Service Manual Computer model: XPS 9P33 Regulatory model: P16T Regulatory type: P16T001

Service Manual
Page 4
... 19 Procedure 19 Replacing the Display Assembly 23 Procedure 23 Postrequisites 23 Removing the System Board 24 Prerequisites 24 Procedure 24 Replacing the System Board 30 Procedure 30 Postrequisites 30 Entering the Service Tag in the BIOS 30 Removing the Palm-Rest Assembly 31 Prerequisites 31 Procedure 31 Replacing the Palm-Rest Assembly 33 Procedure 33 Postrequisites 33 Flashing the BIOS 34 4 | Contents
... 19 Procedure 19 Replacing the Display Assembly 23 Procedure 23 Postrequisites 23 Removing the System Board 24 Prerequisites 24 Procedure 24 Replacing the System Board 30 Procedure 30 Postrequisites 30 Entering the Service Tag in the BIOS 30 Removing the Palm-Rest Assembly 31 Prerequisites 31 Procedure 31 Replacing the Palm-Rest Assembly 33 Procedure 33 Postrequisites 33 Flashing the BIOS 34 4 | Contents
Service Manual
Page 5
..., including media cards, connected to the lower or upper-right corner of your operating system for shut-down instructions. 2 After the computer shuts down . such as power and USB cables - Point to your computer. Before Working Inside Your Computer Before You Begin CAUTION: To avoid data loss, save and close all open files and exit all open programs before turning off your...
..., including media cards, connected to the lower or upper-right corner of your operating system for shut-down instructions. 2 After the computer shuts down . such as power and USB cables - Point to your computer. Before Working Inside Your Computer Before You Begin CAUTION: To avoid data loss, save and close all open files and exit all open programs before turning off your...
Service Manual
Page 6
... must disengage before connecting to the power source. CAUTION: To avoid damaging the components and cards, handle them evenly aligned to avoid bending any of the computer. Safety Instructions Use the following safety guidelines to protect your computer from the media-card reader. 6 | Before Working Inside Your Computer WARNING: Disconnect all covers, panels, and screws before disconnecting the cable. See the safety...
... must disengage before connecting to the power source. CAUTION: To avoid damaging the components and cards, handle them evenly aligned to avoid bending any of the computer. Safety Instructions Use the following safety guidelines to protect your computer from the media-card reader. 6 | Before Working Inside Your Computer WARNING: Disconnect all covers, panels, and screws before disconnecting the cable. See the safety...
Service Manual
Page 11
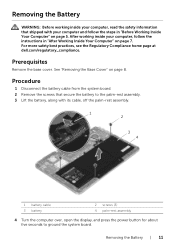
... page 7. Removing the Battery | 11 Procedure 1 Disconnect the battery cable from the system board. 2 Remove the screws that secure the battery to the palm-rest assembly. 3 Lift the battery, along with your computer, read the safety information that shipped with its cable, off the palm-rest assembly. 1 2 3 4 1 battery cable 3 battery 2 screws (3) 4 palm-rest assembly 4 Turn the computer over, open the display, and press the power button for about...
... page 7. Removing the Battery | 11 Procedure 1 Disconnect the battery cable from the system board. 2 Remove the screws that secure the battery to the palm-rest assembly. 3 Lift the battery, along with your computer, read the safety information that shipped with its cable, off the palm-rest assembly. 1 2 3 4 1 battery cable 3 battery 2 screws (3) 4 palm-rest assembly 4 Turn the computer over, open the display, and press the power button for about...

Service Manual
Page 12
... the instructions in "Before Working Inside Your Computer" on page 5. See "Replacing the Base Cover" on page 10. 12 | Replacing the Battery For more safety best practices, see the Regulatory Compliance home page at dell.com/regulatory_compliance. Replacing the Battery WARNING: Before working inside your computer, read the safety information that secure the battery to the palm-rest assembly. 4 Connect the battery cable to...
... the instructions in "Before Working Inside Your Computer" on page 5. See "Replacing the Base Cover" on page 10. 12 | Replacing the Battery For more safety best practices, see the Regulatory Compliance home page at dell.com/regulatory_compliance. Replacing the Battery WARNING: Before working inside your computer, read the safety information that secure the battery to the palm-rest assembly. 4 Connect the battery cable to...
Service Manual
Page 13
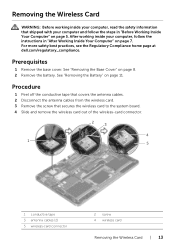
... battery. Procedure 1 Peel off the conductive tape that covers the antenna cables. 2 Disconnect the antenna cables from the wireless card. 3 Remove the screw that shipped with your computer and follow the instructions in "Before Working Inside Your Computer" on page 5. Removing the Wireless Card WARNING: Before working inside your computer, read the safety information that secures the wireless card to the system board. 4 Slide and remove the wireless card...
... battery. Procedure 1 Peel off the conductive tape that covers the antenna cables. 2 Disconnect the antenna cables from the wireless card. 3 Remove the screw that shipped with your computer and follow the instructions in "Before Working Inside Your Computer" on page 5. Removing the Wireless Card WARNING: Before working inside your computer, read the safety information that secures the wireless card to the system board. 4 Slide and remove the wireless card...
Service Manual
Page 14
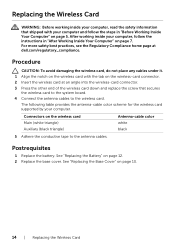
... wireless card with your computer and follow the instructions in "Before Working Inside Your Computer" on page 10. 14 | Replacing the Wireless Card Connectors on the wireless-card connector. 2 Insert the wireless card at dell.com/regulatory_compliance. See "Replacing the Base Cover" on page 5. Postrequisites 1 Replace the battery. Replacing the Wireless Card WARNING: Before working inside your computer, read the safety information that secures the wireless card to the system board. 4 Connect the antenna cables...
... wireless card with your computer and follow the instructions in "Before Working Inside Your Computer" on page 10. 14 | Replacing the Wireless Card Connectors on the wireless-card connector. 2 Insert the wireless card at dell.com/regulatory_compliance. See "Replacing the Base Cover" on page 5. Postrequisites 1 Replace the battery. Replacing the Wireless Card WARNING: Before working inside your computer, read the safety information that secures the wireless card to the system board. 4 Connect the antenna cables...
Service Manual
Page 15
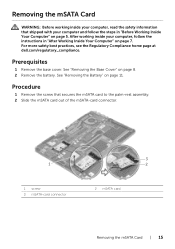
... Card WARNING: Before working inside your computer and follow the instructions in "Before Working Inside Your Computer" on page 11. After working inside your computer, follow the steps in "After Working Inside Your Computer" on page 8. 2 Remove the battery. See "Removing the Base Cover" on page 7. For more safety best practices, see the Regulatory Compliance home page at dell.com/regulatory_compliance. Procedure 1 Remove...
... Card WARNING: Before working inside your computer and follow the instructions in "Before Working Inside Your Computer" on page 11. After working inside your computer, follow the steps in "After Working Inside Your Computer" on page 8. 2 Remove the battery. See "Removing the Base Cover" on page 7. For more safety best practices, see the Regulatory Compliance home page at dell.com/regulatory_compliance. Procedure 1 Remove...

Service Manual
Page 17
... "Removing the Base Cover" on page 11. Removing the Fan WARNING: Before working inside your computer, read the safety information that secure the fan to the palm-rest assembly. 3 Lift the fan, along with your computer and follow the instructions in "Before Working Inside Your Computer" on page 7. Procedure 1 Lift the connector latch and disconnect the fan cable from the system board. 2 Remove the...
... "Removing the Base Cover" on page 11. Removing the Fan WARNING: Before working inside your computer, read the safety information that secure the fan to the palm-rest assembly. 3 Lift the fan, along with your computer and follow the instructions in "Before Working Inside Your Computer" on page 7. Procedure 1 Lift the connector latch and disconnect the fan cable from the system board. 2 Remove the...

Service Manual
Page 18
... information that secure the fan to secure the cable. After working inside your computer and follow the instructions in "Before Working Inside Your Computer" on the connector latch to the palm-rest assembly. 3 Slide the fan cable into the system-board connector and press down on page 5. See "Replacing the Base Cover" on page 12. 2 Replace the base cover. Procedure 1 Align the...
... information that secure the fan to secure the cable. After working inside your computer and follow the instructions in "Before Working Inside Your Computer" on the connector latch to the palm-rest assembly. 3 Slide the fan cable into the system-board connector and press down on page 5. See "Replacing the Base Cover" on page 12. 2 Replace the base cover. Procedure 1 Align the...

Service Manual
Page 19
... your computer and follow the instructions in "Before Working Inside Your Computer" on page 5. See "Removing the Base Cover" on page 11. Procedure 1 Carefully rotate the palm-rest assembly to an angle of 180 degrees. 1 2 1 palm-rest assembly 2 display assembly Removing the Display Assembly | 19 See "Removing the Battery" on page 8. 2 Remove the battery. Removing the Display Assembly WARNING: Before working inside your computer, read...
... your computer and follow the instructions in "Before Working Inside Your Computer" on page 5. See "Removing the Base Cover" on page 11. Procedure 1 Carefully rotate the palm-rest assembly to an angle of 180 degrees. 1 2 1 palm-rest assembly 2 display assembly Removing the Display Assembly | 19 See "Removing the Battery" on page 8. 2 Remove the battery. Removing the Display Assembly WARNING: Before working inside your computer, read...

Service Manual
Page 23
... board. 5 Connect the antenna cables to the wireless card. 6 Adhere the conductive and Mylar tapes to the antenna cables. 7 Turn the computer over. 8 Rotate the palm-rest assembly to an angle of 180 degrees. See "Replacing the Base Cover" on page 5. After working inside your computer and follow the instructions in "Before Working Inside Your Computer" on page 10. Postrequisites 1 Replace the battery. See "Replacing...
... board. 5 Connect the antenna cables to the wireless card. 6 Adhere the conductive and Mylar tapes to the antenna cables. 7 Turn the computer over. 8 Rotate the palm-rest assembly to an angle of 180 degrees. See "Replacing the Base Cover" on page 5. After working inside your computer and follow the instructions in "Before Working Inside Your Computer" on page 10. Postrequisites 1 Replace the battery. See "Replacing...
Service Manual
Page 25
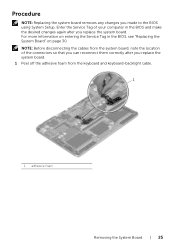
... system board, note the location of your computer in the BIOS, see "Replacing the System Board" on entering the Service Tag in the BIOS and make the desired changes again after you made to the BIOS using System Setup. Procedure NOTE: Replacing the system board removes any changes you replace the system board. For more information on page 30. NOTE: Before disconnecting the cables from the keyboard and keyboard-backlight cable. 1 1 adhesive foam Removing...
... system board, note the location of your computer in the BIOS, see "Replacing the System Board" on entering the Service Tag in the BIOS and make the desired changes again after you made to the BIOS using System Setup. Procedure NOTE: Replacing the system board removes any changes you replace the system board. For more information on page 30. NOTE: Before disconnecting the cables from the keyboard and keyboard-backlight cable. 1 1 adhesive foam Removing...
Service Manual
Page 30
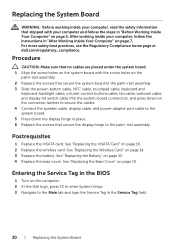
... "Replacing the Battery" on page 16. 2 Replace the wireless card. For more safety best practices, see the Regulatory Compliance home page at dell.com/regulatory_compliance. Replacing the System Board WARNING: Before working inside your computer, read the safety information that secure the system board to the palm-rest assembly. 3 Slide the power-button cable, NFC cable, touchpad cable, keyboard and keyboard-backlight cable, volume-control buttons cable, fan cable, webcam cable, and display-lid switch cable into the system-board connectors...
... "Replacing the Battery" on page 16. 2 Replace the wireless card. For more safety best practices, see the Regulatory Compliance home page at dell.com/regulatory_compliance. Replacing the System Board WARNING: Before working inside your computer, read the safety information that secure the system board to the palm-rest assembly. 3 Slide the power-button cable, NFC cable, touchpad cable, keyboard and keyboard-backlight cable, volume-control buttons cable, fan cable, webcam cable, and display-lid switch cable into the system-board connectors...
Service Manual
Page 34
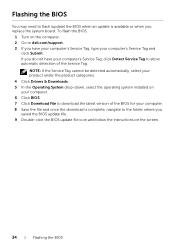
... under the product categories. 4 Click Drivers & Downloads. 5 In the Operating System drop-down, select the operating system installed on the screen. 34 | Flashing the BIOS To flash the BIOS: 1 Turn on the computer. 2 Go to dell.com/support. 3 If you do not have your computer's Service Tag, type your computer's Service Tag, click Detect Service Tag to allow automatic detection of the BIOS for your computer. 8 Save the...
... under the product categories. 4 Click Drivers & Downloads. 5 In the Operating System drop-down, select the operating system installed on the screen. 34 | Flashing the BIOS To flash the BIOS: 1 Turn on the computer. 2 Go to dell.com/support. 3 If you do not have your computer's Service Tag, type your computer's Service Tag, click Detect Service Tag to allow automatic detection of the BIOS for your computer. 8 Save the...

Specifications
Page 2
Ports and Connectors External: USB HDMI Audio Internal: NGFF Mini Card Two USB 3.0 ports with PowerShare One HDMI port One headphone and microphone combo (headset) port One Next Generation Form Factor (NGFF) slot for WLAN, Bluetooth, and Wireless Display (WiDi) combo card One mSATA Mini Card slot System Information Computer model Processor Chipset XPS 9P33 • Intel Core i3 (4th generation) • Intel Core i5 (4th generation) Integrated in (201 mm) 2.75 lb (1.25...
Ports and Connectors External: USB HDMI Audio Internal: NGFF Mini Card Two USB 3.0 ports with PowerShare One HDMI port One headphone and microphone combo (headset) port One Next Generation Form Factor (NGFF) slot for WLAN, Bluetooth, and Wireless Display (WiDi) combo card One mSATA Mini Card slot System Information Computer model Processor Chipset XPS 9P33 • Intel Core i3 (4th generation) • Intel Core i5 (4th generation) Integrated in (201 mm) 2.75 lb (1.25...

Specifications
Page 3
...-Fi 802.11 ac • Bluetooth 4.0 with Ultra High Speed (UHS) Media-Card Reader Type Cards supported One 3-in-1 slot • SD card • SD High-Capacity (SDHC) card • SD Input Output (SDIO) card • SD Extended Capacity (SDXC) card with Enhanced Data Rate (EDR) • Near Field Communication (NFC) • Wireless Display (WiDi) 3.0 Video and Audio Video: Controller External display support External display resolution (maximum): HDMI WiDi Audio: Controller Speakers Speaker output: Average Peak Microphone Volume controls Intel...
...-Fi 802.11 ac • Bluetooth 4.0 with Ultra High Speed (UHS) Media-Card Reader Type Cards supported One 3-in-1 slot • SD card • SD High-Capacity (SDHC) card • SD Input Output (SDIO) card • SD Extended Capacity (SDXC) card with Enhanced Data Rate (EDR) • Near Field Communication (NFC) • Wireless Display (WiDi) 3.0 Video and Audio Video: Controller External display support External display resolution (maximum): HDMI WiDi Audio: Controller Speakers Speaker output: Average Peak Microphone Volume controls Intel...

Specifications
Page 4
... in standby or connected standby mode and running on battery • Computer is in standby or connected standby mode and battery is not being charged Storage Interface Solid state drives mSATA SATA 6 Gbps One Solid-state drive (SSD) with Intel Smart Cache support One mSATA Mini Card Display Type Resolution (maximum) Dimensions: Height Width Diagonal Refresh rate Operating angle Pixel pitch Controls 11.6-inches WQHD touchscreen...
... in standby or connected standby mode and running on battery • Computer is in standby or connected standby mode and battery is not being charged Storage Interface Solid state drives mSATA SATA 6 Gbps One Solid-state drive (SSD) with Intel Smart Cache support One mSATA Mini Card Display Type Resolution (maximum) Dimensions: Height Width Diagonal Refresh rate Operating angle Pixel pitch Controls 11.6-inches WQHD touchscreen...

Specifications
Page 5
... the desired key. Keyboard Type Shortcut keys Camera Resolution: Still image Video (maximum) Diagonal viewing angle Touchpad Resolution: Horizontal Vertical Dimensions: Width Height Backlit touch matrix keyboard Some keys on your keyboard have two symbols on them. To type alternate characters, press Shift and the desired key. Two symbols indicate that the key can define the primary behavior of the shortcut keys by changing the Function Key Behavior in...
... the desired key. Keyboard Type Shortcut keys Camera Resolution: Still image Video (maximum) Diagonal viewing angle Touchpad Resolution: Horizontal Vertical Dimensions: Width Height Backlit touch matrix keyboard Some keys on your keyboard have two symbols on them. To type alternate characters, press Shift and the desired key. Two symbols indicate that the key can define the primary behavior of the shortcut keys by changing the Function Key Behavior in...


