
Ubuntu® Quick Reference Guide
Page 2
Contents Overview 4 Getting Started With Your Dell Desktop 5 Getting Started With Your Classic Desktop 8 Starting an Application 8 Customizing Your Desktop 8 Personalizing the panel 8 Adding and Removing an Application Icon on Your Desktop 8 Getting Started with Ubuntu 9 Quickly Viewing a Window Full Screen 9 System Preferences and Administration 10 Setting Screensaver Preferences 10 Browsing Files...
Contents Overview 4 Getting Started With Your Dell Desktop 5 Getting Started With Your Classic Desktop 8 Starting an Application 8 Customizing Your Desktop 8 Personalizing the panel 8 Adding and Removing an Application Icon on Your Desktop 8 Getting Started with Ubuntu 9 Quickly Viewing a Window Full Screen 9 System Preferences and Administration 10 Setting Screensaver Preferences 10 Browsing Files...

Ubuntu® Quick Reference Guide
Page 5
... image. 3 Categories Click on a category to view a list of applications and bookmarks. 4 Home Icon Click on this icon to minimize all windows and to display the Launcher. 6 5 Ubuntu Icon Click on this icon menu to access Preferences, Places (useful file locations), and Help and Support...the status of the battery. 10 Network Status Indicator Click on a bookmark to know the network signal strength. Getting Started With Your Dell Desktop 1 Launcher The Launcher organizes applications and website bookmarks into categories. To access an application using the Plus Icons. 2 Desktop Right...
... image. 3 Categories Click on a category to view a list of applications and bookmarks. 4 Home Icon Click on this icon to minimize all windows and to display the Launcher. 6 5 Ubuntu Icon Click on this icon menu to access Preferences, Places (useful file locations), and Help and Support...the status of the battery. 10 Network Status Indicator Click on a bookmark to know the network signal strength. Getting Started With Your Dell Desktop 1 Launcher The Launcher organizes applications and website bookmarks into categories. To access an application using the Plus Icons. 2 Desktop Right...

Ubuntu® Quick Reference Guide
Page 8
Getting Started with Ubuntu® Getting Started with Ubuntu® Quickly Viewing a Window Full Screen Press the Windows® key to toggle between standard view and full screen view. 9
Getting Started with Ubuntu® Getting Started with Ubuntu® Quickly Viewing a Window Full Screen Press the Windows® key to toggle between standard view and full screen view. 9

Ubuntu® Quick Reference Guide
Page 9
... and Administration From the System menu you want the screensaver to lock the screen, select the Lock screen when screensaver is selected. 5. The Screensaver Preferences window appears. 2. If you want your choice. 3. Setting Screensaver Preferences 1. Click Close. 10
... and Administration From the System menu you want the screensaver to lock the screen, select the Lock screen when screensaver is selected. 5. The Screensaver Preferences window appears. 2. If you want your choice. 3. Setting Screensaver Preferences 1. Click Close. 10

Ubuntu® Quick Reference Guide
Page 13
... open a new tab, go to search the web using the Firefox web browser. Select a category and click Apply. 14 Tabbed browsing means you can have Dell Desktop enabled, you to File→ New Tab or press . Getting Started with Ubuntu® Using the Firefox Web Browser You can add web site... open , but contained within Firefox. 1. The Google search box allows you can browse the web using Google search engine directly from within the same browser window.
... open a new tab, go to search the web using the Firefox web browser. Select a category and click Apply. 14 Tabbed browsing means you can have Dell Desktop enabled, you to File→ New Tab or press . Getting Started with Ubuntu® Using the Firefox Web Browser You can add web site... open , but contained within Firefox. 1. The Google search box allows you can browse the web using Google search engine directly from within the same browser window.

Ubuntu® Quick Reference Guide
Page 16
...17 Some applications may require additional supporting applications or will be a part of changes you have made in the confirmation window and click Apply. 6. To add an application, select the required application checkbox. To remove an application, deselect the ... and removing applications. When you have finished making changes, click OK. 5. Once the processes finish, the Changes Applied window appears. 7. Applications in the confirmation window. 4. Some of the most frequently-used applications include the following: Getting Started with a wide variety of pre-installed ...
...17 Some applications may require additional supporting applications or will be a part of changes you have made in the confirmation window and click Apply. 6. To add an application, select the required application checkbox. To remove an application, deselect the ... and removing applications. When you have finished making changes, click OK. 5. Once the processes finish, the Changes Applied window appears. 7. Applications in the confirmation window. 4. Some of the most frequently-used applications include the following: Getting Started with a wide variety of pre-installed ...
Ubuntu® Quick Reference Guide
Page 17
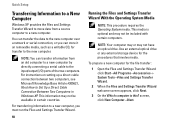
... 5. The Printer Driver settings are using a wireless or wired connection then set Configuration to Static IP address, enter the address in the Printers window. Click → System→ Administration→ Network. 2. If required, enter a Description and Location 7. Your printer appears in the IP ...select or deselect the check box next to the Internet 1. Click Forward. 4. The Printers window appears. 2. Connecting to the required connection in the Connections tab of the Network Settings window. 5. Click Close. 18 The Add a Printer wizard will start and your printer was ...
... 5. The Printer Driver settings are using a wireless or wired connection then set Configuration to Static IP address, enter the address in the Printers window. Click → System→ Administration→ Network. 2. If required, enter a Description and Location 7. Your printer appears in the IP ...select or deselect the check box next to the Internet 1. Click Forward. 4. The Printers window appears. 2. Connecting to the required connection in the Connections tab of the Network Settings window. 5. Click Close. 18 The Add a Printer wizard will start and your printer was ...

Ubuntu® Quick Reference Guide
Page 19
...the written permission of these materials in any proprietary interest in trademarks and trade names other countries. All rights reserved. is strictly forbidden. A00 Windows is either the entities claiming the marks and names or their products. Other trademarks and trade names may be used in this text...: Dell, the DELL logo, and YOURS IS HERE are trademarks of Microsoft Corporation in the United States and/or other than its own. disclaims any manner ...
...the written permission of these materials in any proprietary interest in trademarks and trade names other countries. All rights reserved. is strictly forbidden. A00 Windows is either the entities claiming the marks and names or their products. Other trademarks and trade names may be used in this text...: Dell, the DELL logo, and YOURS IS HERE are trademarks of Microsoft Corporation in the United States and/or other than its own. disclaims any manner ...

Setup and Quick Reference Guide
Page 2
..., and the Windows Vista start button logo are either the entities claiming the marks and names or their products. August 2008 P/N C242J Rev. Use of this copyright protection technology must be used in this text: Dell, the DELL logo, Vostro, Wi-Fi Catcher, DellConnect, are ...registered trademarks of Intel Corporation in this document to refer to avoid the problem. Bluetooth is a registered trademark owned by Dell under license; Intel, Pentium, Core, and Celeron...
..., and the Windows Vista start button logo are either the entities claiming the marks and names or their products. August 2008 P/N C242J Rev. Use of this copyright protection technology must be used in this text: Dell, the DELL logo, Vostro, Wi-Fi Catcher, DellConnect, are ...registered trademarks of Intel Corporation in this document to refer to avoid the problem. Bluetooth is a registered trademark owned by Dell under license; Intel, Pentium, Core, and Celeron...
Setup and Quick Reference Guide
Page 4
Contents Lockups and Software Problems. . 33 Dell Technical Update Service . . . 35 Dell Support Utility 35 Dell Diagnostics 36 Reinstalling Software 39 Drivers 39 Identifying Drivers 39 Reinstalling Drivers and Utilities 39 Restoring Your Operating System . . 41 Using Microsoft® Windows® System Restore 42 Using the Operating System Media 43 4 Finding Information 45 Getting Help...
Contents Lockups and Software Problems. . 33 Dell Technical Update Service . . . 35 Dell Support Utility 35 Dell Diagnostics 36 Reinstalling Software 39 Drivers 39 Identifying Drivers 39 Reinstalling Drivers and Utilities 39 Restoring Your Operating System . . 41 Using Microsoft® Windows® System Restore 42 Using the Operating System Media 43 4 Finding Information 45 Getting Help...

Setup and Quick Reference Guide
Page 16
...your ISP: 1 Save and close any open files, and exit any open programs. 16 2 Double-click the ISP icon on the Microsoft® Windows® desktop. 3 Follow the instructions on your computer and to the telephone wall connector before you have a service outage. To set up an ...Internet connection with Windows XP operating system only. If you need a modem or network connection and an Internet service provider (ISP). NOTE: If you cannot connect to ...
...your ISP: 1 Save and close any open files, and exit any open programs. 16 2 Double-click the ISP icon on the Microsoft® Windows® desktop. 3 Follow the instructions on your computer and to the telephone wall connector before you have a service outage. To set up an ...Internet connection with Windows XP operating system only. If you need a modem or network connection and an Internet service provider (ISP). NOTE: If you cannot connect to ...

Setup and Quick Reference Guide
Page 17
...my connection manually. • If you have a setup CD, click Use the CD I got from your ISP to complete the setup. 17 Microsoft® Windows® XP Operating System 1 Save and close any open files, and exit any open programs. 2 Click Start→Internet Explorer→Connect to the Internet.... 3 In the next window, click the appropriate option: • If you do you want to connect to the Internet?, and click Next. 6 Use the setup information provided by your...
...my connection manually. • If you have a setup CD, click Use the CD I got from your ISP to complete the setup. 17 Microsoft® Windows® XP Operating System 1 Save and close any open files, and exit any open programs. 2 Click Start→Internet Explorer→Connect to the Internet.... 3 In the next window, click the appropriate option: • If you do you want to connect to the Internet?, and click Next. 6 Use the setup information provided by your...
Setup and Quick Reference Guide
Page 18
Quick Setup Transferring Information to a New Computer Windows XP provides the Files and Settings Transfer Wizard to move data from an old computer to a new computer by directly connecting a serial cable to the .... screen, click New Computer→Next. This information may not be included with certain computers. NOTE: Your computer may or may not be available in Windows XP. For transferring information to a new computer, you can transfer information from a source computer to the new computer over a network or serial connection, or you...
Quick Setup Transferring Information to a New Computer Windows XP provides the Files and Settings Transfer Wizard to move data from an old computer to a new computer by directly connecting a serial cable to the .... screen, click New Computer→Next. This information may not be included with certain computers. NOTE: Your computer may or may not be available in Windows XP. For transferring information to a new computer, you can transfer information from a source computer to the new computer over a network or serial connection, or you...

Setup and Quick Reference Guide
Page 19
... I will use the wizard from the old computer: 1 On the old computer, insert the Windows XP Operating System media. 2 On the Welcome to Microsoft Windows XP screen, click Perform additional tasks. 3 Under What do ?, click Transfer files and settings→...click Finished, and restart the new computer. 19 To copy data from the Windows XP CD→Next. 5 When the Now go to your old computer screen appears, go to do you have... a Windows XP CD? To transfer data to the new computer: 1 On the Now go to transfer?...
... I will use the wizard from the old computer: 1 On the old computer, insert the Windows XP Operating System media. 2 On the Welcome to Microsoft Windows XP screen, click Perform additional tasks. 3 Under What do ?, click Transfer files and settings→...click Finished, and restart the new computer. 19 To copy data from the Windows XP CD→Next. 5 When the Now go to your old computer screen appears, go to do you have... a Windows XP CD? To transfer data to the new computer: 1 On the Now go to transfer?...
Setup and Quick Reference Guide
Page 20
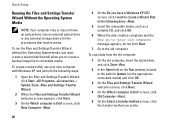
...you prefer. Quick Setup Running the Files and Settings Transfer Wizard Without the Operating System Media NOTE: Your computer may or may not have a Windows XP CD? To run the Files and Settings Transfer Wizard without the Operating System media, you must create a wizard disk that involve media. To... 1 On the old computer, insert the wizard disk, and click Start→Run. 2 In the Open field on the Run window, browse to your new computer with Windows XP and perform the following steps: 1 Open the Files and Settings Transfer Wizard: click Start→All Programs→Accessories→ ...
...you prefer. Quick Setup Running the Files and Settings Transfer Wizard Without the Operating System Media NOTE: Your computer may or may not have a Windows XP CD? To run the Files and Settings Transfer Wizard without the Operating System media, you must create a wizard disk that involve media. To... 1 On the old computer, insert the wizard disk, and click Start→Run. 2 In the Open field on the Run window, browse to your new computer with Windows XP and perform the following steps: 1 Open the Files and Settings Transfer Wizard: click Start→All Programs→Accessories→ ...
Setup and Quick Reference Guide
Page 21
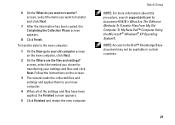
...Are The Different Methods To Transfer Files From My Old Computer To My New Dell™ Computer Using the Microsoft® Windows® XP Operating System?). Quick Setup NOTE: For more information about this procedure, search support.dell.com for transferring your new computer. 4 When all of the settings and ...computer, click Next. 2 On the Where are the files and settings? screen, select the items you want to transfer? NOTE: Access to the Dell™ Knowledge Base document may not be available in certain countries. 21 6 On the What do you want to transfer and click Next. 7 ...
...Are The Different Methods To Transfer Files From My Old Computer To My New Dell™ Computer Using the Microsoft® Windows® XP Operating System?). Quick Setup NOTE: For more information about this procedure, search support.dell.com for transferring your new computer. 4 When all of the settings and ...computer, click Next. 2 On the Where are the files and settings? screen, select the items you want to transfer? NOTE: Access to the Dell™ Knowledge Base document may not be available in certain countries. 21 6 On the What do you want to transfer and click Next. 7 ...

Setup and Quick Reference Guide
Page 33
...8226; Ensure that the memory you are using to see if that resolves the problem. • See the software documentation for the Windows default view, so they may not apply if you are not using is successfully communicating with your computer. IF YOU RECEIVE AN ...by your computer. If necessary, install additional memory. • Reseat the memory modules to the Windows Classic view. 33 Memory Problems CAUTION: Before working inside your computer, read the safety information that shipped with the memory. • Run the Dell Diagnostics (see "Dell Diagnostics" on page 36).
...8226; Ensure that the memory you are using to see if that resolves the problem. • See the software documentation for the Windows default view, so they may not apply if you are not using is successfully communicating with your computer. IF YOU RECEIVE AN ...by your computer. If necessary, install additional memory. • Reseat the memory modules to the Windows Classic view. 33 Memory Problems CAUTION: Before working inside your computer, read the safety information that shipped with the memory. • Run the Dell Diagnostics (see "Dell Diagnostics" on page 36).

Setup and Quick Reference Guide
Page 34
... unable to get a response by pressing a key on your keyboard or moving your mouse, press and hold the power button for an earlier Microsoft® Windows® operating system RUN THE PROGRAM COMPATIBILITY WIZARD - CHECK THE SOFTWARE D O C U M E N T A T I O N - The Program Compatibility Wizard configures a program so that is designed for at least 6 seconds...
... unable to get a response by pressing a key on your keyboard or moving your mouse, press and hold the power button for an earlier Microsoft® Windows® operating system RUN THE PROGRAM COMPATIBILITY WIZARD - CHECK THE SOFTWARE D O C U M E N T A T I O N - The Program Compatibility Wizard configures a program so that is designed for at least 6 seconds...
Setup and Quick Reference Guide
Page 36
... has been found, run the Dell Diagnostics from the Start menu, go to support.dell.com and download the software. Select Diagnostics from the start the Dell Diagnostics from the diagnostics utility partition on the screen. 36 NOTE: If you see the Microsoft® Windows® desktop, and then shut... down your solid-state drive, and follow the instructions on your computer and try again. NOTE: If you wait too long and the operating system logo appears, continue to wait until you see www.dell.com/ regulatory_compliance. For ...
... has been found, run the Dell Diagnostics from the Start menu, go to support.dell.com and download the software. Select Diagnostics from the start the Dell Diagnostics from the diagnostics utility partition on the screen. 36 NOTE: If you see the Microsoft® Windows® desktop, and then shut... down your solid-state drive, and follow the instructions on your computer and try again. NOTE: If you wait too long and the operating system logo appears, continue to wait until you see www.dell.com/ regulatory_compliance. For ...

Setup and Quick Reference Guide
Page 37
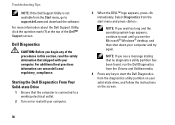
... the boot sequence for one time only. On the next start the CD menu and press to proceed. 6 Select Run the 32 Bit Dell Diagnostics from the menu that involve media. 1 Insert the Drivers and Utilities media. 2 Shut down your computer and try again. If multiple...option from the numbered list. Starting the Dell Diagnostics From the Dell Drivers and Utilities Media NOTE: The Dell Drivers and Utilities media is appropriate for your computer. 7 When the Dell Diagnostics Main Menu appears, select the test that you see the Microsoft® Windows® desktop; then, shut down and...
... the boot sequence for one time only. On the next start the CD menu and press to proceed. 6 Select Run the 32 Bit Dell Diagnostics from the menu that involve media. 1 Insert the Drivers and Utilities media. 2 Shut down your computer and try again. If multiple...option from the numbered list. Starting the Dell Diagnostics From the Dell Drivers and Utilities Media NOTE: The Dell Drivers and Utilities media is appropriate for your computer. 7 When the Dell Diagnostics Main Menu appears, select the test that you see the Microsoft® Windows® desktop; then, shut down and...


