Re-imaging guide for Windows
Page 3
...6 Chapter 4: Updating or resetting the BIOS 7 Updating the BIOS in Windows...7 Clearing CMOS settings...7 Trusted Platform Module (TPM) security...7 Chapter 5: Reinstalling the operating system 8 Chapter 6: Reinstalling drivers and applications 9 Displaying drivers and applications on your computer 9 Chapter 7: Reinstallation sequence for drivers and applications 10 AMD chipset device software...10 Downloading and installing the chipset driver...10 Critical Microsoft Knowledge Base (KB) updates...10 Media-card reader driver...10 Downloading and installing the media-card reader driver 11...
...6 Chapter 4: Updating or resetting the BIOS 7 Updating the BIOS in Windows...7 Clearing CMOS settings...7 Trusted Platform Module (TPM) security...7 Chapter 5: Reinstalling the operating system 8 Chapter 6: Reinstalling drivers and applications 9 Displaying drivers and applications on your computer 9 Chapter 7: Reinstallation sequence for drivers and applications 10 AMD chipset device software...10 Downloading and installing the chipset driver...10 Critical Microsoft Knowledge Base (KB) updates...10 Media-card reader driver...10 Downloading and installing the media-card reader driver 11...
Re-imaging guide for Windows
Page 4
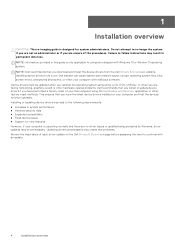
... or if you are facing networking, graphics, sound or other hardware-related problems. Dell recommends that you install or update device drivers if you have the latest device drivers installed on the Dell Drivers & Downloads page before assessing the need to follow instructions may result in this guide is operating normally and there are no driver issues or updates being prompted by Windows, driver updates may create new problems. Review the importance of the procedures. Device drivers must be unnecessary.
... or if you are facing networking, graphics, sound or other hardware-related problems. Dell recommends that you install or update device drivers if you have the latest device drivers installed on the Dell Drivers & Downloads page before assessing the need to follow instructions may result in this guide is operating normally and there are no driver issues or updates being prompted by Windows, driver updates may create new problems. Review the importance of the procedures. Device drivers must be unnecessary.
Re-imaging guide for Windows
Page 6
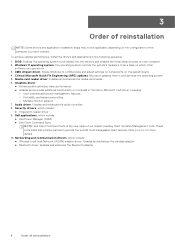
...: ● Dell Power Manager (DPM) ● Dell Client Command Suite NOTE: Dell Client Command Suite is the new name of reinstallation Media-card reader driver: Enables and enhances the media-card reader. 6. Click on the configuration of the computer you have ordered. BIOS: Enables the operating system to communicate and adjust settings on components on . 3. Security drivers, which include: ● Wireless Local Area Network (WLAN) adapter driver: Enables and enhances the wireless adapter. ● Bluetooth driver: Enables and enhances the Bluetooth adapter. 6 Order of our...
...: ● Dell Power Manager (DPM) ● Dell Client Command Suite NOTE: Dell Client Command Suite is the new name of reinstallation Media-card reader driver: Enables and enhances the media-card reader. 6. Click on the configuration of the computer you have ordered. BIOS: Enables the operating system to communicate and adjust settings on components on . 3. Security drivers, which include: ● Wireless Local Area Network (WLAN) adapter driver: Enables and enhances the wireless adapter. ● Bluetooth driver: Enables and enhances the Bluetooth adapter. 6 Order of our...

Re-imaging guide for Windows
Page 7
... Dell logo is displayed. 3. In the Search support field, enter the Service Tag/Serial Number/Service Request/Model/Keyword of BIOS, and click Download to manually browse for your computer. 3. 4 Updating or resetting the BIOS Updating the BIOS in your computer, and then click Search. Clearing the CMOS settings will not enable the TPM during POST and it can also click Browse all products to download the BIOS file for your computer. 7. Turn on -screen instructions...
... Dell logo is displayed. 3. In the Search support field, enter the Service Tag/Serial Number/Service Request/Model/Keyword of BIOS, and click Download to manually browse for your computer. 3. 4 Updating or resetting the BIOS Updating the BIOS in your computer, and then click Search. Clearing the CMOS settings will not enable the TPM during POST and it can also click Browse all products to download the BIOS file for your computer. 7. Turn on -screen instructions...

Re-imaging guide for Windows
Page 9
... on your computer. 2. Turn on your computer 1. 6 Reinstalling drivers and applications Drivers and applications are software that enables Windows to manually browse for your computer. 4. Windows includes drivers for most devices, but device-specific drivers may have the Service Tag/Serial Number/Service Request/Model/Keyword, use the SupportAssist feature to adjust hardware settings. Applications must be downloaded and installed separately. Devices such as video and sound cards require drivers to function correctly within Windows, and enable users to automatically identify your...
... on your computer. 2. Turn on your computer 1. 6 Reinstalling drivers and applications Drivers and applications are software that enables Windows to manually browse for your computer. 4. Windows includes drivers for most devices, but device-specific drivers may have the Service Tag/Serial Number/Service Request/Model/Keyword, use the SupportAssist feature to adjust hardware settings. Applications must be downloaded and installed separately. Devices such as video and sound cards require drivers to function correctly within Windows, and enable users to automatically identify your...
Re-imaging guide for Windows
Page 10
... the instructions on Dell's support site www.dell.com/support. Install the Realtek driver that is available for download from the Microsoft support site. Turn on your computer, and then click Submit. In some scenarios, you are enabled and can install webcam software available from the latest Windows Service Pack. no additional webcam-driver installation is required. The AMD chipset device software is available on the screen. Service packs are automatically downloaded and installed when Windows Updates...
... the instructions on Dell's support site www.dell.com/support. Install the Realtek driver that is available for download from the Microsoft support site. Turn on your computer, and then click Submit. In some scenarios, you are enabled and can install webcam software available from the latest Windows Service Pack. no additional webcam-driver installation is required. The AMD chipset device software is available on the screen. Service packs are automatically downloaded and installed when Windows Updates...
Re-imaging guide for Windows
Page 12
..., use the SupportAssist feature to manually browse for your computer. NOTE: If you to control processor and cooling fan settings to manually browse for Dell computers. Turn on your computer, and then click Search. In the Search support field, enter the Service Tag/Serial Number/Service Request/Model/Keyword of alerts. ● Group policies-You can easily apply default settings and/or prevent users from changing power alerts system events, power management...
..., use the SupportAssist feature to manually browse for your computer. NOTE: If you to control processor and cooling fan settings to manually browse for Dell computers. Turn on your computer, and then click Search. In the Search support field, enter the Service Tag/Serial Number/Service Request/Model/Keyword of alerts. ● Group policies-You can easily apply default settings and/or prevent users from changing power alerts system events, power management...

Re-imaging guide for Windows
Page 13
... obtain wireless network functionality, install the relevant WLAN drivers from the Dell support site. Downloading and installing the Wi-Fi driver 1. D6000 The Dell Universal Dock - D6000, see www.dell.com/support. Click Download to the latest versions available on the screen. 7. Connecting the computer to the docking station enables you do not have the Service Tag/Serial Number/Service Request/Model/Keyword, use the SupportAssist feature to the computer. Turn on the screen. Double...
... obtain wireless network functionality, install the relevant WLAN drivers from the Dell support site. Downloading and installing the Wi-Fi driver 1. D6000 The Dell Universal Dock - D6000, see www.dell.com/support. Click Download to the latest versions available on the screen. 7. Connecting the computer to the docking station enables you do not have the Service Tag/Serial Number/Service Request/Model/Keyword, use the SupportAssist feature to the computer. Turn on the screen. Double...

Service Manual
Page 3
... service kit ...8 Transporting sensitive components...9 After working inside your computer...9 Chapter 2: Removing and installing components 10 Recommended tools...10 Screw list...10 Major components of Vostro 5625...11 Base cover...13 Removing the base cover...13 Installing the base cover...15 Battery...17 Lithium-ion battery precautions...17 Removing the 3-cell battery...18 Installing the 3-cell battery...18 Removing the 4-cell battery...19 Installing the 4-cell battery...20 Memory modules...21 Removing the memory module...21 Installing the memory module...
... service kit ...8 Transporting sensitive components...9 After working inside your computer...9 Chapter 2: Removing and installing components 10 Recommended tools...10 Screw list...10 Major components of Vostro 5625...11 Base cover...13 Removing the base cover...13 Installing the base cover...15 Battery...17 Lithium-ion battery precautions...17 Removing the 3-cell battery...18 Installing the 3-cell battery...18 Removing the 4-cell battery...19 Installing the 4-cell battery...20 Memory modules...21 Removing the memory module...21 Installing the memory module...

Service Manual
Page 4
...board...50 Power button with optional fingerprint reader...52 Removing the power button with optional fingerprint reader 52 Installing the power button with optional fingerprint reader 53 Power-adapter port...54 Removing the power-adapter port...54 Installing the power-adapter port...54 Palm-rest and keyboard assembly...55 Removing the palm-rest and keyboard assembly 55 Installing the palm-rest and keyboard assembly 56 Chapter 3: Drivers and downloads 58 Chapter 4: BIOS setup...59 BIOS overview...59 Entering BIOS setup program...59 Navigation keys...59 One time boot menu...60 System setup...
...board...50 Power button with optional fingerprint reader...52 Removing the power button with optional fingerprint reader 52 Installing the power button with optional fingerprint reader 53 Power-adapter port...54 Removing the power-adapter port...54 Installing the power-adapter port...54 Palm-rest and keyboard assembly...55 Removing the palm-rest and keyboard assembly 55 Installing the palm-rest and keyboard assembly 56 Chapter 3: Drivers and downloads 58 Chapter 4: BIOS setup...59 BIOS overview...59 Entering BIOS setup program...59 Navigation keys...59 One time boot menu...60 System setup...

Service Manual
Page 7
... removing any installation or break/fix procedures involving disassembly or reassembly: ● Turn off . CAUTION: To disconnect a network cable, first unplug the cable from your computer and then unplug the cable from your computer. Safety precautions The safety precautions chapter details the primary steps to be taken before performing any media card and optical disc from AC power. ● Disconnect all attached network devices and...
... removing any installation or break/fix procedures involving disassembly or reassembly: ● Turn off . CAUTION: To disconnect a network cable, first unplug the cable from your computer and then unplug the cable from your computer. Safety precautions The safety precautions chapter details the primary steps to be taken before performing any media card and optical disc from AC power. ● Disconnect all attached network devices and...
Service Manual
Page 17
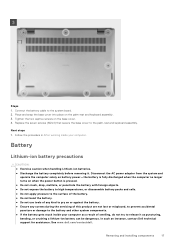
Replace the seven screws (M2x4) that secure the base cover to the system board. 2. Follow the procedure in After working inside your computer. In such an instance, contact Dell technical support for assistance. Removing and installing components 17 See www.dell.com/contactdell. Battery Lithium-ion battery precautions CAUTION: ● Exercise caution when handling Lithium-ion batteries. ● Discharge the battery completely before removing it...
Replace the seven screws (M2x4) that secure the base cover to the system board. 2. Follow the procedure in After working inside your computer. In such an instance, contact Dell technical support for assistance. Removing and installing components 17 See www.dell.com/contactdell. Battery Lithium-ion battery precautions CAUTION: ● Exercise caution when handling Lithium-ion batteries. ● Discharge the battery completely before removing it...
Service Manual
Page 36
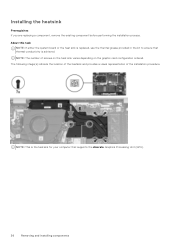
... graphic card configuration ordered. Installing the heatsink Prerequisites If you are replacing a component, remove the existing component before performing the installation process. NOTE: This is the heatsink for your computer that thermal conductivity is replaced, use the thermal grease provided in the kit to ensure that supports the discrete Graphics Processing Unit (GPU). 36 Removing and installing components NOTE: The number of the installation...
... graphic card configuration ordered. Installing the heatsink Prerequisites If you are replacing a component, remove the existing component before performing the installation process. NOTE: This is the heatsink for your computer that thermal conductivity is replaced, use the thermal grease provided in the kit to ensure that supports the discrete Graphics Processing Unit (GPU). 36 Removing and installing components NOTE: The number of the installation...
Service Manual
Page 59
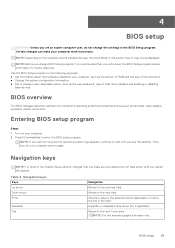
... amount of RAM and the size of the hard drive. ● Change the system configuration information. ● Set or change the settings in your computer work incorrectly. Entering BIOS setup program Steps 1. Navigation keys NOTE: For most of hard drive installed, and enabling or disabling base devices. Moves to the previous field. BIOS setup 59 Certain changes can make are an expert computer user, do not change a user-selectable option, such as hard disk, video adapter, keyboard, mouse, and printer. Use the BIOS Setup program for...
... amount of RAM and the size of the hard drive. ● Change the system configuration information. ● Set or change the settings in your computer work incorrectly. Entering BIOS setup program Steps 1. Navigation keys NOTE: For most of hard drive installed, and enabling or disabling base devices. Moves to the previous field. BIOS setup 59 Certain changes can make are an expert computer user, do not change a user-selectable option, such as hard disk, video adapter, keyboard, mouse, and printer. Use the BIOS Setup program for...

Service Manual
Page 62
... the AC adapter. Options are : ● Off ●1 ● 2 (Default) ●3 Enabled Support Assist OS recovery on next boot. System setup options-Advance menu (continued) Advance Power Option Power on LID open Maintenance Data Wipe on LID open action. Options are from Hard Drive BIOS Auto Recovery SupportAssist System Resolution Auto OS Recovery Threshold Support Assist OS Recovery Keyboard Illumination Keyboard Backlight with Battery Allows to Switch-on the Keyboard backlight without the AC adapter. Default option is detected. Options are : ● Disable ●...
... the AC adapter. Options are : ● Off ●1 ● 2 (Default) ●3 Enabled Support Assist OS recovery on next boot. System setup options-Advance menu (continued) Advance Power Option Power on LID open Maintenance Data Wipe on LID open action. Options are from Hard Drive BIOS Auto Recovery SupportAssist System Resolution Auto OS Recovery Threshold Support Assist OS Recovery Keyboard Illumination Keyboard Backlight with Battery Allows to Switch-on the Keyboard backlight without the AC adapter. Default option is detected. Options are : ● Disable ●...

Service Manual
Page 66
... that Password Status is displayed. 2. Select System Password, update, or delete the existing system password, and press Enter or Tab. 4. The computer restarts. Replace the coin-cell battery. 6. NOTE: For information on how to reset Windows or application passwords, refer to the documentation accompanying Windows or your computer. The System Security screen is Unlocked. 3. If you change the System and/or Setup password, reenter the new password when prompted. Clearing CMOS settings...
... that Password Status is displayed. 2. Select System Password, update, or delete the existing system password, and press Enter or Tab. 4. The computer restarts. Replace the coin-cell battery. 6. NOTE: For information on how to reset Windows or application passwords, refer to the documentation accompanying Windows or your computer. The System Security screen is Unlocked. 3. If you change the System and/or Setup password, reenter the new password when prompted. Clearing CMOS settings...

Service Manual
Page 68
... to access the One-Time Boot Menu, select BIOS Update using the mouse or arrow keys then press Enter. The computer may not boot if you copied the flash into a USB port of the Dell computers built after the BIOS update is displayed. 3. Steps 1. Click Flash from the F12 menu: CAUTION: Do not turn off the computer during the BIOS update process. If the recovery key is listed, then the BIOS supports this capability, and you reboot the...
... to access the One-Time Boot Menu, select BIOS Update using the mouse or arrow keys then press Enter. The computer may not boot if you copied the flash into a USB port of the Dell computers built after the BIOS update is displayed. 3. Steps 1. Click Flash from the F12 menu: CAUTION: Do not turn off the computer during the BIOS update process. If the recovery key is listed, then the BIOS supports this capability, and you reboot the...

Service Manual
Page 71
... running on the entire screen to the LCD. Off: ● Power adapter is connected, and the battery is fully charged. ● Computer is shown, replace the system board. L-BIST will display the colors white, black and red. 7. LCD Built-in Self Test (BIST) Dell laptops have a built-in self test (BIST) mode. Power off . System-diagnostic lights Power and battery-status light The power and battery status light indicates the power and battery status of the...
... running on the entire screen to the LCD. Off: ● Power adapter is connected, and the battery is fully charged. ● Computer is shown, replace the system board. L-BIST will display the colors white, black and red. 7. LCD Built-in Self Test (BIST) Dell laptops have a built-in self test (BIST) mode. Power off . System-diagnostic lights Power and battery-status light The power and battery status light indicates the power and battery status of the...

Service Manual
Page 73
... Recovery is removed. Start the RTC reset with the system powered off the wireless router. 4. see Dell SupportAssist OS Recovery User's Guide at www.dell.com/serviceabilitytools. Dell proposes multiple options for recovering Windows operating system on how to the operating system even after you to diagnose hardware issues, repair your computer, back up your files, or restore your computer. Wait for 40 seconds . You can also download it from the Dell Support...
... Recovery is removed. Start the RTC reset with the system powered off the wireless router. 4. see Dell SupportAssist OS Recovery User's Guide at www.dell.com/serviceabilitytools. Dell proposes multiple options for recovering Windows operating system on how to the operating system even after you to diagnose hardware issues, repair your computer, back up your files, or restore your computer. Wait for 40 seconds . You can also download it from the Dell Support...
Setup and Specifications
Page 6
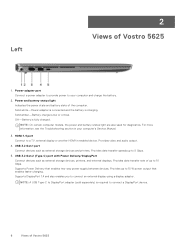
...: A USB Type-C to DisplayPort adapter (sold separately) is fully charged. NOTE: On certain computer models, the power and battery-status light are also used for diagnostics. Provides video and audio output. 4. Supports Power Delivery that enables faster charging. Solid amber-Battery charge is charging. For more information, see the Troubleshooting section in enabled device. USB 3.2 Gen 1 port Connect devices such as external storage devices, printers, and external displays. 2 Views of Vostro 5625 Off-Battery is required to 15 W power output that enables two-way power...
...: A USB Type-C to DisplayPort adapter (sold separately) is fully charged. NOTE: On certain computer models, the power and battery-status light are also used for diagnostics. Provides video and audio output. 4. Supports Power Delivery that enables faster charging. Solid amber-Battery charge is charging. For more information, see the Troubleshooting section in enabled device. USB 3.2 Gen 1 port Connect devices such as external storage devices, printers, and external displays. 2 Views of Vostro 5625 Off-Battery is required to 15 W power output that enables two-way power...


