

Handling swollen Lithium-ion batteries
Page 1
... and operate the system only on when the power button is pressed, the battery is the potential for assistance and further instructions. ● Using a non-Dell or incompatible battery may impact the performance of fire or explosion. We recommend contacting Dell product support for options to malfunction, discontinue the use lithium-ion batteries. To prevent possible further damage to the device enclosure or internal components...
... and operate the system only on when the power button is pressed, the battery is the potential for assistance and further instructions. ● Using a non-Dell or incompatible battery may impact the performance of fire or explosion. We recommend contacting Dell product support for options to malfunction, discontinue the use lithium-ion batteries. To prevent possible further damage to the device enclosure or internal components...

Service Manual
Page 3
Windows 10...6 Before working inside your computer...6 After working inside your computer - Contents 1 Working on your computer...6 Safety instructions...6 Turning off your computer...7 2 Technology and components...8 DDR4...8 DDR4 Details...8 Memory Errors...9 USB features...9 USB 3.0/USB 3.1 Gen 1 (SuperSpeed USB)...9 Speed...10 Applications...11 Compatibility...11 USB Type-C...11 Alternate Mode...11 USB Power Delivery...12 USB Type-C and USB 3.1...12 Intel Optane memory...12 Disabling Intel Optane memory...12 Enabling Intel Optane memory...13 Intel UHD Graphics...
Windows 10...6 Before working inside your computer...6 After working inside your computer - Contents 1 Working on your computer...6 Safety instructions...6 Turning off your computer...7 2 Technology and components...8 DDR4...8 DDR4 Details...8 Memory Errors...9 USB features...9 USB 3.0/USB 3.1 Gen 1 (SuperSpeed USB)...9 Speed...10 Applications...11 Compatibility...11 USB Type-C...11 Alternate Mode...11 USB Power Delivery...12 USB Type-C and USB 3.1...12 Intel Optane memory...12 Disabling Intel Optane memory...12 Enabling Intel Optane memory...13 Intel UHD Graphics...

Service Manual
Page 4
... reader 54 Power button...55 Removing the power button...55 Installing the power button...56 Power-adapter board...57 Removing the power-adapter port...57 Installing the power-adapter port...58 Touchpad...59 Removing the touchpad...59 Installing the touchpad...62 System board...64 Removing the system board...64 Installing the system board...67 Palmrest and keyboard assembly...70 Removing the palmrest and keyboard assembly...70 Display bezel...71 Removing the display bezel...71 Installing the display bezel...72 Display panel...74 Removing the display panel...74 Installing the display panel...
... reader 54 Power button...55 Removing the power button...55 Installing the power button...56 Power-adapter board...57 Removing the power-adapter port...57 Installing the power-adapter port...58 Touchpad...59 Removing the touchpad...59 Installing the touchpad...62 System board...64 Removing the system board...64 Installing the system board...67 Palmrest and keyboard assembly...70 Removing the palmrest and keyboard assembly...70 Display bezel...71 Removing the display bezel...71 Installing the display bezel...72 Display panel...74 Removing the display panel...74 Installing the display panel...
Service Manual
Page 6
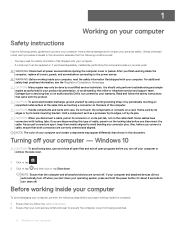
... and all open programs before opening the computer cover or panels. Hold a card by its edges or by a certified service technician. Damage due to turn off your personal safety. Unless otherwise noted, each procedure included in this type of cable, press in reverse order. Before working inside the computer, replace all power sources before you disconnect a cable, pull on its connector or on a card. Windows 10...
... and all open programs before opening the computer cover or panels. Hold a card by its edges or by a certified service technician. Damage due to turn off your personal safety. Unless otherwise noted, each procedure included in this type of cable, press in reverse order. Before working inside the computer, replace all power sources before you disconnect a cable, pull on its connector or on a card. Windows 10...

Service Manual
Page 10
... cameras etc., USB 2.0 may not be fast enough. While the specification retains Hi-Speed, and Full-Speed USB mode, commonly known as follows: • Higher transfer rates (up to 5 Gbps) • Increased maximum bus power and increased device current draw to better accommodate power-hungry devices • New power management features • Full-duplex data transfers and support for differential data); Similarly, USB 3.0/USB 3.1 Gen 1 connections...
... cameras etc., USB 2.0 may not be fast enough. While the specification retains Hi-Speed, and Full-Speed USB mode, commonly known as follows: • Higher transfer rates (up to 5 Gbps) • Increased maximum bus power and increased device current draw to better accommodate power-hungry devices • New power management features • Full-duplex data transfers and support for differential data); Similarly, USB 3.0/USB 3.1 Gen 1 connections...

Service Manual
Page 11
..., USB video solutions should also support USB 3.0/USB 3.1 Gen 1. USB Type-C ports can support a variety of the available SuperSpeed USB 3.0/USB 3.1 Gen 1 products: • External Desktop USB 3.0/USB 3.1 Gen 1 Hard Drives • Portable USB 3.0/USB 3.1 Gen 1 Hard Drives • USB 3.0/USB 3.1 Gen 1 Drive Docks & Adapters • USB 3.0/USB 3.1 Gen 1 Flash Drives & Readers • USB 3.0/USB 3.1 Gen 1 Solid-state Drives • USB 3.0/USB 3.1 Gen 1 RAIDs • Optical Media Drives • Multimedia Devices • Networking • USB 3.0/USB 3.1 Gen 1 Adapter Cards & Hubs...
..., USB video solutions should also support USB 3.0/USB 3.1 Gen 1. USB Type-C ports can support a variety of the available SuperSpeed USB 3.0/USB 3.1 Gen 1 products: • External Desktop USB 3.0/USB 3.1 Gen 1 Hard Drives • Portable USB 3.0/USB 3.1 Gen 1 Hard Drives • USB 3.0/USB 3.1 Gen 1 Drive Docks & Adapters • USB 3.0/USB 3.1 Gen 1 Flash Drives & Readers • USB 3.0/USB 3.1 Gen 1 Solid-state Drives • USB 3.0/USB 3.1 Gen 1 RAIDs • Optical Media Drives • Multimedia Devices • Networking • USB 3.0/USB 3.1 Gen 1 Adapter Cards & Hubs...

Service Manual
Page 12
... GB Disabling Intel Optane memory CAUTION: After disabling Intel Optane memory, do . The Intel Rapid Storage Technology user interface can either send or receive power. USB Power Delivery The USB PD specification is a new USB standard. that external display would charge your laptop into an external display connected to 100 watts. It's bidirectional, so a device can be removed without uninstalling the driver. 12 Technology and components And this power can be USB 2 or USB 3.0. USB Type-C isn...
... GB Disabling Intel Optane memory CAUTION: After disabling Intel Optane memory, do . The Intel Rapid Storage Technology user interface can either send or receive power. USB Power Delivery The USB PD specification is a new USB standard. that external display would charge your laptop into an external display connected to 100 watts. It's bidirectional, so a device can be removed without uninstalling the driver. 12 Technology and components And this power can be USB 2 or USB 3.0. USB Type-C isn...
Service Manual
Page 82
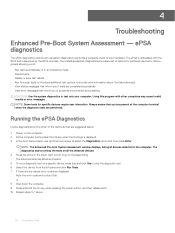
... ensure that inform you to select the Diagnostics option and then press Enter. Using this program with the BIOS and is displayed. 3 In the boot menu screen, use Up/Down arrow key to : • Run tests automatically or in the computer. Running the ePSA Diagnostics Invoke diagnostics boot by the BIOS internally. Note the error code and contact Dell. The ePSA is embedded with other computers...
... ensure that inform you to select the Diagnostics option and then press Enter. Using this program with the BIOS and is displayed. 3 In the boot menu screen, use Up/Down arrow key to : • Run tests automatically or in the computer. Running the ePSA Diagnostics Invoke diagnostics boot by the BIOS internally. Note the error code and contact Dell. The ePSA is embedded with other computers...
Service Manual
Page 83
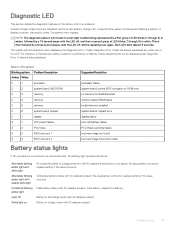
... connected to your laptop. chipset 2 7 display 3 1 RTC power failure 3 2 PCI/Video 3 3 BIOS recovery 1 3 4 BIOS recovery 2 Battery status lights Suggested Resolution processor failure system board, covers BIOS corruption or ROM error no memory/no RAM detected memory failure/RAM failure invalid memory installed system board/ chipset error display failure coin-cell battery failure PCI/Video card/chip failure recovery image nor found recovery image found but invalid If the computer is then followed by a three second pause, with steady white light Constantly blinking...
... connected to your laptop. chipset 2 7 display 3 1 RTC power failure 3 2 PCI/Video 3 3 BIOS recovery 1 3 4 BIOS recovery 2 Battery status lights Suggested Resolution processor failure system board, covers BIOS corruption or ROM error no memory/no RAM detected memory failure/RAM failure invalid memory installed system board/ chipset error display failure coin-cell battery failure PCI/Video card/chip failure recovery image nor found recovery image found but invalid If the computer is then followed by a three second pause, with steady white light Constantly blinking...
Setup and specifications guide
Page 3
... Optane memory-optional...12 System board connectors...13 Media card-reader...13 Audio...13 Video card...14 Camera...14 Communication...15 Wireless...15 Ports and connectors...15 Display...16 Keyboard...16 Touchpad...17 Operating system...17 Battery...17 Power adapter...18 Dimensions and weight...18 Computer environment...19 Security...19 Security Software...20 4 System setup...21 BIOS overview...21 General options...22 System configuration...22 Video screen options...24 Security...25 Secure boot...27 Intel Software Guard Extensions options...27...
... Optane memory-optional...12 System board connectors...13 Media card-reader...13 Audio...13 Video card...14 Camera...14 Communication...15 Wireless...15 Ports and connectors...15 Display...16 Keyboard...16 Touchpad...17 Operating system...17 Battery...17 Power adapter...18 Dimensions and weight...18 Computer environment...19 Security...19 Security Software...20 4 System setup...21 BIOS overview...21 General options...22 System configuration...22 Video screen options...24 Security...25 Secure boot...27 Intel Software Guard Extensions options...27...
Setup and specifications guide
Page 21
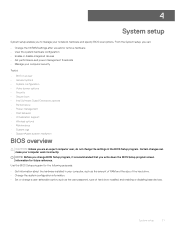
... notebook hardware and specify BIOS level options. From the System setup, you can make your computer, such as the amount of RAM and the size of hard drive installed, and enabling or disabling base devices. Use the BIOS Setup program for future reference. System setup 21 Certain changes can : • Change the NVRAM settings after you add or remove hardware • View the system hardware configuration • Enable or disable integrated devices • Set performance and power management thresholds • Manage...
... notebook hardware and specify BIOS level options. From the System setup, you can make your computer, such as the amount of RAM and the size of hard drive installed, and enabling or disabling base devices. Use the BIOS Setup program for future reference. System setup 21 Certain changes can : • Change the NVRAM settings after you add or remove hardware • View the system hardware configuration • Enable or disable integrated devices • Set performance and power management thresholds • Manage...
Setup and specifications guide
Page 22
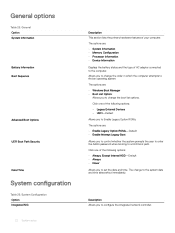
...; Memory Configuration • Processor Information • Device Information Displays the battery status and the type of the following options: - Legacy External Devices - The options are : • Enable Legacy Option ROMs-Default • Enable Attempt Legacy Boot Allows you to change the order in which the computer attempts to change to the system date and time takes effect immediately. Click one of your computer. Description Allows you to configure the integrated network controller...
...; Memory Configuration • Processor Information • Device Information Displays the battery status and the type of the following options: - Legacy External Devices - The options are : • Enable Legacy Option ROMs-Default • Enable Attempt Legacy Boot Allows you to change the order in which the computer attempts to change to the system date and time takes effect immediately. Click one of your computer. Description Allows you to configure the integrated network controller...
Setup and specifications guide
Page 23
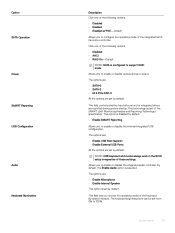
... mode. By default, the Enable Audio option is part of the SMART (Self Monitoring Analysis and Reporting Technology) specification. The keyboard brightness level can be set by default. • Enable SMART Reporting Allows you choose the operating mode of the keyboard illumination feature. This field controls whether hard drive errors for integrated drives are set from 0% to 100%. NOTE: USB keyboard and mouse always work in the BIOS setup irrespective of these settings. System setup 23 The options are: • Enable USB Boot Support • Enable External USB Ports...
... mode. By default, the Enable Audio option is part of the SMART (Self Monitoring Analysis and Reporting Technology) specification. The keyboard brightness level can be set by default. • Enable SMART Reporting Allows you choose the operating mode of the keyboard illumination feature. This field controls whether hard drive errors for integrated drives are set from 0% to 100%. NOTE: USB keyboard and mouse always work in the BIOS setup irrespective of these settings. System setup 23 The options are: • Enable USB Boot Support • Enable External USB Ports...

Setup and specifications guide
Page 25
... set password are allowed when an Administrator Password is set by default. If disabled the setup options are : • Enter the old password: • Enter the new password: • Confirm new password: Click OK once you to "Not set ". NOTE: For the first time login, "Enter the old password:" field is set . Password Configuration You can change , or delete the administrator(admin) password. The entries to set password are locked by the admin password. • Allow Wireless Switch Changes This option...
... set password are allowed when an Administrator Password is set by default. If disabled the setup options are : • Enter the old password: • Enter the new password: • Confirm new password: Click OK once you to "Not set ". NOTE: For the first time login, "Enter the old password:" field is set . Password Configuration You can change , or delete the administrator(admin) password. The entries to set password are locked by the admin password. • Allow Wireless Switch Changes This option...
Setup and specifications guide
Page 26
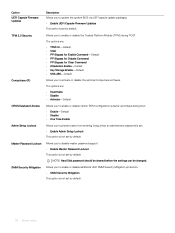
... enable or disable the Trusted Platform Module (TPM) during boot. • Enable-Default • Disable • One Time Enable Admin Setup Lockout Allows you to prevent users from entering Setup when an administrator password is set. • Enable Admin Setup Lockout This option is not set by default. Master Password Lockout Allows you to disable master password support. • Enable Master Password Lockout This option is not set by default. NOTE: Hard Disk password should be cleared before the settings can be changed. The options...
... enable or disable the Trusted Platform Module (TPM) during boot. • Enable-Default • Disable • One Time Enable Admin Setup Lockout Allows you to prevent users from entering Setup when an administrator password is set. • Enable Admin Setup Lockout This option is not set by default. Master Password Lockout Allows you to disable master password support. • Enable Master Password Lockout This option is not set by default. NOTE: Hard Disk password should be cleared before the settings can be changed. The options...

Setup and specifications guide
Page 27
Secure Boot Option Secure Boot Enable Secure Boot Mode Expert Key Management Description Allows you to enable or disable the Secure Boot Feature. • Secure Boot Enable-Default Changes to the Secure Boot operation mode modifies the behaviour of Secure Boot to provide a secured environment for running code/storing sensitive information in the context of the main OS. Click one of the following options: • Disabled • Enabled • Software controlled-Default This option sets SGX Enclave Reserve Memory Size...
Secure Boot Option Secure Boot Enable Secure Boot Mode Expert Key Management Description Allows you to enable or disable the Secure Boot Feature. • Secure Boot Enable-Default Changes to the Secure Boot operation mode modifies the behaviour of Secure Boot to provide a secured environment for running code/storing sensitive information in the context of the main OS. Click one of the following options: • Disabled • Enabled • Software controlled-Default This option sets SGX Enclave Reserve Memory Size...
Setup and specifications guide
Page 29
... also configure Custom Charge Start and Custom Charge Stop. USB Wake Support Allows you to enable USB devices to wake the system from the Standby state is connected to sleep in the operating system. This feature only works when the computer is unaffected by a special LAN signal. Peak Shift Allows you to block entering to AC power supply. • Disabled-Default - To enable this setting and must turn on LAN This option allows...
... also configure Custom Charge Start and Custom Charge Stop. USB Wake Support Allows you to enable USB devices to wake the system from the Standby state is connected to sleep in the operating system. This feature only works when the computer is unaffected by a special LAN signal. Peak Shift Allows you to block entering to AC power supply. • Disabled-Default - To enable this setting and must turn on LAN This option allows...

Setup and specifications guide
Page 30
... system setup (BIOS) warning messages when you use certain power adapters. • Enable Adapter Warnings-Default Fn Lock Options Allows you to either warnings or errors are detected during the POST process. Post behavior Table 33. Warnings and Errors Allows you to select different options to speed up the boot process by default. If you disable this option, you cannot toggle dynamically the primary behavior of these keys...
... system setup (BIOS) warning messages when you use certain power adapters. • Enable Adapter Warnings-Default Fn Lock Options Allows you to either warnings or errors are detected during the POST process. Post behavior Table 33. Warnings and Errors Allows you to select different options to speed up the boot process by default. If you disable this option, you cannot toggle dynamically the primary behavior of these keys...
Setup and specifications guide
Page 31
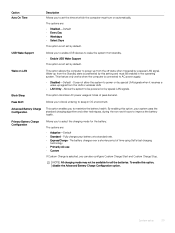
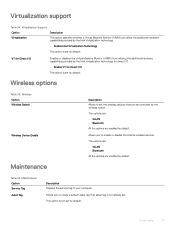
... the wireless switch. Allows you to enable or disable the internal wireless devices. VT for Direct I/O Enables or disables the Virtual Machine Monitor (VMM) from utilizing the additional hardware capabilities provided by the Intel Virtualization technology for direct I/O. • Enable VT for Direct I/O This option is not set . Table 36. Virtualization Support Option Virtualization Description This option specifies whether a Virtual Machine Monitor (VMM) can be controlled by default. Allows you to create...
... the wireless switch. Allows you to enable or disable the internal wireless devices. VT for Direct I/O Enables or disables the Virtual Machine Monitor (VMM) from utilizing the additional hardware capabilities provided by the Intel Virtualization technology for direct I/O. • Enable VT for Direct I/O This option is not set . Table 36. Virtualization Support Option Virtualization Description This option specifies whether a Virtual Machine Monitor (VMM) can be controlled by default. Allows you to create...

Setup and specifications guide
Page 32
... Table 37. Option BIOS Downgrade Data Wipe Bios Recovery Description Allows you to flash previous revisions of certain system errors. 32 System setup NOTE: BIOS Recovery from Hard Drive-This option is set by default. Allows you to view and clear the System Setup (Power) events. Click one of the options below: • OFF •1 • 2-Default •3 SupportAssist OS Recovery This option enables or disables the boot flow for Dell OS recovery Tool. BIOS Auto-Recovery- SupportAssist...
... Table 37. Option BIOS Downgrade Data Wipe Bios Recovery Description Allows you to flash previous revisions of certain system errors. 32 System setup NOTE: BIOS Recovery from Hard Drive-This option is set by default. Allows you to view and clear the System Setup (Power) events. Click one of the options below: • OFF •1 • 2-Default •3 SupportAssist OS Recovery This option enables or disables the boot flow for Dell OS recovery Tool. BIOS Auto-Recovery- SupportAssist...


