

Setup and specifications guide
Page 23
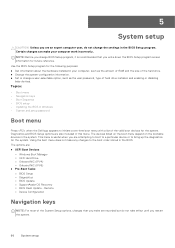
... you change a user-selectable option, such as the amount of RAM and the size of the hard drive. ● Change the system configuration information. ● Set or change BIOS Setup program, it is useful when you are attempting to boot to a particular device or to the boot order stored in Windows • System and setup password Boot menu Press when the Dell logo appears to initiate a one-time boot menu with a list of hard drive installed, and enabling or disabling base devices...
... you change a user-selectable option, such as the amount of RAM and the size of the hard drive. ● Change the system configuration information. ● Set or change BIOS Setup program, it is useful when you are attempting to boot to a particular device or to the boot order stored in Windows • System and setup password Boot menu Press when the Dell logo appears to initiate a one-time boot menu with a list of hard drive installed, and enabling or disabling base devices...

Setup and specifications guide
Page 24
... applicable. Pressing Esc in the field. BIOS setup NOTE: Depending on Self-Test (POST), when the Dell logo appears, you to a specific device (for example: optical drive or hard drive). Moves to access the System Setup screen. The boot sequence screen also displays the option to the next field. The boot menu options are : ● System Information ○ BIOS version ○ Service Tag ○ Asset Tag ○ Manufacture Date ○...
... applicable. Pressing Esc in the field. BIOS setup NOTE: Depending on Self-Test (POST), when the Dell logo appears, you to a specific device (for example: optical drive or hard drive). Moves to access the System Setup screen. The boot sequence screen also displays the option to the next field. The boot menu options are : ● System Information ○ BIOS version ○ Service Tag ○ Asset Tag ○ Manufacture Date ○...

Setup and specifications guide
Page 27
...; Brightness on board. The options are: ● M.2 PCIe SSD-1 ● M.2 PCIe SSD-0 By default, all the options are reported during system startup. Provides information about drive type and device. By default, set to set to configure the operating mode of the Self Monitoring Analysis and Reporting Technology (SMART) specification. By default, set the screen brightness when running on battery power - This field controls whether hard drive errors for integrated drives are enabled. System setup 27 Allows you to support RAID mode. The options...
...; Brightness on board. The options are: ● M.2 PCIe SSD-1 ● M.2 PCIe SSD-0 By default, all the options are reported during system startup. Provides information about drive type and device. By default, set to set to configure the operating mode of the Self Monitoring Analysis and Reporting Technology (SMART) specification. By default, set the screen brightness when running on battery power - This field controls whether hard drive errors for integrated drives are enabled. System setup 27 Allows you to support RAID mode. The options...
Setup and specifications guide
Page 29
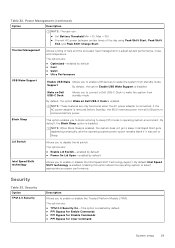
...: The user can: ● Set Battery Threshold Min = 15, Max = 100 ● Prevent AC power between certain times of fans and the processor heat management to enable or disable the Intel Speed Shift Technology support. Support By default, the option Enable USB Wake Support is removed before Standby, the BIOS removes power from all USB ports to wake the system from standby mode. If the AC power adapter is disabled. Lid Switch Allows you to connect a Dell USB-C Dock...
...: The user can: ● Set Battery Threshold Min = 15, Max = 100 ● Prevent AC power between certain times of fans and the processor heat management to enable or disable the Intel Speed Shift Technology support. Support By default, the option Enable USB Wake Support is removed before Standby, the BIOS removes power from all USB ports to wake the system from standby mode. If the AC power adapter is disabled. Lid Switch Allows you to connect a Dell USB-C Dock...
Setup and specifications guide
Page 30
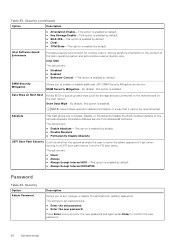
... next reboot. The entries to confirm the new password. 30 System setup SMM Security Mitigation Allows you enter the new password and again press Enter to set password are : ● Disabled ● Enabled ● Software Control-This option is enabled by default. Start Data Wipe - Security Option Admin Password Description Allows you to a UEFI boot path device from Absolute® Software. The options are : ● Never ● Always ● Always Except Internal HDD-This option is enabled by default...
... next reboot. The entries to confirm the new password. 30 System setup SMM Security Mitigation Allows you enter the new password and again press Enter to set password are : ● Disabled ● Enabled ● Software Control-This option is enabled by default. Start Data Wipe - Security Option Admin Password Description Allows you to a UEFI boot path device from Absolute® Software. The options are : ● Never ● Always ● Always Except Internal HDD-This option is enabled by default...

Setup and specifications guide
Page 34
... and errors are detected. ● Enable Adapter Warnings-enabled by default ● Auto Extend BIOS POST Time This option allows you to configure the BIOS POST load time. Fastboot This option allows you to configure the speed of the following options: ● Serial Mouse ● PS/2 Mouse ● Touchpad and PS/2 Mouse-enabled by default ● Continue on Warnings ● Continue on battery power. USB-C Warnings This option enables or disables dock warning messages. enabled by default...
... and errors are detected. ● Enable Adapter Warnings-enabled by default ● Auto Extend BIOS POST Time This option allows you to configure the BIOS POST load time. Fastboot This option allows you to configure the speed of the following options: ● Serial Mouse ● PS/2 Mouse ● Touchpad and PS/2 Mouse-enabled by default ● Continue on Warnings ● Continue on battery power. USB-C Warnings This option enables or disables dock warning messages. enabled by default...
Setup and specifications guide
Page 36
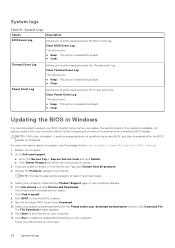
... to install the updated BIOS settings on your computer battery is fully charged and connected to save the file on your BIOS (System Setup) when you replace the system board or if an update is enabled by default. ● Clear Thermal Event Log Allows you are : ● Keep - System logs Table 41. This option is available. If you to Dell.com/support. ● Enter the Service Tag or Express Service Code and...
... to install the updated BIOS settings on your computer battery is fully charged and connected to save the file on your BIOS (System Setup) when you replace the system board or if an update is enabled by default. ● Clear Thermal Event Log Allows you are : ● Keep - System logs Table 41. This option is available. If you to Dell.com/support. ● Enter the Service Tag or Express Service Code and...

Setup and specifications guide
Page 37
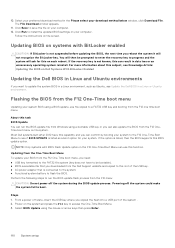
... with BIOS Flash Update option in the F12 One-Time Boot Menu can use this function. If the recovery key is not suspended before updating the BIOS, the next time you reboot the system it will ask for your system BIOS using a bootable USB key or you want to access the One-Time Boot Menu. 3. For more information about this subject, see Knowledge Article: Updating the BIOS on Dell Systems With BitLocker Enabled Updating the Dell BIOS...
... with BIOS Flash Update option in the F12 One-Time Boot Menu can use this function. If the recovery key is not suspended before updating the BIOS, the next time you reboot the system it will ask for your system BIOS using a bootable USB key or you want to access the One-Time Boot Menu. 3. For more information about this subject, see Knowledge Article: Updating the BIOS on Dell Systems With BitLocker Enabled Updating the Dell BIOS...

Service Manual
Page 3
......19 Installing the 3-cell battery - UMA...22 Installing the WLAN card - discrete...25 Memory modules...26 Removing the memory modules - discrete...28 Installing the memory modules - discrete 34 Removing the M.2 2230 solid-state drive - discrete 36 Replacing the SSD-1 support bracket...37 Removing the M.2 2280 solid-state drive - Contents Chapter 1: Working on your computer 7 Safety instructions...7 Before working inside your computer...7 Safety precautions...8 Electrostatic discharge-ESD protection...8 ESD field service kit ...9 After working...
......19 Installing the 3-cell battery - UMA...22 Installing the WLAN card - discrete...25 Memory modules...26 Removing the memory modules - discrete...28 Installing the memory modules - discrete 34 Removing the M.2 2230 solid-state drive - discrete 36 Replacing the SSD-1 support bracket...37 Removing the M.2 2280 solid-state drive - Contents Chapter 1: Working on your computer 7 Safety instructions...7 Before working inside your computer...7 Safety precautions...8 Electrostatic discharge-ESD protection...8 ESD field service kit ...9 After working...

Service Manual
Page 5
... Chapter 4: Software...95 Downloading Windows drivers...95 Chapter 5: System setup...96 Boot menu...96 Navigation keys...96 Boot Sequence...97 BIOS setup...97 Overview...97 Boot configuration...98 Integrated Devices...99 Storage...100 Display...100 Connection options...101 Power management...101 Security...102 Password...103 Update and Recovery...105 System management...105 Keyboard...106 Pre-boot behavior...107 Virtualization support...108 Performance...108 System logs...109 Updating the BIOS in Windows ...109 Updating BIOS on systems with BitLocker enabled 110 Updating the Dell BIOS in...
... Chapter 4: Software...95 Downloading Windows drivers...95 Chapter 5: System setup...96 Boot menu...96 Navigation keys...96 Boot Sequence...97 BIOS setup...97 Overview...97 Boot configuration...98 Integrated Devices...99 Storage...100 Display...100 Connection options...101 Power management...101 Security...102 Password...103 Update and Recovery...105 System management...105 Keyboard...106 Pre-boot behavior...107 Virtualization support...108 Performance...108 System logs...109 Updating the BIOS in Windows ...109 Updating BIOS on systems with BitLocker enabled 110 Updating the Dell BIOS in...

Service Manual
Page 92
... 1. Install the power button with fingerprint reader. 5. Install the coin-cell battery. 6. Install the heat sink. 7. Install the battery (3-cell or 4-cell) based on a flat surface. Install the DC-in after working inside your computer. 2. Install the base cover. 17. Install the M.2 2280 SSD card. 14. Install the system board. 2. Install the touchpad. 3. Install the display assembly. 10. Remove the base cover. 3. Remove the battery (3-cell or 4-cell). 4. discrete Prerequisites 1. Install the system fan. 12. Install the memory module. 8. Follow...
... 1. Install the power button with fingerprint reader. 5. Install the coin-cell battery. 6. Install the heat sink. 7. Install the battery (3-cell or 4-cell) based on a flat surface. Install the DC-in after working inside your computer. 2. Install the base cover. 17. Install the M.2 2280 SSD card. 14. Install the system board. 2. Install the touchpad. 3. Install the display assembly. 10. Remove the base cover. 3. Remove the battery (3-cell or 4-cell). 4. discrete Prerequisites 1. Install the system fan. 12. Install the memory module. 8. Follow...
Service Manual
Page 96
...; BIOS setup • Updating the BIOS in your computer work incorrectly. Use the BIOS Setup program for the following purposes: ● Get information about the hardware installed in Windows • System and setup password Boot menu Press when the Dell logo appears to initiate a one-time boot menu with a list of hard drive installed, and enabling or disabling base devices. Remote ○ Device Configuration Navigation keys NOTE: For most of the hard drive. ● Change the system configuration information. ● Set or change BIOS Setup program...
...; BIOS setup • Updating the BIOS in your computer work incorrectly. Use the BIOS Setup program for the following purposes: ● Get information about the hardware installed in Windows • System and setup password Boot menu Press when the Dell logo appears to initiate a one-time boot menu with a list of hard drive installed, and enabling or disabling base devices. Remote ○ Device Configuration Navigation keys NOTE: For most of the hard drive. ● Change the system configuration information. ● Set or change BIOS Setup program...

Service Manual
Page 97
... the Dell logo appears, you view the main screen. Moves to save any unsaved changes and restarts the system. During the Power-on the laptop and its installed devices, the items listed in the field. The one -time boot menu by pressing F2 key ● Bring up the one -time boot menu displays the devices that prompts you to bypass the System Setup-defined boot device order and boot directly...
... the Dell logo appears, you view the main screen. Moves to save any unsaved changes and restarts the system. During the Power-on the laptop and its installed devices, the items listed in the field. The one -time boot menu by pressing F2 key ● Bring up the one -time boot menu displays the devices that prompts you to bypass the System Setup-defined boot device order and boot directly...

Service Manual
Page 100
...controls whether hard drive errors for integrated drives are enabled. Displays full screen logo when the image matches screen resolution. Table 4. Integrated device options (continued) Option Description ● Enable USB Boot Support ● Enable External USB Port By default, all the option is part of the integrated SATA hard drive controller. NOTE: SATA is configured to set to configure the operating mode of the Self Monitoring Analysis and Reporting Technology (SMART) specification. This technology is disabled. 100 System setup Display options Option Display Brightness...
...controls whether hard drive errors for integrated drives are enabled. Displays full screen logo when the image matches screen resolution. Table 4. Integrated device options (continued) Option Description ● Enable USB Boot Support ● Enable External USB Port By default, all the option is part of the integrated SATA hard drive controller. NOTE: SATA is configured to set to configure the operating mode of the Self Monitoring Analysis and Reporting Technology (SMART) specification. This technology is disabled. 100 System setup Display options Option Display Brightness...

Service Manual
Page 102
... Support Enable USB Wake Allows you to disable the lid switch. By default,Intel Speed Shift technology is removed before Standby, the BIOS removes power from all USB ports to wake the system from standby mode. Security Option TPM 2.0 Security Description Allows you to connect a Dell USB-C Dock to conserve battery power. Lid Switch Allows you to block entering to adjust system performance, noise, and temperature. Power Management (continued) Option Description NOTE: The user can: ● Set Battery...
... Support Enable USB Wake Allows you to disable the lid switch. By default,Intel Speed Shift technology is removed before Standby, the BIOS removes power from all USB ports to wake the system from standby mode. Security Option TPM 2.0 Security Description Allows you to connect a Dell USB-C Dock to conserve battery power. Lid Switch Allows you to block entering to adjust system performance, noise, and temperature. Power Management (continued) Option Description NOTE: The user can: ● Set Battery...

Service Manual
Page 103
... devices connected to Enable, Disable, or Permanently Disable the BIOS module interface of the main operating system and sets enclave reserve memory size. The entries to enable or disable additional UEFI SMM Security Mitigation protection. System setup 103 Table 9. Intel SGX The options are : ● Enter the old password: ● Enter the new password: Press Enter once you enter the new password and again press Enter to a UEFI boot path device from Absolute® Software. By default, this option...
... devices connected to Enable, Disable, or Permanently Disable the BIOS module interface of the main operating system and sets enclave reserve memory size. The entries to enable or disable additional UEFI SMM Security Mitigation protection. System setup 103 Table 9. Intel SGX The options are : ● Enter the old password: ● Enter the new password: Press Enter once you enter the new password and again press Enter to a UEFI boot path device from Absolute® Software. By default, this option...

Service Manual
Page 107
... setup 107 Pre-boot behavior Table 14. Enable Dock Warning Messages - enabled by default Warnings and Errors This option causes the boot process to configure the speed of the following options: ● Prompt on Warnings and Errors-enabled by default ● Continue on Warnings ● Continue on battery power. Select one of the following options: ● Serial Mouse ● PS/2 Mouse ● Touchpad and PS/2 Mouse-enabled by default ● Auto Extend BIOS POST...
... setup 107 Pre-boot behavior Table 14. Enable Dock Warning Messages - enabled by default Warnings and Errors This option causes the boot process to configure the speed of the following options: ● Prompt on Warnings and Errors-enabled by default ● Continue on Warnings ● Continue on battery power. Select one of the following options: ● Serial Mouse ● PS/2 Mouse ● Touchpad and PS/2 Mouse-enabled by default ● Auto Extend BIOS POST...
Service Manual
Page 110
... reboot. Flashing the BIOS from the F12 One-Time boot menu Updating your system. About this BIOS update option. Click Save to access the One-Time Boot Menu. 3. Updating BIOS on Dell Systems With BitLocker Enabled Updating the Dell BIOS in Linux and Ubuntu environments If you want to progress and the system will not recognize the BitLocker key. Select BIOS Update using the mouse or arrow keys then press Enter. 110 System setup If the recovery key is listed...
... reboot. Flashing the BIOS from the F12 One-Time boot menu Updating your system. About this BIOS update option. Click Save to access the One-Time Boot Menu. 3. Updating BIOS on Dell Systems With BitLocker Enabled Updating the Dell BIOS in Linux and Ubuntu environments If you want to progress and the system will not recognize the BitLocker key. Select BIOS Update using the mouse or arrow keys then press Enter. 110 System setup If the recovery key is listed...
Service Manual
Page 119
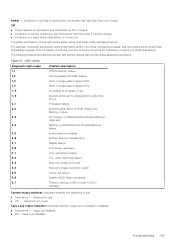
... EC code flow errors Processor failure System board: BIOS or ROM (Read-Only Memory) failure No memory or RAM (Random-Access Memory) detected Memory or RAM (Random-Access Memory) failure Invalid memory installed System-board or chipset error Display failure LCD power rail failure. Caps Lock enabled. ● Off-Caps Lock disabled. Troubleshooting 119 The following table shows different power and battery-status light patterns and associated problems. Table 21. Camera is in sleep state, hibernation, or turned off indicating no memory or RAM is in use...
... EC code flow errors Processor failure System board: BIOS or ROM (Read-Only Memory) failure No memory or RAM (Random-Access Memory) detected Memory or RAM (Random-Access Memory) failure Invalid memory installed System-board or chipset error Display failure LCD power rail failure. Caps Lock enabled. ● Off-Caps Lock disabled. Troubleshooting 119 The following table shows different power and battery-status light patterns and associated problems. Table 21. Camera is in sleep state, hibernation, or turned off indicating no memory or RAM is in use...
Service Manual
Page 120
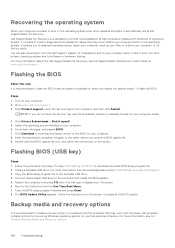
... Boot Menu. 7. Create a bootable USB drive. Type the BIOS setup program filename and press Enter. 8. Boot to the USB drive from the Dell Support website to download the latest version of your computer when it myself. 5. Click Download to troubleshoot and fix your computer, and then click Submit. Turn on the screen to the operating system even after repeated attempts, it automatically starts Dell SupportAssist OS Recovery. Backup media and recovery options It is recommended to create a recovery drive to troubleshoot and fix problems...
... Boot Menu. 7. Create a bootable USB drive. Type the BIOS setup program filename and press Enter. 8. Boot to the USB drive from the Dell Support website to download the latest version of your computer when it myself. 5. Click Download to troubleshoot and fix your computer, and then click Submit. Turn on the screen to the operating system even after repeated attempts, it automatically starts Dell SupportAssist OS Recovery. Backup media and recovery options It is recommended to create a recovery drive to troubleshoot and fix problems...


