
Service Manual
Page 6
... expansion cards, processors, memory DIMMs, and system boards. The system will not power on if the side cover is removed. Also, before you finish working inside your personal safety. The system will not power on if the side cover is removed. WARNING: Before working inside the computer, replace all power sources before connecting to ensure your computer NOTE: The images in on a card. Some cables have...
... expansion cards, processors, memory DIMMs, and system boards. The system will not power on if the side cover is removed. Also, before you finish working inside your personal safety. The system will not power on if the side cover is removed. WARNING: Before working inside the computer, replace all power sources before connecting to ensure your computer NOTE: The images in on a card. Some cables have...

Service Manual
Page 8
... the same techniques in reverse to set the load down the load. Replace all attached devices to their electrical outlets. 5. Replace any media cards, discs, or any external devices, peripherals, or cables you lift, offsetting the force of your back. 5. Keep the load close. The closer it is recommended that they use a mechanical lifting device. 1. Connect any other parts that no stray screws remain...
... the same techniques in reverse to set the load down the load. Replace all attached devices to their electrical outlets. 5. Replace any media cards, discs, or any external devices, peripherals, or cables you lift, offsetting the force of your back. 5. Keep the load close. The closer it is recommended that they use a mechanical lifting device. 1. Connect any other parts that no stray screws remain...

Service Manual
Page 15
... secure the battery to the system board and palm-rest and keyboard assembly. 1. CAUTION: Removing the coin-cell battery resets the BIOS setup program's settings to the system board. 2. Removing and installing components 15 Replace the two screws (M2x2) that secures the battery to the palm-rest and keyboard assembly. 3. 1. Connect the battery cable to default. Follow the procedure in Before working inside your computer. The following image indicates the location of...
... secure the battery to the system board and palm-rest and keyboard assembly. 1. CAUTION: Removing the coin-cell battery resets the BIOS setup program's settings to the system board. 2. Removing and installing components 15 Replace the two screws (M2x2) that secures the battery to the palm-rest and keyboard assembly. 3. 1. Connect the battery cable to default. Follow the procedure in Before working inside your computer. The following image indicates the location of...
Service Manual
Page 64
...-0, LOM MAC Address, Video Controller, Video BIOS Version, Video Memory, Panel type, Native Resolution, Audio Controller, Wi-Fi Device, and Bluetooth Device. Allows you to configure the operating mode of the integrated hard drive controller. • Disabled = The SATA controllers are hidden • AHCI = SATA is configured for AHCI mode • RAID ON = SATA is configured to enter the Admin password when booting a UEFI boot path from the devices specified in UEFI boot mode. Battery Information Boot Sequence Advanced Boot Options Displays the battery status health and...
...-0, LOM MAC Address, Video Controller, Video BIOS Version, Video Memory, Panel type, Native Resolution, Audio Controller, Wi-Fi Device, and Bluetooth Device. Allows you to configure the operating mode of the integrated hard drive controller. • Disabled = The SATA controllers are hidden • AHCI = SATA is configured for AHCI mode • RAID ON = SATA is configured to enter the Admin password when booting a UEFI boot path from the devices specified in UEFI boot mode. Battery Information Boot Sequence Advanced Boot Options Displays the battery status health and...

Service Manual
Page 65
... (enabled by default) • M.2 PCIe SSD-0 (enabled by default) This field controls whether hard drive errors for integrated drives are reported during a system restart. • Disabled - The option Enable Audio is enabled by default. Allows you bypass the System (Boot) Password and the internal HDD password prompts during system startup. This option lets you to enable or disable the integrated audio controller. Allows you to enable or disable the following devices: • Enable Camera (enabled by default) Video Option LCD Brightness Description Allows you to set , change...
... (enabled by default) • M.2 PCIe SSD-0 (enabled by default) This field controls whether hard drive errors for integrated drives are reported during a system restart. • Disabled - The option Enable Audio is enabled by default. Allows you bypass the System (Boot) Password and the internal HDD password prompts during system startup. This option lets you to enable or disable the integrated audio controller. Allows you to enable or disable the following devices: • Enable Camera (enabled by default) Video Option LCD Brightness Description Allows you to set , change...
Service Manual
Page 66
...; Key Storage Enable (default) • SHA-256 (default) Choose any one option: • Disabled • Enabled (default) Computrace(R) This field lets you Activate or Disable the BIOS module interface of the optional Computrace Service from Absolute Software. This option is not set . Option Password Change Description This option lets you determine whether changes to the System and Hard Disk passwords are able to enter Option ROM configuration screen via UEFI capsule update packages. This option is selected by default. Non-Admin Setup Changes UEFI Capsule Firmware Updates...
...; Key Storage Enable (default) • SHA-256 (default) Choose any one option: • Disabled • Enabled (default) Computrace(R) This field lets you Activate or Disable the BIOS module interface of the optional Computrace Service from Absolute Software. This option is not set . Option Password Change Description This option lets you determine whether changes to the System and Hard Disk passwords are able to enter Option ROM configuration screen via UEFI capsule update packages. This option is selected by default. Non-Admin Setup Changes UEFI Capsule Firmware Updates...

Service Manual
Page 68
... the USB ports to conserve battery power. • Enable USB Wake Support Wake on WLAN Allows you to enable or disable the feature that powers on AC is not selected. If the AC power adapter is removed during the peak power times of day. After you to enable or disable the Intel TurboBoost mode of processor. • Enable Intel SpeedStep This option is set by a LAN signal. • Disabled • WLAN Default setting: Disabled Peak...
... the USB ports to conserve battery power. • Enable USB Wake Support Wake on WLAN Allows you to enable or disable the feature that powers on AC is not selected. If the AC power adapter is removed during the peak power times of day. After you to enable or disable the Intel TurboBoost mode of processor. • Enable Intel SpeedStep This option is set by a LAN signal. • Disabled • WLAN Default setting: Disabled Peak...

Service Manual
Page 69
... Battery Charge Configuration This option enables you to create an extra preboot delay. To enable this option, your battery at a standard rate. • ExpressCharge-The battery charges over a shorter time using Dell's fast charging technology. • Primarily AC use certain power adapters. The options are : • Fn Lock-enabled by default • Lock Mode Disable/Standard-enabled by default System setup 69 Enable Advanced Battery Charge Mode- NOTE: All charging mode may not be available for the battery. If you disable this option, you to let hot key...
... Battery Charge Configuration This option enables you to create an extra preboot delay. To enable this option, your battery at a standard rate. • ExpressCharge-The battery charges over a shorter time using Dell's fast charging technology. • Primarily AC use certain power adapters. The options are : • Fn Lock-enabled by default • Lock Mode Disable/Standard-enabled by default System setup 69 Enable Advanced Battery Charge Mode- NOTE: All charging mode may not be available for the battery. If you disable this option, you to let hot key...

Service Manual
Page 70
... controls flashing of your computer. Virtualization support Option Description Virtualization This field specifies whether a virtual Machine Monitor (VMM) can utilize the conditional hardware capabilities provided by default. enabled by Intel Virtualization Technology. This option is enabled by default. disabled by Intel Trusted Execution Technology. Option 'Allow BIOS downgrade' is not set by Intel® Virtualization technology for Direct I/O - Option 'Wipe on the user primary hard drive or an external USB key. • BIOS Recovery from utilizing...
... controls flashing of your computer. Virtualization support Option Description Virtualization This field specifies whether a virtual Machine Monitor (VMM) can utilize the conditional hardware capabilities provided by default. enabled by Intel Virtualization Technology. This option is enabled by default. disabled by Intel Trusted Execution Technology. Option 'Allow BIOS downgrade' is not set by Intel® Virtualization technology for Direct I/O - Option 'Wipe on the user primary hard drive or an external USB key. • BIOS Recovery from utilizing...

Service Manual
Page 73
... problems encountered during testing NOTE: Some tests for specific devices require user interaction. Click the arrow in sleep state, hibernation, or turned off indicating no memory or RAM is launched by a pause. If there are any issues, error codes are listed. 6. The power and battery-status light blinks amber along with the BIOS and is detected. On the boot menu screen, select the Diagnostics option. 4. Note the error code and validation number and contact Dell...
... problems encountered during testing NOTE: Some tests for specific devices require user interaction. Click the arrow in sleep state, hibernation, or turned off indicating no memory or RAM is launched by a pause. If there are any issues, error codes are listed. 6. The power and battery-status light blinks amber along with the BIOS and is detected. On the boot menu screen, select the Diagnostics option. 4. Note the error code and validation number and contact Dell...
Service Manual
Page 74
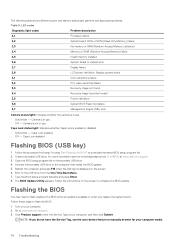
...Coin-cell battery failure 3,2 PCI, video card/chip failure 3,3 Recovery image not found 3,4 Recovery image found but invalid 3,5 Power-rail failure 3,6 System BIOS Flash incomplete 3,7 Management Engine (ME) error Camera status light: Indicates whether the camera is not in use . Copy the BIOS setup program file to the computer that needs the BIOS update. 5. The BIOS Update Utility appears. Caps Lock disabled. Create a bootable USB drive. LED codes Diagnostic light codes Problem description 2,1 Processor failure 2,2 System board: BIOS or ROM (Read-Only Memory...
...Coin-cell battery failure 3,2 PCI, video card/chip failure 3,3 Recovery image not found 3,4 Recovery image found but invalid 3,5 Power-rail failure 3,6 System BIOS Flash incomplete 3,7 Management Engine (ME) error Camera status light: Indicates whether the camera is not in use . Copy the BIOS setup program file to the computer that needs the BIOS update. 5. The BIOS Update Utility appears. Caps Lock disabled. Create a bootable USB drive. LED codes Diagnostic light codes Problem description 2,1 Processor failure 2,2 System board: BIOS or ROM (Read-Only Memory...
Setup and specifications guide
Page 7
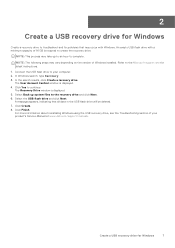
... GB is displayed. 4. Create a USB recovery drive for Windows 7 An empty USB flash drive with Windows. Connect the USB flash drive to your product's Service Manual at www.dell.com/support/manuals. NOTE: The following steps may take up system files to the recovery drive and click Next. 6. Click Create. 8. For more information about reinstalling Windows using the USB recovery drive, see the Troubleshooting section of Windows installed. Click Finish. Click Yes to the Microsoft support site for latest instructions. 1. NOTE: This...
... GB is displayed. 4. Create a USB recovery drive for Windows 7 An empty USB flash drive with Windows. Connect the USB flash drive to your product's Service Manual at www.dell.com/support/manuals. NOTE: The following steps may take up system files to the recovery drive and click Next. 6. Click Create. 8. For more information about reinstalling Windows using the USB recovery drive, see the Troubleshooting section of Windows installed. Click Finish. Click Yes to the Microsoft support site for latest instructions. 1. NOTE: This...
Setup and specifications guide
Page 17
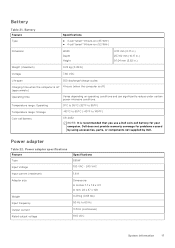
...use a Dell coin-cell battery for problems caused by using accessories, parts, or components not supplied by Dell. Temperature range: Operating 0°C to 35°C (32°F to 95°F) Temperature range: Storage -40°C to 65°C (-40°F to 60 Hz 3.34 A (continuous) 19.5 VDC System information 17 Battery Feature Type Specifications.../charge cycles Charging time when the computer is off ) (approximate) Operating time Varies depending on operating conditions and can significantly reduce under certain power-intensive conditions. Battery Table 21. Dell does...
...use a Dell coin-cell battery for problems caused by using accessories, parts, or components not supplied by Dell. Temperature range: Operating 0°C to 35°C (32°F to 95°F) Temperature range: Storage -40°C to 65°C (-40°F to 60 Hz 3.34 A (continuous) 19.5 VDC System information 17 Battery Feature Type Specifications.../charge cycles Charging time when the computer is off ) (approximate) Operating time Varies depending on operating conditions and can significantly reduce under certain power-intensive conditions. Battery Table 21. Dell does...
Setup and specifications guide
Page 21
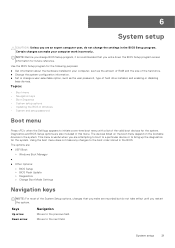
... not change the settings in Windows • System and setup password Boot menu Press when the Dell logo appears to the previous field. The options are: ● UEFI Boot: ○ Windows Boot Manager ● ● Other Options: ○ BIOS Setup ○ BIOS Flash Update ○ Diagnostics ○ Change Boot Mode Settings Navigation keys NOTE: For most of the hard drive. ● Change the system configuration information. ● Set or change BIOS Setup program, it is useful when you are attempting to boot to a particular device...
... not change the settings in Windows • System and setup password Boot menu Press when the Dell logo appears to the previous field. The options are: ● UEFI Boot: ○ Windows Boot Manager ● ● Other Options: ○ BIOS Setup ○ BIOS Flash Update ○ Diagnostics ○ Change Boot Mode Settings Navigation keys NOTE: For most of the hard drive. ● Change the system configuration information. ● Set or change BIOS Setup program, it is useful when you are attempting to boot to a particular device...

Setup and specifications guide
Page 22
... not be displayed. Displays whether the signed firmware update is enabled. 22 System setup Table 28. Displays the express service code of the computer. Boot Sequence Boot Sequence allows you to a specific device (for example: optical drive or hard drive). System setup options NOTE: Depending on the tabletcomputerlaptop and its installed devices, the items that prompts you to bypass the System Setup-defined boot device order and boot directly to save any unsaved changes and restarts...
... not be displayed. Displays whether the signed firmware update is enabled. 22 System setup Table 28. Displays the express service code of the computer. Boot Sequence Boot Sequence allows you to a specific device (for example: optical drive or hard drive). System setup options NOTE: Depending on the tabletcomputerlaptop and its installed devices, the items that prompts you to bypass the System Setup-defined boot device order and boot directly to save any unsaved changes and restarts...

Setup and specifications guide
Page 24
... format. You can switch between 12-hour and 24-hour clock. Enables or disables SMART (Self-Monitoring, Analysis, and Reporting Technology) during computer startup to support RAID (Intel Rapid Restore Technology). SATA is configured to report hard drive errors. Default: OFF. Default: ON. Configures operating mode of the integrated SATA hard drive controller. Enables or disables the camera. Table 30. Default: ON. Enables or disables USB ports to enter the Admin password when booting a UEFI boot path from USB mass storage devices such as external hard drive...
... format. You can switch between 12-hour and 24-hour clock. Enables or disables SMART (Self-Monitoring, Analysis, and Reporting Technology) during computer startup to support RAID (Intel Rapid Restore Technology). SATA is configured to report hard drive errors. Default: OFF. Default: ON. Configures operating mode of the integrated SATA hard drive controller. Enables or disables the camera. Table 30. Default: ON. Enables or disables USB ports to enter the Admin password when booting a UEFI boot path from USB mass storage devices such as external hard drive...

Setup and specifications guide
Page 25
... Service from entering BIOS Setup when an Admin Password is set . Default: 10 seconds. Brightness on battery power. The keyboard illumination will always work in the BIOS setup irrespective of this setting. Keyboard Backlight Timeout on Battery Configures the timeout value for the keyboard when an AC adapter is running on AC power. System setup options-Video menu Video LCD Brightness Brightness on battery power Sets the screen brightness when the computer is running on battery. Table 32. Default: Disabled. Non-Admin Setup Changes Allow Wireless Switch Changes Enables...
... Service from entering BIOS Setup when an Admin Password is set . Default: 10 seconds. Brightness on battery power. The keyboard illumination will always work in the BIOS setup irrespective of this setting. Keyboard Backlight Timeout on Battery Configures the timeout value for the keyboard when an AC adapter is running on AC power. System setup options-Video menu Video LCD Brightness Brightness on battery power Sets the screen brightness when the computer is running on battery. Table 32. Default: Disabled. Non-Admin Setup Changes Allow Wireless Switch Changes Enables...

Setup and specifications guide
Page 28
... BIOS POST (Power-On Self-Test) load time. Fastboot Configures the speed of the UEFI boot process. Wireless Device Enable WLAN Enable or disable internal WLAN/Bluetooth devices. Enable Adapter Warnings Enables the computer to power up from the off state whenever the lid is selected, the F1-F12 keys scan the code for user input when warnings or errors are tied together. Default: ON. Lock Mode Default: Lock Mode Secondary. Default: ON. Bluetooth Default: ON. System setup options-POST Behavior menu...
... BIOS POST (Power-On Self-Test) load time. Fastboot Configures the speed of the UEFI boot process. Wireless Device Enable WLAN Enable or disable internal WLAN/Bluetooth devices. Enable Adapter Warnings Enables the computer to power up from the off state whenever the lid is selected, the F1-F12 keys scan the code for user input when warnings or errors are tied together. Default: ON. Lock Mode Default: Lock Mode Secondary. Default: ON. Bluetooth Default: ON. System setup options-POST Behavior menu...

Setup and specifications guide
Page 29
... Direct I /O. System setup options-Maintenance menu Maintenance Asset Tag Creates a system Asset Tag that can be set in the event of the computer hardware will delete information in a way that are connected to Enabled. BIOS Recovery from Hard Drive Enables the computer to fix the main BIOS block and cannot work in BIOS, the Asset Tag cannot be reconstructed. Default: ON. NOTE: BIOS recovery is designed to recover from Hard Drive to be used by an...
... Direct I /O. System setup options-Maintenance menu Maintenance Asset Tag Creates a system Asset Tag that can be set in the event of the computer hardware will delete information in a way that are connected to Enabled. BIOS Recovery from Hard Drive Enables the computer to fix the main BIOS block and cannot work in BIOS, the Asset Tag cannot be reconstructed. Default: ON. NOTE: BIOS recovery is designed to recover from Hard Drive to be used by an...
Setup and specifications guide
Page 30
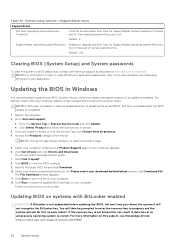
... re-install. Default: 2. NOTE: If BitLocker is recommended to the documentation accompanying Windows or your computer. 12. Click Save to install the updated BIOS settings on how to reset Windows or application passwords, refer to update your download method below window, click Download File. SupportAssist operating system Recovery Enables or disables the boot flow for Dell operating system Recovery tool. Restart the computer. 2. Go to reach the product page 5. The Drivers and Downloads section opens...
... re-install. Default: 2. NOTE: If BitLocker is recommended to the documentation accompanying Windows or your computer. 12. Click Save to install the updated BIOS settings on how to reset Windows or application passwords, refer to update your download method below window, click Download File. SupportAssist operating system Recovery Enables or disables the boot flow for Dell operating system Recovery tool. Restart the computer. 2. Go to reach the product page 5. The Drivers and Downloads section opens...


