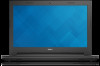
Dell Vostro 14 3446 Owners Manual
Page 3
... Turning Off Your Computer...7 After Working Inside Your Computer 7 2 Removing and Installing Components 9 System Overview...9 Removing the Battery...11 Installing the Battery...12 Removing the Optical Disk Drive...12 Installing the Optical-Disk Drive...12 Removing the Access Panel...12 Installing the Access Panel...13 Removing the Hard Drive...13 Installing the Hard Drive...14 Removing the Memory Module...14 Installing the Memory Module...15 Removing the WLAN Card...15 Installing the WLAN Card...16 Removing the Keyboard...16 Installing the Keyboard...17 Removing the Palmrest...18 Installing...
... Turning Off Your Computer...7 After Working Inside Your Computer 7 2 Removing and Installing Components 9 System Overview...9 Removing the Battery...11 Installing the Battery...12 Removing the Optical Disk Drive...12 Installing the Optical-Disk Drive...12 Removing the Access Panel...12 Installing the Access Panel...13 Removing the Hard Drive...13 Installing the Hard Drive...14 Removing the Memory Module...14 Installing the Memory Module...15 Removing the WLAN Card...15 Installing the WLAN Card...16 Removing the Keyboard...16 Installing the Keyboard...17 Removing the Palmrest...18 Installing...
Dell Vostro 14 3446 Owners Manual
Page 4
Removing the Power Connector...30 Installing the Power Connector...31 3 System Setup...33 Boot Sequence...33 Navigation Keys...33 System Setup Options...34 Updating the BIOS ...38 System and Setup Password...38 Assigning a System Password and Setup Password 39 Deleting or Changing an Existing System and/or Setup Password 39 4 Diagnostics...41 Enhanced Pre-Boot System Assessment (ePSA) Diagnostics 41 5 Specifications...43 Specifications...43 6 Contacting Dell...49 Contacting Dell...49
Removing the Power Connector...30 Installing the Power Connector...31 3 System Setup...33 Boot Sequence...33 Navigation Keys...33 System Setup Options...34 Updating the BIOS ...38 System and Setup Password...38 Assigning a System Password and Setup Password 39 Deleting or Changing an Existing System and/or Setup Password 39 4 Diagnostics...41 Enhanced Pre-Boot System Assessment (ePSA) Diagnostics 41 5 Specifications...43 Specifications...43 6 Contacting Dell...49 Contacting Dell...49
Dell Vostro 14 3446 Owners Manual
Page 5
... before opening the computer cover or panels. Hold a card by its edges or by a certified service technician. Unless otherwise noted, each procedure included in on the locking tabs before you disconnect a cable, pull on its connector or on a card. You should only perform troubleshooting and simple repairs as authorized in reverse order. Damage due to ensure your work surface is not covered by...
... before opening the computer cover or panels. Hold a card by its edges or by a certified service technician. Unless otherwise noted, each procedure included in on the locking tabs before you disconnect a cable, pull on its connector or on a card. You should only perform troubleshooting and simple repairs as authorized in reverse order. Damage due to ensure your work surface is not covered by...
Dell Vostro 14 3446 Owners Manual
Page 6
... computer is connected to ground the system board. Press the power button to a docking device (docked), undock it. While you service the computer. 7. Turn the computer top-side up. 9. Remove any installed ExpressCards or Smart Cards from their electrical outlets. 6. CAUTION: Before touching anything inside your computer and all network cables from the network device. 4. Disconnect all attached devices from the appropriate slots. Close the display and turn the...
... computer is connected to ground the system board. Press the power button to a docking device (docked), undock it. While you service the computer. 7. Turn the computer top-side up. 9. Remove any installed ExpressCards or Smart Cards from their electrical outlets. 6. CAUTION: Before touching anything inside your computer and all network cables from the network device. 4. Disconnect all attached devices from the appropriate slots. Close the display and turn the...
Dell Vostro 14 3446 Owners Manual
Page 7
... the operating system: • In Windows 8: - Click Start . 2. Click Start . 2. Click the arrow in from the right edge of the Start menu as an ExpressCard. 2. Ensure that the computer and all attached devices are turned off when you turn off . Connect any external devices, such as a port replicator or media base, and replace any telephone or network cables to the computer, use batteries designed for this particular Dell computer. Replace the battery. 4.
... the operating system: • In Windows 8: - Click Start . 2. Click Start . 2. Click the arrow in from the right edge of the Start menu as an ExpressCard. 2. Ensure that the computer and all attached devices are turned off when you turn off . Connect any external devices, such as a port replicator or media base, and replace any telephone or network cables to the computer, use batteries designed for this particular Dell computer. Replace the battery. 4.
Dell Vostro 14 3446 Owners Manual
Page 11
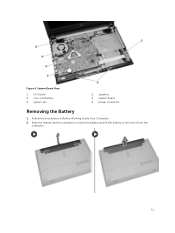
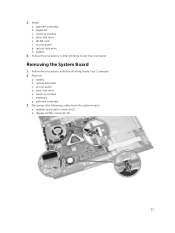
speakers 4. Follow the procedures in Before Working Inside Your Computer. 2. coin-cell battery 5. Figure 4. System Board View 1. system board 6. power connector Removing the Battery 1. Slide the release latches outwards to unlock the battery and lift the battery to remove it from the computer. 11 system fan 2. I/O board 3.
speakers 4. Follow the procedures in Before Working Inside Your Computer. 2. coin-cell battery 5. Figure 4. System Board View 1. system board 6. power connector Removing the Battery 1. Slide the release latches outwards to unlock the battery and lift the battery to remove it from the computer. 11 system fan 2. I/O board 3.
Dell Vostro 14 3446 Owners Manual
Page 14
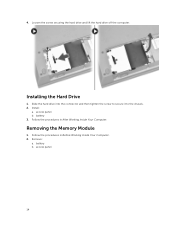
Loosen the screw securing the hard drive and lift the hard drive off the computer. Installing the Hard Drive 1. Follow the procedures in Before Working Inside Your Computer. 2. Follow the procedures in After Working Inside Your Computer. Slide the hard drive into the connector and then tighten the screw to secure it to the chassis. 2. Removing the Memory Module 1. access panel b. Remove: a. access panel 14 Install: a. battery b. battery 3. 4.
Loosen the screw securing the hard drive and lift the hard drive off the computer. Installing the Hard Drive 1. Follow the procedures in Before Working Inside Your Computer. 2. Follow the procedures in After Working Inside Your Computer. Slide the hard drive into the connector and then tighten the screw to secure it to the chassis. 2. Removing the Memory Module 1. access panel b. Remove: a. access panel 14 Install: a. battery b. battery 3. 4.
Dell Vostro 14 3446 Owners Manual
Page 15
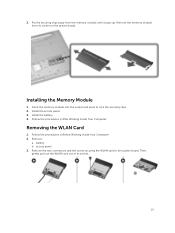
... After Working Inside Your Computer. access panel 3. Installing the Memory Module 1. Install the battery. 4. battery b. Insert the memory module into the socket and press to the system board. Follow the procedures in Before Working Inside Your Computer. 2. Remove the two connectors and the screw securing the WLAN card to lock the securing clips. 2. 3. Pry the securing clips away from its socket. 15 Remove: a. Install the access panel. 3. Removing the WLAN Card 1. Then...
... After Working Inside Your Computer. access panel 3. Installing the Memory Module 1. Install the battery. 4. battery b. Insert the memory module into the socket and press to the system board. Follow the procedures in Before Working Inside Your Computer. 2. Remove the two connectors and the screw securing the WLAN card to lock the securing clips. 2. 3. Pry the securing clips away from its socket. 15 Remove: a. Install the access panel. 3. Removing the WLAN Card 1. Then...
Dell Vostro 14 3446 Owners Manual
Page 19
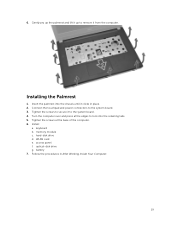
hard-disk drive d. Connect the touchpad and power connectors to remove it up to the system board. 3. Install: a. optical-disk drive g. Tighten the screws at the edges to the system board. 4. keyboard b. access panel f. Gently pry up the palmrest and lift it from the computer. Tighten the screws to secure it clicks in After Working Inside Your Computer. 19 6. memory module c. WLAN card e. Turn the computer over and press at the...
hard-disk drive d. Connect the touchpad and power connectors to remove it up to the system board. 3. Install: a. optical-disk drive g. Tighten the screws at the edges to the system board. 4. keyboard b. access panel f. Gently pry up the palmrest and lift it from the computer. Tighten the screws to secure it clicks in After Working Inside Your Computer. 19 6. memory module c. WLAN card e. Turn the computer over and press at the...
Dell Vostro 14 3446 Owners Manual
Page 20
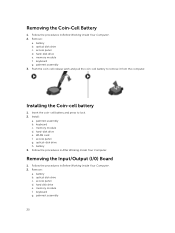
... memory module d. Remove: a. access panel d. Installing the Coin-cell battery 1. Install: a. hard disk drive e. memory module f. Remove: a. optical disk drive c. Removing the Coin-Cell Battery 1. Follow the procedures in Before Working Inside Your Computer. 2. optical disk drive c. access panel d. keyboard g. Push the coin-cell release latch and pull the coin-cell battery to lock. 2. palmrest assembly b. keyboard c. hard-disk drive e. WLAN card f. battery 3. Follow the procedures in After Working Inside Your Computer. Removing the Input/Output (I/0) Board...
... memory module d. Remove: a. access panel d. Installing the Coin-cell battery 1. Install: a. hard disk drive e. memory module f. Remove: a. optical disk drive c. Removing the Coin-Cell Battery 1. Follow the procedures in Before Working Inside Your Computer. 2. optical disk drive c. access panel d. keyboard g. Push the coin-cell release latch and pull the coin-cell battery to lock. 2. palmrest assembly b. keyboard c. hard-disk drive e. WLAN card f. battery 3. Follow the procedures in After Working Inside Your Computer. Removing the Input/Output (I/0) Board...
Dell Vostro 14 3446 Owners Manual
Page 21
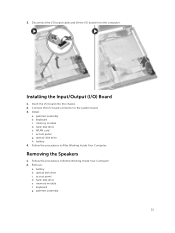
... b. keyboard c. hard-disk drive e. Follow the procedures in After Working Inside Your Computer. access panel d. Insert the I /O board from the computer. access panel g. Removing the Speakers 1. optical disk drive c. keyboard g. WLAN card f. memory module d. battery b. Connect the I /O) Board 1. Remove: a. hard-disk drive e. palmrest assembly 21 Follow the procedures in Before Working Inside Your Computer. 2. Installing the Input/Output (I /O board connector to the system board. 3. battery 4. memory module f. Install: a. 3. optical-disk drive h.
... b. keyboard c. hard-disk drive e. Follow the procedures in After Working Inside Your Computer. access panel d. Insert the I /O board from the computer. access panel g. Removing the Speakers 1. optical disk drive c. keyboard g. WLAN card f. memory module d. battery b. Connect the I /O) Board 1. Remove: a. hard-disk drive e. palmrest assembly 21 Follow the procedures in Before Working Inside Your Computer. 2. Installing the Input/Output (I /O board connector to the system board. 3. battery 4. memory module f. Install: a. 3. optical-disk drive h.
Dell Vostro 14 3446 Owners Manual
Page 23
hard-disk drive e. battery 4. Remove: a. palmrest assembly 3. Install: a. optical-disk drive h. Follow the procedures in Before Working Inside Your Computer. 2. battery b. hard-disk drive e. WLAN card f. optical disk drive c. access panel d. Disconnect the following cables from the system board: a. Follow the procedures in After Working Inside Your Computer. speaker and power connector(1) b. keyboard c. memory module d. memory module f. 3. access panel g. palmrest assembly b. keyboard g. Removing the System Board 1. display (LVDS) connector (2) ...
hard-disk drive e. battery 4. Remove: a. palmrest assembly 3. Install: a. optical-disk drive h. Follow the procedures in Before Working Inside Your Computer. 2. battery b. hard-disk drive e. WLAN card f. optical disk drive c. access panel d. Disconnect the following cables from the system board: a. Follow the procedures in After Working Inside Your Computer. speaker and power connector(1) b. keyboard c. memory module d. memory module f. 3. access panel g. palmrest assembly b. keyboard g. Removing the System Board 1. display (LVDS) connector (2) ...
Dell Vostro 14 3446 Owners Manual
Page 25
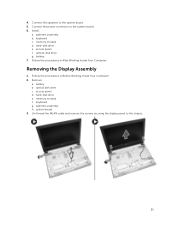
...drive g. Removing the Display Assembly 1. Un-thread the WLAN cable and remove the screws securing the display panel to the system board. 5. hard-disk drive e. optical disk drive c. hard-disk drive e. memory module f. system board 3. battery 7. Remove: a. access panel d. Follow the procedures in After Working Inside Your Computer. Connect the speakers to the chassis. 25 Follow the procedures in Before Working Inside Your Computer. 2. memory module d. palmrest assembly h. 4. Connect the power connector to the system board. 6. Install: a. keyboard...
...drive g. Removing the Display Assembly 1. Un-thread the WLAN cable and remove the screws securing the display panel to the system board. 5. hard-disk drive e. optical disk drive c. hard-disk drive e. memory module f. system board 3. battery 7. Remove: a. access panel d. Follow the procedures in After Working Inside Your Computer. Connect the speakers to the chassis. 25 Follow the procedures in Before Working Inside Your Computer. 2. memory module d. palmrest assembly h. 4. Connect the power connector to the system board. 6. Install: a. keyboard...
Dell Vostro 14 3446 Owners Manual
Page 27
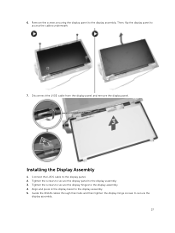
... cable from the display panel and remove the display panel. Align and press in the display bezel to secure the display assembly. 27 Installing the Display Assembly 1. Connect the LVDS cable to access the cables underneath. 7. Then, flip the display panel to the display panel. 2. Tighten the screws to secure the display hinges to the display assembly. 3. Tighten the screws to secure the display panel to the display assembly. 4. Remove the screws securing the display panel...
... cable from the display panel and remove the display panel. Align and press in the display bezel to secure the display assembly. 27 Installing the Display Assembly 1. Connect the LVDS cable to access the cables underneath. 7. Then, flip the display panel to the display panel. 2. Tighten the screws to secure the display hinges to the display assembly. 3. Tighten the screws to secure the display panel to the display assembly. 4. Remove the screws securing the display panel...
Dell Vostro 14 3446 Owners Manual
Page 33
... screen also displays the option to a specific device (for example: optical drive or hard drive). NOTE: For most of the system setup options, changes that you can : • Change the NVRAM settings after you add or remove hardware • View the system hardware configuration • Enable or disable integrated devices • Set performance and power management thresholds • Manage your computer hardware and specify BIOS‐level options. Navigation Keys The following table displays the system setup navigation keys. 3 System Setup System Setup enables...
... screen also displays the option to a specific device (for example: optical drive or hard drive). NOTE: For most of the system setup options, changes that you can : • Change the NVRAM settings after you add or remove hardware • View the system hardware configuration • Enable or disable integrated devices • Set performance and power management thresholds • Manage your computer hardware and specify BIOS‐level options. Navigation Keys The following table displays the system setup navigation keys. 3 System Setup System Setup enables...
Dell Vostro 14 3446 Owners Manual
Page 36
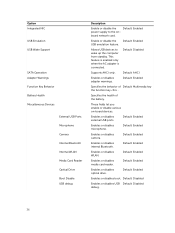
...adapter is connected. Enables or disables external USB ports. Default: Disabled Enables or disables USB Default: Disabled debug. 36 Option Integrated NIC USB Emulation USB Wake Support SATA Operation Adapter Warnings Function Key Behavior Battery Health Miscellaneous Devices External USB Ports Microphone Camera Internal Bluetooth Internal WLAN Media Card Reader Optical Drive Boot Disable USB debug Description Enable or disable the Default: Enabled power supply to wake up the computer from standby. Default: Disabled Supports AHCI only. Default: Enabled Enables or disables media card...
...adapter is connected. Enables or disables external USB ports. Default: Disabled Enables or disables USB Default: Disabled debug. 36 Option Integrated NIC USB Emulation USB Wake Support SATA Operation Adapter Warnings Function Key Behavior Battery Health Miscellaneous Devices External USB Ports Microphone Camera Internal Bluetooth Internal WLAN Media Card Reader Optical Drive Boot Disable USB debug Description Enable or disable the Default: Enabled power supply to wake up the computer from standby. Default: Disabled Supports AHCI only. Default: Enabled Enables or disables media card...
Dell Vostro 14 3446 Owners Manual
Page 37
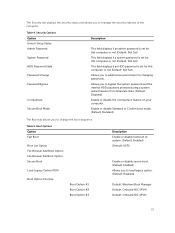
...) Enable or disable secure boot. (Default: Enabled) Allows you to add/remove permission for changing passwords. Enable or disable Standard or Custom boot mode. (Default: Standard) The Boot tab allows you to load legacy option. (Default: Disabled) Default: Windows Boot Manager Default: Onboard NIC (IPV4) Default: Onboard NIC (IPV6) 37 Boot Options Option Fast Boot Boot List Option File Browser Add Boot Option File Browser Del Boot Option Secure Boot Load Legacy Option ROM Boot Option Priorities Boot Option #1 Boot Option #2 Boot Option #3 Description Enable or disable fast boot...
...) Enable or disable secure boot. (Default: Enabled) Allows you to add/remove permission for changing passwords. Enable or disable Standard or Custom boot mode. (Default: Standard) The Boot tab allows you to load legacy option. (Default: Disabled) Default: Windows Boot Manager Default: Onboard NIC (IPV4) Default: Onboard NIC (IPV6) 37 Boot Options Option Fast Boot Boot List Option File Browser Add Boot Option File Browser Del Boot Option Secure Boot Load Legacy Option ROM Boot Option Priorities Boot Option #1 Boot Option #2 Boot Option #3 Description Enable or disable fast boot...
Dell Vostro 14 3446 Owners Manual
Page 38
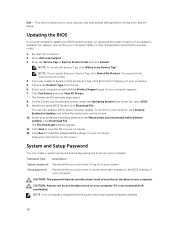
... Drivers and Downloads screen, under the Operating System drop-down list, select BIOS. 9. You can access the data stored on the screen. 10. Follow the instructions on your Service Tag, click Detect My Product. Password that you must enter to log on to install the updated BIOS settings on your computer. NOTE: Your computer is my Service Tag? For laptops, ensure that you are unable to a power outlet 1. Enter the Service...
... Drivers and Downloads screen, under the Operating System drop-down list, select BIOS. 9. You can access the data stored on the screen. 10. Follow the instructions on your Service Tag, click Detect My Product. Password that you must enter to log on to install the updated BIOS settings on your computer. NOTE: Your computer is my Service Tag? For laptops, ensure that you are unable to a power outlet 1. Enter the Service...

Dell Vostro 14 3446 Owners Manual
Page 41
... computer boots, press the key as system diagnostics) performs a complete check of problems encountered during testing CAUTION: Use the system diagnostics to stop the diagnostic test. 5. Note the error code and contact Dell. 41 Select the device from the left pane and click Run Tests. 6. If there are any issues, error codes are performed. 1. On the boot menu screen, select the Diagnostics option. If...
... computer boots, press the key as system diagnostics) performs a complete check of problems encountered during testing CAUTION: Use the system diagnostics to stop the diagnostic test. 5. Note the error code and contact Dell. 41 Select the device from the left pane and click Run Tests. 6. If there are any issues, error codes are performed. 1. On the boot menu screen, select the Diagnostics option. If...
Dell Vostro 14 3446 Owners Manual
Page 44
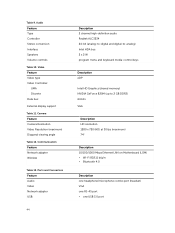
... bits VGA Description HD resolution 1280 x 720 (HD) at 30 fps (maximum) 74° Description 10/100/1000 Mbps Ethernet LAN on Motherboard (LOM) • Wi-Fi 802.11 b/g/n • Bluetooth 4.0 Description one headphone/microphone combo port (headset) VGA one RJ-45 port • one USB 3.0 port Communication Feature Network adapter Wireless Table 13. Video Feature Video type Video Controller: UMA Discrete Data bus: External display support Table 11.
... bits VGA Description HD resolution 1280 x 720 (HD) at 30 fps (maximum) 74° Description 10/100/1000 Mbps Ethernet LAN on Motherboard (LOM) • Wi-Fi 802.11 b/g/n • Bluetooth 4.0 Description one headphone/microphone combo port (headset) VGA one RJ-45 port • one USB 3.0 port Communication Feature Network adapter Wireless Table 13. Video Feature Video type Video Controller: UMA Discrete Data bus: External display support Table 11.


