Dell Vostro 2421/2521 Setup And Features Information
Page 1
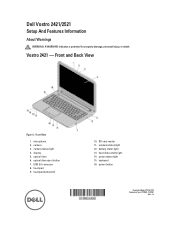
optical drive eject button 7. USB 2.0 connector 8. touchpad buttons (2) 10. SD card reader 11. microphone 2. battery status light 13. keyboard 16. camera status light 4. hard-disk activity light 14. Dell Vostro 2421/2521 Setup And Features Information About Warnings WARNING: A WARNING indicates a potential for property damage, personal injury, or death. camera 3. optical drive 6. Front View 1. touchpad...
optical drive eject button 7. USB 2.0 connector 8. touchpad buttons (2) 10. SD card reader 11. microphone 2. battery status light 13. keyboard 16. camera status light 4. hard-disk activity light 14. Dell Vostro 2421/2521 Setup And Features Information About Warnings WARNING: A WARNING indicates a potential for property damage, personal injury, or death. camera 3. optical drive 6. Front View 1. touchpad...
Dell Vostro 2421/2521 Setup And Features Information
Page 3
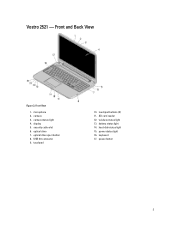
security cable slot 6. hard-disk status light 15. Front and Back View Figure 3. camera status light 4. display 5. touchpad 10. touchpad buttons (2) 11. camera 3. keyboard 17. microphone 2. optical drive 7. SD card reader 12. battery status light 14. power button 3 Front View 1. USB 2.0 connector 9. optical drive eject button 8. power status light 16. wireless status light 13. Vostro 2521 -
security cable slot 6. hard-disk status light 15. Front and Back View Figure 3. camera status light 4. display 5. touchpad 10. touchpad buttons (2) 11. camera 3. keyboard 17. microphone 2. optical drive 7. SD card reader 12. battery status light 14. power button 3 Front View 1. USB 2.0 connector 9. optical drive eject button 8. power status light 16. wireless status light 13. Vostro 2521 -
Dell Vostro 2421/2521 Setup And Features Information
Page 5
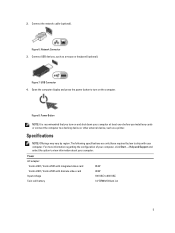
... Network Connector 3. Connect USB devices, such as a printer. USB Connector 4. Figure 8. Power AC adapter: Vostro 2421 / Vostro 2521 with integrated video card Vostro 2421 / Vostro 2521 with your computer. Specifications NOTE: Offerings may vary by law to a docking device or other external device, ... It is recommended that you install any cards or connect the computer to ship with discrete video card Input voltage Coin-cell battery 65 W 90 W 100 VAC to view information about your computer. 2. Connect the network cable (optional). The following specifications ...
... Network Connector 3. Connect USB devices, such as a printer. USB Connector 4. Figure 8. Power AC adapter: Vostro 2421 / Vostro 2521 with integrated video card Vostro 2421 / Vostro 2521 with your computer. Specifications NOTE: Offerings may vary by law to a docking device or other external device, ... It is recommended that you install any cards or connect the computer to ship with discrete video card Input voltage Coin-cell battery 65 W 90 W 100 VAC to view information about your computer. 2. Connect the network cable (optional). The following specifications ...
Dell Vostro 2521 Owner's Manual
Page 3
...Installing Components 9 Recommended Tools...9 Removing the Secure Digital (SD) Card...9 Installing the Secure Digital (SD) Card...9 Removing the Battery...9 Installing the Battery...10 Removing the Access Panel...10 Installing the Access Panel...10 Removing the Memory Module...11 Installing the Memory Module...11 Removing ...Output (I/O) Board...19 Removing the System Board...19 Installing the System Board...20 Removing the Coin-Cell Battery...21 Installing the Coin-Cell Battery...21 Removing the Heatsink...22 Installing the Heatsink...22 Removing the System Fan...23 Installing the System Fan......
...Installing Components 9 Recommended Tools...9 Removing the Secure Digital (SD) Card...9 Installing the Secure Digital (SD) Card...9 Removing the Battery...9 Installing the Battery...10 Removing the Access Panel...10 Installing the Access Panel...10 Removing the Memory Module...11 Installing the Memory Module...11 Removing ...Output (I/O) Board...19 Removing the System Board...19 Installing the System Board...20 Removing the Coin-Cell Battery...21 Installing the Coin-Cell Battery...21 Removing the Heatsink...22 Installing the Heatsink...22 Removing the System Fan...23 Installing the System Fan......
Dell Vostro 2521 Owner's Manual
Page 4
... and Setup Password 38 Deleting or Changing an Existing System and/or Setup Password 38 4 Diagnostics...41 Enhanced Pre-Boot System Assessment (ePSA) Diagnostics 41 Battery Status Lights...41 5 Troubleshooting...43 Enhanced Pre-Boot System Assessment (ePSA) Diagnostics 43 Diagnostics...43 Beep Codes...44 LED Error Codes...45 6 Technical Specifications...47...
... and Setup Password 38 Deleting or Changing an Existing System and/or Setup Password 38 4 Diagnostics...41 Enhanced Pre-Boot System Assessment (ePSA) Diagnostics 41 Battery Status Lights...41 5 Troubleshooting...43 Enhanced Pre-Boot System Assessment (ePSA) Diagnostics 43 Diagnostics...43 Beep Codes...44 LED Error Codes...45 6 Technical Specifications...47...
Dell Vostro 2521 Owner's Manual
Page 5
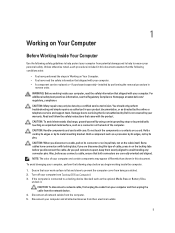
...a cable, pull on its connector or on its edges, not by periodically touching an unpainted metal surface, such as the optional Media Base or Battery Slice, undock it. NOTE: The color of your work surface is flat and clean to a docking device (docked) such as a connector on... the back of cable, press in your computer and all network cables from the computer. 5. Ensure that is not authorized by Dell is connected to prevent the computer cover from being scratched. 2. You should only perform troubleshooting and simple repairs as directed by a certified service ...
...a cable, pull on its connector or on its edges, not by periodically touching an unpainted metal surface, such as the optional Media Base or Battery Slice, undock it. NOTE: The color of your work surface is flat and clean to a docking device (docked) such as a connector on... the back of cable, press in your computer and all network cables from the computer. 5. Ensure that is not authorized by Dell is connected to prevent the computer cover from being scratched. 2. You should only perform troubleshooting and simple repairs as directed by a certified service ...
Dell Vostro 2521 Owner's Manual
Page 6
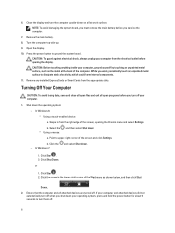
...programs before you work, periodically touch an unpainted metal surface to turn the computer upside-down on a flat work surface. Remove the main battery. 8. Open the display. 10. Remove any installed ExpressCards or Smart Cards from the electrical outlet before opening the Charms menu and select ... Shut down a. In Windows 7: and select Shut down your computer. 1. NOTE: To avoid damaging the system board, you must remove the main battery before you shut down . 1. or 1. Click the arrow in from the right edge of the screen and click Settings. Close the display and ...
...programs before you work, periodically touch an unpainted metal surface to turn the computer upside-down on a flat work surface. Remove the main battery. 8. Open the display. 10. Remove any installed ExpressCards or Smart Cards from the electrical outlet before opening the Charms menu and select ... Shut down a. In Windows 7: and select Shut down your computer. 1. NOTE: To avoid damaging the system board, you must remove the main battery before you shut down . 1. or 1. Click the arrow in from the right edge of the screen and click Settings. Close the display and ...
Dell Vostro 2521 Owner's Manual
Page 7
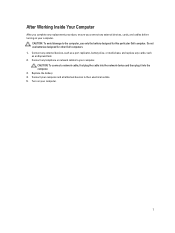
.... After Working Inside Your Computer After you complete any replacement procedure, ensure you connect any cards, such as an ExpressCard. 2. Do not use only the battery designed for other Dell computers. 1. Connect your computer and all attached devices to your computer. 7 Connect any telephone or network cables to their electrical outlets. 5.
.... After Working Inside Your Computer After you complete any replacement procedure, ensure you connect any cards, such as an ExpressCard. 2. Do not use only the battery designed for other Dell computers. 1. Connect your computer and all attached devices to your computer. 7 Connect any telephone or network cables to their electrical outlets. 5.

Dell Vostro 2521 Owner's Manual
Page 9
...screwdriver • Phillips screwdriver • Small plastic scribe Removing the Secure Digital (SD) Card 1. Slide the release latches outwards to unlock the battery and lift the battery to remove it clicks into place. 2. 2 Removing and Installing Components This section provides detailed information on the SD memory card to release it from...Computer. 2. Push the memory card into the compartment until it from the computer. 9 Follow the procedures in Before Working Inside Your Computer. 2. Removing the Battery 1. Follow the procedures in After Working Inside Your Computer.
...screwdriver • Phillips screwdriver • Small plastic scribe Removing the Secure Digital (SD) Card 1. Slide the release latches outwards to unlock the battery and lift the battery to remove it clicks into place. 2. 2 Removing and Installing Components This section provides detailed information on the SD memory card to release it from...Computer. 2. Push the memory card into the compartment until it from the computer. 9 Follow the procedures in Before Working Inside Your Computer. 2. Removing the Battery 1. Follow the procedures in After Working Inside Your Computer.
Dell Vostro 2521 Owner's Manual
Page 10
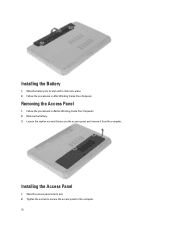
Removing the Access Panel 1. Loosen the captive screws that secure the access panel and remove it clicks into place. 2. Slide the access panel into its slot. 2. Installing the Access Panel 1. Tighten the screws to secure the access panel to the computer. 10 Slide the battery into its slot until it from the computer. Remove the battery. 3. Follow the procedures in After Working Inside Your Computer. Follow the procedures in Before Working Inside Your Computer. 2. Installing the Battery 1.
Removing the Access Panel 1. Loosen the captive screws that secure the access panel and remove it clicks into place. 2. Slide the access panel into its slot. 2. Installing the Access Panel 1. Tighten the screws to secure the access panel to the computer. 10 Slide the battery into its slot until it from the computer. Remove the battery. 3. Follow the procedures in After Working Inside Your Computer. Follow the procedures in Before Working Inside Your Computer. 2. Installing the Battery 1.

Dell Vostro 2521 Owner's Manual
Page 11
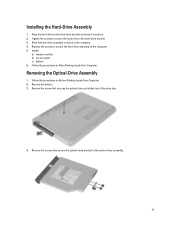
... Insert the memory module into the memory socket and press until it clicks into place. 2. Installing the Memory Module 1. Remove: a) battery b) access panel 3. Remove the screws that secure the hard-drive assembly to the computer. 11 Follow the procedures in Before Working Inside... Removing the Memory Module 1. Remove the memory module from the memory module until it pops up. Install: a) access panel b) battery 3. 3. Install the battery. 4. Follow the procedures in Before Working Inside Your Computer. 2. Follow the procedures in After Working Inside Your Computer.
... Insert the memory module into the memory socket and press until it clicks into place. 2. Installing the Memory Module 1. Remove: a) battery b) access panel 3. Remove the screws that secure the hard-drive assembly to the computer. 11 Follow the procedures in Before Working Inside... Removing the Memory Module 1. Remove the memory module from the memory module until it pops up. Install: a) access panel b) battery 3. 3. Install the battery. 4. Follow the procedures in Before Working Inside Your Computer. 2. Follow the procedures in After Working Inside Your Computer.
Dell Vostro 2521 Owner's Manual
Page 13
Removing the Optical-Drive Assembly 1. Remove the battery. 3. Follow the procedures in Before Working Inside Your Computer. 2. Remove the screw that secure the optical-drive bracket to the optical-drive assembly. 13 Follow ...the procedures in After Working Inside Your Computer. Slide the hard-drive assembly in its slot in the computer. 4. Install: a) memory module b) access panel c) battery 6. Align the hard drive on the hard-drive bracket and snap it out of the drive bay. 4. Remove the screws that secures the optical drive...
Removing the Optical-Drive Assembly 1. Remove the battery. 3. Follow the procedures in Before Working Inside Your Computer. 2. Remove the screw that secure the optical-drive bracket to the optical-drive assembly. 13 Follow ...the procedures in After Working Inside Your Computer. Slide the hard-drive assembly in its slot in the computer. 4. Install: a) memory module b) access panel c) battery 6. Align the hard drive on the hard-drive bracket and snap it out of the drive bay. 4. Remove the screws that secures the optical drive...
Dell Vostro 2521 Owner's Manual
Page 14
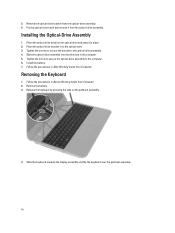
Place the optical-drive bracket in Before Working Inside Your Computer. 2. Removing the Keyboard 1. Remove the battery. 3. Remove the optical-drive bracket from the optical-drive assembly. Install the battery. 7. Slide the keyboard towards the display assembly and flip the keyboard over the palmrest assembly. 14 Tighten the screw to secure the optical...
Place the optical-drive bracket in Before Working Inside Your Computer. 2. Removing the Keyboard 1. Remove the battery. 3. Remove the optical-drive bracket from the optical-drive assembly. Install the battery. 7. Slide the keyboard towards the display assembly and flip the keyboard over the palmrest assembly. 14 Tighten the screw to secure the optical...

Dell Vostro 2521 Owner's Manual
Page 15
Install the battery. 4. Disconnect the keyboard cable from the connector on the system board. 2. Installing the Keyboard 1. Follow the procedures in its place on the computer and snap it into place. 3. Slide the keyboard in After Working Inside Your Computer. 15 Connect the keyboard cable to the connector on the system board and lift the keyboard off the palmrest assembly. 5.
Install the battery. 4. Disconnect the keyboard cable from the connector on the system board. 2. Installing the Keyboard 1. Follow the procedures in its place on the computer and snap it into place. 3. Slide the keyboard in After Working Inside Your Computer. 15 Connect the keyboard cable to the connector on the system board and lift the keyboard off the palmrest assembly. 5.

Dell Vostro 2521 Owner's Manual
Page 16
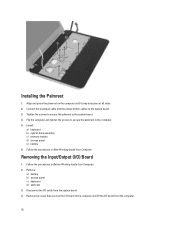
Follow the procedures in Before Working Inside Your Computer. 2. Removing the Palmrest 1. Remove: a) battery b) access panel c) memory module d) optical-drive assembly e) keyboard 3. Insert the wireless mini-card into its connector at... mini-card to their respective connectors marked on the system board. Install: a) keyboard b) optical-drive assembly c) memory module d) access panel e) battery 5. Remove: a) battery b) access panel c) memory module d) optical-drive assembly e) keyboard 3. Removing the Wireless Mini-Card 1. Follow the procedures in Before Working Inside Your...
Follow the procedures in Before Working Inside Your Computer. 2. Removing the Palmrest 1. Remove: a) battery b) access panel c) memory module d) optical-drive assembly e) keyboard 3. Insert the wireless mini-card into its connector at... mini-card to their respective connectors marked on the system board. Install: a) keyboard b) optical-drive assembly c) memory module d) access panel e) battery 5. Remove: a) battery b) access panel c) memory module d) optical-drive assembly e) keyboard 3. Removing the Wireless Mini-Card 1. Follow the procedures in Before Working Inside Your...
Dell Vostro 2521 Owner's Manual
Page 18
Remove: a) battery b) access panel c) keyboard d) palmrest 3. Follow the procedures in Before Working Inside Your Computer. 2. Align and press the plamrest on the computer until it snap into ... sides. 2. Flip the computer and tighten the screws to secure the palmrest to the system board. 4. Install: a) keyboard b) optical-drive assembly c) memory module d) access panel e) battery 6. Removing the Input/Output (I /O board from the system board. 4. Tighten the screws to secure the palmrest to the computer. 5. Follow the procedures in After Working...
Remove: a) battery b) access panel c) keyboard d) palmrest 3. Follow the procedures in Before Working Inside Your Computer. 2. Align and press the plamrest on the computer until it snap into ... sides. 2. Flip the computer and tighten the screws to secure the palmrest to the system board. 4. Install: a) keyboard b) optical-drive assembly c) memory module d) access panel e) battery 6. Removing the Input/Output (I /O board from the system board. 4. Tighten the screws to secure the palmrest to the computer. 5. Follow the procedures in After Working...

Dell Vostro 2521 Owner's Manual
Page 19
Install: a) palmrest b) keyboard c) optical-drive assembly d) memory module e) access panel f) battery 5. Remove: a) battery b) access panel c) memory module d) hard-drive assembly e) SD card f) optical-drive assembly g) keyboard h) palmrest i) wireless mini-card 3. Disconnect the display cable from the connector on ...
Install: a) palmrest b) keyboard c) optical-drive assembly d) memory module e) access panel f) battery 5. Remove: a) battery b) access panel c) memory module d) hard-drive assembly e) SD card f) optical-drive assembly g) keyboard h) palmrest i) wireless mini-card 3. Disconnect the display cable from the connector on ...

Dell Vostro 2521 Owner's Manual
Page 21
...Before Working Inside Your Computer. 2. Follow the procedures in After Working Inside Your Computer. Place the coin-cell battery in its slot. 2. 6. Remove: a) battery b) access panel c) memory module d) hard-drive assembly e) optical-drive assembly f) keyboard g) palmrest h) ...board b) wireless mini-card c) palmrest d) keyboard e) optical-drive assembly f) hard-drive assembly g) memory module h) access panel i) battery 21 Pry out the coin-cell battery from the system board. Install: a) wireless mini-card b) palmrest c) keyboard d) optical-drive assembly e) SD card f) hard-drive...
...Before Working Inside Your Computer. 2. Follow the procedures in After Working Inside Your Computer. Place the coin-cell battery in its slot. 2. 6. Remove: a) battery b) access panel c) memory module d) hard-drive assembly e) optical-drive assembly f) keyboard g) palmrest h) ...board b) wireless mini-card c) palmrest d) keyboard e) optical-drive assembly f) hard-drive assembly g) memory module h) access panel i) battery 21 Pry out the coin-cell battery from the system board. Install: a) wireless mini-card b) palmrest c) keyboard d) optical-drive assembly e) SD card f) hard-drive...

Dell Vostro 2521 Owner's Manual
Page 22
... the system board. 3. Align the heatsink in After Working Inside Your Computer. Follow the procedures in Before Working Inside Your Computer. 2. Removing the Heatsink 1. Remove: a) battery b) access panel c) memory module d) hard-drive assembly e) optical-drive assembly f) keyboard g) palmrest h) wireless mini-card i) system board 3. Follow the procedures in After Working ...on a flat surface. 4. Installing the Heatsink 1. Install: a) system board b) wireless mini-card c) palmrest d) keyboard e) optical-drive assembly f) hard-drive assembly g) memory module h) access panel i) battery 4.
... the system board. 3. Align the heatsink in After Working Inside Your Computer. Follow the procedures in Before Working Inside Your Computer. 2. Removing the Heatsink 1. Remove: a) battery b) access panel c) memory module d) hard-drive assembly e) optical-drive assembly f) keyboard g) palmrest h) wireless mini-card i) system board 3. Follow the procedures in After Working ...on a flat surface. 4. Installing the Heatsink 1. Install: a) system board b) wireless mini-card c) palmrest d) keyboard e) optical-drive assembly f) hard-drive assembly g) memory module h) access panel i) battery 4.
Dell Vostro 2521 Owner's Manual
Page 23
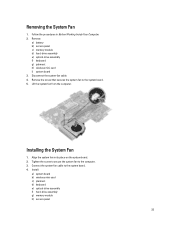
... the procedures in its place on the system board. 2. Installing the System Fan 1. Tighten the screw to secure the system fan to the computer. 3. Remove: a) battery b) access panel c) memory module d) hard-drive assembly e) optical-drive assembly f) keyboard g) palmrest h) wireless mini-card i) system board 3. Lift the system fan from the computer...
... the procedures in its place on the system board. 2. Installing the System Fan 1. Tighten the screw to secure the system fan to the computer. 3. Remove: a) battery b) access panel c) memory module d) hard-drive assembly e) optical-drive assembly f) keyboard g) palmrest h) wireless mini-card i) system board 3. Lift the system fan from the computer...

