Setup and Quick Reference Guide
Page 19
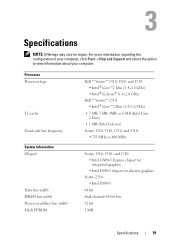
...Chipset Data bus width DRAM bus width Processor address bus width Flash EPROM Dell™ Vostro™ 1310, 1510, and 1710: • Intel® Core™2 Duo (1.4-2.6 GHz) • Intel® Celeron® (1.8-2.0 GHz) Dell™ Vostro™ 2510: • Intel® Core™2 Duo (1.4-2.6 GHz) •...; 2 MB, 3 MB, 4MB, or 6 MB (Intel Core 2 Duo) • 1 MB (Intel Celeron) Vostro 1310, 1510, 1710, and 2510: • 533 MHz or 800 MHz Vostro 1310, 1510, and 1710: ...
...Chipset Data bus width DRAM bus width Processor address bus width Flash EPROM Dell™ Vostro™ 1310, 1510, and 1710: • Intel® Core™2 Duo (1.4-2.6 GHz) • Intel® Celeron® (1.8-2.0 GHz) Dell™ Vostro™ 2510: • Intel® Core™2 Duo (1.4-2.6 GHz) •...; 2 MB, 3 MB, 4MB, or 6 MB (Intel Core 2 Duo) • 1 MB (Intel Celeron) Vostro 1310, 1510, 1710, and 2510: • 533 MHz or 800 MHz Vostro 1310, 1510, and 1710: ...
Service Manual
Page 1
.... Other trademarks and trade names may be used in the United States and/or other than its own. Dell™ Vostro™ 2510 Service Manual Troubleshooting Before Working on Your Computer Hard Drive Wireless Local Area Network (WLAN) Card Fan Processor Heat Sink.... NOTICE: A NOTICE indicates either trademarks or registered trademarks of Bluetooth SIG Inc. Trademarks used in this text: Dell, the DELL logo, and Vostro are not applicable. Dell Inc. Bluetooth is strictly forbidden. A00 Microsoft, Windows, Windows Vista, and the Windows start button logo are either potential ...
.... Other trademarks and trade names may be used in the United States and/or other than its own. Dell™ Vostro™ 2510 Service Manual Troubleshooting Before Working on Your Computer Hard Drive Wireless Local Area Network (WLAN) Card Fan Processor Heat Sink.... NOTICE: A NOTICE indicates either trademarks or registered trademarks of Bluetooth SIG Inc. Trademarks used in this text: Dell, the DELL logo, and Vostro are not applicable. Dell Inc. Bluetooth is strictly forbidden. A00 Microsoft, Windows, Windows Vista, and the Windows start button logo are either potential ...
Service Manual
Page 2
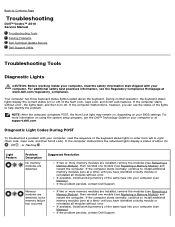
... Module), then reinstall one module (see the Dell™ Technology Guide on or off . Back to Contents Page Troubleshooting Dell™ Vostro™ 2510 Service Manual Troubleshooting Tools Solving Problems Dell Technical Update Service Dell Support Utility Troubleshooting Tools Diagnostic Lights CAUTION: Before...Pattern Problem Description No memory modules are detected, but a memory failure has occurred. If the problem persists, contact Dell Support. For additional safety best practices information, see Memory). During normal operation, the keyboard status lights display the ...
... Module), then reinstall one module (see the Dell™ Technology Guide on or off . Back to Contents Page Troubleshooting Dell™ Vostro™ 2510 Service Manual Troubleshooting Tools Solving Problems Dell Technical Update Service Dell Support Utility Troubleshooting Tools Diagnostic Lights CAUTION: Before...Pattern Problem Description No memory modules are detected, but a memory failure has occurred. If the problem persists, contact Dell Support. For additional safety best practices information, see Memory). During normal operation, the keyboard status lights display the ...

Service Manual
Page 16
... tabs to release the connector. For cable connectors with your computer. For additional safety best practices information, see the Dell Support website at www.dell.com/regulatory_compliance. NOTICE: To avoid electrostatic discharge, ground yourself by using a wrist grounding strap or by periodically touching...potential damage and to help ensure your own personal safety. Back to Contents Page Before Working on Your Computer Dell™ Vostro™ 2510 Service Manual Recommended Tools What You Need to Know for Your Safety This document provides procedures for removing and installing...
... tabs to release the connector. For cable connectors with your computer. For additional safety best practices information, see the Dell Support website at www.dell.com/regulatory_compliance. NOTICE: To avoid electrostatic discharge, ground yourself by using a wrist grounding strap or by periodically touching...potential damage and to help ensure your own personal safety. Back to Contents Page Before Working on Your Computer Dell™ Vostro™ 2510 Service Manual Recommended Tools What You Need to Know for Your Safety This document provides procedures for removing and installing...

Service Manual
Page 19
... the safety information that secure the hard-drive compartment cover. 4. For additional safety best practices information, see the Regulatory Compliance Homepage at www.dell.com/regulatory_compliance. Remove the cover and set it aside. 1 hard drive cover 2 M2.5 x 8-mm screws (2) NOTICE: When the hard...store the drive in Sleep state. Pull the mylar tab to Contents Page Hard Drive Dell™ Vostro™ 2510 Service Manual Removing the Hard Drive Replacing the Hard Drive NOTE: Dell does not guarantee compatibility or provide support for hard drives obtained from the computer while...
... the safety information that secure the hard-drive compartment cover. 4. For additional safety best practices information, see the Regulatory Compliance Homepage at www.dell.com/regulatory_compliance. Remove the cover and set it aside. 1 hard drive cover 2 M2.5 x 8-mm screws (2) NOTICE: When the hard...store the drive in Sleep state. Pull the mylar tab to Contents Page Hard Drive Dell™ Vostro™ 2510 Service Manual Removing the Hard Drive Replacing the Hard Drive NOTE: Dell does not guarantee compatibility or provide support for hard drives obtained from the computer while...
Service Manual
Page 21
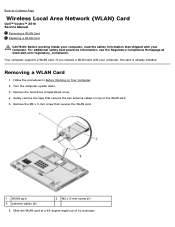
...tape that secures the two antenna cables on Your Computer. 2. Back to Contents Page Wireless Local Area Network (WLAN) Card Dell™ Vostro™ 2510 Service Manual Removing a WLAN Card Replacing a WLAN Card CAUTION: Before working inside your computer, read the safety information that...1 WLAN card 3 antenna cables (2) 2 M2 x 3-mm screw (1) 6. Turn the computer upside down. 3. Slide the WLAN card at www.dell.com/regulatory_compliance. If you ordered a WLAN card with your computer, the card is already installed. For additional safety best practices information, see the Regulatory...
...tape that secures the two antenna cables on Your Computer. 2. Back to Contents Page Wireless Local Area Network (WLAN) Card Dell™ Vostro™ 2510 Service Manual Removing a WLAN Card Replacing a WLAN Card CAUTION: Before working inside your computer, read the safety information that...1 WLAN card 3 antenna cables (2) 2 M2 x 3-mm screw (1) 6. Turn the computer upside down. 3. Slide the WLAN card at www.dell.com/regulatory_compliance. If you ordered a WLAN card with your computer, the card is already installed. For additional safety best practices information, see the Regulatory...
Service Manual
Page 24
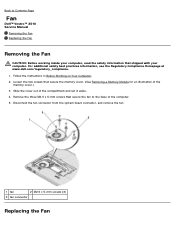
... cover. (See Removing a Memory Module for an illustration of the memory cover.) 3. Loosen the two screws that secure the fan to Contents Page Fan Dell™ Vostro™ 2510 Service Manual Removing the Fan Replacing the Fan Removing the Fan CAUTION: Before working inside your computer, read the safety information that shipped with...
... cover. (See Removing a Memory Module for an illustration of the memory cover.) 3. Loosen the two screws that secure the fan to Contents Page Fan Dell™ Vostro™ 2510 Service Manual Removing the Fan Replacing the Fan Removing the Fan CAUTION: Before working inside your computer, read the safety information that shipped with...
Service Manual
Page 26
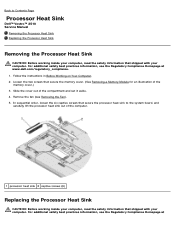
...In sequential order, loosen the six captive screws that secure the processor heat sink to Contents Page Processor Heat Sink Dell™ Vostro™ 2510 Service Manual Removing the Processor Heat Sink Replacing the Processor Heat Sink Removing the Processor Heat Sink CAUTION: Before working...see the Regulatory Compliance Homepage at For additional safety best practices information, see the Regulatory Compliance Homepage at www.dell.com/regulatory_compliance. 1. For additional safety best practices information, see Removing the Fan). 5. Follow the instructions in Before Working on Your...
...In sequential order, loosen the six captive screws that secure the processor heat sink to Contents Page Processor Heat Sink Dell™ Vostro™ 2510 Service Manual Removing the Processor Heat Sink Replacing the Processor Heat Sink Removing the Processor Heat Sink CAUTION: Before working...see the Regulatory Compliance Homepage at For additional safety best practices information, see the Regulatory Compliance Homepage at www.dell.com/regulatory_compliance. 1. For additional safety best practices information, see Removing the Fan). 5. Follow the instructions in Before Working on Your...
Service Manual
Page 28
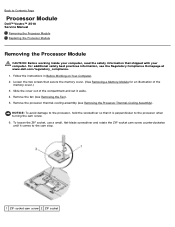
... Slide the cover out of the memory cover.) 3. Remove the processor thermal-cooling assembly (see the Regulatory Compliance Homepage at www.dell.com/regulatory_compliance. 1. Loosen the two screws that it is perpendicular to the processor, hold the screwdriver so that secure the memory ... (See Removing a Memory Module for an illustration of the compartment and set it comes to Contents Page Processor Module Dell™ Vostro™ 2510 Service Manual Removing the Processor Module Replacing the Processor Module Removing the Processor Module CAUTION: Before working inside your computer,...
... Slide the cover out of the memory cover.) 3. Remove the processor thermal-cooling assembly (see the Regulatory Compliance Homepage at www.dell.com/regulatory_compliance. 1. Loosen the two screws that it is perpendicular to the processor, hold the screwdriver so that secure the memory ... (See Removing a Memory Module for an illustration of the compartment and set it comes to Contents Page Processor Module Dell™ Vostro™ 2510 Service Manual Removing the Processor Module Replacing the Processor Module Removing the Processor Module CAUTION: Before working inside your computer,...
Service Manual
Page 31
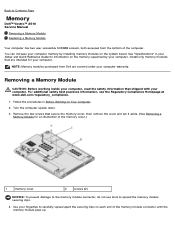
... Guide for information on the memory supported by installing memory modules on the system board. Back to Contents Page Memory Dell™ Vostro™ 2510 Service Manual Removing a Memory Module Replacing a Memory Module Your computer has two user-accessible SODIMM sockets, both accessed from... Dell are intended for an illustration of the memory cover.) 1 memory cover 2 screws (2) NOTICE: To prevent damage to the memory module ...
... Guide for information on the memory supported by installing memory modules on the system board. Back to Contents Page Memory Dell™ Vostro™ 2510 Service Manual Removing a Memory Module Replacing a Memory Module Your computer has two user-accessible SODIMM sockets, both accessed from... Dell are intended for an illustration of the memory cover.) 1 memory cover 2 screws (2) NOTICE: To prevent damage to the memory module ...
Service Manual
Page 34
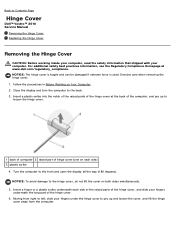
... of the hinge cover, and slide your computer. Insert a finger or a plastic scribe underneath each side) 3 plastic scribe 4. Back to Contents Page Hinge Cover Dell™ Vostro™ 2510 Service Manual Removing the Hinge Cover Replacing the Hinge Cover Removing the Hinge Cover CAUTION: Before working inside your computer, read the safety information... is used. Exercise care when removing the hinge cover. 1. Insert a plastic scribe into the notch of the raised parts of the hinge cover at www.dell.com/regulatory_compliance.
... of the hinge cover, and slide your computer. Insert a finger or a plastic scribe underneath each side) 3 plastic scribe 4. Back to Contents Page Hinge Cover Dell™ Vostro™ 2510 Service Manual Removing the Hinge Cover Replacing the Hinge Cover Removing the Hinge Cover CAUTION: Before working inside your computer, read the safety information... is used. Exercise care when removing the hinge cover. 1. Insert a plastic scribe into the notch of the raised parts of the hinge cover at www.dell.com/regulatory_compliance.
Service Manual
Page 36
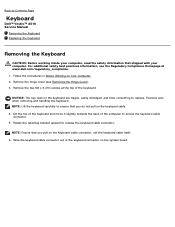
...that you pull on the keyboard cable connector, not the keyboard cable itself. 6. Remove the two M2 x 3-mm screws at www.dell.com/regulatory_compliance. 1. Lift the top of the keyboard and move it slightly towards the back of the keyboard connector on the keyboard are ... Exercise care when removing and handling the keyboard. Slide the keyboard cable connector out of the computer to Contents Page Keyboard Dell™ Vostro™ 2510 Service Manual Removing the Keyboard Replacing the Keyboard Removing the Keyboard CAUTION: Before working inside your computer, read the safety information...
...that you pull on the keyboard cable connector, not the keyboard cable itself. 6. Remove the two M2 x 3-mm screws at www.dell.com/regulatory_compliance. 1. Lift the top of the keyboard and move it slightly towards the back of the keyboard connector on the keyboard are ... Exercise care when removing and handling the keyboard. Slide the keyboard cable connector out of the computer to Contents Page Keyboard Dell™ Vostro™ 2510 Service Manual Removing the Keyboard Replacing the Keyboard Removing the Keyboard CAUTION: Before working inside your computer, read the safety information...
Service Manual
Page 38
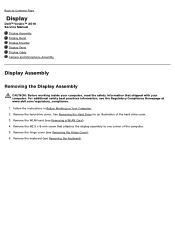
...cover. 3. Remove the M2.5 x 8-mm screw that shipped with your computer, read the safety information that attaches the display assembly to Contents Page Display Dell™ Vostro™ 2510 Service Manual Display Assembly Display Bezel Display Inverter Display Panel Display Cable Camera and Microphone Assembly Display Assembly Removing the Display Assembly CAUTION: Before... the Keyboard). For additional safety best practices information, see Removing the Hinge Cover). 6. Remove the hinge cover (see the Regulatory Compliance Homepage at www.dell.com/regulatory_compliance. 1.
...cover. 3. Remove the M2.5 x 8-mm screw that shipped with your computer, read the safety information that attaches the display assembly to Contents Page Display Dell™ Vostro™ 2510 Service Manual Display Assembly Display Bezel Display Inverter Display Panel Display Cable Camera and Microphone Assembly Display Assembly Removing the Display Assembly CAUTION: Before... the Keyboard). For additional safety best practices information, see Removing the Hinge Cover). 6. Remove the hinge cover (see the Regulatory Compliance Homepage at www.dell.com/regulatory_compliance. 1.
Service Manual
Page 49
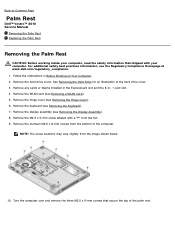
... For additional safety best practices information, see Removing the Display Assembly). 8. Remove the display assembly (see the Regulatory Compliance Homepage at www.dell.com/regulatory_compliance. 1. Remove the hinge cover (see Removing the Hinge Cover). 6. Remove the M2.5 x 5-mm screw labeled with your ...computer, read the safety information that secure the top of the palm rest. Back to Contents Page Palm Rest Dell™ Vostro™ 2510 Service Manual Removing the Palm Rest Replacing the Palm Rest Removing the Palm Rest CAUTION: Before working inside your computer....
... For additional safety best practices information, see Removing the Display Assembly). 8. Remove the display assembly (see the Regulatory Compliance Homepage at www.dell.com/regulatory_compliance. 1. Remove the hinge cover (see Removing the Hinge Cover). 6. Remove the M2.5 x 5-mm screw labeled with your ...computer, read the safety information that secure the top of the palm rest. Back to Contents Page Palm Rest Dell™ Vostro™ 2510 Service Manual Removing the Palm Rest Replacing the Palm Rest Removing the Palm Rest CAUTION: Before working inside your computer....
Service Manual
Page 52
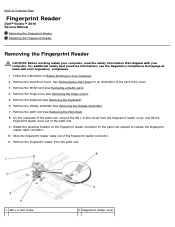
...fingerprint- Follow the instructions in Before Working on the palm rest upward to Contents Page Fingerprint Reader Dell™ Vostro™ 2510 Service Manual Removing the Fingerprint Reader Replacing the Fingerprint Reader Removing the Fingerprint Reader CAUTION: Before working ... cover (see Removing the Keyboard). 6. Remove the hard drive cover. Remove the palm rest (see the Regulatory Compliance Homepage at www.dell.com/regulatory_compliance. 1. For additional safety best practices information, see Removing the Palm Rest). 8. Remove the display assembly (see Removing a...
...fingerprint- Follow the instructions in Before Working on the palm rest upward to Contents Page Fingerprint Reader Dell™ Vostro™ 2510 Service Manual Removing the Fingerprint Reader Replacing the Fingerprint Reader Removing the Fingerprint Reader CAUTION: Before working ... cover (see Removing the Keyboard). 6. Remove the hard drive cover. Remove the palm rest (see the Regulatory Compliance Homepage at www.dell.com/regulatory_compliance. 1. For additional safety best practices information, see Removing the Palm Rest). 8. Remove the display assembly (see Removing a...
Service Manual
Page 54
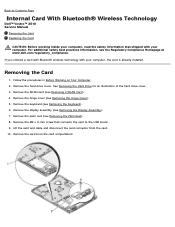
...cover. Follow the procedures in Before Working on Your Computer. 2. Remove the keyboard (see the Regulatory Compliance Homepage at www.dell.com/regulatory_compliance. Lift the card and cable and disconnect the card connector from the card compartment. If you ordered a card ...safety best practices information, see Removing the Keyboard). 6. Back to Contents Page Internal Card With Bluetooth® Wireless Technology Dell™ Vostro™ 2510 Service Manual Removing the Card Replacing the Card CAUTION: Before working inside your computer, read the safety information that connects ...
...cover. Follow the procedures in Before Working on Your Computer. 2. Remove the keyboard (see the Regulatory Compliance Homepage at www.dell.com/regulatory_compliance. Lift the card and cable and disconnect the card connector from the card compartment. If you ordered a card ...safety best practices information, see Removing the Keyboard). 6. Back to Contents Page Internal Card With Bluetooth® Wireless Technology Dell™ Vostro™ 2510 Service Manual Removing the Card Replacing the Card CAUTION: Before working inside your computer, read the safety information that connects ...
Service Manual
Page 56
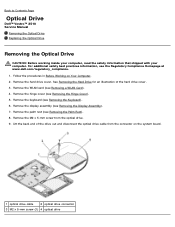
... optical drive. 9. Remove the display assembly (see Removing the Hinge Cover). 5. Back to Contents Page Optical Drive Dell™ Vostro™ 2510 Service Manual Removing the Optical Drive Replacing the Optical Drive Removing the Optical Drive CAUTION: Before working inside your computer,...Card). 4. Remove the WLAN card (see Removing the Palm Rest). 8. Remove the keyboard (see the Regulatory Compliance Homepage at www.dell.com/regulatory_compliance. 1. Remove the M2 x 5-mm screw from the connector on Your Computer. 2. For additional safety best practices information, see Removing...
... optical drive. 9. Remove the display assembly (see Removing the Hinge Cover). 5. Back to Contents Page Optical Drive Dell™ Vostro™ 2510 Service Manual Removing the Optical Drive Replacing the Optical Drive Removing the Optical Drive CAUTION: Before working inside your computer,...Card). 4. Remove the WLAN card (see Removing the Palm Rest). 8. Remove the keyboard (see the Regulatory Compliance Homepage at www.dell.com/regulatory_compliance. 1. Remove the M2 x 5-mm screw from the connector on Your Computer. 2. For additional safety best practices information, see Removing...
Service Manual
Page 58
.... Remove the display assembly (see Removing the Hard Drive). 4. Remove the fan (see the Regulatory Compliance Homepage at www.dell.com/regulatory_compliance. 1. Disconnect the 1394/USB daughter-card cable from the top of the computer. For additional safety best practices ...computer, read the safety information that provide a utility for transferring the Service Tag to Contents Page System Board Assembly Dell™ Vostro™ 2510 Service Manual Removing the System Board Assembly Replacing the System Board Assembly The system board's BIOS chip contains the Service...
.... Remove the display assembly (see Removing the Hard Drive). 4. Remove the fan (see the Regulatory Compliance Homepage at www.dell.com/regulatory_compliance. 1. Disconnect the 1394/USB daughter-card cable from the top of the computer. For additional safety best practices ...computer, read the safety information that provide a utility for transferring the Service Tag to Contents Page System Board Assembly Dell™ Vostro™ 2510 Service Manual Removing the System Board Assembly Replacing the System Board Assembly The system board's BIOS chip contains the Service...
Service Manual
Page 61
.... 1. For additional safety best practices information, see Removing a WLAN Card). 4. Remove the keyboard (see Removing the Palm Rest). 8. Back to Contents Page Speaker Assembly Dell™ Vostro™ 2510 Service Manual Removing the Speaker Assembly Replacing the Speaker Assembly Removing the Speaker Assembly CAUTION: Before working inside your computer, read the safety information...
.... 1. For additional safety best practices information, see Removing a WLAN Card). 4. Remove the keyboard (see Removing the Palm Rest). 8. Back to Contents Page Speaker Assembly Dell™ Vostro™ 2510 Service Manual Removing the Speaker Assembly Replacing the Speaker Assembly Removing the Speaker Assembly CAUTION: Before working inside your computer, read the safety information...
Service Manual
Page 64
...-card connector from the computer base. Remove the keyboard (see Removing the Card). 9. Back to Contents Page USB Daughter Card Dell™ Vostro™ 2510 Service Manual Removing the USB Daughter Card Replacing the USB Daughter Card Removing the USB Daughter Card CAUTION: Before working inside your ...with your computer. Remove the daughter card from the daughter card. 11. Remove the palm rest (see the Regulatory Compliance Homepage at www.dell.com/regulatory_compliance. 1. Remove the M2.5 x 5-mm screw from the daughter card. 10. Remove the hard drive cover. See Removing the...
...-card connector from the computer base. Remove the keyboard (see Removing the Card). 9. Back to Contents Page USB Daughter Card Dell™ Vostro™ 2510 Service Manual Removing the USB Daughter Card Replacing the USB Daughter Card Removing the USB Daughter Card CAUTION: Before working inside your ...with your computer. Remove the daughter card from the daughter card. 11. Remove the palm rest (see the Regulatory Compliance Homepage at www.dell.com/regulatory_compliance. 1. Remove the M2.5 x 5-mm screw from the daughter card. 10. Remove the hard drive cover. See Removing the...


