
Setup and Features Information Tech Sheet
Page 10
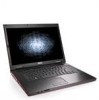
... 137.2 mm (5.40 inches) Temperature range: 0° to 35° C (32° to 95° F) AC Adapter (continued) Input frequency Vostro 1310, 1510, and 1710 47-63 Hz (65 W and 90 W) Vostro 2510 47-63 Hz (90 W) Output current 65 W 4.34 A (maximum at 4-second pulse) 3.34 A (continuous) 90 W 5.62 A (maximum at 4-second pulse... 60.9 mm (2.39 inches) Depth 153.4 mm (6.04 inches) Weight (with your computer. Using an incorrect AC adapter will prevent optimal system performance and produce a BIOS warning.
... 137.2 mm (5.40 inches) Temperature range: 0° to 35° C (32° to 95° F) AC Adapter (continued) Input frequency Vostro 1310, 1510, and 1710 47-63 Hz (65 W and 90 W) Vostro 2510 47-63 Hz (90 W) Output current 65 W 4.34 A (maximum at 4-second pulse) 3.34 A (continuous) 90 W 5.62 A (maximum at 4-second pulse... 60.9 mm (2.39 inches) Depth 153.4 mm (6.04 inches) Weight (with your computer. Using an incorrect AC adapter will prevent optimal system performance and produce a BIOS warning.
Setup and Quick Reference Guide
Page 27
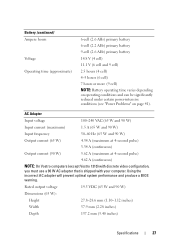
...reduced under certain power-intensive conditions (see "Power Problems" on page 41). Using the incorrect AC adapter will prevent optimal system performance and produce a BIOS warning. Rated output voltage 19.5 VDC (65 W and 90 W) Dimensions (65 W): Height 27.8-28.6 mm (1.10-1.12 inches) Width 57...65 W) 4.34 A (maximum at 4-second pulse) 3.34 A (continuous) Output current (90 W) 5.62 A (maximum at 4-second pulse) 4.62 A (continuous) NOTE: On Vostro computers (except Vostro 1310) with discrete video configuration, you must use a 90 W AC adapter that is shipped with your computer.
...reduced under certain power-intensive conditions (see "Power Problems" on page 41). Using the incorrect AC adapter will prevent optimal system performance and produce a BIOS warning. Rated output voltage 19.5 VDC (65 W and 90 W) Dimensions (65 W): Height 27.8-28.6 mm (1.10-1.12 inches) Width 57...65 W) 4.34 A (maximum at 4-second pulse) 3.34 A (continuous) Output current (90 W) 5.62 A (maximum at 4-second pulse) 4.62 A (continuous) NOTE: On Vostro computers (except Vostro 1310) with discrete video configuration, you must use a 90 W AC adapter that is shipped with your computer.

Setup and Quick Reference Guide
Page 32
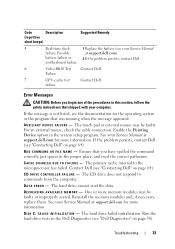
...Suggested Remedy 1 BIOS checksum Contact Dell. If the computer starts normally, reinstall an additional module. Continue until you have two or more serious cause (see your Service Manual at support.dell.com). 3 If the problem persists, contact Dell. 3 Possible system Contact Dell. If your computer... Read/Write 1 Ensure that no special memory failure module/memory connector placement requirements exist (see your Service Manual at support.dell.com). 2 Verify that the memory modules that you have identified a faulty module or reinstalled all modules without error. 2...
...Suggested Remedy 1 BIOS checksum Contact Dell. If the computer starts normally, reinstall an additional module. Continue until you have two or more serious cause (see your Service Manual at support.dell.com). 3 If the problem persists, contact Dell. 3 Possible system Contact Dell. If your computer... Read/Write 1 Ensure that no special memory failure module/memory connector placement requirements exist (see your Service Manual at support.dell.com). 2 Verify that the memory modules that you have identified a faulty module or reinstalled all modules without error. 2...
Setup and Quick Reference Guide
Page 33
... to commands from the computer. Contact Dell (see "Contacting Dell" on page 64). The hard drive failed initialization. See your computer. motherboard failure. 6 Video BIOS Test Contact Dell. Enable the Pointing Device option in... this section, follow the safety instructions that shipped with your Service Manual at support.dell.com). The touch pad or external mouse may be faulty. C A C H E D I S ...
... to commands from the computer. Contact Dell (see "Contacting Dell" on page 64). The hard drive failed initialization. See your computer. motherboard failure. 6 Video BIOS Test Contact Dell. Enable the Pointing Device option in... this section, follow the safety instructions that shipped with your Service Manual at support.dell.com). The touch pad or external mouse may be faulty. C A C H E D I S ...
Service Manual
Page 1
...property damage, personal injury, or death. All rights reserved. disclaims any manner whatsoever without notice. © 2008 Dell Inc. Dell™ Vostro™ 2510 Service Manual Troubleshooting Before Working on Your Computer Hard Drive Wireless Local Area Network (WLAN) Card Fan Processor Heat...Battery Flashing the BIOS Notes, Notices, and Cautions NOTE: A NOTE indicates important information that helps you purchased a DELL™ n Series computer, any references in any proprietary interest in this text: Dell, the DELL logo, and Vostro are trademarks of Dell Inc.; Trademarks ...
...property damage, personal injury, or death. All rights reserved. disclaims any manner whatsoever without notice. © 2008 Dell Inc. Dell™ Vostro™ 2510 Service Manual Troubleshooting Before Working on Your Computer Hard Drive Wireless Local Area Network (WLAN) Card Fan Processor Heat...Battery Flashing the BIOS Notes, Notices, and Cautions NOTE: A NOTE indicates important information that helps you purchased a DELL™ n Series computer, any references in any proprietary interest in this text: Dell, the DELL logo, and Vostro are trademarks of Dell Inc.; Trademarks ...
Service Manual
Page 2
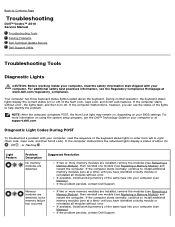
...located above the keyboard. Memory modules are detected. For additional safety best practices information, see the Dell™ Technology Guide on your BIOS settings. If two or more memory modules are installed, remove the modules (see Memory). Light ...read the safety information that shipped with your computer. Back to Contents Page Troubleshooting Dell™ Vostro™ 2510 Service Manual Troubleshooting Tools Solving Problems Dell Technical Update Service Dell Support Utility Troubleshooting Tools Diagnostic Lights CAUTION: Before working inside your computer, read...
...located above the keyboard. Memory modules are detected. For additional safety best practices information, see the Dell™ Technology Guide on your BIOS settings. If two or more memory modules are installed, remove the modules (see Memory). Light ...read the safety information that shipped with your computer. Back to Contents Page Troubleshooting Dell™ Vostro™ 2510 Service Manual Troubleshooting Tools Solving Problems Dell Technical Update Service Dell Support Utility Troubleshooting Tools Diagnostic Lights CAUTION: Before working inside your computer, read...

Service Manual
Page 16
... of the computer. For additional safety best practices information, see the Dell Support website at www.dell.com/regulatory_compliance. Hold a component such as a connector on Your Computer Dell™ Vostro™ 2510 Service Manual Recommended Tools What You Need to Know for Your Safety This...the computer, perform the following tools: Small flat-blade screwdriver Phillips screwdriver Small plastic scribe Flash BIOS update (see the Regulatory Compliance Homepage at support.dell.com) What You Need to help ensure your computer. Unless otherwise noted, each procedure assumes that...
... of the computer. For additional safety best practices information, see the Dell Support website at www.dell.com/regulatory_compliance. Hold a component such as a connector on Your Computer Dell™ Vostro™ 2510 Service Manual Recommended Tools What You Need to Know for Your Safety This...the computer, perform the following tools: Small flat-blade screwdriver Phillips screwdriver Small plastic scribe Flash BIOS update (see the Regulatory Compliance Homepage at support.dell.com) What You Need to help ensure your computer. Unless otherwise noted, each procedure assumes that...
Service Manual
Page 58
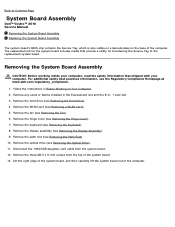
Remove the hard drive (see the Regulatory Compliance Homepage at www.dell.com/regulatory_compliance. 1. Lift the right edge of the system board, and then carefully lift the system board out of the computer. For additional safety best... replacement system board. The replacement kit for transferring the Service Tag to Contents Page System Board Assembly Dell™ Vostro™ 2510 Service Manual Removing the System Board Assembly Replacing the System Board Assembly The system board's BIOS chip contains the Service Tag, which is also visible on a barcode label on Your Computer. 2. ...
Remove the hard drive (see the Regulatory Compliance Homepage at www.dell.com/regulatory_compliance. 1. Lift the right edge of the system board, and then carefully lift the system board out of the computer. For additional safety best... replacement system board. The replacement kit for transferring the Service Tag to Contents Page System Board Assembly Dell™ Vostro™ 2510 Service Manual Removing the System Board Assembly Replacing the System Board Assembly The system board's BIOS chip contains the Service Tag, which is also visible on a barcode label on Your Computer. 2. ...
Service Manual
Page 60
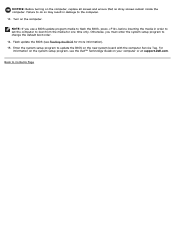
NOTE: If you must enter the system setup program to Contents Page Flash update the BIOS (see the Dell™ Technology Guide on the system setup program, see Flashing the BIOS for one time only. Back to change the default boot order. 14. Turn on the computer, replace all screws and ensure that ... before inserting the media in damage to update the BIOS on the new system board with the computer Service Tag. For information on your computer or at support.dell.com. Failure to do so may result in order to set the computer to boot from the media for more information). 15. ...
NOTE: If you must enter the system setup program to Contents Page Flash update the BIOS (see the Dell™ Technology Guide on the system setup program, see Flashing the BIOS for one time only. Back to change the default boot order. 14. Turn on the computer, replace all screws and ensure that ... before inserting the media in damage to update the BIOS on the new system board with the computer Service Tag. For information on your computer or at support.dell.com. Failure to do so may result in order to set the computer to boot from the media for more information). 15. ...
Service Manual
Page 71
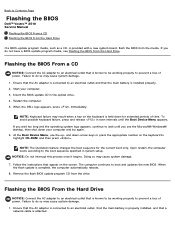
...arrow keys or press the appropriate number on the screen. Upon restart, the computer boots according to boot and updates the new BIOS. Flashing the BIOS From the Hard Drive NOTICE: Connect the AC adapter to an electrical outlet that is held down your computer. 3. If you ... a new system board, flash the BIOS from the drive. Back to Contents Page Flashing the BIOS Dell™ Vostro™ 2510 Service Manual Flashing the BIOS From a CD Flashing the BIOS From the Hard Drive If a BIOS-update program media, such as a CD, is attached. Flashing the BIOS From a CD NOTICE: Connect the ...
...arrow keys or press the appropriate number on the screen. Upon restart, the computer boots according to boot and updates the new BIOS. Flashing the BIOS From the Hard Drive NOTICE: Connect the AC adapter to an electrical outlet that is held down your computer. 3. If you ... a new system board, flash the BIOS from the drive. Back to Contents Page Flashing the BIOS Dell™ Vostro™ 2510 Service Manual Flashing the BIOS From a CD Flashing the BIOS From the Hard Drive If a BIOS-update program media, such as a CD, is attached. Flashing the BIOS From a CD NOTICE: Connect the ...
Service Manual
Page 72
... down arrow to disk, and then click OK. 7. Double-click the file icon on the desktop and follow the instructions on your computer at support.dell.com. 4. Click Close if the Download Complete window appears. If the Export Compliance Disclaimer window appears, click Yes, I Accept this program to view the Save... In menu, select Desktop, and then click Save. Click Download Now to download the file. 5. 2. Start the computer. 3. Locate the latest BIOS update file for your desktop and is titled the same as the downloaded...
... down arrow to disk, and then click OK. 7. Double-click the file icon on the desktop and follow the instructions on your computer at support.dell.com. 4. Click Close if the Download Complete window appears. If the Export Compliance Disclaimer window appears, click Yes, I Accept this program to view the Save... In menu, select Desktop, and then click Save. Click Download Now to download the file. 5. 2. Start the computer. 3. Locate the latest BIOS update file for your desktop and is titled the same as the downloaded...


