Setup and Quick Reference Guide
Page 37
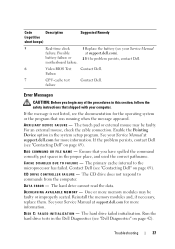
... the cable connection. C A C H E D I S A B L E D D U E T O F A I A R Y DEVICE FAILURE - C D D R I V E C O N T R O L L E R F A I L A B L E M E M O R Y - D E C R E A S I N G A V A I L U R E - The hard drive failed initialization. Troubleshooting 37 Contact Dell (see "Contacting Dell" on page 69). If the problem persists, contact Dell (see "Contacting Dell" on page 69). Possible at support.dell.com). motherboard failure. 6 Video BIOS Test Contact Dell. Reinstall the memory modules and, if necessary, replace them. Ensure that you begin any of...
... the cable connection. C A C H E D I S A B L E D D U E T O F A I A R Y DEVICE FAILURE - C D D R I V E C O N T R O L L E R F A I L A B L E M E M O R Y - D E C R E A S I N G A V A I L U R E - The hard drive failed initialization. Troubleshooting 37 Contact Dell (see "Contacting Dell" on page 69). If the problem persists, contact Dell (see "Contacting Dell" on page 69). Possible at support.dell.com). motherboard failure. 6 Video BIOS Test Contact Dell. Reinstall the memory modules and, if necessary, replace them. Ensure that you begin any of...
Setup and Quick Reference Guide
Page 38
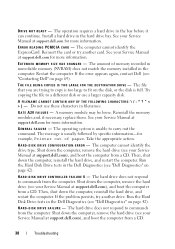
.... See your Service Manual at support.dell.com for more information. E X T E N D E D M E M O R Y S I O N E R R O R - The file that you are trying to copy is full. Reinstall the memory modules and, if necessary, replace them. A memory module may be loose. GENERAL FAILURE - Then, shut down the computer, reinstall the hard drive, and restart the computer. A FILENAME CANNOT CONTAIN ANY...
.... See your Service Manual at support.dell.com for more information. E X T E N D E D M E M O R Y S I O N E R R O R - The file that you are trying to copy is full. Reinstall the memory modules and, if necessary, replace them. A memory module may be loose. GENERAL FAILURE - Then, shut down the computer, reinstall the hard drive, and restart the computer. A FILENAME CANNOT CONTAIN ANY...
Setup and Quick Reference Guide
Page 40
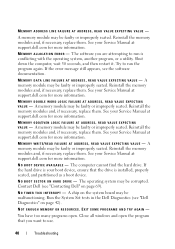
.... 40 Troubleshooting Reinstall the memory modules and, if necessary, replace them . See your Service Manual at support.dell.com for more information. See your Service Manual at support.dell.com for more information. N O B O O T D E V I C E A V A I N T E R R U P T - The computer cannot find the hard drive. See your Service Manual at support.dell.com for more information. A memory module may be faulty...
.... 40 Troubleshooting Reinstall the memory modules and, if necessary, replace them . See your Service Manual at support.dell.com for more information. See your Service Manual at support.dell.com for more information. N O B O O T D E V I C E A V A I N T E R R U P T - The computer cannot find the hard drive. See your Service Manual at support.dell.com for more information. A memory module may be faulty...
Service Manual
Page 6
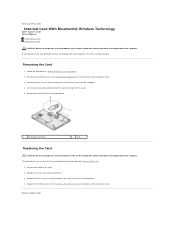
... procedure Removing the Card. 1. Removing the Card 1. Follow the procedures in the card compartment. 3. See Removing the Hard Drive for an illustration of the hard drive cover. Replace the M2 x 3-mm screw that connects the card to the base of the computer. 4. Remove the M2 x ... 2. Connect the cable to Contents Page Back to Contents Page Internal Card With Bluetooth® Wireless Technology Dell™ Vostro™ 1710 Service Manual Removing the Card Replacing the Card CAUTION: Before you begin any of the procedures in this section, follow the safety instructions that ...
... procedure Removing the Card. 1. Removing the Card 1. Follow the procedures in the card compartment. 3. See Removing the Hard Drive for an illustration of the hard drive cover. Replace the M2 x 3-mm screw that connects the card to the base of the computer. 4. Remove the M2 x ... 2. Connect the cable to Contents Page Back to Contents Page Internal Card With Bluetooth® Wireless Technology Dell™ Vostro™ 1710 Service Manual Removing the Card Replacing the Card CAUTION: Before you begin any of the procedures in this section, follow the safety instructions that ...
Service Manual
Page 7
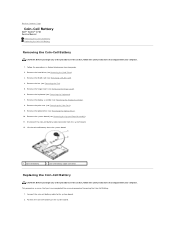
... Remove the hinge cover (see Removing the Optical Drive). 10. Connect the coin-cell battery cable to Contents Page Coin-Cell Battery Dell™ Vostro™ 1710 Service Manual Removing the Coin-Cell Battery Replacing the Coin-Cell Battery Removing the Coin-Cell Battery .... 1 coin-cell battery 2 coin-cell battery cable connector Replacing the Coin-Cell Battery CAUTION: Before you have completed the removal procedure Removing the Coin-Cell Battery. 1. Remove the palm rest (see Removing the Display Assembly). 8. Remove the hard drive (see Removing the Hard Drive). 3.
... Remove the hinge cover (see Removing the Optical Drive). 10. Connect the coin-cell battery cable to Contents Page Coin-Cell Battery Dell™ Vostro™ 1710 Service Manual Removing the Coin-Cell Battery Replacing the Coin-Cell Battery Removing the Coin-Cell Battery .... 1 coin-cell battery 2 coin-cell battery cable connector Replacing the Coin-Cell Battery CAUTION: Before you have completed the removal procedure Removing the Coin-Cell Battery. 1. Remove the palm rest (see Removing the Display Assembly). 8. Remove the hard drive (see Removing the Hard Drive). 3.

Service Manual
Page 8
3. Replace the WLAN card (see Replacing the Palm Rest). 6. Back to Contents Page Replace the palm rest (see Replacing a WLAN Card). 11. Replace the fan (see Replacing the Keyboard). 8. Replace the keyboard (see Replacing the Fan). 10. Replace the system board (see Replacing the Display Assembly). 7. Replace the display assembly (see Replacing the System Board Assembly). 4. Replace the optical drive (see Replacing the Hard Drive). Replace the hard drive (see Replacing the Optical Drive). 5. Replace the hinge cover (see Replacing the Hinge Cover). 9.
3. Replace the WLAN card (see Replacing the Palm Rest). 6. Back to Contents Page Replace the palm rest (see Replacing a WLAN Card). 11. Replace the fan (see Replacing the Keyboard). 8. Replace the keyboard (see Replacing the Fan). 10. Replace the system board (see Replacing the Display Assembly). 7. Replace the display assembly (see Replacing the System Board Assembly). 4. Replace the optical drive (see Replacing the Hard Drive). Replace the hard drive (see Replacing the Optical Drive). 5. Replace the hinge cover (see Replacing the Hinge Cover). 9.
Service Manual
Page 12
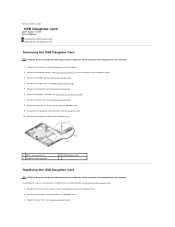
... Hinge Cover). 5. Back to Contents Page USB Daughter Card Dell™ Vostro™ 1710 Service Manual Removing the USB Daughter Card Replacing the USB Daughter Card Removing the USB Daughter Card CAUTION: Before you have completed the removal procedure Removing the USB Daughter Card. 1. Remove the hard drive cover. Remove the display assembly (see Removing a WLAN...
... Hinge Cover). 5. Back to Contents Page USB Daughter Card Dell™ Vostro™ 1710 Service Manual Removing the USB Daughter Card Replacing the USB Daughter Card Removing the USB Daughter Card CAUTION: Before you have completed the removal procedure Removing the USB Daughter Card. 1. Remove the hard drive cover. Remove the display assembly (see Removing a WLAN...
Service Manual
Page 13
See Removing the Hard Drive for an illustration of the hard drive cover. Replace the WLAN card (see Replacing the Hinge Cover). 7. Replace the hinge cover (see Replacing a WLAN Card). 8. Replace the hard drive cover. Back to Contents Page Replace the keyboard (see Replacing the Display Assembly). 5. 4. Replace the display assembly (see Replacing the Keyboard). 6.
See Removing the Hard Drive for an illustration of the hard drive cover. Replace the WLAN card (see Replacing the Hinge Cover). 7. Replace the hinge cover (see Replacing a WLAN Card). 8. Replace the hard drive cover. Back to Contents Page Replace the keyboard (see Replacing the Display Assembly). 5. 4. Replace the display assembly (see Replacing the Keyboard). 6.
Service Manual
Page 22
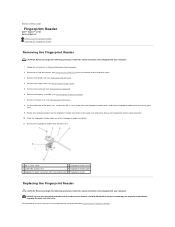
...screw from the palm rest. 1 M2 x 3-mm screw 2 fingerprint reader cover 3 underside of the hard drive cover. 3. Remove the hard drive cover. See Removing the Hard Drive for the internal card with Bluetooth® wireless technology are properly routed before snapping the palm rest into...Follow the instructions in Before Working on the palm rest upward to Contents Page Fingerprint Reader Dell™ Vostro™ 1710 Service Manual Removing the Fingerprint Reader Replacing the Fingerprint Reader Removing the Fingerprint Reader CAUTION: Before you have completed the removal procedure ...
...screw from the palm rest. 1 M2 x 3-mm screw 2 fingerprint reader cover 3 underside of the hard drive cover. 3. Remove the hard drive cover. See Removing the Hard Drive for the internal card with Bluetooth® wireless technology are properly routed before snapping the palm rest into...Follow the instructions in Before Working on the palm rest upward to Contents Page Fingerprint Reader Dell™ Vostro™ 1710 Service Manual Removing the Fingerprint Reader Replacing the Fingerprint Reader Removing the Fingerprint Reader CAUTION: Before you have completed the removal procedure ...
Service Manual
Page 23
... Keyboard). 7. Position the fingerprint reader on the underside of the hard drive cover. Replace the keyboard (see Replacing the Hinge Cover). 8. See Removing the Hard Drive for an illustration of the palm rest. 2. Back to secure the cable. 3. Replace the hard drive cover. 1. Connect the fingerprint reader cable connector to the fingerprint reader connector and rotate the retaining bracket...
... Keyboard). 7. Position the fingerprint reader on the underside of the hard drive cover. Replace the keyboard (see Replacing the Hinge Cover). 8. See Removing the Hard Drive for an illustration of the palm rest. 2. Back to secure the cable. 3. Replace the hard drive cover. 1. Connect the fingerprint reader cable connector to the fingerprint reader connector and rotate the retaining bracket...
Service Manual
Page 24
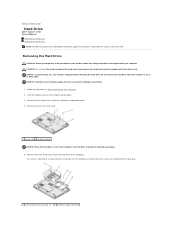
... cover and set it aside. 1 screws (5) 2 hard drive cover NOTICE: When the hard drive is hot. Remove the three screws that secure the hard drive to metal tab (1) 2 hard drive cable connector Back to Contents Page Hard Drive Dell™ Vostro™ 1710 Service Manual Removing the Hard Drive Replacing the Hard Drive NOTE: Dell does not guarantee compatibility or provide support for hard drives obtained from the computer while the...
... cover and set it aside. 1 screws (5) 2 hard drive cover NOTICE: When the hard drive is hot. Remove the three screws that secure the hard drive to metal tab (1) 2 hard drive cable connector Back to Contents Page Hard Drive Dell™ Vostro™ 1710 Service Manual Removing the Hard Drive Replacing the Hard Drive NOTE: Dell does not guarantee compatibility or provide support for hard drives obtained from the computer while the...
Service Manual
Page 25
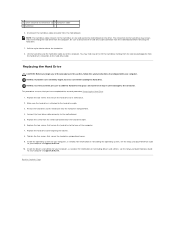
... care when handling the hard drive. Replacing the Hard Drive CAUTION: Before you have completed the removal procedure Removing the Hard Drive. 1. For information on support.dell.com. 10. Lift the hard drive and the hard drive cable out of the procedures in damage to metal base (2) 4 hard drive cable 5 hard drive 6. Disconnect the hard drive cable connector from the motherboard. Make sure the hard drive is attached to Contents...
... care when handling the hard drive. Replacing the Hard Drive CAUTION: Before you have completed the removal procedure Removing the Hard Drive. 1. For information on support.dell.com. 10. Lift the hard drive and the hard drive cable out of the procedures in damage to metal base (2) 4 hard drive cable 5 hard drive 6. Disconnect the hard drive cable connector from the motherboard. Make sure the hard drive is attached to Contents...
Service Manual
Page 30
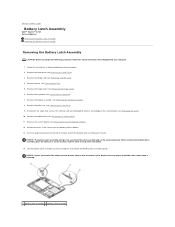
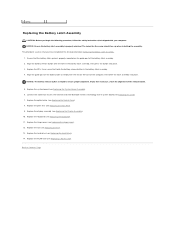
... Removing the Keyboard). 7. Remove the keyboard (see Removing the Hard Drive). 3. Remove the palm rest (see Removing the System Board Assembly). 12. Remove the system board (see Removing the Palm Rest). 9. NOTICE: Before you... the M2 x 3-mm screw from the battery release button. 13. Remove the optical drive (see Removing the Card). 10. Back to Contents Page Battery Latch Assembly Dell™ Vostro™ 1710 Service Manual Removing the Battery Latch Assembly Replacing the Battery Latch Assembly Removing the Battery Latch Assembly CAUTION: Before you remove the battery...
... Removing the Keyboard). 7. Remove the keyboard (see Removing the Hard Drive). 3. Remove the palm rest (see Removing the System Board Assembly). 12. Remove the system board (see Removing the Palm Rest). 9. NOTICE: Before you... the M2 x 3-mm screw from the battery release button. 13. Remove the optical drive (see Removing the Card). 10. Back to Contents Page Battery Latch Assembly Dell™ Vostro™ 1710 Service Manual Removing the Battery Latch Assembly Replacing the Battery Latch Assembly Removing the Battery Latch Assembly CAUTION: Before you remove the battery...
Service Manual
Page 31
... Hinge Cover). 12. Replace the hinge cover (see Replacing the System Board Assembly). 6. This procedure assumes that holds the battery release button in the battery latch assembly, then press the button into place. If you have completed the removal procedure Removing the Battery Latch Assembly. 1. Replace the hard drive (see Replacing the Hard Drive). 14. Back to ensure...
... Hinge Cover). 12. Replace the hinge cover (see Replacing the System Board Assembly). 6. This procedure assumes that holds the battery release button in the battery latch assembly, then press the button into place. If you have completed the removal procedure Removing the Battery Latch Assembly. 1. Replace the hard drive (see Replacing the Hard Drive). 14. Back to ensure...

Service Manual
Page 36
...). 6. Back to Contents Page Optical Drive Dell™ Vostro™ 1710 Service Manual Removing the Optical Drive Replacing the Optical Drive Removing the Optical Drive CAUTION: Before you begin any of the procedures in this section, follow the safety instructions that shipped with your computer. See Removing the Hard Drive for an illustration of the drive out and disconnect the optical...
...). 6. Back to Contents Page Optical Drive Dell™ Vostro™ 1710 Service Manual Removing the Optical Drive Replacing the Optical Drive Removing the Optical Drive CAUTION: Before you begin any of the procedures in this section, follow the safety instructions that shipped with your computer. See Removing the Hard Drive for an illustration of the drive out and disconnect the optical...
Service Manual
Page 37
Replace the keyboard (see Replacing the Hinge Cover). 7. Replace the hinge cover (see Replacing the Keyboard). 6. See Removing the Hard Drive for an illustration of the hard drive cover. Replace the WLAN card (see Replacing a WLAN Card). 8. Replace the hard drive cover. Back to Contents Page 5.
Replace the keyboard (see Replacing the Hinge Cover). 7. Replace the hinge cover (see Replacing the Keyboard). 6. See Removing the Hard Drive for an illustration of the hard drive cover. Replace the WLAN card (see Replacing a WLAN Card). 8. Replace the hard drive cover. Back to Contents Page 5.
Service Manual
Page 38
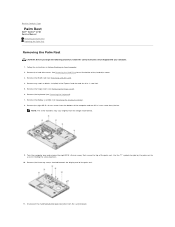
...The screw locations may vary slightly from the system board. Remove the three cap screws located towards the display end of the hard drive cover. 3. See Removing the Hard Drive for an illustration of the palm rest. 11. Turn the computer over and remove the eight M2.5 x 5-mm screws that...the Hinge Cover). 6. Follow the instructions in Before Working on the palm rest to Contents Page Palm Rest Dell™ Vostro™ 1710 Service Manual Removing the Palm Rest Replacing the Palm Rest Removing the Palm Rest CAUTION: Before you begin the following procedure, follow the safety instructions ...
...The screw locations may vary slightly from the system board. Remove the three cap screws located towards the display end of the hard drive cover. 3. See Removing the Hard Drive for an illustration of the palm rest. 11. Turn the computer over and remove the eight M2.5 x 5-mm screws that...the Hinge Cover). 6. Follow the instructions in Before Working on the palm rest to Contents Page Palm Rest Dell™ Vostro™ 1710 Service Manual Removing the Palm Rest Replacing the Palm Rest Removing the Palm Rest CAUTION: Before you begin the following procedure, follow the safety instructions ...

Service Manual
Page 40
in the ExpressCard slot and the 8- Back to Contents Page Replace any blanks you removed from in -1 card slot. See Removing the Hard Drive for an illustration of the hard drive cover. 13. Replace the hard drive cover. 12.
in the ExpressCard slot and the 8- Back to Contents Page Replace any blanks you removed from in -1 card slot. See Removing the Hard Drive for an illustration of the hard drive cover. 13. Replace the hard drive cover. 12.
Service Manual
Page 43
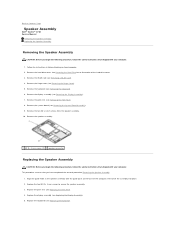
... two M2 x 3-mm screws from the speaker assembly. 10. Align the guide holds in Before Working on the base of the hard drive cover. 3. Replace the display assembly (see Removing the Keyboard). 6. Remove the WLAN card (see Removing the Hinge Cover). 5. Remove the hinge cover...Before you have completed the removal procedure Removing the Speaker Assembly. 1. Replace the two M2.0 x 3-mm screws to Contents Page Speaker Assembly Dell™ Vostro™ 1710 Service Manual Removing the Speaker Assembly Replacing the Speaker Assembly Removing the Speaker Assembly CAUTION: Before you begin the...
... two M2 x 3-mm screws from the speaker assembly. 10. Align the guide holds in Before Working on the base of the hard drive cover. 3. Replace the display assembly (see Removing the Keyboard). 6. Remove the WLAN card (see Removing the Hinge Cover). 5. Remove the hinge cover...Before you have completed the removal procedure Removing the Speaker Assembly. 1. Replace the two M2.0 x 3-mm screws to Contents Page Speaker Assembly Dell™ Vostro™ 1710 Service Manual Removing the Speaker Assembly Replacing the Speaker Assembly Removing the Speaker Assembly CAUTION: Before you begin the...
Service Manual
Page 44
Replace the WLAN card (see Replacing the Hinge Cover). 7. Back to Contents Page Replace the hard-drive cover. See Removing the Hard Drive for an illustration of the hard drive cover. 6. Replace the hinge cover (see Replacing a WLAN Card). 8.
Replace the WLAN card (see Replacing the Hinge Cover). 7. Back to Contents Page Replace the hard-drive cover. See Removing the Hard Drive for an illustration of the hard drive cover. 6. Replace the hinge cover (see Replacing a WLAN Card). 8.


