Setup and Quick Reference Guide
Page 38
... the bay before it can continue. Take the appropriate action. Shut down the computer, remove the hard drive (see "Dell Diagnostics" on page 42). Run the Hard Disk Drive tests in the computer. If the error appears again, contact Dell (see "Dell Diagnostics" on page 42). GENERAL FAILURE - Reinsert the card or try another card. The file that...
... the bay before it can continue. Take the appropriate action. Shut down the computer, remove the hard drive (see "Dell Diagnostics" on page 42). Run the Hard Disk Drive tests in the computer. If the error appears again, contact Dell (see "Dell Diagnostics" on page 42). GENERAL FAILURE - Reinsert the card or try another card. The file that...
Setup and Quick Reference Guide
Page 39
... SETUP PROGRAM - Run the Keyboard Controller test in the Dell Diagnostics (see "Dell Diagnostics" on page 42). K E Y B O A R D S T U C K KEY F A I L U R E - Troubleshooting 39 Run the Hard Disk Drive tests in the Dell Diagnostics (see "Dell Diagnostics" on page 42). Shut down the computer, remove the hard drive (see your Service Manual at support.dell.com), and boot the computer from a CD. Then, shut...
... SETUP PROGRAM - Run the Keyboard Controller test in the Dell Diagnostics (see "Dell Diagnostics" on page 42). K E Y B O A R D S T U C K KEY F A I L U R E - Troubleshooting 39 Run the Hard Disk Drive tests in the Dell Diagnostics (see "Dell Diagnostics" on page 42). Shut down the computer, remove the hard drive (see your Service Manual at support.dell.com), and boot the computer from a CD. Then, shut...
Setup and Quick Reference Guide
Page 41
... documentation for instructions (click Start→ Help and Support). The operating system cannot find a specific track on the hard drive. Run the System Set tests in the Dell Diagnostics (see "Dell Diagnostics" on the hard drive. OPTIONAL R O M B A D CHECKSUM - Remove and then reinstall the program. Windows Vista: 1 Click the Windows Vista Start button → Control Panel→ Programs...
... documentation for instructions (click Start→ Help and Support). The operating system cannot find a specific track on the hard drive. Run the System Set tests in the Dell Diagnostics (see "Dell Diagnostics" on the hard drive. OPTIONAL R O M B A D CHECKSUM - Remove and then reinstall the program. Windows Vista: 1 Click the Windows Vista Start button → Control Panel→ Programs...
Setup and Quick Reference Guide
Page 53
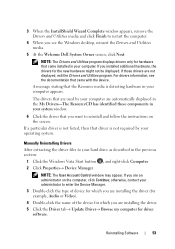
3 When the InstallShield Wizard Complete window appears, remove the Drivers and Utilities media and click Finish to your hard drive as described in the previous section: 1 Click the Windows Vista Start button , and right-click Computer. 2 Click Properties→ Device Manager...that came installed in your computer. For drivers information, see the Windows desktop, reinsert the Drivers and Utilities media. 5 At the Welcome Dell System Owner screen, click Next. If you installed additional hardware, the drivers for hardware that are used by your administrator to reinstall and...
3 When the InstallShield Wizard Complete window appears, remove the Drivers and Utilities media and click Finish to your hard drive as described in the previous section: 1 Click the Windows Vista Start button , and right-click Computer. 2 Click Properties→ Device Manager...that came installed in your computer. For drivers information, see the Windows desktop, reinsert the Drivers and Utilities media. 5 At the Welcome Dell System Owner screen, click Next. If you installed additional hardware, the drivers for hardware that are used by your administrator to reinstall and...

Setup and Quick Reference Guide
Page 54
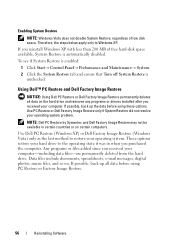
...Restore makes to restore your operating system problem. However, using the Operating System disc also deletes all data on the hard drive. Use Dell PC Restore or Dell Factory Image Restore only if System Restore did not resolve your operating system. Use the disc only if System Restore ...appropriate driver appears, click the name of your Dell™ computer to the Windows Classic view. 6 Click Browse and browse to the location to which allows you received the computer. Both permanently delete all data on the hard drive and remove any programs installed after you to return your...
...Restore makes to restore your operating system problem. However, using the Operating System disc also deletes all data on the hard drive. Use Dell PC Restore or Dell Factory Image Restore only if System Restore did not resolve your operating system. Use the disc only if System Restore ...appropriate driver appears, click the name of your Dell™ computer to the Windows Classic view. 6 Click Browse and browse to the location to which allows you received the computer. Both permanently delete all data on the hard drive and remove any programs installed after you to return your...
Setup and Quick Reference Guide
Page 56
... Symantec and Dell Factory Image Restore may not be available in when you received your hard drive to the operating state it was in certain countries or on certain computers. These options restore your computer. Data files include documents, spreadsheets, e-mail messages, digital photos, music files, and so on the hard drive and removes any programs...
... Symantec and Dell Factory Image Restore may not be available in when you received your hard drive to the operating state it was in certain countries or on certain computers. These options restore your computer. Data files include documents, spreadsheets, e-mail messages, digital photos, music files, and so on the hard drive and removes any programs...
Setup and Quick Reference Guide
Page 58
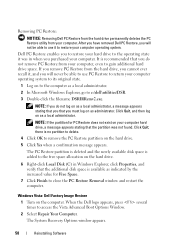
... PC Restore partition on as administrator. NOTE: If you do not remove PC Restore from your computer. Removing PC Restore: NOTICE: Removing Dell PC Restore from the hard drive permanently deletes the PC Restore utility from your computer hard drive, a message appears stating that the partition was in Windows Explorer, click Properties, and verify that the additional disk...
... PC Restore partition on as administrator. NOTE: If you do not remove PC Restore from your computer. Removing PC Restore: NOTICE: Removing Dell PC Restore from the hard drive permanently deletes the PC Restore utility from your computer hard drive, a message appears stating that the partition was in Windows Explorer, click Properties, and verify that the additional disk...
Service Manual
Page 4
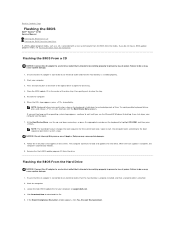
...you do not have a BIOS-update program media, see the Microsoft® Windows® desktop, then shut down your computer and try again. 7. Remove the flash BIOS update program CD from the media. Failure to do so may cause system damage. 1. Start the computer. 3. Place the BIOS-...known to be working properly to prevent a loss of the drive tray, then gently push to close the tray. 5. Back to Contents Page Flashing the BIOS Dell™ Vostro™ 1710 Service Manual Flashing the BIOS From a CD Flashing the BIOS From the Hard Drive If a BIOS-update program media, such as a CD,...
...you do not have a BIOS-update program media, see the Microsoft® Windows® desktop, then shut down your computer and try again. 7. Remove the flash BIOS update program CD from the media. Failure to do so may cause system damage. 1. Start the computer. 3. Place the BIOS-...known to be working properly to prevent a loss of the drive tray, then gently push to close the tray. 5. Back to Contents Page Flashing the BIOS Dell™ Vostro™ 1710 Service Manual Flashing the BIOS From a CD Flashing the BIOS From the Hard Drive If a BIOS-update program media, such as a CD,...
Service Manual
Page 6
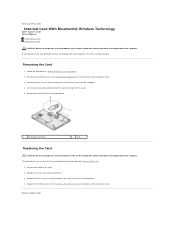
...cable to the base of the procedures in this section, follow the safety instructions that shipped with your computer. See Removing the Hard Drive for an illustration of the procedures in this section, follow the safety instructions that connects the card to the card...Card With Bluetooth® Wireless Technology Dell™ Vostro™ 1710 Service Manual Removing the Card Replacing the Card CAUTION: Before you begin any of the hard drive cover. Replace the hard drive cover. If you have completed the removal procedure Removing the Card. 1. Remove the M2 x 3-mm screw that ...
...cable to the base of the procedures in this section, follow the safety instructions that shipped with your computer. See Removing the Hard Drive for an illustration of the procedures in this section, follow the safety instructions that connects the card to the card...Card With Bluetooth® Wireless Technology Dell™ Vostro™ 1710 Service Manual Removing the Card Replacing the Card CAUTION: Before you begin any of the hard drive cover. Replace the hard drive cover. If you have completed the removal procedure Removing the Card. 1. Remove the M2 x 3-mm screw that ...
Service Manual
Page 7
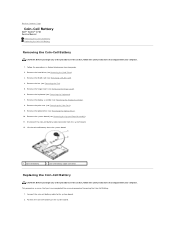
Remove the hard drive (see Removing the Hinge Cover). 6. Remove the hinge cover (see Removing the Hard Drive). 3. Remove the display assembly (see Removing a WLAN Card). 4. Remove the WLAN card (see Removing the Display Assembly). 8. Connect the coin-cell battery cable to Contents Page Coin-Cell Battery Dell™ Vostro™ 1710 Service Manual Removing the Coin-Cell Battery Replacing the Coin-Cell Battery Removing the Coin-Cell...
Remove the hard drive (see Removing the Hinge Cover). 6. Remove the hinge cover (see Removing the Hard Drive). 3. Remove the display assembly (see Removing a WLAN Card). 4. Remove the WLAN card (see Removing the Display Assembly). 8. Connect the coin-cell battery cable to Contents Page Coin-Cell Battery Dell™ Vostro™ 1710 Service Manual Removing the Coin-Cell Battery Replacing the Coin-Cell Battery Removing the Coin-Cell...
Service Manual
Page 12
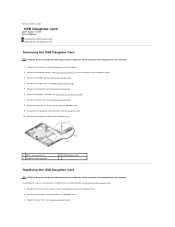
... Dell™ Vostro™ 1710 Service Manual Removing the USB Daughter Card Replacing the USB Daughter Card Removing the USB Daughter Card CAUTION: Before you have completed the removal procedure Removing the USB Daughter Card. 1. Remove the daughter card from the daughter card. 9. See Removing the Hard Drive for an illustration of the hard drive cover. 3. Remove the WLAN card (see Removing the Display Assembly). 7. Remove...
... Dell™ Vostro™ 1710 Service Manual Removing the USB Daughter Card Replacing the USB Daughter Card Removing the USB Daughter Card CAUTION: Before you have completed the removal procedure Removing the USB Daughter Card. 1. Remove the daughter card from the daughter card. 9. See Removing the Hard Drive for an illustration of the hard drive cover. 3. Remove the WLAN card (see Removing the Display Assembly). 7. Remove...
Service Manual
Page 13
Replace the display assembly (see Replacing the Keyboard). 6. Replace the hard drive cover. See Removing the Hard Drive for an illustration of the hard drive cover. Replace the keyboard (see Replacing the Display Assembly). 5. Back to Contents Page Replace the hinge cover (see Replacing a WLAN Card). 8. Replace the WLAN card (see Replacing the Hinge Cover). 7. 4.
Replace the display assembly (see Replacing the Keyboard). 6. Replace the hard drive cover. See Removing the Hard Drive for an illustration of the hard drive cover. Replace the keyboard (see Replacing the Display Assembly). 5. Back to Contents Page Replace the hinge cover (see Replacing a WLAN Card). 8. Replace the WLAN card (see Replacing the Hinge Cover). 7. 4.
Service Manual
Page 22
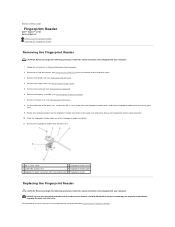
... display assembly (see Removing a WLAN Card). 4. Remove the hard drive cover. This procedure assumes that the touch pad cable and the cable for an illustration of the fingerprint reader connector. 11. Follow the instructions in Before Working on the palm rest upward to Contents Page Fingerprint Reader Dell™ Vostro™ 1710 Service Manual Removing the Fingerprint Reader...
... display assembly (see Removing a WLAN Card). 4. Remove the hard drive cover. This procedure assumes that the touch pad cable and the cable for an illustration of the fingerprint reader connector. 11. Follow the instructions in Before Working on the palm rest upward to Contents Page Fingerprint Reader Dell™ Vostro™ 1710 Service Manual Removing the Fingerprint Reader...
Service Manual
Page 23
...replace the M2 x 3-mm screw that secures the cover to Contents Page Replace the keyboard (see Replacing the Hinge Cover). 8. See Removing the Hard Drive for an illustration of the palm rest. 2. Replace the hinge cover (see Replacing the Keyboard). 7. Back to the palm rest. ...4. Position the fingerprint reader on the underside of the hard drive cover. Replace the palm rest (see Replacing the Display Assembly). 6. Replace the display assembly (see Replacing the Palm Rest). 5. Connect the...
...replace the M2 x 3-mm screw that secures the cover to Contents Page Replace the keyboard (see Replacing the Hinge Cover). 8. See Removing the Hard Drive for an illustration of the palm rest. 2. Replace the hinge cover (see Replacing the Keyboard). 7. Back to the palm rest. ...4. Position the fingerprint reader on the underside of the hard drive cover. Replace the palm rest (see Replacing the Display Assembly). 6. Replace the display assembly (see Replacing the Palm Rest). 5. Connect the...
Service Manual
Page 24
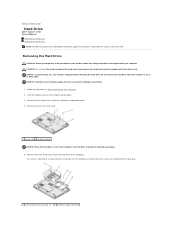
... of the procedures in this section, follow the safety instructions that secure the hard drive to Contents Page Hard Drive Dell™ Vostro™ 1710 Service Manual Removing the Hard Drive Replacing the Hard Drive NOTE: Dell does not guarantee compatibility or provide support for hard drives obtained from the computer while the drive is on Your Computer. 2. NOTICE: To prevent data loss, turn the computer...
... of the procedures in this section, follow the safety instructions that secure the hard drive to Contents Page Hard Drive Dell™ Vostro™ 1710 Service Manual Removing the Hard Drive Replacing the Hard Drive NOTE: Dell does not guarantee compatibility or provide support for hard drives obtained from the computer while the drive is on Your Computer. 2. NOTICE: To prevent data loss, turn the computer...
Service Manual
Page 25
... the hard-drive compartment cover. 9. Back to release the hard drive. 8. Disconnect the hard drive cable connector from the hard drive's connection to the hard drive may remain intact when lifting the hard drive from the motherboard before removing the hard drive. 7. 3 screws attached to the connector. You may result in this section, follow the safety instructions that secure the hard drive to the motherboard on support.dell...
... the hard-drive compartment cover. 9. Back to release the hard drive. 8. Disconnect the hard drive cable connector from the hard drive's connection to the hard drive may remain intact when lifting the hard drive from the motherboard before removing the hard drive. 7. 3 screws attached to the connector. You may result in this section, follow the safety instructions that secure the hard drive to the motherboard on support.dell...
Service Manual
Page 30
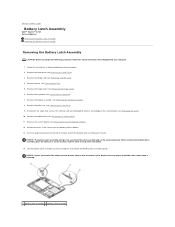
... that secures the internal card with your computer. 1. Remove the WLAN card (see Removing the Display Assembly). 8. Remove the display assembly (see Removing a WLAN Card). 4. Remove the optical drive (see Removing the Hard Drive). 3. Remove the M2 x 3-mm screw from the battery release ... Remove the keyboard (see Removing the Hinge Cover). 6. Back to Contents Page Battery Latch Assembly Dell™ Vostro™ 1710 Service Manual Removing the Battery Latch Assembly Replacing the Battery Latch Assembly Removing the Battery Latch Assembly CAUTION: Before you remove...
... that secures the internal card with your computer. 1. Remove the WLAN card (see Removing the Display Assembly). 8. Remove the display assembly (see Removing a WLAN Card). 4. Remove the optical drive (see Removing the Hard Drive). 3. Remove the M2 x 3-mm screw from the battery release ... Remove the keyboard (see Removing the Hinge Cover). 6. Back to Contents Page Battery Latch Assembly Dell™ Vostro™ 1710 Service Manual Removing the Battery Latch Assembly Replacing the Battery Latch Assembly Removing the Battery Latch Assembly CAUTION: Before you remove...
Service Manual
Page 31
...Assembly). 6. NOTICE: Ensure the battery latch assembly is keyed to ensure proper alignment. Connect the cable that you have completed the removal procedure Removing the Battery Latch Assembly. 1. Align the battery release button with the slot on the guide post of the battery latch assembly.... wireless technology to Contents Page Replace the fan (see Replacing the Palm Rest). 9. Back to the system board (see Replacing the Hard Drive). 14. NOTICE: The battery release button is properly oriented. Replace the palm rest (see Replacing the Fan). 13. The indent ...
...Assembly). 6. NOTICE: Ensure the battery latch assembly is keyed to ensure proper alignment. Connect the cable that you have completed the removal procedure Removing the Battery Latch Assembly. 1. Align the battery release button with the slot on the guide post of the battery latch assembly.... wireless technology to Contents Page Replace the fan (see Replacing the Palm Rest). 9. Back to the system board (see Replacing the Hard Drive). 14. NOTICE: The battery release button is properly oriented. Replace the palm rest (see Replacing the Fan). 13. The indent ...

Service Manual
Page 36
... Optical Drive Dell™ Vostro™ 1710 Service Manual Removing the Optical Drive Replacing the Optical Drive Removing the Optical Drive CAUTION: Before you begin any of the procedures in this section, follow the safety instructions that you begin any of the procedures in Before Working on Your Computer. 2. Remove the hinge cover (see Replacing the Palm Rest). 4. Remove the hard drive cover...
... Optical Drive Dell™ Vostro™ 1710 Service Manual Removing the Optical Drive Replacing the Optical Drive Removing the Optical Drive CAUTION: Before you begin any of the procedures in this section, follow the safety instructions that you begin any of the procedures in Before Working on Your Computer. 2. Remove the hinge cover (see Replacing the Palm Rest). 4. Remove the hard drive cover...

Service Manual
Page 37
Back to Contents Page Replace the keyboard (see Replacing the Hinge Cover). 7. Replace the hard drive cover. Replace the hinge cover (see Replacing the Keyboard). 6. Replace the WLAN card (see Replacing a WLAN Card). 8. 5. See Removing the Hard Drive for an illustration of the hard drive cover.
Back to Contents Page Replace the keyboard (see Replacing the Hinge Cover). 7. Replace the hard drive cover. Replace the hinge cover (see Replacing the Keyboard). 6. Replace the WLAN card (see Replacing a WLAN Card). 8. 5. See Removing the Hard Drive for an illustration of the hard drive cover.


