
Setup and Quick Reference Guide
Page 13
... 13 CAUTION: Do not block, push objects into, or allow dust to work with your Dell™ computer. Fan noise is running. CAUTION: Before removing or replacing the battery, turn off the computer, disconnect the AC adapter from the electrical outlet and the computer, ...disconnect the modem from Dell. Battery Removal CAUTION: Before you begin any other computers with a compatible battery purchased from the wall connector and computer...
... 13 CAUTION: Do not block, push objects into, or allow dust to work with your Dell™ computer. Fan noise is running. CAUTION: Before removing or replacing the battery, turn off the computer, disconnect the AC adapter from the electrical outlet and the computer, ...disconnect the modem from Dell. Battery Removal CAUTION: Before you begin any other computers with a compatible battery purchased from the wall connector and computer...
Setup and Quick Reference Guide
Page 37
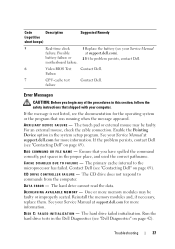
... mouse, check the cable connection. DATA ERROR - If the problem persists, contact Dell (see "Contacting Dell" on page 69). Contact Dell (see "Contacting Dell" on page 42). D E C R E A S I N G A V A I L U R E - battery failure or 2 If the problem persists, contact Dell. AU X I L I L U R E - Reinstall the memory modules and, if necessary, replace them. The touch pad or external mouse may be faulty. C D D R I V E C O N T R O L L E R F A I A R Y DEVICE FAILURE...
... mouse, check the cable connection. DATA ERROR - If the problem persists, contact Dell (see "Contacting Dell" on page 69). Contact Dell (see "Contacting Dell" on page 42). D E C R E A S I N G A V A I L U R E - battery failure or 2 If the problem persists, contact Dell. AU X I L I L U R E - Reinstall the memory modules and, if necessary, replace them. The touch pad or external mouse may be faulty. C D D R I V E C O N T R O L L E R F A I A R Y DEVICE FAILURE...

Setup and Quick Reference Guide
Page 42
... running out of the procedures in this section, follow the safety instructions that supports the system configuration settings may be loose. Replace the battery, or connect the computer to Use the Dell Diagnostics If you experience a problem with your computer, perform the checks in the system setup program does not match the system...
... running out of the procedures in this section, follow the safety instructions that supports the system configuration settings may be loose. Replace the battery, or connect the computer to Use the Dell Diagnostics If you experience a problem with your computer, perform the checks in the system setup program does not match the system...
Service Manual
Page 7
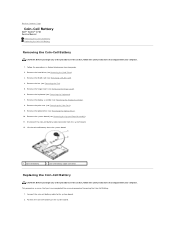
... Removing the Display Assembly). 8. Remove the system board (see Removing the Hinge Cover). 6. Connect the coin-cell battery cable to Contents Page Coin-Cell Battery Dell™ Vostro™ 1710 Service Manual Removing the Coin-Cell Battery Replacing the Coin-Cell Battery Removing the Coin-Cell Battery CAUTION: Before you have completed the removal procedure Removing the Coin-Cell...
... Removing the Display Assembly). 8. Remove the system board (see Removing the Hinge Cover). 6. Connect the coin-cell battery cable to Contents Page Coin-Cell Battery Dell™ Vostro™ 1710 Service Manual Removing the Coin-Cell Battery Replacing the Coin-Cell Battery Removing the Coin-Cell Battery CAUTION: Before you have completed the removal procedure Removing the Coin-Cell...
Service Manual
Page 15
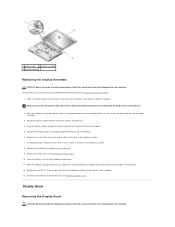
... cable to both corners of the display assembly. 7. Replace the hinge cover (see Replacing a WLAN Card). Close the display and turn the computer upside down. 11. With the computer facing top side up , replace the screw located at the bottom of the battery bay near the edge of the computer. 5. Slide ...the antenna cables through the hole in the base of the display assembly. 8. Replace the two M2.5 x 8-mm screws that attach the display ...
... cable to both corners of the display assembly. 7. Replace the hinge cover (see Replacing a WLAN Card). Close the display and turn the computer upside down. 11. With the computer facing top side up , replace the screw located at the bottom of the battery bay near the edge of the computer. 5. Slide ...the antenna cables through the hole in the base of the display assembly. 8. Replace the two M2.5 x 8-mm screws that attach the display ...
Service Manual
Page 30
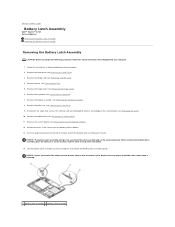
... assembly over the pin. Remove the hard drive (see Removing the Card). 10. Back to Contents Page Battery Latch Assembly Dell™ Vostro™ 1710 Service Manual Removing the Battery Latch Assembly Replacing the Battery Latch Assembly Removing the Battery Latch Assembly CAUTION: Before you remove the battery release button, observe the orientation of the computer and unhook the...
... assembly over the pin. Remove the hard drive (see Removing the Card). 10. Back to Contents Page Battery Latch Assembly Dell™ Vostro™ 1710 Service Manual Removing the Battery Latch Assembly Replacing the Battery Latch Assembly Removing the Battery Latch Assembly CAUTION: Before you remove the battery release button, observe the orientation of the computer and unhook the...
Service Manual
Page 31
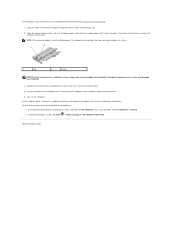
...Replace the display assembly (see Replacing the Palm Rest). 9. Replace the keyboard (see Replacing the System Board Assembly). 6. Back to ensure proper alignment. Replace the system board (see Replacing the Keyboard). 11. Replace the hinge cover (see Replacing the Hard Drive). 14. Replace the hard drive (see Replacing the Hinge Cover). 12. NOTICE: Ensure the battery...3. Ensure that the battery latch spring is properly oriented. If you have completed the removal procedure Removing the Battery Latch Assembly. 1. 3 spring Replacing the Battery Latch Assembly CAUTION: ...
...Replace the display assembly (see Replacing the Palm Rest). 9. Replace the keyboard (see Replacing the System Board Assembly). 6. Back to ensure proper alignment. Replace the system board (see Replacing the Keyboard). 11. Replace the hinge cover (see Replacing the Hard Drive). 14. Replace the hard drive (see Replacing the Hinge Cover). 12. NOTICE: Ensure the battery...3. Ensure that the battery latch spring is properly oriented. If you have completed the removal procedure Removing the Battery Latch Assembly. 1. 3 spring Replacing the Battery Latch Assembly CAUTION: ...
Service Manual
Page 33
...Forcing the memory cover to close may not boot. Insert the battery into place. l In Microsoft Windows Vista®, click Start ® Help and Support® Dell System Information. Back to your computer and an electrical outlet. 5. Replace the memory cover and tighten the eight screws that you do ...not feel the click, remove the module and reinstall it clicks into the battery bay, or connect the AC adapter ...
...Forcing the memory cover to close may not boot. Insert the battery into place. l In Microsoft Windows Vista®, click Start ® Help and Support® Dell System Information. Back to your computer and an electrical outlet. 5. Replace the memory cover and tighten the eight screws that you do ...not feel the click, remove the module and reinstall it clicks into the battery bay, or connect the AC adapter ...
Service Manual
Page 52
... manufacturer's instructions. Windows XP: 1. Battery Problems CAUTION: There is incorrectly installed. Click Uninstall. 4. Click Start ® Control Panel® Programs® Programs and Features. 2. Contact Dell Support. Windows Vista: l Click Start... and click Computer. Click Start® Control Panel® Add or Remove Programs® Programs and Features. 2. Insert a disk into the drive and try again - Insert a bootable floppy disk, CD, or DVD. Non-system disk error - Not enough memory or resources. Replace the battery...
... manufacturer's instructions. Windows XP: 1. Battery Problems CAUTION: There is incorrectly installed. Click Uninstall. 4. Click Start ® Control Panel® Programs® Programs and Features. 2. Contact Dell Support. Windows Vista: l Click Start... and click Computer. Click Start® Control Panel® Add or Remove Programs® Programs and Features. 2. Insert a disk into the drive and try again - Insert a bootable floppy disk, CD, or DVD. Non-system disk error - Not enough memory or resources. Replace the battery...


