Owners Manual
Page 4
... Installing The Power Button Board 28 10 Removing The Hard Drive 29 Installing The Hard Drive 30 11 Removing The Wireless Local Area Network (WLAN) Card...........31 Installing The Wireless Local Area Network (WLAN) Card 32 12 Removing The Coin-Cell Battery 33 Installing The Coin-Cell Battery 34 13 Removing The USB Board 35 Installing The USB...
... Installing The Power Button Board 28 10 Removing The Hard Drive 29 Installing The Hard Drive 30 11 Removing The Wireless Local Area Network (WLAN) Card...........31 Installing The Wireless Local Area Network (WLAN) Card 32 12 Removing The Coin-Cell Battery 33 Installing The Coin-Cell Battery 34 13 Removing The USB Board 35 Installing The USB...

Owners Manual
Page 29
Removing The Hard Drive 1. Remove the battery. 3. Remove the screws that secure the hard drive bracket and detach it out of the computer. 10 6. Remove the palm rest. 5. Slide the hard drive and lift it from the hard drive. 29 Remove the keyboard. 4. Follow the procedures in Before Working On Your Computer. 2.
Removing The Hard Drive 1. Remove the battery. 3. Remove the screws that secure the hard drive bracket and detach it out of the computer. 10 6. Remove the palm rest. 5. Slide the hard drive and lift it from the hard drive. 29 Remove the keyboard. 4. Follow the procedures in Before Working On Your Computer. 2.
Owners Manual
Page 43
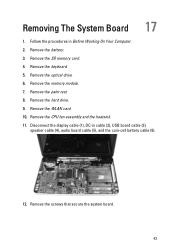
Removing The System Board 17 1. Remove the keyboard. 5. Remove the optical drive. 6. Remove the CPU fan assembly and the heatsink. 11. Remove the screws that secure the system board. 43 Remove the SD memory card. 4. Remove the palm rest. 8. Remove the battery. 3. Remove the WLAN card. 10. Follow the procedures in cable (2), USB board cable (3), speaker cable (4), audio board cable (5), and the coin-cell battery cable (6). 12. Remove the memory module. 7. Remove the hard drive. 9. Disconnect the display cable (1), DC-in Before Working On Your Computer. 2.
Removing The System Board 17 1. Remove the keyboard. 5. Remove the optical drive. 6. Remove the CPU fan assembly and the heatsink. 11. Remove the screws that secure the system board. 43 Remove the SD memory card. 4. Remove the palm rest. 8. Remove the battery. 3. Remove the WLAN card. 10. Follow the procedures in cable (2), USB board cable (3), speaker cable (4), audio board cable (5), and the coin-cell battery cable (6). 12. Remove the memory module. 7. Remove the hard drive. 9. Disconnect the display cable (1), DC-in Before Working On Your Computer. 2.
Owners Manual
Page 47
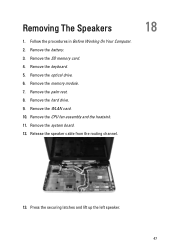
Remove the keyboard. 5. Remove the memory module. 7. Release the speaker cable from the routing channel. 18 13. Remove the battery. 3. Remove the optical drive. 6. Remove the CPU fan assembly and the heatsink. 11. Press the securing latches and lift up the left speaker. 47 Remove the palm rest. 8. Removing The Speakers 1. Remove the hard drive. 9. Remove the system board. 12. Remove the SD memory card. 4. Follow the procedures in Before Working On Your Computer. 2. Remove the WLAN card. 10.
Remove the keyboard. 5. Remove the memory module. 7. Release the speaker cable from the routing channel. 18 13. Remove the battery. 3. Remove the optical drive. 6. Remove the CPU fan assembly and the heatsink. 11. Press the securing latches and lift up the left speaker. 47 Remove the palm rest. 8. Removing The Speakers 1. Remove the hard drive. 9. Remove the system board. 12. Remove the SD memory card. 4. Follow the procedures in Before Working On Your Computer. 2. Remove the WLAN card. 10.

Owners Manual
Page 71
... Menu option is recommended that you must watch for the F2 prompt to wait until you add, change, or remove any hardware in your computer. • set the type of hard drive installed. If you wait too long and the operating system logo appears, continue to appear. 3. Appears on your... computer and try again. Press < Left Arrow > 71 When the blue DELL logo is displayed, you write down your computer. ...
... Menu option is recommended that you must watch for the F2 prompt to wait until you add, change, or remove any hardware in your computer. • set the type of hard drive installed. If you wait too long and the operating system logo appears, continue to appear. 3. Appears on your... computer and try again. Press < Left Arrow > 71 When the blue DELL logo is displayed, you write down your computer. ...


