Vostro 15 - 3568 Quick Start Guide -Windows 10
Page 1
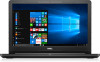
... Dell.com/regulatory_compliance P63F P63F002 Vostro 15-3568 Vostro 15-3568 系列 Taiwan RoHS RoHS 標準 CNS15663 單元 鉛 汞 鎘 (Pb) (Hg) (Cd) - o o o o - o o o o 備考 1. o o o o 配件 - Vostro 15 3000 Series Quick Start Guide 1 Connect the power adapter and press the power button 2 Finish Windows 10 setup 完成 Windows 10 Windows 10 設定 Windows 10 Enable Support and Protection Connect to your network Create recovery media for Windows...
... Dell.com/regulatory_compliance P63F P63F002 Vostro 15-3568 Vostro 15-3568 系列 Taiwan RoHS RoHS 標準 CNS15663 單元 鉛 汞 鎘 (Pb) (Hg) (Cd) - o o o o - o o o o 備考 1. o o o o 配件 - Vostro 15 3000 Series Quick Start Guide 1 Connect the power adapter and press the power button 2 Finish Windows 10 setup 完成 Windows 10 Windows 10 設定 Windows 10 Enable Support and Protection Connect to your network Create recovery media for Windows...

Vostro 15 - 3568 Quick Start Guide -Windows 10
Page 2
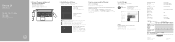
.../Pause Next track Extend display Search Decrease brightness Increase brightness Toggle off/on wireless Toggle Fn-key lock 切换 Fn Fn 鍵鎖定 Fn Sleep Toggle between power and battery-status light/ hard-drive activity light Features 1. Network port 19. Service tag label 1. 摄像头 2 3. 麦克风 4 5 6 7. Speaker 15. HDMI 連接埠 17. Power button 6. USB 2.0 port 8. Power and battery-status light/ hard-drive activity light 13. VGA port 18. HDMI 端口 17...
.../Pause Next track Extend display Search Decrease brightness Increase brightness Toggle off/on wireless Toggle Fn-key lock 切换 Fn Fn 鍵鎖定 Fn Sleep Toggle between power and battery-status light/ hard-drive activity light Features 1. Network port 19. Service tag label 1. 摄像头 2 3. 麦克风 4 5 6 7. Speaker 15. HDMI 連接埠 17. Power button 6. USB 2.0 port 8. Power and battery-status light/ hard-drive activity light 13. VGA port 18. HDMI 端口 17...
Vostro 15-3568 Owners Manual
Page 3
... Installing the optical drive...16 Keyboard lattice and Keyboard...16 Removing the keyboard...16 Installing the keyboard...18 Base cover...18 Removing the base cover...18 Installing the base cover...21 Hard drive...21 Removing the hard drive assembly...21 Removing the hard drive from the hard drive bracket 22 Installing the hard drive into the hard drive bracket 23 Installing the hard drive assembly...23 WLAN card...23 Removing the WLAN card...23 Installing the WLAN card...24 Memory modules...24 Removing the memory module...24 Installing the memory module...25 Coin-cell battery...
... Installing the optical drive...16 Keyboard lattice and Keyboard...16 Removing the keyboard...16 Installing the keyboard...18 Base cover...18 Removing the base cover...18 Installing the base cover...21 Hard drive...21 Removing the hard drive assembly...21 Removing the hard drive from the hard drive bracket 22 Installing the hard drive into the hard drive bracket 23 Installing the hard drive assembly...23 WLAN card...23 Removing the WLAN card...23 Installing the WLAN card...24 Memory modules...24 Removing the memory module...24 Installing the memory module...25 Coin-cell battery...
Vostro 15-3568 Owners Manual
Page 5
... the display adapter...55 Rotating the display...55 Downloading drivers...56 Changing the screen resolution...56 Adjusting brightness in Windows 10...56 Adjusting brightness in Windows 8...57 Adjusting brightness in Windows 7...57 Cleaning the display...57 Connecting to external display devices...57 Hard drive options...57 Identifying the hard drive in Windows 10...58 Identifying the hard drive in Windows 8...58 Identifying the hard drive in Windows 7...58 Entering BIOS setup...58 USB features...59 HDMI 1.4...61 USB Powershare...61 Camera features...62 Identifying the camera in Device Manager...
... the display adapter...55 Rotating the display...55 Downloading drivers...56 Changing the screen resolution...56 Adjusting brightness in Windows 10...56 Adjusting brightness in Windows 8...57 Adjusting brightness in Windows 7...57 Cleaning the display...57 Connecting to external display devices...57 Hard drive options...57 Identifying the hard drive in Windows 10...58 Identifying the hard drive in Windows 8...58 Identifying the hard drive in Windows 7...58 Entering BIOS setup...58 USB features...59 HDMI 1.4...61 USB Powershare...61 Camera features...62 Identifying the camera in Device Manager...
Vostro 15-3568 Owners Manual
Page 7
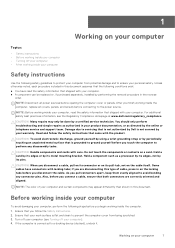
... performing the removal procedure in this document. Ensure that you touch the computer to the power source. Unless otherwise noted, each procedure included in the reverse order. NOTE: Disconnect all covers, panels, and screws before you disconnect a cable, pull on its connector or on its pull-tab, not on a card. You should only perform troubleshooting and simple repairs as authorized...
... performing the removal procedure in this document. Ensure that you touch the computer to the power source. Unless otherwise noted, each procedure included in the reverse order. NOTE: Disconnect all covers, panels, and screws before you disconnect a cable, pull on its connector or on its pull-tab, not on a card. You should only perform troubleshooting and simple repairs as authorized...
Vostro 15-3568 Owners Manual
Page 16
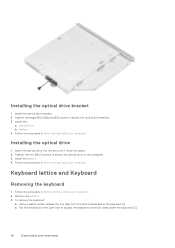
.... 3. Installing the optical drive 1. Remove the battery. 3. Install the battery. 4. Using a plastic scribe, release the five tabs from the slots located above the keyboard [1]. battery 4. b. Tighten the single M2L2(Big head05) screw to access the keyboard connector cable under the keyboard [2]. 16 Disassembly and reassembly Follow the procedure in Before working inside your computer. 2. Insert the optical drive into the slot until it clicks into place. 2. Keyboard lattice and Keyboard Removing the keyboard 1. Installing...
.... 3. Installing the optical drive 1. Remove the battery. 3. Install the battery. 4. Using a plastic scribe, release the five tabs from the slots located above the keyboard [1]. battery 4. b. Tighten the single M2L2(Big head05) screw to access the keyboard connector cable under the keyboard [2]. 16 Disassembly and reassembly Follow the procedure in Before working inside your computer. 2. Insert the optical drive into the slot until it clicks into place. 2. Keyboard lattice and Keyboard Removing the keyboard 1. Installing...
Vostro 15-3568 Owners Manual
Page 21
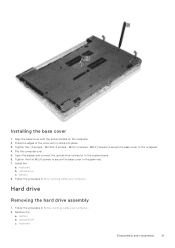
... the ( 8 screws - battery 8. battery b. M2.5L8; 3 screws - M2L2; 2 screws- M2L2) screws to secure the base cover to the system board. 6. Open the display and connect the optical drive connector to the computer. 4. Remove the: a. keyboard b. Hard drive Removing the hard drive assembly 1. optical drive c. Flip the computer over. 5. Tighten the five M2L5 screws to secure the base cover to the palm rest. 7. Install the: a. optical drive c. keyboard Disassembly and reassembly 21...
... the ( 8 screws - battery 8. battery b. M2.5L8; 3 screws - M2L2; 2 screws- M2L2) screws to secure the base cover to the system board. 6. Open the display and connect the optical drive connector to the computer. 4. Remove the: a. keyboard b. Hard drive Removing the hard drive assembly 1. optical drive c. Flip the computer over. 5. Tighten the five M2L5 screws to secure the base cover to the palm rest. 7. Install the: a. optical drive c. keyboard Disassembly and reassembly 21...
Vostro 15-3568 Owners Manual
Page 23
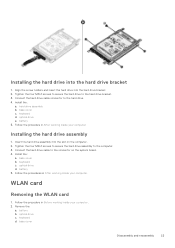
... hard drive assembly into the slot on the system board. 4. optical drive d. Follow the procedure in Before working inside your computer. Remove the: a. base cover Disassembly and reassembly 23 Connect the hard drive cable connector to the hard drive bracket. 3. base cover c. Tighten the four M2L3 screws to secure the hard drive assembly to the connector on the computer. 2. battery 5. keyboard d. optical drive e. battery 5. Connect the hard drive cable to the computer. 3. optical drive c. keyboard d. WLAN card Removing the WLAN card 1. battery b. hard drive...
... hard drive assembly into the slot on the system board. 4. optical drive d. Follow the procedure in Before working inside your computer. Remove the: a. base cover Disassembly and reassembly 23 Connect the hard drive cable connector to the hard drive bracket. 3. base cover c. Tighten the four M2L3 screws to secure the hard drive assembly to the connector on the computer. 2. battery 5. keyboard d. optical drive e. battery 5. Connect the hard drive cable to the computer. 3. optical drive c. keyboard d. WLAN card Removing the WLAN card 1. battery b. hard drive...
Vostro 15-3568 Owners Manual
Page 53
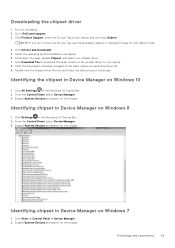
... in Device Manager on Windows 7 1. Technology and components 53 Click Download File to Dell.com/support. 3. Identifying chipset in Device Manager on Windows 8 1. Go to download the latest version of your laptop model. 4. Click Product Support, enter the Service Tag of the chipset driver for the chipset. From the Control Panel, select Device Manager. 3. Double-click the chipset driver file icon and follow the instructions on the Windows 8.1 Charms Bar. 2. Click Settings on the screen. Downloading...
... in Device Manager on Windows 7 1. Technology and components 53 Click Download File to Dell.com/support. 3. Identifying chipset in Device Manager on Windows 8 1. Go to download the latest version of your laptop model. 4. Click Product Support, enter the Service Tag of the chipset driver for the chipset. From the Control Panel, select Device Manager. 3. Double-click the chipset driver file icon and follow the instructions on the Windows 8.1 Charms Bar. 2. Click Settings on the screen. Downloading...
Vostro 15-3568 Owners Manual
Page 56
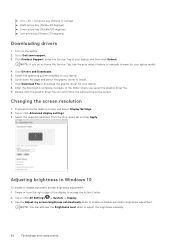
... Downloads. 5. Click Download File to download the graphic driver for your laptop. 6. Swipe-in Windows 10 To enable or disable automatic screen brightness adjustment: 1. Turn on your laptop model. 4. Go to normal) ● Right arrow key (Rotate 90 degrees) ● Down arrow key (Rotate 180 degrees) ● Left arrow key (Rotate 270 degrees) Downloading drivers 1. NOTE: If you saved the graphic driver file. 9. Changing the screen resolution 1. Tap or click Advanced display settings. 3. Scroll down list...
... Downloads. 5. Click Download File to download the graphic driver for your laptop. 6. Swipe-in Windows 10 To enable or disable automatic screen brightness adjustment: 1. Turn on your laptop model. 4. Go to normal) ● Right arrow key (Rotate 90 degrees) ● Down arrow key (Rotate 180 degrees) ● Left arrow key (Rotate 270 degrees) Downloading drivers 1. NOTE: If you saved the graphic driver file. 9. Changing the screen resolution 1. Tap or click Advanced display settings. 3. Scroll down list...
Vostro 15-3568 Owners Manual
Page 57
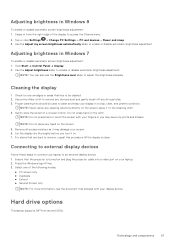
... in Windows 7 To enable or disable automatic screen brightness adjustment: 1. Press the Windows logo+P key. 3. Tap or click Settings → Change PC Settings → PC and devices→ Power and sleep. 3. Use the Adjust brightness slider to an external display device: 1. NOTE: Do not press hard or touch the screen with your laptop to enable or disable automatic-brightness adjustment. Connecting to external display devices Follow these steps to connect your display device. Ensure that shipped with your laptop. 2. Click Start → Control Panel → Display. 2. Remove...
... in Windows 7 To enable or disable automatic screen brightness adjustment: 1. Press the Windows logo+P key. 3. Tap or click Settings → Change PC Settings → PC and devices→ Power and sleep. 3. Use the Adjust brightness slider to an external display device: 1. NOTE: Do not press hard or touch the screen with your laptop to enable or disable automatic-brightness adjustment. Connecting to external display devices Follow these steps to connect your display device. Ensure that shipped with your laptop. 2. Click Start → Control Panel → Display. 2. Remove...
Vostro 15-3568 Owners Manual
Page 58
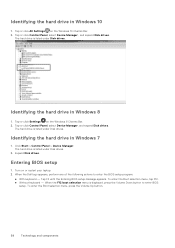
... keyboard - The hard drive is listed under Disk drives. Expand Disk drives. Entering BIOS setup 1. Identifying the hard drive in Windows 7 1. The hard drive is listed under Disk drives. When the Dell logo appears, perform one of the following actions to enter BIOS setup. The hard drive is displayed, press the Volume Down button to enter the BIOS setup program: ● With keyboard - Click Start > Control Panel > Device Manager. Tap F2 until the Entering BIOS setup message appears. Tap or click Settings on or restart your laptop. 2. Identifying the hard drive in Windows...
... keyboard - The hard drive is listed under Disk drives. Expand Disk drives. Entering BIOS setup 1. Identifying the hard drive in Windows 7 1. The hard drive is listed under Disk drives. When the Dell logo appears, perform one of the following actions to enter BIOS setup. The hard drive is displayed, press the Volume Down button to enter the BIOS setup program: ● With keyboard - Click Start > Control Panel > Device Manager. Tap F2 until the Entering BIOS setup message appears. Tap or click Settings on or restart your laptop. 2. Identifying the hard drive in Windows...
Vostro 15-3568 Owners Manual
Page 61
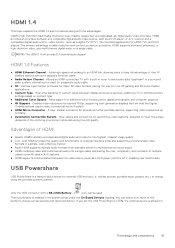
... portable devices, supporting video resolutions up to optimize picture settings based on a single cable. A new, smaller connector for additional color models used in many commercial movie theaters ● HDMI Micro Connector - This functionality is enabled in digital photography and computer graphics ● 4K Support - You can select how much of multiple cables currently used in the system setup under the On Board Devices heading. Adds high-speed networking...
... portable devices, supporting video resolutions up to optimize picture settings based on a single cable. A new, smaller connector for additional color models used in many commercial movie theaters ● HDMI Micro Connector - This functionality is enabled in digital photography and computer graphics ● 4K Support - You can select how much of multiple cables currently used in the system setup under the On Board Devices heading. Adds high-speed networking...
Vostro 15-3568 Owners Manual
Page 67
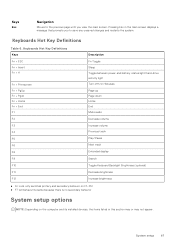
... F5 F6 F8 F9 F10 F11 F12 Description Fn Toggle Sleep Toggle between power and battery-status light/hard-drive activity light Turn offf/on Wireless Page up Page down Home End Mute audio Decrease volume Increase volume Previous track Play/Pause Next track Extended display Search Toggle Keyboard Backlight Brightness (optional) Decrease brightness Increase brightness ● Fn Lock only switches primary and secondary behavior on F1-F12 ● F7 will...
... F5 F6 F8 F9 F10 F11 F12 Description Fn Toggle Sleep Toggle between power and battery-status light/hard-drive activity light Turn offf/on Wireless Page up Page down Home End Mute audio Decrease volume Increase volume Previous track Play/Pause Next track Extended display Search Toggle Keyboard Backlight Brightness (optional) Decrease brightness Increase brightness ● Fn Lock only switches primary and secondary behavior on F1-F12 ● F7 will...
Vostro 15-3568 Owners Manual
Page 68
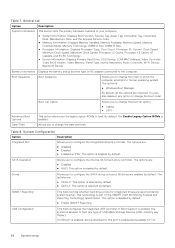
.... ● Device Information: Displays Primary Hard Drive, ODD Device, LOM MAC Address, Video Controller, Video BIOS Version, Video Memory, Panel Type, Native Resolution, Audio Controller, Wi-Fi Device, Bluetooth Device. Allows you to load. The options are: ● SATA-0: This option is selected by default. ● SATA-1: This option is allowed to the computer. This option is enabled by default. Table 7. The options are enabled by default. All drives are : ● Disabled ● AHCI: This option is disabled by default. If USB port is enabled and...
.... ● Device Information: Displays Primary Hard Drive, ODD Device, LOM MAC Address, Video Controller, Video BIOS Version, Video Memory, Panel Type, Native Resolution, Audio Controller, Wi-Fi Device, Bluetooth Device. Allows you to load. The options are: ● SATA-0: This option is selected by default. ● SATA-1: This option is allowed to the computer. This option is enabled by default. Table 7. The options are enabled by default. All drives are : ● Disabled ● AHCI: This option is disabled by default. If USB port is enabled and...
Vostro 15-3568 Owners Manual
Page 69
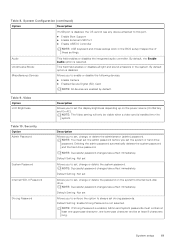
...or hard drive password. By default, the Enable Audio option is not selected. Video Option LCD Brightness Description Allows you to set the display brightness depending up on the system's internal hard-disk drive. Deleting the admin password automatically deletes the system password and the hard drive password. By default option is installed into the system. Security Option Admin Password System Password Internal HDD-0 Password Strong Password Description Allows you to this port. ● Enable Boot Support ● Enable External USB Port ● Enable USB3.0 Controller...
...or hard drive password. By default, the Enable Audio option is not selected. Video Option LCD Brightness Description Allows you to set the display brightness depending up on the system's internal hard-disk drive. Deleting the admin password automatically deletes the system password and the hard drive password. By default option is installed into the system. Security Option Admin Password System Password Internal HDD-0 Password Strong Password Description Allows you to this port. ● Enable Boot Support ● Enable External USB Port ● Enable USB3.0 Controller...
Vostro 15-3568 Owners Manual
Page 70
... upgrade or downgrade TPM1.2/2.0, download the TPM wrapper tool (software). If disabled the setup options are allowed when an Administrator Password is set . Security (continued) Option Description Password Configuration Allows you to enable or disable the permission to controls whether the system allows BIOS update via UEFI capsule update packages. Default Setting: Allow Non-Admin Password Changes is not selected. Non-Admin Setup Changes UEFI Capsule Firmware Updates TPM 2.0 Security Allows you to prevent users from entering Setup...
... upgrade or downgrade TPM1.2/2.0, download the TPM wrapper tool (software). If disabled the setup options are allowed when an Administrator Password is set . Security (continued) Option Description Password Configuration Allows you to enable or disable the permission to controls whether the system allows BIOS update via UEFI capsule update packages. Default Setting: Allow Non-Admin Password Changes is not selected. Non-Admin Setup Changes UEFI Capsule Firmware Updates TPM 2.0 Security Allows you to prevent users from entering Setup...

Vostro 15-3568 Owners Manual
Page 72
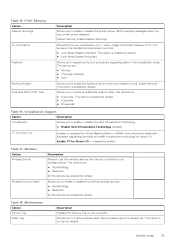
... Charge Configuration option. 72 System setup Fully charges your system uses the standard charging algorithm and other techniques, during Standby, the system setup will remove power from turning on automatically. Power Management Option AC Behavior Description Allows you to enable or disable the HyperThreading in the processor. ● Disabled ● Enabled Default Setting: The option is disabled. Table 13. Performance (continued) Option Description Intel TurboBoost Allows you to conserve battery power. ● Enable USB Wake Support Default Setting: The option...
... Charge Configuration option. 72 System setup Fully charges your system uses the standard charging algorithm and other techniques, during Standby, the system setup will remove power from turning on automatically. Power Management Option AC Behavior Description Allows you to enable or disable the HyperThreading in the processor. ● Disabled ● Enabled Default Setting: The option is disabled. Table 13. Performance (continued) Option Description Intel TurboBoost Allows you to conserve battery power. ● Enable USB Wake Support Default Setting: The option...
Vostro 15-3568 Owners Manual
Page 73
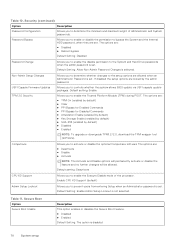
... use certain power adapters. Maintenance Option Service Tag Asset Tag Description Displays the Service Tag of F1-F12, between the standard and secondary functions. ● Lock Mode Disable/Standard. This option is not already set by default. ● 5 seconds ● 10 seconds Table 16. Allows you to create a system asset tag if an asset tag is enabled by default. Wireless Option Wireless Switch Wireless Device Enable Description Allows to create an additional preboot delay. Table 15. Enable Network. The options...
... use certain power adapters. Maintenance Option Service Tag Asset Tag Description Displays the Service Tag of F1-F12, between the standard and secondary functions. ● Lock Mode Disable/Standard. This option is not already set by default. ● 5 seconds ● 10 seconds Table 16. Allows you to create a system asset tag if an asset tag is enabled by default. Wireless Option Wireless Switch Wireless Device Enable Description Allows to create an additional preboot delay. Table 15. Enable Network. The options...
Vostro 15-3568 Owners Manual
Page 74
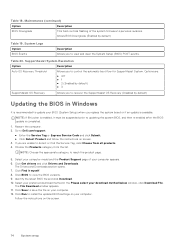
... to Dell.com/support. ● Enter the Service Tag or Express Service Code and click Submit. ● Click Detect Product and follow the instructions on your BIOS (System Setup) when you replace the system board or if an update is recommended to view and clear the System Setup (BIOS) POST events. SupportAssist System Resolution Option Description Auto OS Recovery Threshold Allows you to update your computer. The File Download window...
... to Dell.com/support. ● Enter the Service Tag or Express Service Code and click Submit. ● Click Detect Product and follow the instructions on your BIOS (System Setup) when you replace the system board or if an update is recommended to view and clear the System Setup (BIOS) POST events. SupportAssist System Resolution Option Description Auto OS Recovery Threshold Allows you to update your computer. The File Download window...


