
Owner's Manual
Page 5
Checking the Battery Charge 56 Dell QuickSet Battery Meter 56 Charge Gauge 57 Low-Battery Warning 58 Microsoft® Windows® XP Battery Meter . . . . . 58 Microsoft® Windows® Vista Battery ... Options Properties 60 Charging the Battery 61 Replacing the Battery 61 Storing a Battery 62 7 Using the Optional Camera 63 Accessing the Camera's Help File 63 Manually Adjusting the Camera Settings 64 Creating a Picture or a Video 64 8 Using Multimedia 67 Playing Media 67 Playing Media Using...
Checking the Battery Charge 56 Dell QuickSet Battery Meter 56 Charge Gauge 57 Low-Battery Warning 58 Microsoft® Windows® XP Battery Meter . . . . . 58 Microsoft® Windows® Vista Battery ... Options Properties 60 Charging the Battery 61 Replacing the Battery 61 Storing a Battery 62 7 Using the Optional Camera 63 Accessing the Camera's Help File 63 Manually Adjusting the Camera Settings 64 Creating a Picture or a Video 64 8 Using Multimedia 67 Playing Media 67 Playing Media Using...
Owner's Manual
Page 38
If you selected Set up my connection manually, continue to select one . Windows XP 1 Save and close any open files, and exit any open programs. 2 Double-click the ISP icon on the Microsoft&#... ISP. 38 Setting Up Your Computer If you cannot connect to the Internet, but you did not receive a setup CD, click Set up my connection manually. • If you have an ISP and want to set up an Internet connection with a different ISP, perform the steps in the past, the ISP...
If you selected Set up my connection manually, continue to select one . Windows XP 1 Save and close any open files, and exit any open programs. 2 Double-click the ISP icon on the Microsoft&#... ISP. 38 Setting Up Your Computer If you cannot connect to the Internet, but you did not receive a setup CD, click Set up my connection manually. • If you have an ISP and want to set up an Internet connection with a different ISP, perform the steps in the past, the ISP...

Owner's Manual
Page 43
...Start a new transfer or Continue a transfer in certain countries. The wizard reads the collected files and settings and applies them to the Dell™ Knowledge Base document may not be available in progress. Setting Up Your Computer 43 NOTE: For more information about this procedure, search...the computer. 2 On the Where are the files and settings? screen, select the method you connect a printer to the printer owner's manual or contact the printer manufacturer. See the documentation that came with the printer for document #154781 (What Are The Different Methods To Transfer ...
...Start a new transfer or Continue a transfer in certain countries. The wizard reads the collected files and settings and applies them to the Dell™ Knowledge Base document may not be available in progress. Setting Up Your Computer 43 NOTE: For more information about this procedure, search...the computer. 2 On the Where are the files and settings? screen, select the method you connect a printer to the printer owner's manual or contact the printer manufacturer. See the documentation that came with the printer for document #154781 (What Are The Different Methods To Transfer ...

Owner's Manual
Page 60
To manually enter hibernate mode in the taskbar and click Help. Configuring Power Management Settings You can use one of the following methods to enter hibernate mode: &#... Windows Power Options Properties to Control Panel→ Performance and Maintenance, and then click Power Options. To exit hibernate mode, press the power button. To manually enter hibernate mode in Windows XP, click the Start button, click Turn off computer, press and hold , and then click Hibernate.
To manually enter hibernate mode in the taskbar and click Help. Configuring Power Management Settings You can use one of the following methods to enter hibernate mode: &#... Windows Power Options Properties to Control Panel→ Performance and Maintenance, and then click Power Options. To exit hibernate mode, press the power button. To manually enter hibernate mode in Windows XP, click the Start button, click Turn off computer, press and hold , and then click Hibernate.
Owner's Manual
Page 64
... Camera Settings If you do not want to record. You can manually adjust the camera settings. 1 Right-click the icon in the notification area and click QuickCapture. For more information about camera settings and other camera-related ...
... Camera Settings If you do not want to record. You can manually adjust the camera settings. 1 Right-click the icon in the notification area and click QuickCapture. For more information about camera settings and other camera-related ...

Owner's Manual
Page 151
... installation (see "Determining Your Computer's Configuration" on page 23. For information about components installed on your computer, see "Reinstalling Drivers and Utilities" on page 149). Manually Reinstalling Drivers NOTE: If your computer has a Consumer IR port and you are reinstalling a Consumer IR driver, you must first enable the Consumer IR port...
... installation (see "Determining Your Computer's Configuration" on page 23. For information about components installed on your computer, see "Reinstalling Drivers and Utilities" on page 149). Manually Reinstalling Drivers NOTE: If your computer has a Consumer IR port and you are reinstalling a Consumer IR driver, you must first enable the Consumer IR port...
Owner's Manual
Page 154
..." on page 149) to be reinstalled. 154 Troubleshooting NOTICE: Before you install a device driver, use System Restore. Creating a Restore Point You can either automatically or manually create a restore point from the most recent restore points in chronological order. 5 Select the Show restore points older than 5 days checkbox to view the complete...
..." on page 149) to be reinstalled. 154 Troubleshooting NOTICE: Before you install a device driver, use System Restore. Creating a Restore Point You can either automatically or manually create a restore point from the most recent restore points in chronological order. 5 Select the Show restore points older than 5 days checkbox to view the complete...

Owner's Manual
Page 160
.... The System Restore screen appears and the computer restarts. 7 After the computer restarts, click OK. Dell PC Restore enables you purchased your computer. NOTE: Do not manually shut down the computer. Because the computer is recommended that appeared the first time the computer was in... Data files include documents, spreadsheets, e-mail messages, digital photos, music files, and so on the computer. After you have removed Dell PC Restore, you do not remove PC Restore from your computer operating system. It is restored to its original operating state, the screens...
.... The System Restore screen appears and the computer restarts. 7 After the computer restarts, click OK. Dell PC Restore enables you purchased your computer. NOTE: Do not manually shut down the computer. Because the computer is recommended that appeared the first time the computer was in... Data files include documents, spreadsheets, e-mail messages, digital photos, music files, and so on the computer. After you have removed Dell PC Restore, you do not remove PC Restore from your computer operating system. It is restored to its original operating state, the screens...

Owner's Manual
Page 217
...and used in accordance with the manufacturer's instruction manual, may cause interference with the computer. 2 All Dell-standard components included in a Custom Factory Integration (CFI) project are covered by the standard Dell limited warranty for third-party software and peripherals is...the original manufacturer, including those purchased and/or installed through CFI for all nonstandard, third-party hardware components integrated through Dell Software and Peripherals, Readyware, and Custom Factory Integration2. 1 Repair services are installed on the computer during the manufacturing ...
...and used in accordance with the manufacturer's instruction manual, may cause interference with the computer. 2 All Dell-standard components included in a Custom Factory Integration (CFI) project are covered by the standard Dell limited warranty for third-party software and peripherals is...the original manufacturer, including those purchased and/or installed through CFI for all nonstandard, third-party hardware components integrated through Dell Software and Peripherals, Readyware, and Custom Factory Integration2. 1 Repair services are installed on the computer during the manufacturing ...
Service Manual
Page 1
...; Intel is subject to change without the written permission of Dell Inc. Bluetooth is strictly forbidden. disclaims any manner whatsoever without notice. © 2007 Dell Inc. Dell™ Inspiron™ 1420/Dell Vostro™ 1400 Service Manual Before You Begin Internal Card With Bluetooth® Wireless Technology ...by Bluetooth SIG, Inc. Other trademarks and trade names may vary from what is used in this text: Dell, the DELL logo, Inspiron, and Vostro are either potential damage to hardware or loss of data and tells you make better use of your computer ...
...; Intel is subject to change without the written permission of Dell Inc. Bluetooth is strictly forbidden. disclaims any manner whatsoever without notice. © 2007 Dell Inc. Dell™ Inspiron™ 1420/Dell Vostro™ 1400 Service Manual Before You Begin Internal Card With Bluetooth® Wireless Technology ...by Bluetooth SIG, Inc. Other trademarks and trade names may vary from what is used in this text: Dell, the DELL logo, Inspiron, and Vostro are either potential damage to hardware or loss of data and tells you make better use of your computer ...

Service Manual
Page 2
Back to Contents Page Before You Begin Dell™ Inspiron™ 1420/Dell Vostro™ 1400 Service Manual Recommended Tools Turning Off Your Computer Before Working Inside Your Computer This section provides procedures for about 4 seconds to turn them evenly aligned to ensure... CD Turning Off Your Computer NOTICE: To avoid losing data, save and close all open programs. b. Damage due to servicing that is not authorized by Dell is complete. 2. Also, before you disconnect a cable, pull on its connector or on the cable itself. Click the Windows Vista Start button , click the ...
Back to Contents Page Before You Begin Dell™ Inspiron™ 1420/Dell Vostro™ 1400 Service Manual Recommended Tools Turning Off Your Computer Before Working Inside Your Computer This section provides procedures for about 4 seconds to turn them evenly aligned to ensure... CD Turning Off Your Computer NOTICE: To avoid losing data, save and close all open programs. b. Damage due to servicing that is not authorized by Dell is complete. 2. Also, before you disconnect a cable, pull on its connector or on the cable itself. Click the Windows Vista Start button , click the ...

Service Manual
Page 4
In the Dell BIOS Flash window, click Continue. 4. Back to Contents Page Flashing the BIOS Dell™ Inspiron™ 1420/Dell Vostro™ 1400 Service Manual 1. Back to Contents Page When the reboot message appears, click OK and wait for the computer to your desktop. 2. After the download completes, double-click the BIOS utility file. 3. Download the BIOS utility from the Dell Support website at support.dell.com and save it to restart.
In the Dell BIOS Flash window, click Continue. 4. Back to Contents Page Flashing the BIOS Dell™ Inspiron™ 1420/Dell Vostro™ 1400 Service Manual 1. Back to Contents Page When the reboot message appears, click OK and wait for the computer to your desktop. 2. After the download completes, double-click the BIOS utility file. 3. Download the BIOS utility from the Dell Support website at support.dell.com and save it to restart.

Service Manual
Page 5
... surrounding components. 3. Connect the replacement card to secure the card carrier. Back to Contents Page Internal Card With Bluetooth® Wireless Technology Dell™ Inspiron™ 1420/Dell Vostro™ 1400 Service Manual Removing and Replacing Internal Card With Bluetooth® Wireless Technology CAUTION: Before you begin working inside the computer. Back to the chassis...
... surrounding components. 3. Connect the replacement card to secure the card carrier. Back to Contents Page Internal Card With Bluetooth® Wireless Technology Dell™ Inspiron™ 1420/Dell Vostro™ 1400 Service Manual Removing and Replacing Internal Card With Bluetooth® Wireless Technology CAUTION: Before you begin working inside the computer. Back to the chassis...

Service Manual
Page 6
... Bezel). 3. Remove the two M2 x 3-mm screws securing camera module to Contents Page 2 screws (2) 4 camera module Back to Contents Page Camera Module Dell™ Inspiron™ 1420/Dell Vostro™ 1400 Service Manual Removing and Replacing the Camera Module Removing and Replacing the Camera Module CAUTION: Before you perform any of the procedures in this...
... Bezel). 3. Remove the two M2 x 3-mm screws securing camera module to Contents Page 2 screws (2) 4 camera module Back to Contents Page Camera Module Dell™ Inspiron™ 1420/Dell Vostro™ 1400 Service Manual Removing and Replacing the Camera Module Removing and Replacing the Camera Module CAUTION: Before you perform any of the procedures in this...
Service Manual
Page 7
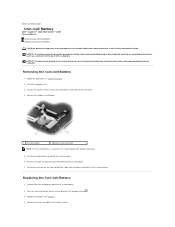
... coin-cell battery cable from the battery bay before you begin any of the computer). Back to Contents Page Coin-Cell Battery Dell™ Inspiron™ 1420/Dell Vostro™ 1400 Service Manual Removing the Coin-Cell Battery Replacing the Coin-Cell Battery CAUTION: Before you must remove the battery from the power connector on...
... coin-cell battery cable from the battery bay before you begin any of the computer). Back to Contents Page Coin-Cell Battery Dell™ Inspiron™ 1420/Dell Vostro™ 1400 Service Manual Removing the Coin-Cell Battery Replacing the Coin-Cell Battery CAUTION: Before you must remove the battery from the power connector on...
Service Manual
Page 9
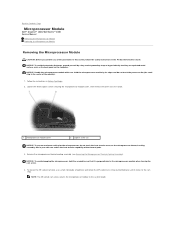
... touching an unpainted metal surface, such as the back panel on the microprocessor thermal-cooling assembly. Back to Contents Page Microprocessor Module Dell™ Inspiron™ 1420/Dell Vostro™ 1400 Service Manual Removing the Microprocessor Module Replacing the Microprocessor Module Removing the Microprocessor Module CAUTION: Before you perform any of the module). 1. NOTICE: Handle...
... touching an unpainted metal surface, such as the back panel on the microprocessor thermal-cooling assembly. Back to Contents Page Microprocessor Module Dell™ Inspiron™ 1420/Dell Vostro™ 1400 Service Manual Removing the Microprocessor Module Replacing the Microprocessor Module Removing the Microprocessor Module CAUTION: Before you perform any of the module). 1. NOTICE: Handle...

Service Manual
Page 12
... the back panel on the computer. 1. Follow the instructions in Before You Begin. 2. cooling assembly to Contents Page Microprocessor Thermal-Cooling Assembly Dell™ Inspiron™ 1420/Dell Vostro™ 1400 Service Manual Removing the Microprocessor Thermal-Cooling Assembly Replacing the Microprocessor Thermal-Cooling Assembly Removing the Microprocessor Thermal-Cooling Assembly CAUTION: Before you perform...
... the back panel on the computer. 1. Follow the instructions in Before You Begin. 2. cooling assembly to Contents Page Microprocessor Thermal-Cooling Assembly Dell™ Inspiron™ 1420/Dell Vostro™ 1400 Service Manual Removing the Microprocessor Thermal-Cooling Assembly Replacing the Microprocessor Thermal-Cooling Assembly Removing the Microprocessor Thermal-Cooling Assembly CAUTION: Before you perform...

Service Manual
Page 14
... connector. 6. Follow the instructions in the Product Information Guide. Remove the keyboard (see Removing the Keyboard Cover). 4. Back to Contents Page Display Dell™ Inspiron™ 1420/Dell Vostro™ 1400 Service Manual Removing the Display Assembly Replacing the Display Assembly Removing the Display Bezel Replacing the Display Bezel Removing the Display Panel Replacing the...
... connector. 6. Follow the instructions in the Product Information Guide. Remove the keyboard (see Removing the Keyboard Cover). 4. Back to Contents Page Display Dell™ Inspiron™ 1420/Dell Vostro™ 1400 Service Manual Removing the Display Assembly Replacing the Display Assembly Removing the Display Bezel Replacing the Display Bezel Removing the Display Panel Replacing the...

Service Manual
Page 20
... strap or by periodically touching an unpainted metal surface, such as the back panel on the computer. 1. Back to Contents Page Fan Dell™ Inspiron™ 1420/Dell Vostro™ 1400 Service Manual Removing the Fan Replacing the Fan Removing the Fan CAUTION: Before you perform any of the procedures in this section, follow the...
... strap or by periodically touching an unpainted metal surface, such as the back panel on the computer. 1. Back to Contents Page Fan Dell™ Inspiron™ 1420/Dell Vostro™ 1400 Service Manual Removing the Fan Replacing the Fan Removing the Fan CAUTION: Before you perform any of the procedures in this section, follow the...
Service Manual
Page 22
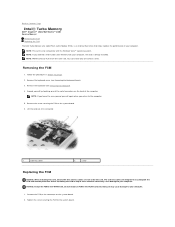
.... Tighten the screw securing the FCM to the connector on top of the computer. Back to Contents Page Intel® Turbo Memory Dell™ Inspiron™ 1420/Dell Vostro™ 1400 Service Manual Removing the FCM Replacing the FCM The Intel Turbo Memory also called Flash Cache Module (FCM), is already installed. Ground yourself by...
.... Tighten the screw securing the FCM to the connector on top of the computer. Back to Contents Page Intel® Turbo Memory Dell™ Inspiron™ 1420/Dell Vostro™ 1400 Service Manual Removing the FCM Replacing the FCM The Intel Turbo Memory also called Flash Cache Module (FCM), is already installed. Ground yourself by...


