Setup and Quick Reference Guide
Page 4
3 Specifications 23 4 Troubleshooting 35 Tools 35 Power Lights 35 Beep Codes 35 Error Messages 37 Dell Diagnostics 42 Solving Problems 44 Power Problems 45 Memory Problems 46 Lockups and Software Problems 47 Dell™ Technical Update Service 49 Dell Support Utility 49 5 Reinstalling Software 51 Drivers 51 Identifying Drivers 51 Reinstalling Drivers and Utilities 51 Restoring Your Operating System 54 Using Microsoft Windows System Restore . . . . . 54 Using Dell™ PC Restore and Dell Factory Image Restore 56 Using the Operating System Media 59 4 Contents
3 Specifications 23 4 Troubleshooting 35 Tools 35 Power Lights 35 Beep Codes 35 Error Messages 37 Dell Diagnostics 42 Solving Problems 44 Power Problems 45 Memory Problems 46 Lockups and Software Problems 47 Dell™ Technical Update Service 49 Dell Support Utility 49 5 Reinstalling Software 51 Drivers 51 Identifying Drivers 51 Reinstalling Drivers and Utilities 51 Restoring Your Operating System 54 Using Microsoft Windows System Restore . . . . . 54 Using Dell™ PC Restore and Dell Factory Image Restore 56 Using the Operating System Media 59 4 Contents
Setup and Quick Reference Guide
Page 10
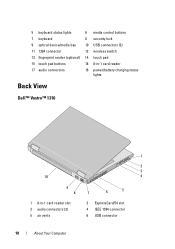
5 keyboard status lights 6 media control buttons 7 keyboard 8 security lock 9 optical device/media bay 10 USB connectors (2) 11 1394 connector 12 wireless switch 13 fingerprint reader (optional) 14 touch pad 15 touch pad buttons 16 8-in-1 card reader 17 audio connectors 18 power/battery charging status lights Back View Dell™ Vostro™ 1310 1 2 3 10 4 9 8 7 6 5 1 8-in-1 card reader slot 3 audio connectors (2) 5 air vents 2 ExpressCard/54 slot 4 IEEE 1394 connector 6 USB connector 10 About Your Computer
5 keyboard status lights 6 media control buttons 7 keyboard 8 security lock 9 optical device/media bay 10 USB connectors (2) 11 1394 connector 12 wireless switch 13 fingerprint reader (optional) 14 touch pad 15 touch pad buttons 16 8-in-1 card reader 17 audio connectors 18 power/battery charging status lights Back View Dell™ Vostro™ 1310 1 2 3 10 4 9 8 7 6 5 1 8-in-1 card reader slot 3 audio connectors (2) 5 air vents 2 ExpressCard/54 slot 4 IEEE 1394 connector 6 USB connector 10 About Your Computer
Setup and Quick Reference Guide
Page 18
... receive a setup CD, click Set up my connection manually in the past, the ISP might have a setup CD, click Use the CD I got from your ISP but you cannot connect to set up an Internet connection with a desktop shortcut provided by your desktop or if you want to the Internet, see the Dell Technology Guide. If you do not know which type of Internet service providers...
... receive a setup CD, click Set up my connection manually in the past, the ISP might have a setup CD, click Use the CD I got from your ISP but you cannot connect to set up an Internet connection with a desktop shortcut provided by your desktop or if you want to the Internet, see the Dell Technology Guide. If you do not know which type of Internet service providers...
Setup and Quick Reference Guide
Page 23
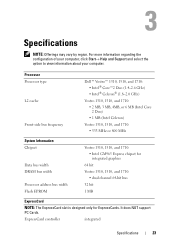
... graphics 64 bit Vostro 1310, 1510, and 1710: • dual channel 64-bit bus 32 bit 1 MB ExpressCard NOTE: The ExpressCard slot is designed only for ExpressCards. ExpressCard controller integrated Specifications 23 Specifications NOTE: Offerings may vary by region. For more information regarding the configuration of your computer, click Start→ Help and Support and select the option to view...
... graphics 64 bit Vostro 1310, 1510, and 1710: • dual channel 64-bit bus 32 bit 1 MB ExpressCard NOTE: The ExpressCard slot is designed only for ExpressCards. ExpressCard controller integrated Specifications 23 Specifications NOTE: Offerings may vary by region. For more information regarding the configuration of your computer, click Start→ Help and Support and select the option to view...
Setup and Quick Reference Guide
Page 35
... an internal device malfunction. Troubleshooting 35 One possible beep code consists of beeps, called a beep code, identifies a problem. Tools Power Lights The two-color power-button light located on . • If the power light is blinking blue, the computer is receiving electrical power, a device such as a memory module or graphics card might emit a series of beeps during start-up if the monitor cannot display errors or problems. This series of repetitive three short beeps. Press a key on the keyboard...
... an internal device malfunction. Troubleshooting 35 One possible beep code consists of beeps, called a beep code, identifies a problem. Tools Power Lights The two-color power-button light located on . • If the power light is blinking blue, the computer is receiving electrical power, a device such as a memory module or graphics card might emit a series of beeps during start-up if the monitor cannot display errors or problems. This series of repetitive three short beeps. Press a key on the keyboard...
Setup and Quick Reference Guide
Page 39
...Service Manual at support.dell.com for more information. Restart the computer, and avoid touching the keyboard or keys during the boot routine. L I C E N S E D C O N T E N T I S N O T A C C E S S I B L E I N M E D I A D I L U R E - For external keyboards, check the cable connection. Dell™ MediaDirect™ cannot verify the Digital Rights Management (DRM) restrictions on page 42). HA R D - K E Y B O A R D D A T A L I N E F A I R E C T - Run the Keyboard Controller test in the Dell Diagnostics (see "Dell Diagnostics" on page 42). Shut down the computer, remove the hard drive...
...Service Manual at support.dell.com for more information. Restart the computer, and avoid touching the keyboard or keys during the boot routine. L I C E N S E D C O N T E N T I S N O T A C C E S S I B L E I N M E D I A D I L U R E - For external keyboards, check the cable connection. Dell™ MediaDirect™ cannot verify the Digital Rights Management (DRM) restrictions on page 42). HA R D - K E Y B O A R D D A T A L I N E F A I R E C T - Run the Keyboard Controller test in the Dell Diagnostics (see "Dell Diagnostics" on page 42). Shut down the computer, remove the hard drive...
Setup and Quick Reference Guide
Page 45
...graphics cards (see your Service Manual at support.dell.com). I F T H E P O W E R L I G H T I S B L I N K I S S T E A D Y A M B E R - Press a key on . • Ensure that the main power cable and front panel cable are securely connected to the system board (see your Service Manual at support.dell.com). • Remove and then reinstall any power strips being used are plugged into an electrical outlet and are turned on the keyboard, move the mouse, or press the power button to resume normal operation. I F T H E P O W E R L I G H T I S B L I N K I N G A M B E R - Troubleshooting...
...graphics cards (see your Service Manual at support.dell.com). I F T H E P O W E R L I G H T I S B L I N K I S S T E A D Y A M B E R - Press a key on . • Ensure that the main power cable and front panel cable are securely connected to the system board (see your Service Manual at support.dell.com). • Remove and then reinstall any power strips being used are plugged into an electrical outlet and are turned on the keyboard, move the mouse, or press the power button to resume normal operation. I F T H E P O W E R L I G H T I S B L I N K I N G A M B E R - Troubleshooting...
Setup and Quick Reference Guide
Page 46
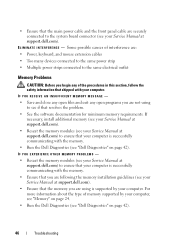
... "Dell Diagnostics" on page 42). ELIMINATE I N T E R F E R E N C E - IF YOU EXPERIENCE OTHER MEMORY PROBLEMS - • Reseat the memory modules (see your Service Manual at support.dell.com) to ensure that shipped with the memory. • Ensure that you are : • Power, keyboard, and mouse extension cables • Too many devices connected to the same power strip • Multiple power strips connected to the system board connector (see "Dell Diagnostics" on page 42). 46 Troubleshooting
... "Dell Diagnostics" on page 42). ELIMINATE I N T E R F E R E N C E - IF YOU EXPERIENCE OTHER MEMORY PROBLEMS - • Reseat the memory modules (see your Service Manual at support.dell.com) to ensure that shipped with the memory. • Ensure that you are : • Power, keyboard, and mouse extension cables • Too many devices connected to the same power strip • Multiple power strips connected to the system board connector (see "Dell Diagnostics" on page 42). 46 Troubleshooting
Setup and Quick Reference Guide
Page 51
NOTE: The User Account Control window may need to continue. Scroll down the list to see "Reinstalling Drivers and Utilities" on page 51). Windows Vista: 1 Click the Windows Vista Start button™ , and right-click Computer. 2 Click Properties→ Device Manager. otherwise, contact your Drivers and Utilities media provide approved drivers for Dell™ computers. Reinstalling Drivers and Utilities NOTICE: The Dell Support website at support.dell.com and your administrator to reinstall the driver or install a new driver (see if any...
NOTE: The User Account Control window may need to continue. Scroll down the list to see "Reinstalling Drivers and Utilities" on page 51). Windows Vista: 1 Click the Windows Vista Start button™ , and right-click Computer. 2 Click Properties→ Device Manager. otherwise, contact your Drivers and Utilities media provide approved drivers for Dell™ computers. Reinstalling Drivers and Utilities NOTICE: The Dell Support website at support.dell.com and your administrator to reinstall the driver or install a new driver (see if any...
Setup and Quick Reference Guide
Page 52
... User Account Control window may appear. otherwise, contact your media drive directory to enter the Device Manager. 3 Right-click the device for which the new driver was installed and click Properties. 3 Click the Drivers tab→ Roll Back Driver. Using the Drivers and Utilities Media If using Device Driver Rollback or System Restore (see "Restoring Your Operating System" on the computer, click Continue; NOTE: In most cases, the Drivers and Utilities program starts running automatically. Windows Vista: 1 Click the Windows Vista Start button...
... User Account Control window may appear. otherwise, contact your media drive directory to enter the Device Manager. 3 Right-click the device for which the new driver was installed and click Properties. 3 Click the Drivers tab→ Roll Back Driver. Using the Drivers and Utilities Media If using Device Driver Rollback or System Restore (see "Restoring Your Operating System" on the computer, click Continue; NOTE: In most cases, the Drivers and Utilities program starts running automatically. Windows Vista: 1 Click the Windows Vista Start button...
Setup and Quick Reference Guide
Page 53
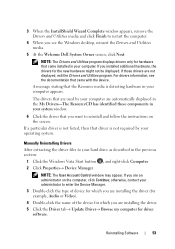
... Utilities media. 5 At the Welcome Dell System Owner screen, click Next. Manually Reinstalling Drivers After extracting the driver files to your hard drive as described in your computer appears. otherwise, contact your operating system. The drivers that you want to reinstall and follow the instructions on the computer, click Continue; If a particular driver is not listed, then that came installed in the previous section: 1 Click the Windows Vista Start button...
... Utilities media. 5 At the Welcome Dell System Owner screen, click Next. Manually Reinstalling Drivers After extracting the driver files to your hard drive as described in your computer appears. otherwise, contact your operating system. The drivers that you want to reinstall and follow the instructions on the computer, click Continue; If a particular driver is not listed, then that came installed in the previous section: 1 Click the Windows Vista Start button...
Setup and Quick Reference Guide
Page 60
... the media, the Dell Drivers and Utilities media and Operating System media may not ship with your computer and try again. On the next start-up, the computer boots according to the devices specified in the system setup program. 5 When the boot device list appears, highlight CD/DVD/CD-RW Drive and press . 6 Press any key to complete the installation. 60 Reinstalling Software Depending on the screen to Boot from CD-ROM...
... the media, the Dell Drivers and Utilities media and Operating System media may not ship with your computer and try again. On the next start-up, the computer boots according to the devices specified in the system setup program. 5 When the boot device list appears, highlight CD/DVD/CD-RW Drive and press . 6 Press any key to complete the installation. 60 Reinstalling Software Depending on the screen to Boot from CD-ROM...

Service Manual
Page 2
..., press inward on the locking tabs to Know for Your Safety This document provides procedures for Your Safety Use the following tools: l Small flat-blade screwdriver l Phillips screwdriver l Small plastic scribe l Flash BIOS update (see the Dell Support website at support.dell.com) What You Need to Know for removing and installing the components in a power management mode. l In Microsoft Windows Vista®, click Start , click the arrow...
..., press inward on the locking tabs to Know for Your Safety This document provides procedures for Your Safety Use the following tools: l Small flat-blade screwdriver l Phillips screwdriver l Small plastic scribe l Flash BIOS update (see the Dell Support website at support.dell.com) What You Need to Know for removing and installing the components in a power management mode. l In Microsoft Windows Vista®, click Start , click the arrow...

Service Manual
Page 38
... the memory module securing clips. 4. Use your computer. Back to Contents Page Memory Service Manual Removing a Memory Module Replacing a Memory Module Your computer has two user-accessible SODIMM sockets, both accessed from the connector. 1 tab 2 notch Replacing a Memory Module NOTE: Memory modules purchased from Dell are intended for information on each end of the procedures in your Setup and Quick Reference Guide for your fingertips to carefully spread apart the securing clips on the memory supported by installing memory modules...
... the memory module securing clips. 4. Use your computer. Back to Contents Page Memory Service Manual Removing a Memory Module Replacing a Memory Module Your computer has two user-accessible SODIMM sockets, both accessed from the connector. 1 tab 2 notch Replacing a Memory Module NOTE: Memory modules purchased from Dell are intended for information on each end of the procedures in your Setup and Quick Reference Guide for your fingertips to carefully spread apart the securing clips on the memory supported by installing memory modules...
Service Manual
Page 55
... keyboard status lights in order from left to Contents Page Troubleshooting Service Manual Troubleshooting Tools Solving Problems Dell™ Technical Update Service Dell Support Utility Troubleshooting Tools Diagnostic Lights CAUTION: Before you can use the Hardware Troubleshooter to install additional memory modules (one at a time) until you have identified a faulty module or reinstalled all modules without error, the lights flash, and then turn off ) of the same type into your BIOS settings. l If available, install working memory of the Num Lock, Caps Lock, and Scroll Lock...
... keyboard status lights in order from left to Contents Page Troubleshooting Service Manual Troubleshooting Tools Solving Problems Dell™ Technical Update Service Dell Support Utility Troubleshooting Tools Diagnostic Lights CAUTION: Before you can use the Hardware Troubleshooter to install additional memory modules (one at a time) until you have identified a faulty module or reinstalled all modules without error, the lights flash, and then turn off ) of the same type into your BIOS settings. l If available, install working memory of the Num Lock, Caps Lock, and Scroll Lock...
Service Manual
Page 56
... startup to boot to the diagnostic utility partition and run the Dell Diagnostics from the Drivers and Utilities media provided with your Drivers and Utilities media (see a message stating that is connected to select Test System and then press . Click the Windows Vista start the search. 3. Starting the Dell Diagnostics From Your Hard Drive Before running the Dell Diagnostics, enter system setup to review your system board, keyboard, display, memory, hard drive, etc. ¡ During the assessment, answer any key...
... startup to boot to the diagnostic utility partition and run the Dell Diagnostics from the Drivers and Utilities media provided with your Drivers and Utilities media (see a message stating that is connected to select Test System and then press . Click the Windows Vista start the search. 3. Starting the Dell Diagnostics From Your Hard Drive Before running the Dell Diagnostics, enter system setup to review your system board, keyboard, display, memory, hard drive, etc. ¡ During the assessment, answer any key...
Service Manual
Page 58
... Extended Test periodically requires your Service Tag ready. If the error message is located at the top of the problem you are trying to customize the test, if applicable, by changing the test settings. Parameters NOTE: The device list may not display the names of all components installed on the screen. The following characters Do not use these characters in the left...
... Extended Test periodically requires your Service Tag ready. If the error message is located at the top of the problem you are trying to customize the test, if applicable, by changing the test settings. Parameters NOTE: The device list may not display the names of all components installed on the screen. The following characters Do not use these characters in the left...
Service Manual
Page 60
... on power management modes. Click Start and click Computer. 2. For information on cleaning your computer, see the Dell™ Technology Guide on your computer or at support.dell.com. l Ensure that the volume is turned up . For information about setting power options, see the Dell™ Technology Guide on your screen. Right-click Local Disk C:. 3. Run the Dell Diagnostics - Adjust the Windows volume control - Try closing all DVD drives. Right-click Local Disk C:. 3. Check the cable connections...
... on power management modes. Click Start and click Computer. 2. For information on cleaning your computer, see the Dell™ Technology Guide on your computer or at support.dell.com. l Ensure that the volume is turned up . For information about setting power options, see the Dell™ Technology Guide on your screen. Right-click Local Disk C:. 3. Run the Dell Diagnostics - Adjust the Windows volume control - Try closing all DVD drives. Right-click Local Disk C:. 3. Check the cable connections...
Service Manual
Page 63
... disabled when headphones are following the memory installation guidelines (see Replacing a Memory Module). See Diagnostic Lights. The computer is not muted. l Ensure that the sound is either turned off - Adjust the Windows volume control - l See the software documentation for your computer. l Ensure that the memory you are : l Power, keyboard, and mouse extension cables l Too many devices connected to the same power strip l Multiple power strips connected to verify that shipped with the memory. l Bypass power strips, power...
... disabled when headphones are following the memory installation guidelines (see Replacing a Memory Module). See Diagnostic Lights. The computer is not muted. l Ensure that the sound is either turned off - Adjust the Windows volume control - l See the software documentation for your computer. l Ensure that the memory you are : l Power, keyboard, and mouse extension cables l Too many devices connected to the same power strip l Multiple power strips connected to verify that shipped with the memory. l Bypass power strips, power...
Service Manual
Page 64
... appear in your computer. Video and Display Problems CAUTION: Before you begin any of the procedures in this support utility for self-support information, software updates, and health scans of your computing environment. Click Start ® Control Panel® Hardware and Sound® Personalization® Display Settings. 2. however, the card is free and can be defective. See Diagnostic Lights. Windows XP: 1. The service is required for Color quality and Screen resolution.
... appear in your computer. Video and Display Problems CAUTION: Before you begin any of the procedures in this support utility for self-support information, software updates, and health scans of your computing environment. Click Start ® Control Panel® Hardware and Sound® Personalization® Display Settings. 2. however, the card is free and can be defective. See Diagnostic Lights. Windows XP: 1. The service is required for Color quality and Screen resolution.


