
User Manual
Page 13
About your printer 13 Use the To 22 Jam clearance cover Access and clear paper jams. 23 Ink cartridge access area Install, replace, or remove ink cartridges. 24 Scanner unit • Access the ink cartridges and printhead. • Clear paper jams.
About your printer 13 Use the To 22 Jam clearance cover Access and clear paper jams. 23 Ink cartridge access area Install, replace, or remove ink cartridges. 24 Scanner unit • Access the ink cartridges and printhead. • Clear paper jams.
User Manual
Page 15
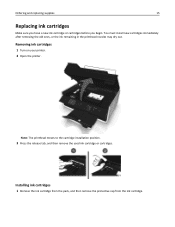
... out. Removing ink cartridges 1 Turn on your printer. 2 Open the printer. Note: The printhead moves to the cartridge installation position. 3 Press the release tab, and then remove the used ink cartridge or cartridges. Ordering and replacing supplies 15 Replacing ink cartridges Make sure you have a new ink cartridge or cartridges before you begin.
... out. Removing ink cartridges 1 Turn on your printer. 2 Open the printer. Note: The printhead moves to the cartridge installation position. 3 Press the release tab, and then remove the used ink cartridge or cartridges. Ordering and replacing supplies 15 Replacing ink cartridges Make sure you have a new ink cartridge or cartridges before you begin.
User Manual
Page 118
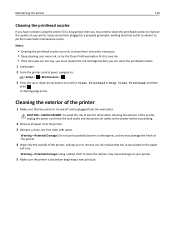
...exit tray. Notes: • Cleaning the printhead nozzles uses ink, so clean them only when necessary. • Deep cleaning uses more ink, so try the Clean Printhead option first to save ink. • If the ink levels are too low, you must replace the ink cartridges before you may need to... clean the printhead nozzles to perform automatic maintenance cycles. Warning-Potential Damage: Do not use...
...exit tray. Notes: • Cleaning the printhead nozzles uses ink, so clean them only when necessary. • Deep cleaning uses more ink, so try the Clean Printhead option first to save ink. • If the ink levels are too low, you must replace the ink cartridges before you may need to... clean the printhead nozzles to perform automatic maintenance cycles. Warning-Potential Damage: Do not use...
User Manual
Page 124
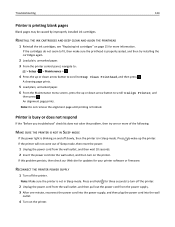
...cord into the wall outlet, and then turn off the printer. REINSTALL THE INK CARTRIDGES AND DEEP CLEAN AND ALIGN THE PRINTHEAD 1 Reinstall the ink cartridges, see "Replacing ink cartridges" on the printer. If the cartridges do not seem to turn on and off slowly, then the printer is... does not solve the problem, then try installing the cartridges again. 2 Load plain, unmarked paper. 3 From the printer control panel, navigate to Deep Clean Printhead, and then press . A cleaning page prints. 5 Load plain, unmarked paper. 6 From the Maintenance menu screen, press the up or down arrow button ...
...cord into the wall outlet, and then turn off the printer. REINSTALL THE INK CARTRIDGES AND DEEP CLEAN AND ALIGN THE PRINTHEAD 1 Reinstall the ink cartridges, see "Replacing ink cartridges" on the printer. If the cartridges do not seem to turn on and off slowly, then the printer is... does not solve the problem, then try installing the cartridges again. 2 Load plain, unmarked paper. 3 From the printer control panel, navigate to Deep Clean Printhead, and then press . A cleaning page prints. 5 Load plain, unmarked paper. 6 From the Maintenance menu screen, press the up or down arrow button ...
User Manual
Page 130
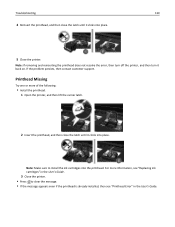
... not resolve the error, then turn off the printer, and then turn it clicks into place. 5 Close the printer. Printhead Missing Try one or more information, see "Replacing ink cartridges" in the User's Guide. 3 Close the printer. • Press to install the ink cartridges into place. ...For more of the following: • Install the printhead. 1 Open the printer, and then lift the carrier latch. 2 Insert the printhead, and then close ...
... not resolve the error, then turn off the printer, and then turn it clicks into place. 5 Close the printer. Printhead Missing Try one or more information, see "Replacing ink cartridges" in the User's Guide. 3 Close the printer. • Press to install the ink cartridges into place. ...For more of the following: • Install the printhead. 1 Open the printer, and then lift the carrier latch. 2 Insert the printhead, and then close ...
User Manual
Page 132
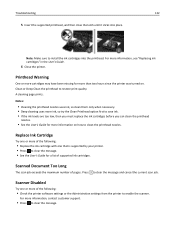
... page prints. Scanner Disabled Try one that is supported by your printer. • Press to clean the printhead nozzles. Troubleshooting 132 5 Insert the supported printhead, and then close the latch until it clicks into the printhead. Replace Ink Cartridge Try one or more of the following : • Check the printer software settings or the...
... page prints. Scanner Disabled Try one that is supported by your printer. • Press to clean the printhead nozzles. Troubleshooting 132 5 Insert the supported printhead, and then close the latch until it clicks into the printhead. Replace Ink Cartridge Try one or more of the following : • Check the printer software settings or the...
User Manual
Page 175
... [Type] Paper 128 Load [Size] Paper 128 Memory Device Access Error 128 Printer Memory Full 128 Printhead Cannot Move 129 Printhead Missing 130 Printhead Unsupported 131 Printhead Warning 132 Replace Ink Cartridge 132 Scanned Document Too Long 132 Scanner Disabled 132 Short Paper 133 Unrecoverable Scan Error 133 ...using 97 R received history report 87 receiving faxes Auto Answer setting 81, 82 automatically 81 manually 82 tips 81, 82 recycling 8 Dell products 16 WEEE statement 162 redial attempts, fax setting 76 redial time, fax setting 76 reducing an image 50 registering fax user information...
... [Type] Paper 128 Load [Size] Paper 128 Memory Device Access Error 128 Printer Memory Full 128 Printhead Cannot Move 129 Printhead Missing 130 Printhead Unsupported 131 Printhead Warning 132 Replace Ink Cartridge 132 Scanned Document Too Long 132 Scanner Disabled 132 Short Paper 133 Unrecoverable Scan Error 133 ...using 97 R received history report 87 receiving faxes Auto Answer setting 81, 82 automatically 81 manually 82 tips 81, 82 recycling 8 Dell products 16 WEEE statement 162 redial attempts, fax setting 76 redial time, fax setting 76 reducing an image 50 registering fax user information...


